Malkoff Devices - Wildcat with Neutral Tint / Custom low setting / Custom grip / Custom strap: ( 8 photos )
(Took these pictures last year, was going to write a big review as I liked the light so much but never got around to shooting beam shots & forgot about it. Rediscovered these pictures in a folder - they were going to accompany the original review. Just thought I would post them anyways).
The short review is this: I work with quality tools everyday and I love this flashlight - the end. Simple, powerful, rock solid, ultra reliable, superb beam & color temp. Long (love u long time) run time too with two 2900mAh 18650's. It's always great when you buy something and it works out perfect.
btw - I needed more lumens on the low setting than the stock Wildcat low setting of 45 lumens so I called Gene, before ordering, and he was able to adjust the low setting to 120 lumens. (high is approx. 750).
(BELOW):
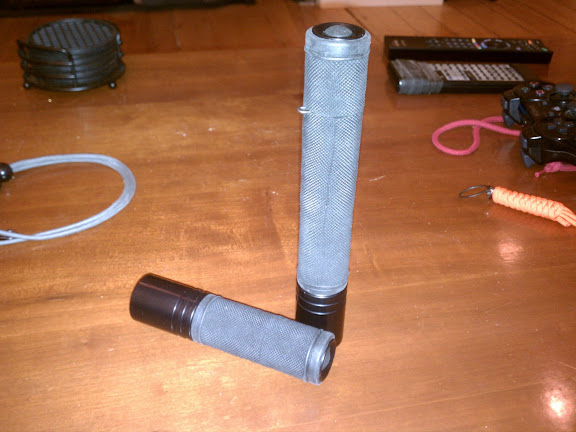
I added a grip over an MD4 body, and it couldn't have worked out better if it had been engineered by Nasa. It fits and feels like it was designed to be this way. Highly recommend you put a grip on your Wildcat. The 'tack' of this grip is so crazy good that you can use a 'cigar' grip a-n-y-w-h-e-r-e on it and have a grip equal to or better than any dedicated plastic, metal, rubber grip ring.
The grip also provides excellent cold weather protection for your hand if you have to take gloves off. Without the lanyard ring the grip gives more than adequate electrical contact insulation when working around voltages. For duty officers the grip has many advantages but if they put it in their sap pocket they would pull their pant leg up around their knee before the tack of the grip let loose from the pocket. In the back pocket of jeans you could run a mile and the flashlight would stay put.
(shown with MD4 battery tube).

-------------------------------------------------------------------------------------------------------------
(BELOW)
I bought a SolarForce belt clip / lanyard hole combo so I could snap off the awkward belt clip & salvage the ring + lanyard string hole. ( I really don't trust these laser cut lanyard rings because I think the edges are too sharp). I used a belt sander to grind off the what was left of the Solar Force belt clip, then chamfered and polished the inside of the string hole with a dremel (was easy so I polished the whole ring). Now that the inside of the ring is polished it's much easier, to slip ring on & off over the o-ring without having to remove the o-ring. Because the Malkoff has a certain compact heft to it, feels like you have a 'sap' in your hand (because essentially you do), I could see it wearing out those little nylon lanyard strings quickly- especially if the string hole isn't rounded off smooth. Alternatively, one of the advantages of the rubber grip is that now you can use a metal lanyard (safety clasp) for quick on / off attachment without worrying about scratching up your finish or excessive rattle. With a metal clip you won't need to bother with rounding or polishing the edge of the lanyard hole either.

--------------------------------------------------------------------------------------------------------------------------------
(BELOW)
You can see here that grip is fairly thin - only 2.5 mm wall thickness. It also gives you an idea of how cleanly it cuts (if you do it right).
What's that blue ring inside the tailcap ? The McClicky's conductive tabs bulge out on the sides a bit too close to the chem filmed aluminum walls for my taste. So I very gently compressed them back a hair and slipped on a 1/4" long band of blue heat shrink for peace of mind. It's really not necessary, but since I had it all apart anyways. The Malkoff tail-switches are some of simplest, if not easiest to access - no need to unscrew tail cap from main body, no tools required - just twist off the delrin (now aluminum) end protector and the McClicky switch will pop right out.

------------------------------------------------------------------------------------------------
(BELOW)
Check out how well the two sections of cut grip seal back together when end cap is screwed on. They even compress over lanyard ring to hide / enclose it. ( when I took this photo it just happened that I had tightened the two halves to line up perfectly - but it's definitely two separate pieces).

---------------------------------------------------------------------------------------------------------------------------------
(BELOW)
I see a lot of summer camp craft braiding (complete with toy skulls) used as lanyards on this site. They always use a thin nylon cord with a synch bead of some sort. I find these to be dangerous. If the light somehow ever gets caught or snagged your wrist is going to receive a nice rope burn or worse it will hold your hand in place as you're trying to pull away from whatever harm (machinery / wild animal / attacker) you encounter.
I took a nice fat neoprene leash that fits snugly around my wrist and attached it to a ring that clips to the light. The benefits are that you can slip it on with only one hand (pinch fingers together, insert into neoprene loop, expand fingers and the leash slips instantly around your wrist). There is no need to adjust it or use a synch bead. If the light or leash snags on anything it won't leave a rope burn and you can easily pull your hand free because the neoprene will expand. Yet it's strong enough to keep your flashlight secured in the most demanding situations and accidental drops (hand release). It is beyond comfortable and doesn't dig into your skin when you just let the flashlight dangle from wrist to work or walk hands free. And unlike the tangled mess of string style lanyards, the neoprene leash stores and retrieves easily for instant set up. I recommend trying one.

-----------------------------------------------------------------------
(BELOW)
You could cut off end of grip to expose more of already recessed tail switch but I liked the bumper protection so I left it that way. Still is able to stand on end.

----------------------------------------------------------------------------------------------------
(BELOW)
Battery config.

--------------------------------------------------------------------------------------------------------------------------------
(BELOW)
The business end.

(Took these pictures last year, was going to write a big review as I liked the light so much but never got around to shooting beam shots & forgot about it. Rediscovered these pictures in a folder - they were going to accompany the original review. Just thought I would post them anyways).
The short review is this: I work with quality tools everyday and I love this flashlight - the end. Simple, powerful, rock solid, ultra reliable, superb beam & color temp. Long (love u long time) run time too with two 2900mAh 18650's. It's always great when you buy something and it works out perfect.
btw - I needed more lumens on the low setting than the stock Wildcat low setting of 45 lumens so I called Gene, before ordering, and he was able to adjust the low setting to 120 lumens. (high is approx. 750).
(BELOW):
I added a grip over an MD4 body, and it couldn't have worked out better if it had been engineered by Nasa. It fits and feels like it was designed to be this way. Highly recommend you put a grip on your Wildcat. The 'tack' of this grip is so crazy good that you can use a 'cigar' grip a-n-y-w-h-e-r-e on it and have a grip equal to or better than any dedicated plastic, metal, rubber grip ring.
The grip also provides excellent cold weather protection for your hand if you have to take gloves off. Without the lanyard ring the grip gives more than adequate electrical contact insulation when working around voltages. For duty officers the grip has many advantages but if they put it in their sap pocket they would pull their pant leg up around their knee before the tack of the grip let loose from the pocket. In the back pocket of jeans you could run a mile and the flashlight would stay put.
(shown with MD4 battery tube).
-------------------------------------------------------------------------------------------------------------
(BELOW)
I bought a SolarForce belt clip / lanyard hole combo so I could snap off the awkward belt clip & salvage the ring + lanyard string hole. ( I really don't trust these laser cut lanyard rings because I think the edges are too sharp). I used a belt sander to grind off the what was left of the Solar Force belt clip, then chamfered and polished the inside of the string hole with a dremel (was easy so I polished the whole ring). Now that the inside of the ring is polished it's much easier, to slip ring on & off over the o-ring without having to remove the o-ring. Because the Malkoff has a certain compact heft to it, feels like you have a 'sap' in your hand (because essentially you do), I could see it wearing out those little nylon lanyard strings quickly- especially if the string hole isn't rounded off smooth. Alternatively, one of the advantages of the rubber grip is that now you can use a metal lanyard (safety clasp) for quick on / off attachment without worrying about scratching up your finish or excessive rattle. With a metal clip you won't need to bother with rounding or polishing the edge of the lanyard hole either.
--------------------------------------------------------------------------------------------------------------------------------
(BELOW)
You can see here that grip is fairly thin - only 2.5 mm wall thickness. It also gives you an idea of how cleanly it cuts (if you do it right).
What's that blue ring inside the tailcap ? The McClicky's conductive tabs bulge out on the sides a bit too close to the chem filmed aluminum walls for my taste. So I very gently compressed them back a hair and slipped on a 1/4" long band of blue heat shrink for peace of mind. It's really not necessary, but since I had it all apart anyways. The Malkoff tail-switches are some of simplest, if not easiest to access - no need to unscrew tail cap from main body, no tools required - just twist off the delrin (now aluminum) end protector and the McClicky switch will pop right out.
------------------------------------------------------------------------------------------------
(BELOW)
Check out how well the two sections of cut grip seal back together when end cap is screwed on. They even compress over lanyard ring to hide / enclose it. ( when I took this photo it just happened that I had tightened the two halves to line up perfectly - but it's definitely two separate pieces).
---------------------------------------------------------------------------------------------------------------------------------
(BELOW)
I see a lot of summer camp craft braiding (complete with toy skulls) used as lanyards on this site. They always use a thin nylon cord with a synch bead of some sort. I find these to be dangerous. If the light somehow ever gets caught or snagged your wrist is going to receive a nice rope burn or worse it will hold your hand in place as you're trying to pull away from whatever harm (machinery / wild animal / attacker) you encounter.
I took a nice fat neoprene leash that fits snugly around my wrist and attached it to a ring that clips to the light. The benefits are that you can slip it on with only one hand (pinch fingers together, insert into neoprene loop, expand fingers and the leash slips instantly around your wrist). There is no need to adjust it or use a synch bead. If the light or leash snags on anything it won't leave a rope burn and you can easily pull your hand free because the neoprene will expand. Yet it's strong enough to keep your flashlight secured in the most demanding situations and accidental drops (hand release). It is beyond comfortable and doesn't dig into your skin when you just let the flashlight dangle from wrist to work or walk hands free. And unlike the tangled mess of string style lanyards, the neoprene leash stores and retrieves easily for instant set up. I recommend trying one.
-----------------------------------------------------------------------
(BELOW)
You could cut off end of grip to expose more of already recessed tail switch but I liked the bumper protection so I left it that way. Still is able to stand on end.
----------------------------------------------------------------------------------------------------
(BELOW)
Battery config.
--------------------------------------------------------------------------------------------------------------------------------
(BELOW)
The business end.
Last edited by a moderator:
")