
Warning: pic heavy, as usual.
The TM15 is a latest member of the 'Tiny Monster' series from Nitecore. It is a high-output, 3xXM-L, 4x18650 (8xCR123A/RCR) light with a built-in recharging dock for 18650. Let's see how it compares to other recent lights in this class that I've reviewed recently ….
Manufacturer's Specifications:
Note: as always, these are only what the manufacturer reports. To see my actual testing results, scroll down the review.
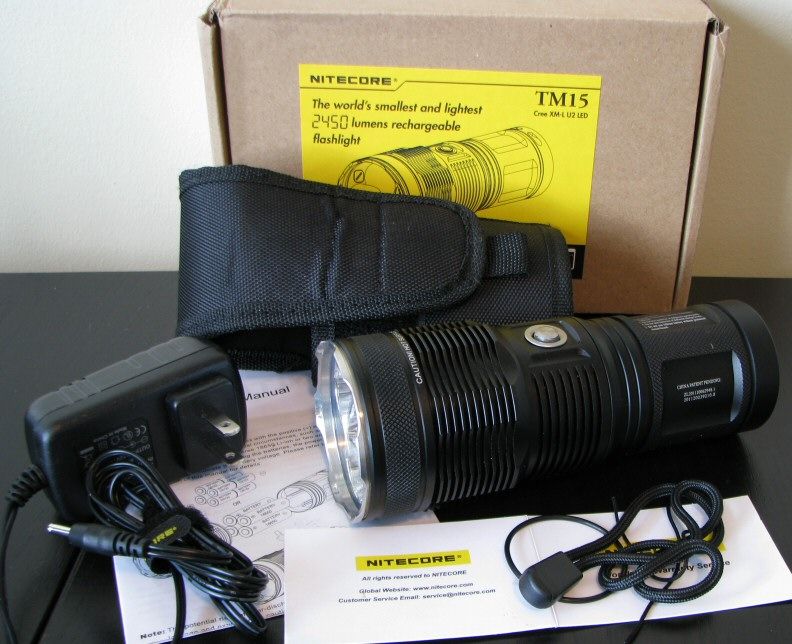
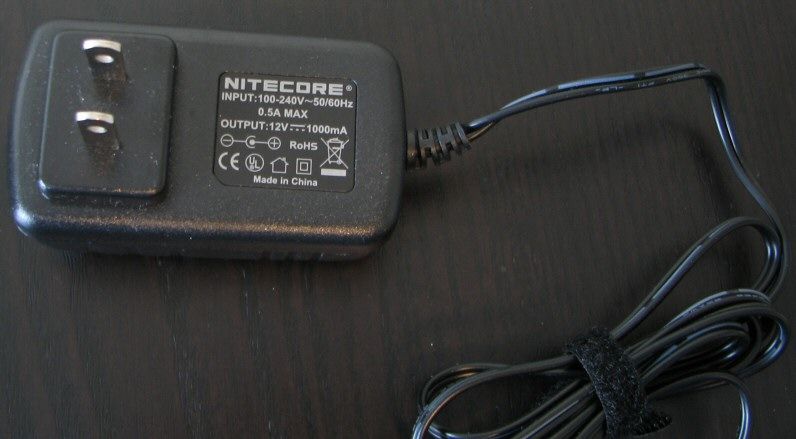
Packaging is a cardboard box with built-in packaging foam. Inside you will find the light, belt holster, extra o-ring, simple wrist lanyard (with threading wire), manual and AC charging cable. My sample came with the standard North American 110V AC charging plug.
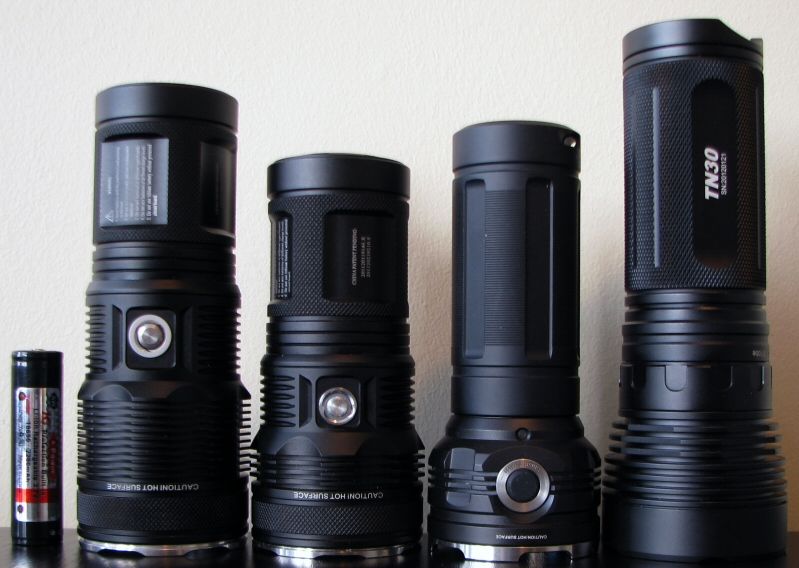
From left to right: AW Protected 18650; Nitecore TM15, TM11; Sunwayman T60CS; Thrunite TN30.
All dimensions are directly measured, and given with no batteries installed:
Nitecore TM15: Weight: 450.6g (634g with 4x18650). Length 158mm, Width (bezel): 59.5mm
Nitecore TM11: Weight: 342.6g (526g with 8xCR123A), Length 135.3mm, Width (bezel): 59.5mm
Sunwayman T60CS: Weight: 338.9g (est 477g with 3x18650), Length: 145.0mm, Width (bezel): 60.0mm
Thrunite TN30: Weight: 468.2g (est 620g with 3x18650), Length: 179mm, Width (bezel): 64.3mm, Width (tailcap): 49.0mm
Xtar S1 Production: Weight: 876.0g (est. 1028g with 3x18650 protected), Length: 240mm, Width (bezel): 83.4mm
Olight SR51: Weight: 405g, Length: 190mm, Width (bezel) 62.0mm
The TM15 is definitely a longer light than the TM11, but otherwise looks very similar in build. In fact, the battery handle appears to be virtually identical – the difference is all in the head.

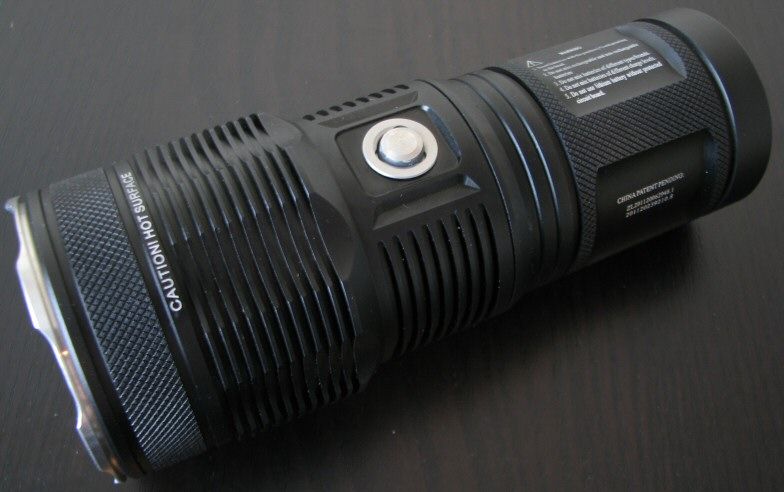
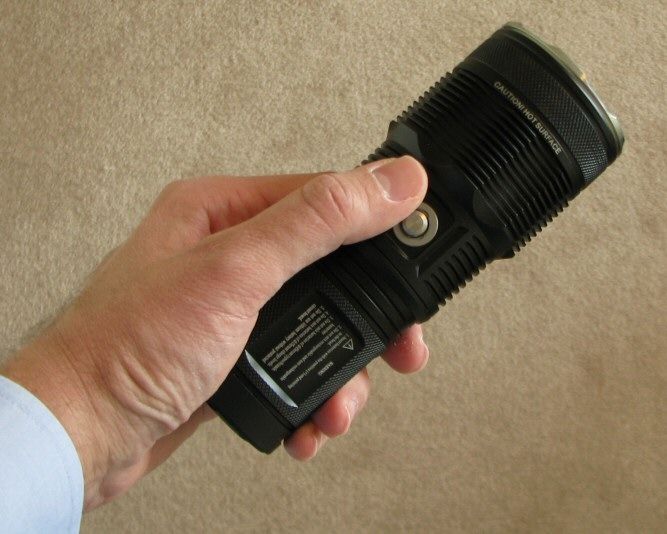
As with the TM11, anodizing is a flat black, and seems in excellent shape on my sample. There is some knurling on the head and body, of reasonable aggressiveness. Overall grip is certainly decent, despite the cylindrical shape.
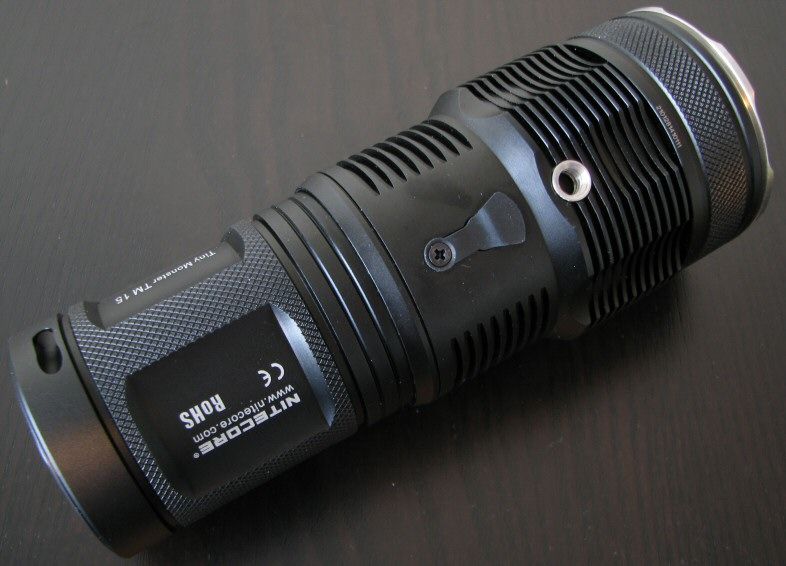
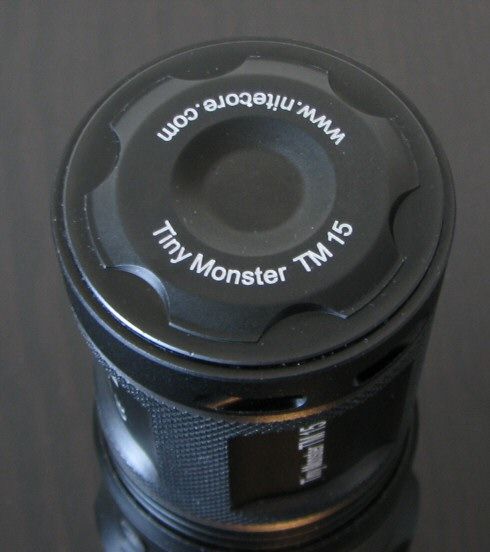
Body labels are rather extensive as before – in additional to the usual maker and model information, you also have a 5-point series of warnings about the light (in a very tiny, but legible, font). The light can tailstand.
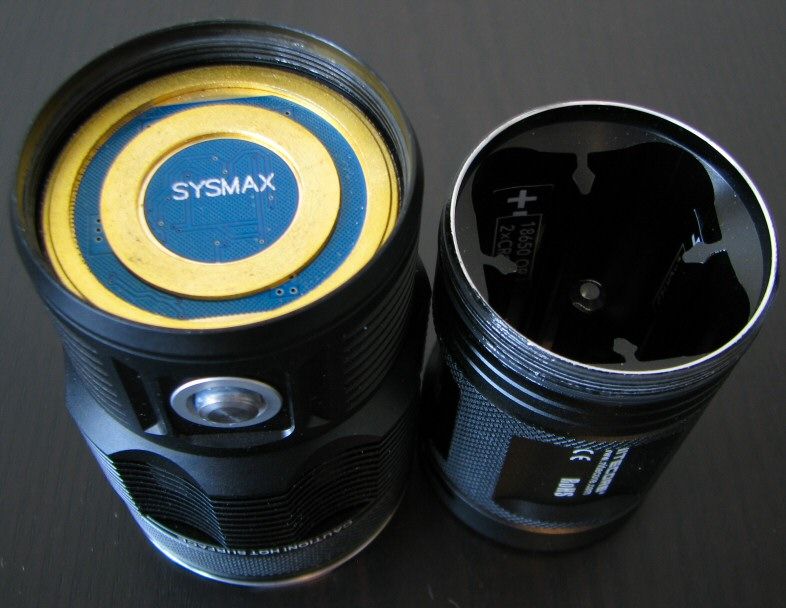
Battery handle is quite compact, and easily houses 4x18650 or 8xCR123A/RCR. The battery compartments are molded right into the aluminum, with a common negative terminal contact plate. You don't need to fill all the wells for the light to work, but should expect lower runtime (and Turbo mode is not recommended on anything but the full complement of cells). Again, scroll down for more info.
As before, screw threads are anodized for lock-out. :thumbsup:
Inside the head, there are two raised contact rings for the positive and negative current paths. These appear the same as the TM11, and are quite solid (likely gold-plated brass?).
The switch design has changed a little bit from the TM11. It is still a two-stage (two-pressure) electronic switch, but the button projects out a little further now. The ring around the switch now uses a blue LED instead of red to signal the state of the light (i.e., battery status, voltage, and standby modes). Scroll down for an explanation of the interface.
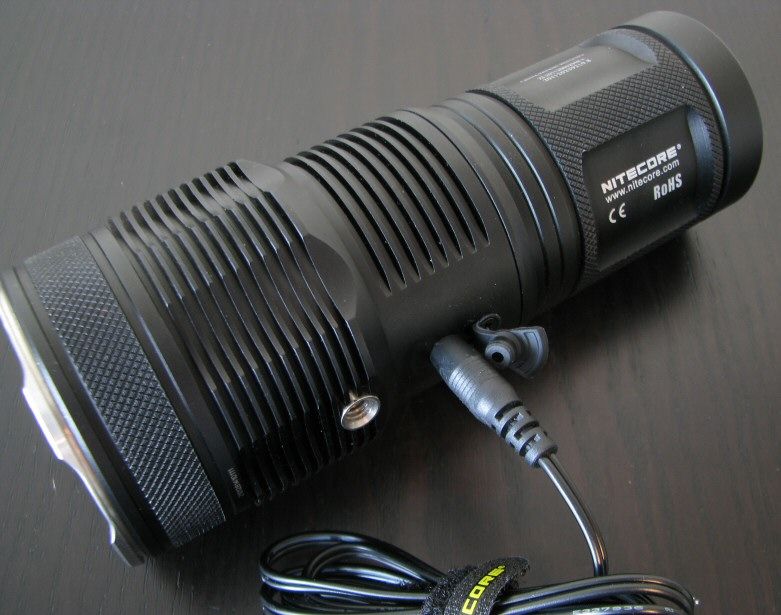
The TM15 has an AC charging cable that connects on the back of the head. The connection point has a small rubber cover, held down with a screw. Not sure how durable or water resistant this will be long-term. Note the charging solution is to be used ONLY with 18650 cells.
Nitecore estimates it will take about 7 hours to full charge the cells this way, which seems a reasonable estimate (i.e., it took just over 6 hours for my relatively low capacity 2200mAh 18650 cells). My somewhat used cells all came out ~4.14-4.15V in my testing, which is a nice conservative level (i.e., just ~0.01-0.02V less than my Pila charger on these same cells).
There is also a tripod attachment mount nearby, with uses the standard tripod screw diameter (presumably 1/4-20 UNC). Note that I found some of inexpensive tripod mounts were a bit loose when screwing into the TM15 (e.g., gorilla-pods), but seemed stable enough in the end. Professional tripods mounts fit stably and securely. The mount seems a little far forward on the light, given that a lot of the weight is in the battery handle.
TM15 has the same size bezel opening as before, and comes with a stainless steel bezel ring, slightly scalloped. The screw-on bezel diffuser from the Eagletac M2- and M3- series lights works as before.
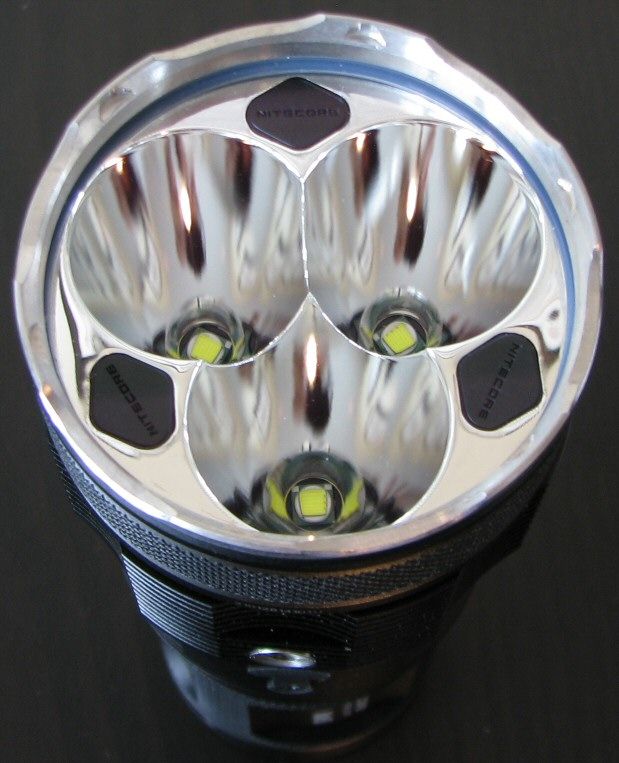
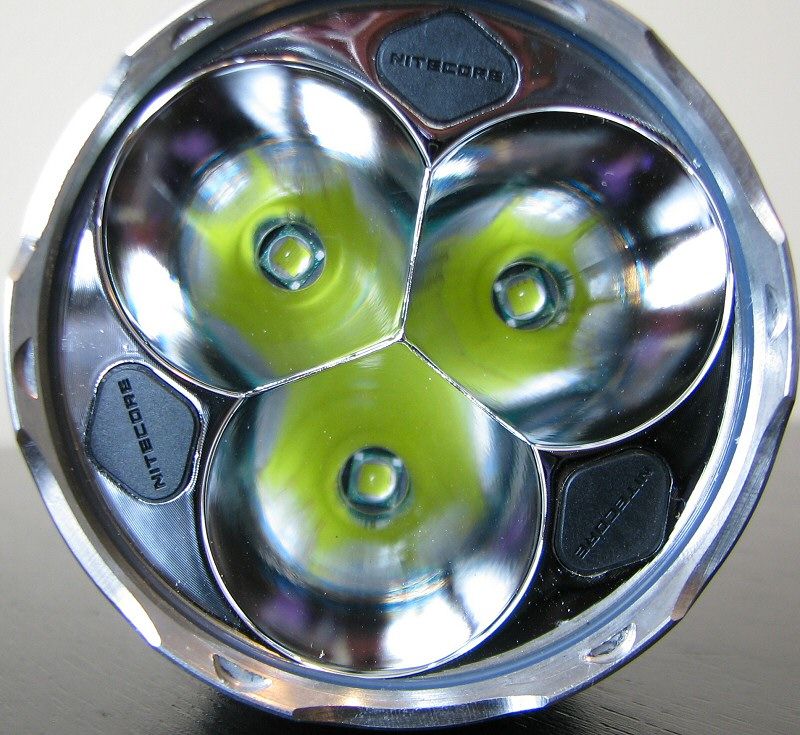
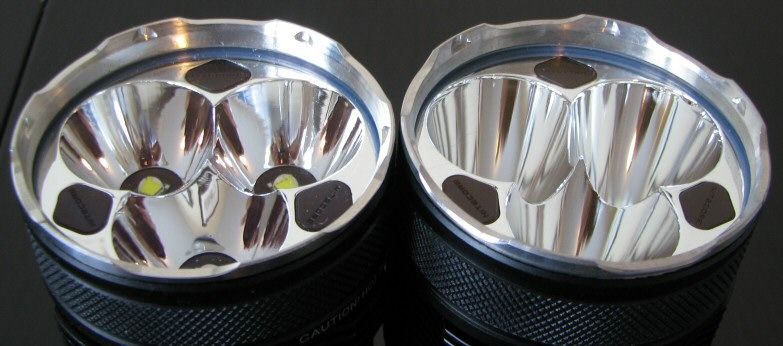
The TM15 uses 3x cool white XM-L emitters as before. However, the TM15 has much deeper reflector wells than the TM11, as illustrated below:
TM11 on the left, TM15 on the right:

Scroll down for beam pic comparisons.
User Interface
The TM15 uses an updated version of the TM11's innovative two-stage electronic switch.
Like before, for Turbo output, press the switch all the way and release (for constant on), or press firmly and hold for momentary on. What's new is that this "Turbo" set also has a slightly lower Hi mode, which you can switch to and from (when locked on in Turbo) by half-pressing the switch and releasing. There is no mode memory on this mode set – the light always comes on in Turbo. Turn off by a full press and release.
For the lower "Daily" modes, only partially press the switch from off (again, hold for momentary, release quickly for locked-on). Light will come on in the memorized lower output mode. As described above, to switch modes when on, simply half-press and quickly release the switch again. The light will advance to the next output, in repeating sequence of Lower > Lo > Med > Hi. The light has memory on this mode set, and will retain the last lower output used. Turn off by a full press and release.
Along with the raised switch, the pressure required to activate the various modes has changed slightly from the TM11, but you quickly get used to it.
The light will read-out the voltage of the cells when you first connect the head, by a series of blue flashes around the on-off switch. After the initial voltage read-out, the light will then flash once every three seconds (when off), to let you know you are in standby mode. The indicator stays constantly illuminated when the light is on. It will start to flash as the batteries begin to drain, at increasing frequency.
A "hidden" strobe mode can be accessed by two rapid full presses of the switch from On. Turn off or double-click again to return to constant output modes.
There is a switch lock-out mode that prevents accidental activation (and lowers the standby current, see below). Press the switch all the way down and hold for more than one second. When you release, the light will turn off and enter the lockout mode. To exit the lockout mode, simply press and hold the switch firmly for more than one second.
The charger plugs in under the rubber cover on the back of the head. The blue indicator light comes on during charging, flashing twice a second. Once the charge is complete, the indicator shows solid blue. My sample charged to a reasonably full level.
For information on the light, including the build and user interface, please see my new video overview:
As always, videos were recorded in 720p, but YouTube typically defaults to 360p. Once the video is running, you can click on the configuration settings icon and select the higher 480p to 720p options. You can also run full-screen.
PWM/Strobe
There is no sign of PWM on any level – I believe the light is current-controlled, as expected.
As you can see above, the TM15 has a true variable frequency strobe. In my testing, the time between pulses varied from ~75 to ~200 msecs (or 5 to 13 Hz).
Standby Drain
Due to the electronic switch, the TM15 will always be drawing a small current when the body/carrier is connected to the head. I measured this current as 790uA (although it would periodically spike every couple of seconds to ~3.6mA for a fraction of a second, when the signal flash occured).
Going with an "average" current of ~1mA, and assuming four times 2600mAh capacity batteries, that would give you a little over 1 year and 2 months before four fully charged batteries would be completely drained (given the parallel cell arrangement). This is about twice the current of my TM11, but it's certainly not bad.
Note there is always an electronic lock-out mode, to lock-out the switch and reduce the standby current. I don't know how much this lowers the current, but it likely to be significant. You can also break this current completely by turning the head a quarter turn (due to the anodized threads).
Beamshots:
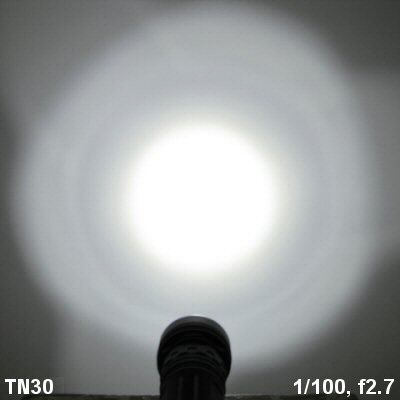
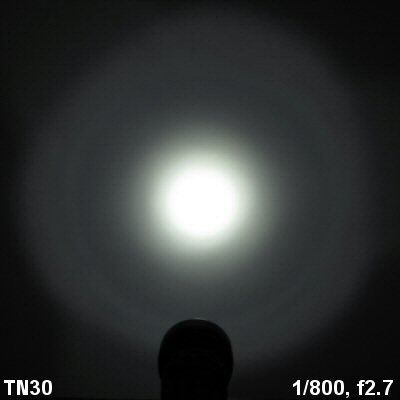
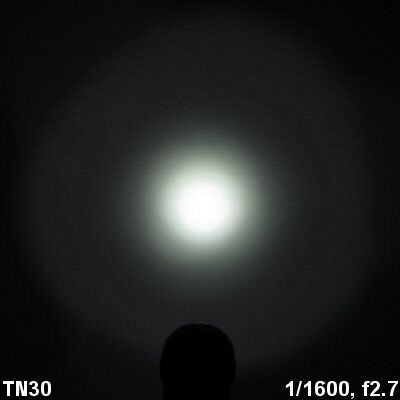
And now, what you have all been waiting for. All lights are on their respective max rechargeable battery sources (i.e., 18650s), about ~0.75 meter from a white wall (with the camera ~1.25 meters back from the wall). Automatic white balance on the camera, to minimize tint differences.
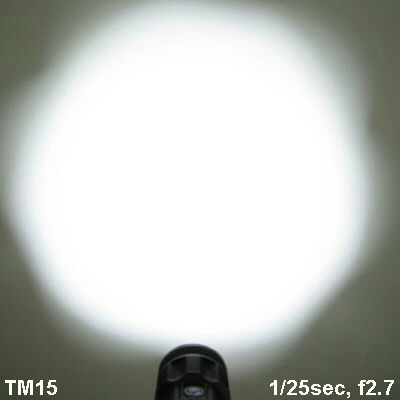
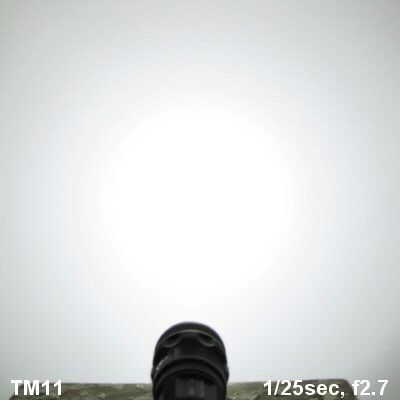
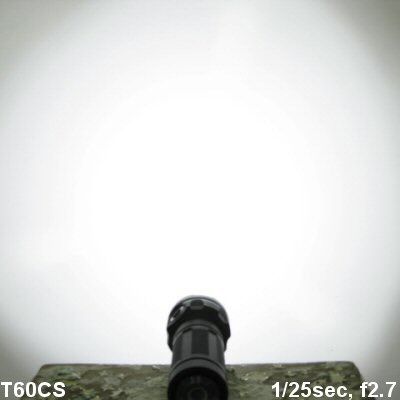

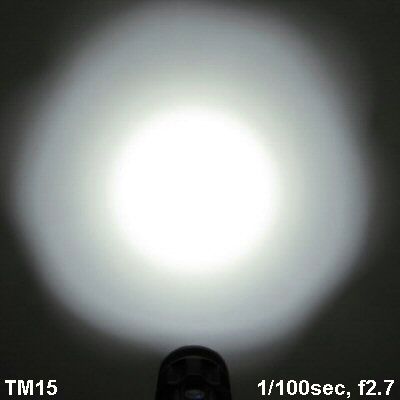
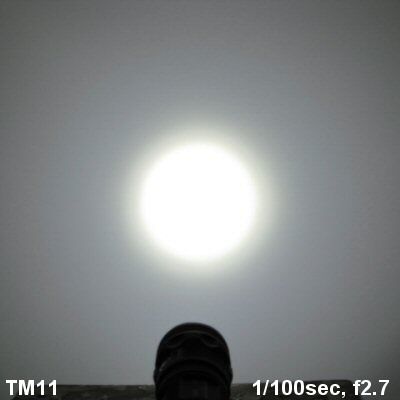
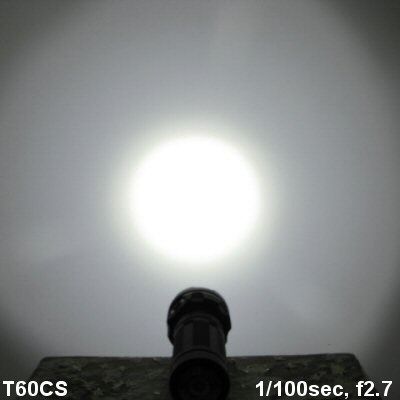
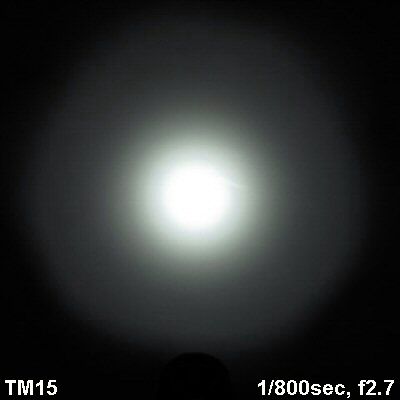
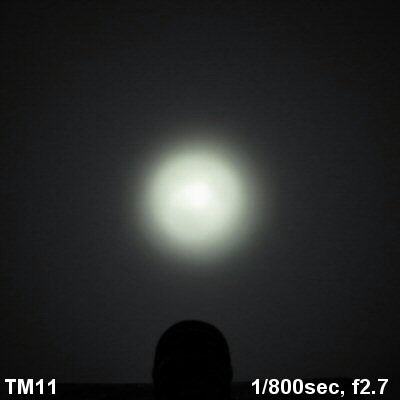

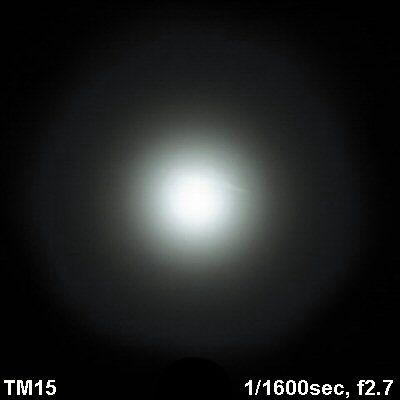
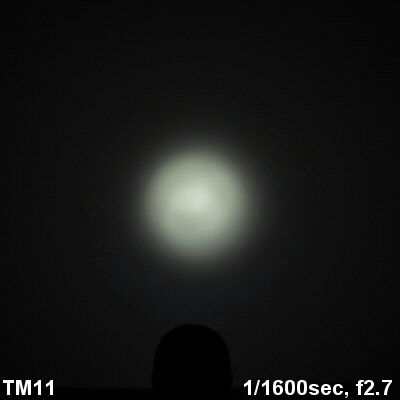

The TM15 clearly has a much narrower spillbeam than the TM11, due to the deeper reflectors.oo: In fact, both overall output and throw have increased on the TM15, compared to the earlier TM11.
Despite how it may look above, there is no artifact near the hotspot on my TM15 (rather, that faint line seems to be a mark on my white wall).
In my experience, these sorts of deep well 3xXM-L lights tend to have a lot of "daisy flower" artifact effects in the spillbeam. But the TM15's reflector design is remarkably good – I see very little evidence of artifacts in this case. Much better than most lights in this class.
To show the spill a little better, here are some side shots on my famed "integrating carpet".
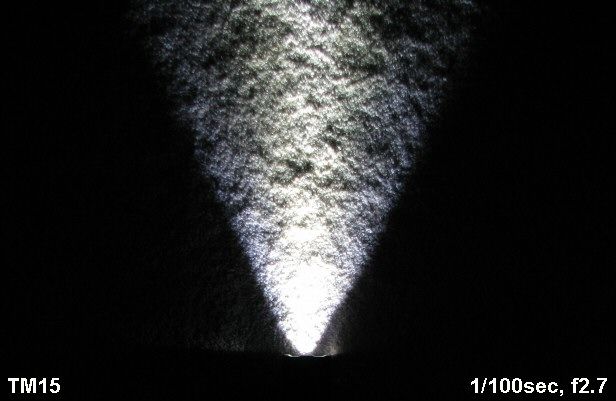
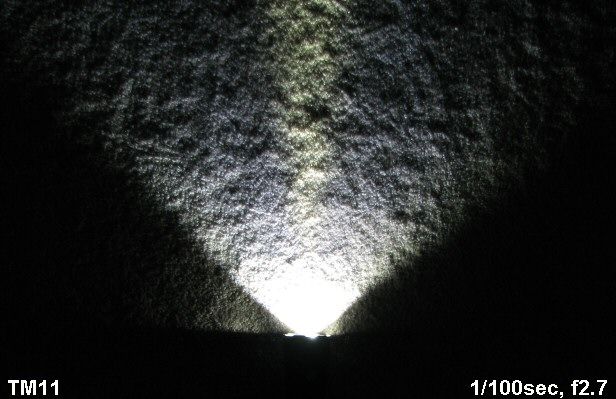
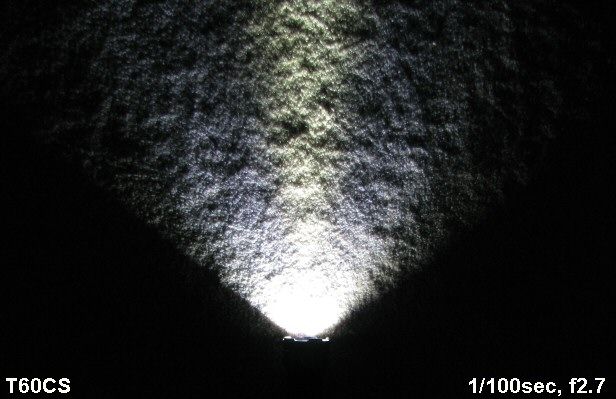
Again, the TM15 is far more focused for throw than most other 3xXM-L lights.
For outdoor beamshots, these are done in the style of my earlier 100-yard round-up review. Please see that thread for a discussion of the topography (i.e. the road dips in the distance, to better show you the corona in the mid-ground). Please ignore the red-tint in the lower-right corner these shots (I was wearing a brighter-than-usual red headlamp during this excursion). Zoomed-in pics of the hotspots are also included.
Here is how the TM15 compares directly to the TM11:
I know it can be a bit hard to compare, given the slight variation in angling of the lights and the tint differences. But as you can probably tell, the TM15 is a greater thrower than the TM11. The TM15 is generally comparable in throw to the Thrunite TN30.
Testing Method:
All my output numbers are relative for my home-made light box setup, a la Quickbeam's flashlightreviews.com method. You can directly compare all my relative output values from different reviews - i.e. an output value of "10" in one graph is the same as "10" in another. All runtimes are done under a cooling fan, except for any extended run Lo/Min modes (i.e. >12 hours) which are done without cooling.
I have devised a method for converting my lightbox relative output values (ROV) to estimated Lumens. See my How to convert Selfbuilt's Lightbox values to Lumens thread for more info.
Throw/Output Summary Chart:
My summary tables are reported in a manner consistent with the ANSI FL-1 standard for flashlight testing. Please see http://www.flashlightreviews.ca/FL1.htm for a discussion, and a description of all the terms used in these tables. Effective July 2012, I have updated all my Peak Intensity/Beam Distance measures with a NIST-certified Extech EA31 lightmeter (orange highlights).
Turbo output is quite high – similar to my other recent 3xXM-L lights (i.e., the Sunwayman T60CS and Thrunite TN30). Throw is higher on my sample than the Nitecore specs indicate.
Here is how the TM15 compares to the TM11 in terms of relative level spacing.
Nitecore's lumen specs seem to be pretty accurate.
Output/Runtime Comparison:
Note: All my 18650 runtimes are done using AW protected 2200mAh.

The TM15 shows excellent efficiency for this class, in keeping with the current-controlled circuit. Output is flat-regulated at all levels, very similar to the TM11.
There was a step-down from Turbo to Hi on 8xCR123A after ~20 mins runtime. I suspect this was the thermal sensor kicking in to limit output. Note that primary CR123As tend to get a lot hotter than 18650 under high drive currents, which may be why I didn't observe any step-down effects on the 18650 runs (all runs above done under a cooling fan, as always).
As you will recall from my earlier TM11 review, there was some variability initially in the thermal sensitivity of the step-down control circuit of that model, even on 18650 (i.e. that light always stepped down eventually, even with cooling). I'm guessing the larger head of the TM15 has also allowed from improved heatsinking.
Since most of you are not likely to be running your lights under a cooling fan, I did an analysis of what happens if you run the light without any cooling whatsoever, on 4x18650. I also attached a thermal probe on the surface of the head of the light, just above the switch.
As you can see above, the rise in temperature triggered a step-down from Turbo to Hi on 18650 after about ~20 mins of runtime. The surface of the light was definitely quite warm by this period, but cooled down quickly once the output stepped down.
With 4x18650, the output remained stably at this Hi level for the rest of the run. This is in contrast to the gradual partial recovery of output on 8xCR123A as the temperature dropped, but that may reflect differences in the internal resistance of the different chemistries. I am happy to report there is no sign of the rapid cycling in output I observed on the early TM11 samples.
In case you are curious, here is how the TM15 compares to other lights in estimated lumens:
Potential Issues
Due to the overlapping reflector design, there are bound to be some artifacts in the periphery of the spillbeam. However, I find them to be surprisingly minor in this case. The light is a lot "throwier" than the TM11 (by design), with a much narrower spillbeam.
Due to the electronic switch in the head, the light has a stand-by current when waiting to receive a button press. This current is reasonably low (~1mA, on average). You can lower this standby current further by locking out the switch. You can also completely break this current by loosening the head from the body.
The charging dock cover feels a little flimsy, but has held in fine during my testing so far. Note the charger is meant only for 18650 cells - do not attempt to charge other kinds of batteries inside the light.
The raised switch - and increased sensitivity - may result in greater accidental activations on the TM15, compared to the earlier TM11. I do find the new sensitivity easier to use in practice, though.
Preliminary Observations
The TM15 is an impressive update to the Tiny Monster series of Nitecore lights. As many of you may recall, there were a number of initial circuit and soldering issues at the time of the TM11 launch. Nitecore seems to have these now well in hand, judging by my one TM15 sample – it performed consistently and reliably throughout my testing.
There are some minor circuit and user interface tweaks from the earlier TM11, as described earlier in this review. These are relatively minor, although I personally prefer the new raised switch and feel. I am glad to see they have kept the standby current to an acceptably low level, and have provided a variety of lock-out options.
Overall output/runtime efficiency and regulation pattern remain excellent. The thermal sensor-driven step-down on Turbo worked exactly as I would have expected, with a reasonable set point and sensitivity (i.e., there was none of the repeated "cycling" pattern I observed on the early TM11 samples).
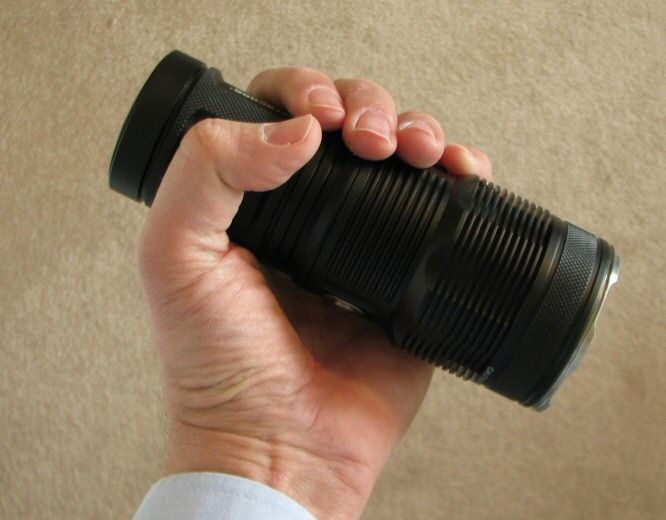
The build is very similar to the TM11, and continues to feel solid and robust. As before, those with smaller hands may find it a bit awkward to carry for extended periods. It is also heavier now, thanks to the greater heatsink and deeper reflector wells.
On that point, I am impressed with the quality of the beam. The TM15 is much "throwier" than the TM11, but without the usual heavy spill artifacts I've noticed on previous on 3xXM-L designs. Clearly, a lot of work went into this reflector.oo:
As before, the light has considerable battery flexibility by running the four wells in parallel. You can thus run the light in 1x, 2x, 3x, or 4x 18650 configurations (or 2x, 4x, 6x, 8x CR123A/RCR). Although I haven't tested it here, I recommend you don't try to run Turbo on anything less than the full 4x/8x complement of cells (or Hi on anything less than 3x/6x). Although in a pinch, I'm sure you could get by with an IMR-18650 or two (if you had ones that were long enough to activate the light).
The other new addition here is the built-in battery charger option. My testing showed this charger worked as expected, with a nice conservative termination level (i.e., didn't over-charge my cells). I can't easily determine if it terminates completely at the end of a charge, but Nitecore assures me that it is "intelligent automatic" like their i4 charger, and will terminate charging immediately. Note that the i4 charger actually has a low uA current once charging is complete, but it is so low as to be close enough to full termination (i.e., it is definitely not a trickle charge). If it is the same here, then there is nothing to worry about.
All told, the TM15 is a nice addition to the Tiny Monster line. The circuit tweaks are really more evolutionary than revolutionary, and the built-in charger worked well in my testing. But to me, the main advantage of this light over the TM11 is the much greater throw. :wave:
----
TM15 provided by Nitecore for review.
The TM15 is a latest member of the 'Tiny Monster' series from Nitecore. It is a high-output, 3xXM-L, 4x18650 (8xCR123A/RCR) light with a built-in recharging dock for 18650. Let's see how it compares to other recent lights in this class that I've reviewed recently ….
Manufacturer's Specifications:
Note: as always, these are only what the manufacturer reports. To see my actual testing results, scroll down the review.
- 3x CREE XM-L U2
- Uses 4 x 18560, or 8 x CR123A batteries (Batteries not included)
- Can run on 1 x 18650, or 2 CR123 batteries in case of emergency
- Output and Runtime: (runtime based on 4x 2600mAh 18650)
- Turbo: 2450 lumens (1 hour)
- High: 1300 lumens (3 hours, 10 minutes)
- Mid: 570 lumens (8 hours, 20 minutes)
- Low: 300 lumens (16 hours, 30 minutes)
- Lower: 95 lumens (52 hours)
- Maximum Throw: 1,190 feet (363 m)
- Peak Beam Intensity: 33,000 candela
- Impact Resistant to 4.9 ft. (1.5 m)
- IPX-8 Water Resistant
- Integrated thermal protection prevents overheating
- Compatible with both 18650 Li-Ion and CR123A Batteries
- Intelligent charging circuit with status detection recharges the light easily, safely, and quickly
- Exceptionally long run times
- Innovative power indicator light displays remaining battery power
- Single button two-stage switch provides a user-friendly interface
- Coated mineral scratch-resistant glass lens
- Aluminum reflector ensures consistent and powerful beam
- Constructed from military grade HA Type III hard-anodized aluminum alloy
- Dimensions: Length: 6.22" (158 mm), Bezel Diameter: 2.36" (60 mm), Body Diameter: 1.96" (50 mm)
- Weight (Excluding batteries): 15.76 oz. (447 g)
- Accessories: Charger, holster, lanyard, and spare O-ring
- MSRP: ~$300
Packaging is a cardboard box with built-in packaging foam. Inside you will find the light, belt holster, extra o-ring, simple wrist lanyard (with threading wire), manual and AC charging cable. My sample came with the standard North American 110V AC charging plug.
From left to right: AW Protected 18650; Nitecore TM15, TM11; Sunwayman T60CS; Thrunite TN30.
All dimensions are directly measured, and given with no batteries installed:
Nitecore TM15: Weight: 450.6g (634g with 4x18650). Length 158mm, Width (bezel): 59.5mm
Nitecore TM11: Weight: 342.6g (526g with 8xCR123A), Length 135.3mm, Width (bezel): 59.5mm
Sunwayman T60CS: Weight: 338.9g (est 477g with 3x18650), Length: 145.0mm, Width (bezel): 60.0mm
Thrunite TN30: Weight: 468.2g (est 620g with 3x18650), Length: 179mm, Width (bezel): 64.3mm, Width (tailcap): 49.0mm
Xtar S1 Production: Weight: 876.0g (est. 1028g with 3x18650 protected), Length: 240mm, Width (bezel): 83.4mm
Olight SR51: Weight: 405g, Length: 190mm, Width (bezel) 62.0mm
The TM15 is definitely a longer light than the TM11, but otherwise looks very similar in build. In fact, the battery handle appears to be virtually identical – the difference is all in the head.
As with the TM11, anodizing is a flat black, and seems in excellent shape on my sample. There is some knurling on the head and body, of reasonable aggressiveness. Overall grip is certainly decent, despite the cylindrical shape.
Body labels are rather extensive as before – in additional to the usual maker and model information, you also have a 5-point series of warnings about the light (in a very tiny, but legible, font).
The light can tailstand. Battery handle is quite compact, and easily houses 4x18650 or 8xCR123A/RCR. The battery compartments are molded right into the aluminum, with a common negative terminal contact plate. You don't need to fill all the wells for the light to work, but should expect lower runtime (and Turbo mode is not recommended on anything but the full complement of cells). Again, scroll down for more info.
As before, screw threads are anodized for lock-out. :thumbsup:
Inside the head, there are two raised contact rings for the positive and negative current paths. These appear the same as the TM11, and are quite solid (likely gold-plated brass?).
The switch design has changed a little bit from the TM11. It is still a two-stage (two-pressure) electronic switch, but the button projects out a little further now. The ring around the switch now uses a blue LED instead of red to signal the state of the light (i.e., battery status, voltage, and standby modes). Scroll down for an explanation of the interface.
The TM15 has an AC charging cable that connects on the back of the head. The connection point has a small rubber cover, held down with a screw. Not sure how durable or water resistant this will be long-term. Note the charging solution is to be used ONLY with 18650 cells.
Nitecore estimates it will take about 7 hours to full charge the cells this way, which seems a reasonable estimate (i.e., it took just over 6 hours for my relatively low capacity 2200mAh 18650 cells). My somewhat used cells all came out ~4.14-4.15V in my testing, which is a nice conservative level (i.e., just ~0.01-0.02V less than my Pila charger on these same cells).
There is also a tripod attachment mount nearby, with uses the standard tripod screw diameter (presumably 1/4-20 UNC). Note that I found some of inexpensive tripod mounts were a bit loose when screwing into the TM15 (e.g., gorilla-pods), but seemed stable enough in the end. Professional tripods mounts fit stably and securely. The mount seems a little far forward on the light, given that a lot of the weight is in the battery handle.
TM15 has the same size bezel opening as before, and comes with a stainless steel bezel ring, slightly scalloped. The screw-on bezel diffuser from the Eagletac M2- and M3- series lights works as before.
The TM15 uses 3x cool white XM-L emitters as before. However, the TM15 has much deeper reflector wells than the TM11, as illustrated below:
TM11 on the left, TM15 on the right:
Scroll down for beam pic comparisons.
User Interface
The TM15 uses an updated version of the TM11's innovative two-stage electronic switch.
Like before, for Turbo output, press the switch all the way and release (for constant on), or press firmly and hold for momentary on. What's new is that this "Turbo" set also has a slightly lower Hi mode, which you can switch to and from (when locked on in Turbo) by half-pressing the switch and releasing. There is no mode memory on this mode set – the light always comes on in Turbo. Turn off by a full press and release.
For the lower "Daily" modes, only partially press the switch from off (again, hold for momentary, release quickly for locked-on). Light will come on in the memorized lower output mode. As described above, to switch modes when on, simply half-press and quickly release the switch again. The light will advance to the next output, in repeating sequence of Lower > Lo > Med > Hi. The light has memory on this mode set, and will retain the last lower output used. Turn off by a full press and release.
Along with the raised switch, the pressure required to activate the various modes has changed slightly from the TM11, but you quickly get used to it.
The light will read-out the voltage of the cells when you first connect the head, by a series of blue flashes around the on-off switch. After the initial voltage read-out, the light will then flash once every three seconds (when off), to let you know you are in standby mode. The indicator stays constantly illuminated when the light is on. It will start to flash as the batteries begin to drain, at increasing frequency.
A "hidden" strobe mode can be accessed by two rapid full presses of the switch from On. Turn off or double-click again to return to constant output modes.
There is a switch lock-out mode that prevents accidental activation (and lowers the standby current, see below). Press the switch all the way down and hold for more than one second. When you release, the light will turn off and enter the lockout mode. To exit the lockout mode, simply press and hold the switch firmly for more than one second.
The charger plugs in under the rubber cover on the back of the head. The blue indicator light comes on during charging, flashing twice a second. Once the charge is complete, the indicator shows solid blue. My sample charged to a reasonably full level.
For information on the light, including the build and user interface, please see my new video overview:
As always, videos were recorded in 720p, but YouTube typically defaults to 360p. Once the video is running, you can click on the configuration settings icon and select the higher 480p to 720p options. You can also run full-screen.
PWM/Strobe
There is no sign of PWM on any level – I believe the light is current-controlled, as expected.
As you can see above, the TM15 has a true variable frequency strobe. In my testing, the time between pulses varied from ~75 to ~200 msecs (or 5 to 13 Hz).
Standby Drain
Due to the electronic switch, the TM15 will always be drawing a small current when the body/carrier is connected to the head. I measured this current as 790uA (although it would periodically spike every couple of seconds to ~3.6mA for a fraction of a second, when the signal flash occured).
Going with an "average" current of ~1mA, and assuming four times 2600mAh capacity batteries, that would give you a little over 1 year and 2 months before four fully charged batteries would be completely drained (given the parallel cell arrangement). This is about twice the current of my TM11, but it's certainly not bad.
Note there is always an electronic lock-out mode, to lock-out the switch and reduce the standby current. I don't know how much this lowers the current, but it likely to be significant. You can also break this current completely by turning the head a quarter turn (due to the anodized threads).
Beamshots:
And now, what you have all been waiting for.
All lights are on their respective max rechargeable battery sources (i.e., 18650s), about ~0.75 meter from a white wall (with the camera ~1.25 meters back from the wall). Automatic white balance on the camera, to minimize tint differences.
The TM15 clearly has a much narrower spillbeam than the TM11, due to the deeper reflectors.
oo: In fact, both overall output and throw have increased on the TM15, compared to the earlier TM11. Despite how it may look above, there is no artifact near the hotspot on my TM15 (rather, that faint line seems to be a mark on my white wall
). In my experience, these sorts of deep well 3xXM-L lights tend to have a lot of "daisy flower" artifact effects in the spillbeam. But the TM15's reflector design is remarkably good – I see very little evidence of artifacts in this case. Much better than most lights in this class.
To show the spill a little better, here are some side shots on my famed "integrating carpet".
Again, the TM15 is far more focused for throw than most other 3xXM-L lights.
For outdoor beamshots, these are done in the style of my earlier 100-yard round-up review. Please see that thread for a discussion of the topography (i.e. the road dips in the distance, to better show you the corona in the mid-ground). Please ignore the red-tint in the lower-right corner these shots (I was wearing a brighter-than-usual red headlamp during this excursion
). Zoomed-in pics of the hotspots are also included.
Here is how the TM15 compares directly to the TM11:
I know it can be a bit hard to compare, given the slight variation in angling of the lights and the tint differences. But as you can probably tell, the TM15 is a greater thrower than the TM11. The TM15 is generally comparable in throw to the Thrunite TN30.
Testing Method:
All my output numbers are relative for my home-made light box setup, a la Quickbeam's flashlightreviews.com method. You can directly compare all my relative output values from different reviews - i.e. an output value of "10" in one graph is the same as "10" in another. All runtimes are done under a cooling fan, except for any extended run Lo/Min modes (i.e. >12 hours) which are done without cooling.
I have devised a method for converting my lightbox relative output values (ROV) to estimated Lumens. See my How to convert Selfbuilt's Lightbox values to Lumens thread for more info.
Throw/Output Summary Chart:
My summary tables are reported in a manner consistent with the ANSI FL-1 standard for flashlight testing. Please see http://www.flashlightreviews.ca/FL1.htm for a discussion, and a description of all the terms used in these tables. Effective July 2012, I have updated all my Peak Intensity/Beam Distance measures with a NIST-certified Extech EA31 lightmeter (orange highlights).
Turbo output is quite high – similar to my other recent 3xXM-L lights (i.e., the Sunwayman T60CS and Thrunite TN30). Throw is higher on my sample than the Nitecore specs indicate.
Here is how the TM15 compares to the TM11 in terms of relative level spacing.
Nitecore's lumen specs seem to be pretty accurate.
Output/Runtime Comparison:
Note: All my 18650 runtimes are done using AW protected 2200mAh.
The TM15 shows excellent efficiency for this class, in keeping with the current-controlled circuit. Output is flat-regulated at all levels, very similar to the TM11.
There was a step-down from Turbo to Hi on 8xCR123A after ~20 mins runtime. I suspect this was the thermal sensor kicking in to limit output. Note that primary CR123As tend to get a lot hotter than 18650 under high drive currents, which may be why I didn't observe any step-down effects on the 18650 runs (all runs above done under a cooling fan, as always).
As you will recall from my earlier TM11 review, there was some variability initially in the thermal sensitivity of the step-down control circuit of that model, even on 18650 (i.e. that light always stepped down eventually, even with cooling). I'm guessing the larger head of the TM15 has also allowed from improved heatsinking.
Since most of you are not likely to be running your lights under a cooling fan, I did an analysis of what happens if you run the light without any cooling whatsoever, on 4x18650. I also attached a thermal probe on the surface of the head of the light, just above the switch.
As you can see above, the rise in temperature triggered a step-down from Turbo to Hi on 18650 after about ~20 mins of runtime. The surface of the light was definitely quite warm by this period, but cooled down quickly once the output stepped down.
With 4x18650, the output remained stably at this Hi level for the rest of the run. This is in contrast to the gradual partial recovery of output on 8xCR123A as the temperature dropped, but that may reflect differences in the internal resistance of the different chemistries. I am happy to report there is no sign of the rapid cycling in output I observed on the early TM11 samples.
In case you are curious, here is how the TM15 compares to other lights in estimated lumens:
Potential Issues
Due to the overlapping reflector design, there are bound to be some artifacts in the periphery of the spillbeam. However, I find them to be surprisingly minor in this case. The light is a lot "throwier" than the TM11 (by design), with a much narrower spillbeam.
Due to the electronic switch in the head, the light has a stand-by current when waiting to receive a button press. This current is reasonably low (~1mA, on average). You can lower this standby current further by locking out the switch. You can also completely break this current by loosening the head from the body.
The charging dock cover feels a little flimsy, but has held in fine during my testing so far. Note the charger is meant only for 18650 cells - do not attempt to charge other kinds of batteries inside the light.
The raised switch - and increased sensitivity - may result in greater accidental activations on the TM15, compared to the earlier TM11. I do find the new sensitivity easier to use in practice, though.
Preliminary Observations
The TM15 is an impressive update to the Tiny Monster series of Nitecore lights. As many of you may recall, there were a number of initial circuit and soldering issues at the time of the TM11 launch. Nitecore seems to have these now well in hand, judging by my one TM15 sample – it performed consistently and reliably throughout my testing.
There are some minor circuit and user interface tweaks from the earlier TM11, as described earlier in this review. These are relatively minor, although I personally prefer the new raised switch and feel. I am glad to see they have kept the standby current to an acceptably low level, and have provided a variety of lock-out options.
Overall output/runtime efficiency and regulation pattern remain excellent.
The thermal sensor-driven step-down on Turbo worked exactly as I would have expected, with a reasonable set point and sensitivity (i.e., there was none of the repeated "cycling" pattern I observed on the early TM11 samples). The build is very similar to the TM11, and continues to feel solid and robust. As before, those with smaller hands may find it a bit awkward to carry for extended periods. It is also heavier now, thanks to the greater heatsink and deeper reflector wells.
On that point, I am impressed with the quality of the beam. The TM15 is much "throwier" than the TM11, but without the usual heavy spill artifacts I've noticed on previous on 3xXM-L designs. Clearly, a lot of work went into this reflector.
oo:As before, the light has considerable battery flexibility by running the four wells in parallel. You can thus run the light in 1x, 2x, 3x, or 4x 18650 configurations (or 2x, 4x, 6x, 8x CR123A/RCR). Although I haven't tested it here, I recommend you don't try to run Turbo on anything less than the full 4x/8x complement of cells (or Hi on anything less than 3x/6x). Although in a pinch, I'm sure you could get by with an IMR-18650 or two (if you had ones that were long enough to activate the light).
The other new addition here is the built-in battery charger option. My testing showed this charger worked as expected, with a nice conservative termination level (i.e., didn't over-charge my cells). I can't easily determine if it terminates completely at the end of a charge, but Nitecore assures me that it is "intelligent automatic" like their i4 charger, and will terminate charging immediately. Note that the i4 charger actually has a low uA current once charging is complete, but it is so low as to be close enough to full termination (i.e., it is definitely not a trickle charge). If it is the same here, then there is nothing to worry about.
All told, the TM15 is a nice addition to the Tiny Monster line. The circuit tweaks are really more evolutionary than revolutionary, and the built-in charger worked well in my testing. But to me, the main advantage of this light over the TM11 is the much greater throw. :wave:
----
TM15 provided by Nitecore for review.
Last edited:


