
idleprocess
Flashaholic
When I "discovered" LED City was selling their basic LED tape for $25 / 3 meter roll, I decided on the spot that I was going to work on some accent/detail lighting in the kitchen and bought two rolls. The fact that they had a ~4500K CCT option was the kicker - I'm no fan of >6500K "cool white" for general lighting, but I'm also not too fond of the 2700-3000K "warm white" that the LED industry has been all-too-eager to supply.
The LED tape is extremely simple to work with - each segment of tape works from 12V DC with a resistor to regulate current to each 3-LED string. For every 3 LED's, you'll need an additional 20mA of current. There's a quirk to this specific tape - for each three 3-LED segment there's a single 6-LED segment. For my project it wasn't a problem - just had to plan ahead on how I cut the segments so as not to waste any tape.
Since everyone loves pictures, here ya go:

Detail of the under-cabinet lighting - should have drilled that hole a wee bit closer to the corner ... live and learn (also good thing that I'm a bachelor).
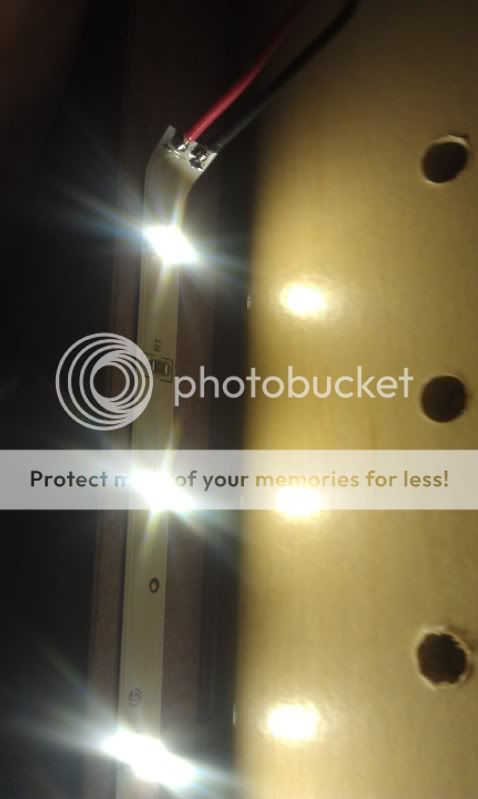
Detail of in-cabinet lighting. Using 18 AWG coarse stranded wire was not the best choice - far too rigid as you can see with it pulling the tape off. I also could have done a better job cutting the wires to length.

The cat seemingly approves...
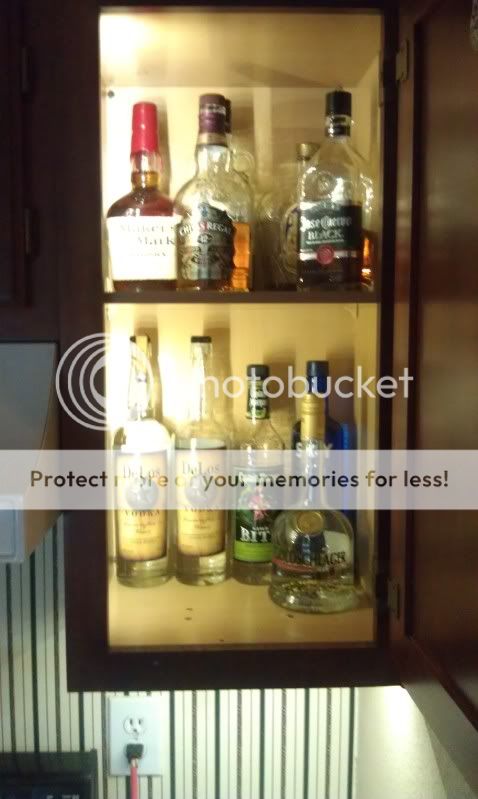
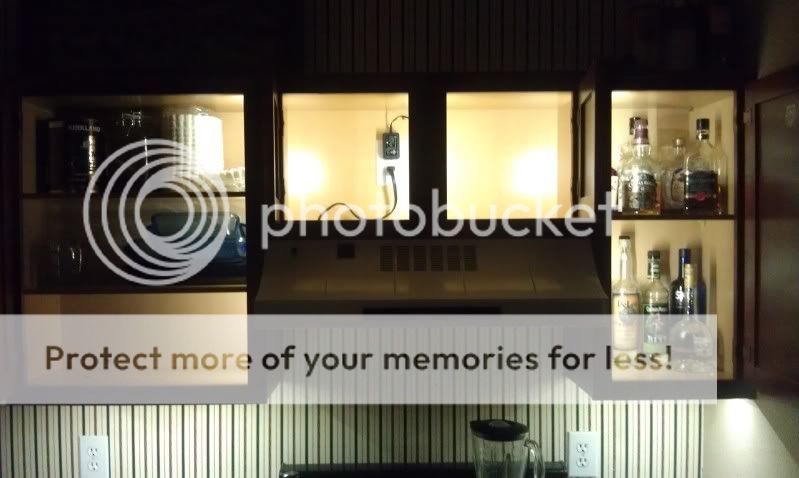
Now I can clearly read labels when I'm "thirsty."
That empty cabinet sure is well-lit! I'm using a regulated 12V DC / 750mA power supply here to run the whole show.

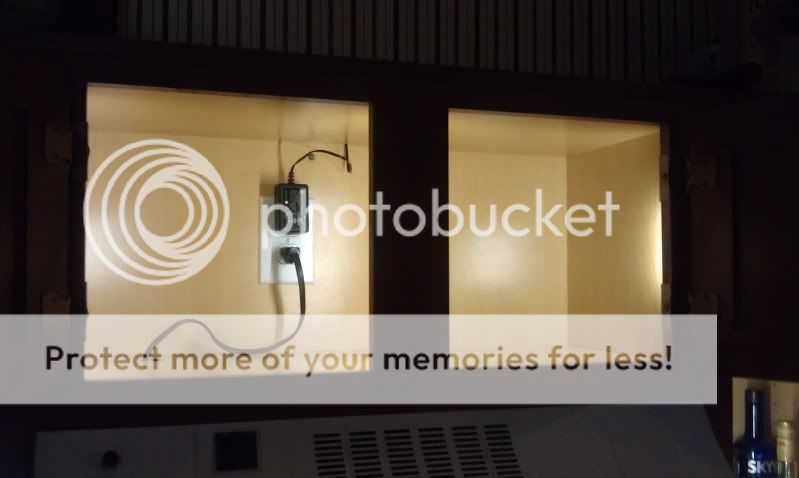
The longer cabinet from below. Note the battery-powered light that's going to suffer neglect now that I'm tapping into the mains...
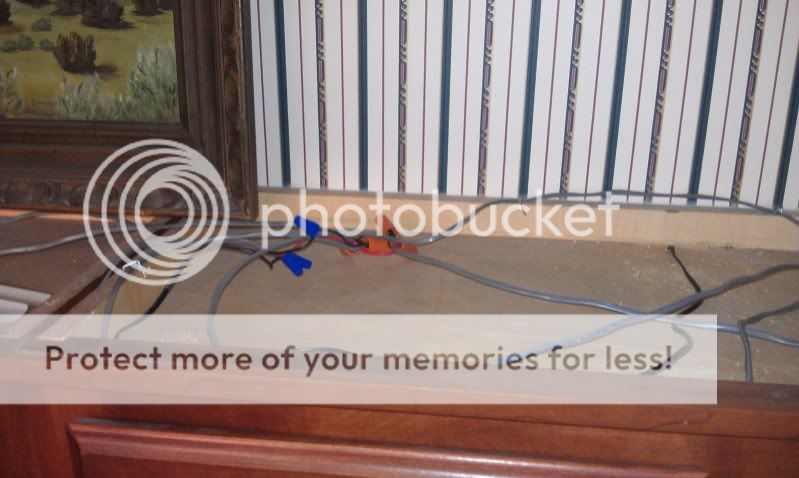
Wire nuts - the choice of the professional! This is where all the connections are made. If I ever change this up, I might solder up a PCB to keep it neater.
The whole shebang.
All in all, it was a surprisingly short project. Took me about 10 hours altogether to lay it out, solder the segments together, string and apply the segments, repair the sole popped solder joint, then make it all neat.
I used less than 2 meters of tape, so I have almost a reel and a half remaining. Overall cost was perhaps $40 ($25 for the tape, $8 for the power supply, $1 for the switch, and a generous $6 worth of other materials).
I was initially hoping to do some sort of slick door-activated switching for the cabinets, but realized that would be a great deal more fitting work in addition to altering my arrangement of 5 strings (2 long outer in-cabinet + under-cabinet lighting plus the 3 short strings in the center cabinet).
Lessons learned:
I think I'm going to call this project done and will be focusing on ways to do the same thing on the other side of the kitchen - main challenge there being that power is not going to be out of sight nor will there be a stove vent hood to inconspicuously mount the switch to.
The LED tape is extremely simple to work with - each segment of tape works from 12V DC with a resistor to regulate current to each 3-LED string. For every 3 LED's, you'll need an additional 20mA of current. There's a quirk to this specific tape - for each three 3-LED segment there's a single 6-LED segment. For my project it wasn't a problem - just had to plan ahead on how I cut the segments so as not to waste any tape.
Since everyone loves pictures, here ya go:
Detail of the under-cabinet lighting - should have drilled that hole a wee bit closer to the corner ... live and learn (also good thing that I'm a bachelor).
Detail of in-cabinet lighting. Using 18 AWG coarse stranded wire was not the best choice - far too rigid as you can see with it pulling the tape off. I also could have done a better job cutting the wires to length.
The cat seemingly approves...
Now I can clearly read labels when I'm "thirsty."
That empty cabinet sure is well-lit! I'm using a regulated 12V DC / 750mA power supply here to run the whole show.
The longer cabinet from below. Note the battery-powered light that's going to suffer neglect now that I'm tapping into the mains...
Wire nuts - the choice of the professional! This is where all the connections are made. If I ever change this up, I might solder up a PCB to keep it neater.
The whole shebang.
All in all, it was a surprisingly short project. Took me about 10 hours altogether to lay it out, solder the segments together, string and apply the segments, repair the sole popped solder joint, then make it all neat.
I used less than 2 meters of tape, so I have almost a reel and a half remaining. Overall cost was perhaps $40 ($25 for the tape, $8 for the power supply, $1 for the switch, and a generous $6 worth of other materials).
I was initially hoping to do some sort of slick door-activated switching for the cabinets, but realized that would be a great deal more fitting work in addition to altering my arrangement of 5 strings (2 long outer in-cabinet + under-cabinet lighting plus the 3 short strings in the center cabinet).
Lessons learned:
- Use thinner wire - the 18 AWG I'm using is probably good for 10 amps when 500mA is about the most I'll see for the entire project. Sure it was "on hand" already, but it's pulling some of the tape off - only reason it's not a problem is due to my "the bigger the job, the better the job" theory of soldering
- Measure wire runs a bit more carefully - slack is not your friend when you're trying to hide the entire project
- Brighter LED tape would not have been a bad thing: it's fine when the lights in the kitchen are out, barely noticable when some ~12,000 lumens from the pair of dual T8 fixtures overhead are lit
I think I'm going to call this project done and will be focusing on ways to do the same thing on the other side of the kitchen - main challenge there being that power is not going to be out of sight nor will there be a stove vent hood to inconspicuously mount the switch to.
Last edited: