Wiring 500 or more LEDs: Parallel or Series?

dwol2010

Newly Enlightened
Joined
Aug 10, 2011
Messages
5
I'm fairly new with working with LEDs and I'm not quite sure how to tackle this task.

I'm creating a grid that' s 24" by 36" and i need to place an LED every inch. I've bought 1000 5mm wideangle LEDs that are the standard 3.2V-3.8V with 30mA. I want to wire these in a way that they could either run off a wall outlet or from a USB cable (5V 500mA max allowance). I have an idea as far as that they need to be in parallel to be at their brightest but the amperage would be through the roof. Maybe wire it in parallel connections, each with 10 series LEDs? I know they wont be as bright but it should bring the amperage down.
Also im not sure what type of resistor to use and where to place it..

Any help would be greatly appreciated!
 

Lynx_Arc

Flashaholic
Joined
Oct 1, 2004
Messages
11,212
Location
Tulsa,OK
24x36 one every inch is 864 LEDs. There is no way you are going to run that off a usb cable and light up even half of them worth the effort as 5v is not high enough to wire them in 2 series strings so you got 800+ LEDs driven at 500ma or about 1-2ma/LED. To run them off wall current (assuming you are in the US 120v) that would be about 3.2v/LED or 38 LEDs in series approxiamately. My advice is get rid of the 5mm LEDs and use a lot less Cree emitters because the 5mm LEDs will dim rather quickly on you if you drive them at any decent level and trying to match strings of them and get consistent brightness could be a time consuming task.
 

dwol2010

Newly Enlightened
Joined
Aug 10, 2011
Messages
5
What if i was to cut it down to 300? say make it a 12v DC supply with 75 parallel, series of 4 leds each? they'd each get 3v which should be enough for a decent brightness. unless im completely missing something. I might be out of some money.... but i guess thats what i get for buying before knowing what i was doing

If it helps, the project is to light up the backside of a piece of white translucent plexiglass for a display case, but theres only enough room for an inch behind the plexiglass which it why i wanted to use leds.

(And yes I'm from the US :) )
 

jtr1962

Flashaholic
Joined
Nov 22, 2003
Messages
7,505
Location
Flushing, NY
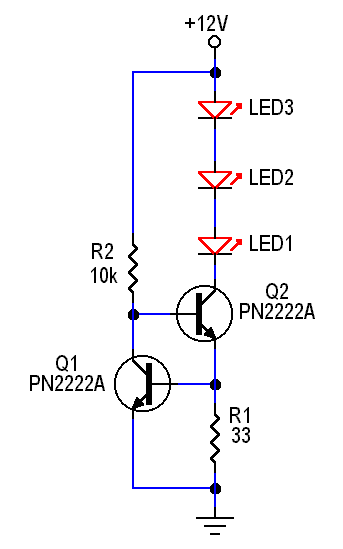
Forget the whole idea of using a USB port. A USB port just isn't going to deliver enough power to light 500 LEDs no matter how you wire them. My suggestion is to just design them to run off 120VAC and be done with it. There are many options to run off 120 VAC. The simplest way is to make up a bunch of series strings which have a forward voltage fairly close to rectified, filtered 120 VAC. That would be roughly 165 VDC. If your LEDs have an average forward voltage at whatever current you plan to run them at of, say 3.25 volts, then you would use 10 strings of 50 LEDs each. You could use a variation on the simple circuit below to regulate the current of each string:

LED_Driver_1.gif


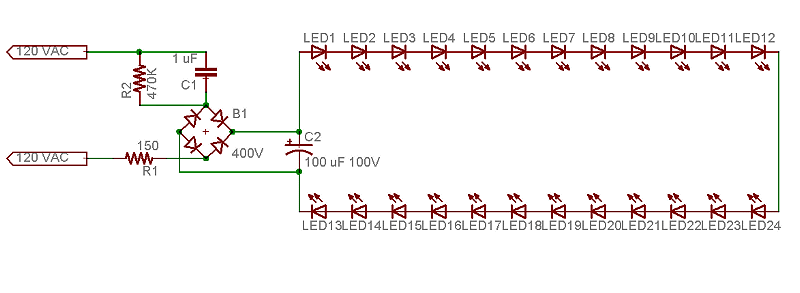
You would need to increase R2 to about 200K, but other than that, the circuit would work fine running 50 LEDs in series off rectified, filtered 120VAC. Another option is the capacitor-fed full-wave bridge. Just wire the LEDs in 20 groups of 25 each. For each group of 25 LEDs, power it using the circuit below:

LED_Night_Light_Schematic.gif


Both of these circuits drive the LEDs at around 20 mA. If you use decent LEDs, they should last a long time at that current.
 

Lynx_Arc

Flashaholic
Joined
Oct 1, 2004
Messages
11,212
Location
Tulsa,OK
I hope you bought wide angle LEDs otherwise you will end up with a lot of dots lit up at that short of a distance.
 

Steve K

Flashlight Enthusiast
Joined
Jun 10, 2002
Messages
2,786
Location
Peoria, IL
boy, this sounds very similar to the backlight I made for a stained glass piece. The schematic and pics are in a Flickr set.

I am running it off of 115vac (and you do need to be careful about construction and the use of the safety ground and fuses, etc.). It uses a basic current regulator circuit for each of the 4 strings of leds. Very simple. The power dissipation is reasonable, and the use of copper-clad circuit board as the heatsink (along with the aluminum framework) keeps the temperature low. Electrically, it works very well.

My only issue is that I need to allow more space between the leds and the diffuser material in order to get an even, uniform illumination. I think an inch or more would be needed. The leds that I used are surface mount with no optics, so they have a very wide beam angle to start with. You may want to experiment with four leds arranged in a square to see how even the illumination is as you vary the spacing between leds and the distance between the leds and the diffuser.

good luck,

Steve K.

edit: one more thought... an alternate approach is to use a 1/2" thick (10mm) piece of plexiglass, inject light into the side(s), and use surface texture on the front as a way to let the light out. Again, experimentation on the small scale might be adviseable. Getting the light into the plexiglass can be a challenge, but there are optics that can help. Keeping the light from coming out of the other sides may require the use of reflective material. Adding texture to the front might be done by sanding, bead blasting, etc. I haven't tried this myself and don't know what works well. The amont of texture will control the amount of light that can get out of the plastic, so this might not be simple. Of course, the big question is whether it is any harder than mounting hundreds of leds and wiring them up! :)
 
Last edited:

SemiMan

Banned
Joined
Jan 13, 2005
Messages
3,899
boy, this sounds very similar to the backlight I made for a stained glass piece. The schematic and pics are in a Flickr set.

I am running it off of 115vac (and you do need to be careful about construction and the use of the safety ground and fuses, etc.). It uses a basic current regulator circuit for each of the 4 strings of leds. Very simple. The power dissipation is reasonable, and the use of copper-clad circuit board as the heatsink (along with the aluminum framework) keeps the temperature low. Electrically, it works very well.

My only issue is that I need to allow more space between the leds and the diffuser material in order to get an even, uniform illumination. I think an inch or more would be needed. The leds that I used are surface mount with no optics, so they have a very wide beam angle to start with. You may want to experiment with four leds arranged in a square to see how even the illumination is as you vary the spacing between leds and the distance between the leds and the diffuser.

good luck,

Steve K.

edit: one more thought... an alternate approach is to use a 1/2" thick (10mm) piece of plexiglass, inject light into the side(s), and use surface texture on the front as a way to let the light out. Again, experimentation on the small scale might be adviseable. Getting the light into the plexiglass can be a challenge, but there are optics that can help. Keeping the light from coming out of the other sides may require the use of reflective material. Adding texture to the front might be done by sanding, bead blasting, etc. I haven't tried this myself and don't know what works well. The amont of texture will control the amount of light that can get out of the plastic, so this might not be simple. Of course, the big question is whether it is any harder than mounting hundreds of leds and wiring them up! :)

Any number of backlit sign suppliers that do exactly this. Infinitely easier, good homogeneity, and fairy even illumination over large surfaces.
 

dwol2010

Newly Enlightened
Joined
Aug 10, 2011
Messages
5
Now i do have a 12V acdc converter that i could use but i doubt it has enough power to illuminate the 500 bright enough to what i need. i haven't opened yet so i can still return that..
 

dwol2010

Newly Enlightened
Joined
Aug 10, 2011
Messages
5
I hope you bought wide angle LEDs otherwise you will end up with a lot of dots lit up at that short of a distance.

Yes i bought the wide angle "straw hat" leds. they have a viewing angle of around 120 degrees so im not incredibly worried about the spotting, but it is still on my mind.
 

dwol2010

Newly Enlightened
Joined
Aug 10, 2011
Messages
5
one more thought... an alternate approach is to use a 1/2" thick (10mm) piece of plexiglass, inject light into the side(s), and use surface texture on the front as a way to let the light out. Again, experimentation on the small scale might be adviseable. Getting the light into the plexiglass can be a challenge, but there are optics that can help. Keeping the light from coming out of the other sides may require the use of reflective material. Adding texture to the front might be done by sanding, bead blasting, etc. I haven't tried this myself and don't know what works well. The amont of texture will control the amount of light that can get out of the plastic, so this might not be simple. Of course, the big question is whether it is any harder than mounting hundreds of leds and wiring them up! :)


As for lighting it through the side of the plexiglass, thats going to be rather hard because unfortunately the piece i bought is only an 1/8 inch thick...
 

Steve K

Flashlight Enthusiast
Joined
Jun 10, 2002
Messages
2,786
Location
Peoria, IL
As for lighting it through the side of the plexiglass, thats going to be rather hard because unfortunately the piece i bought is only an 1/8 inch thick...

I was looking around for 1/2" thick plexiglass myself, and it's not just laying around the local hardware store. I think the only place I could find it was McMaster Carr, but there must(?) be a more convenient source somewhere.

Before you get too committed to one approach, consider carefully how much trouble it is to install hundreds of leds. I once built a bike headlight with 60 of the 5mm leds, and just the details of providing the heatsinking, attaching wires, etc. was driving me nuts. My design with surface mount leds on copper-clad board simplified things a bit... no wiring, no extra heatsinking... just cut slots in the copper layer and solder on the leds. It's a lot simpler, but you still have issues with copper slivers shorting out the cuts (and you need to inspect the cuts with a magnifier to find the slivers), and there are still a couple hundred solder connections that have to be carefully made. Not a cakewalk.

The issues related to shoving light into the edge of a thick piece of plexiglass may be pretty significant too. I haven't seen anyone write about their experiences with making one yet. Maybe you can be the first?? :)

Steve K.
 

blasterman

Flashlight Enthusiast
Joined
Jul 17, 2008
Messages
1,802
Given the narrow space you have to work Cold Cathode would have been a lot easier to work with and have less 'hot spot' issues. I know the LED's are cheap, but get ready for soldering hell.

Designing the array itself is both simple, and hard. There are a lot of LED drivers that can easily handle the load (approx 50 watts) and at 48volt you can run a lot of 3.5volt LED in series, but they involve using a lot of parallel runs to spread out the current on a single 50 watt LED driver. That means either running a mirror circuit to prevent cascade failure, or taking a risk that entire string won't die and take down a bunch of others. The flipside is that high current LED drivers force you to use a lot of parallel runs, and in this respect if one run dies the current being spread to the other series isn't as critical. This is where the Chinse make a big mistake with beehive type lights because they only involve 2-3 runs in parallel.

Ideally you want a 20-30mA current driver on each series, and then power each driver in parallel with a typical 24vdc source. It would be reliable, but that's a lot of drivers.

Also, you can stack pieces of milk plexi. Two 1/8" pieces equal the diffusion of 1/4", etc., and is easier to find. You can also use custom window film that emulates frosted glass, and just use multiple layers of it. Ideally a material like Acrylite works the best, but it's tricky to find it online and not in single custom pieces.
 
Last edited:
Top