
HKJ
Flashaholic
[size=+3]Charger Opus BT-C2000[/size]
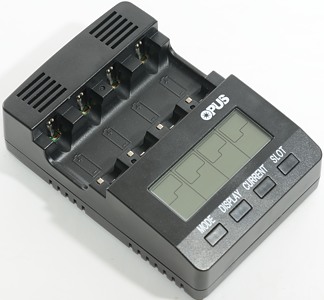

This charger is new on the market, with a design that looks very much like the BM200 charger. This is because the charger is an improved version of the BM200. I have not tested the BM200 and will not be able to say exactly what improvements it has.
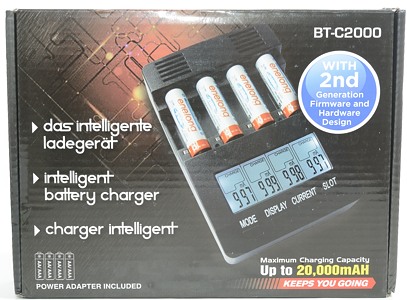
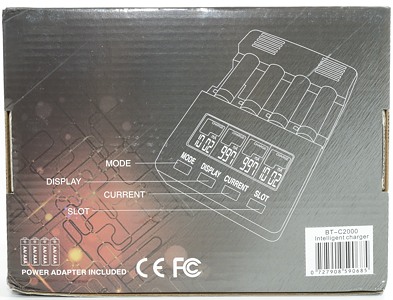
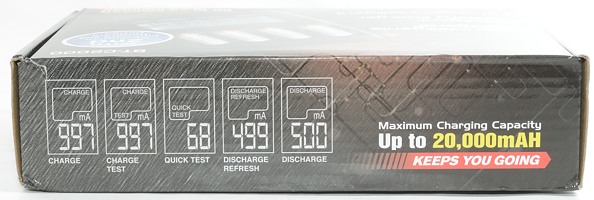
The charger comes in a cardboard box with a little explanation about the charger on the outside.
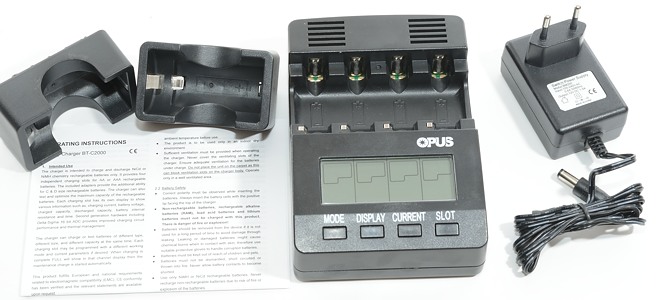
Inside the box is the charger, a power supply, two C/D cell adapters and a manual.
The power adapter I got is the EU version, it has universal voltage 100-240VAC 50/60Hz and delivers 12V 1.5A.
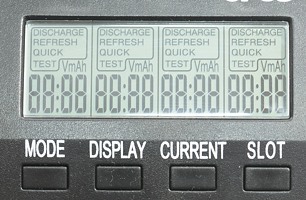
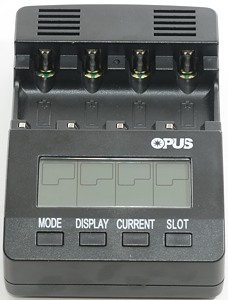
When the charger is turned on, it first displayes the formware version (2.0 for the tested charger), then does a display test where all the text can be seen.
When the text is blinking , it is possible to select mode:
After having selected mode, it is possible to select current.
When putting multiple batteries in the charger at the same time, it is possible to select mode and current simultaneous for all of them (Very nice).
When charging or discharging it is possible to use the DISPLAY button to select between V, mA and mAh (Can be Ah for large cells).

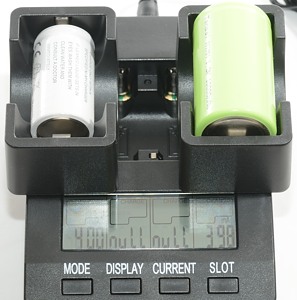
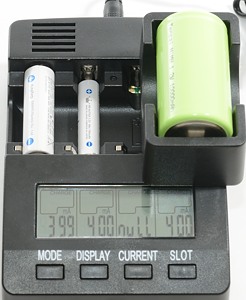
When the slots in the charger is empty, the display will show "null".
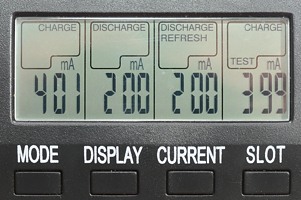
Here is an example where I have selected different functions for each slot.

Each time a button is pressed, the light turns on for a 30 seconds.
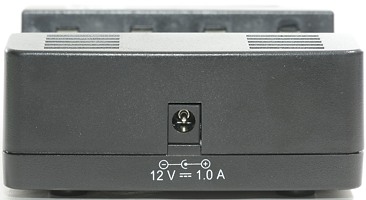
The charger uses an external 12 volt power supply (Specified input voltage range is 10V to 16v).
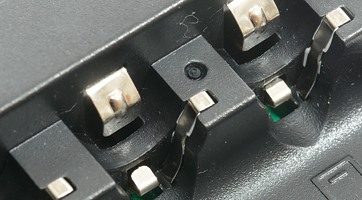
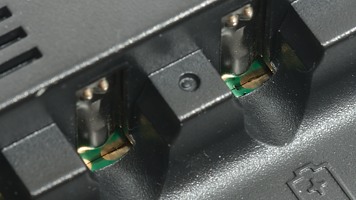
The charger has two minus connection points, but they are not used to select default charging current, it is always 400mA. The metal at the side is probably a temperature sensor.
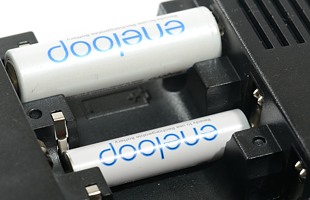
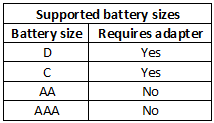
AAA is placed very low in the charger, the AA has more air around them.
The slots are not equal, slot #1 and #4 can charge and discharge with higher current, but only if slot #2 and #3 are empty.
I.e.
Using only slot #1 and/or #4, the maximum charge current is 1400mA and maximum discharge current is 700mA.
In all other cases the maximum charge current is 1000mA and maximum discharge current is 500mA.
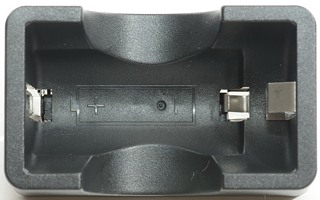
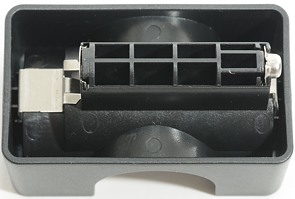
The included adapter are for use in slot #1 and #4 and makes it possible to charge/discharge C and D cells (Notice that internal impedance will give wrong result if used with these adapters).
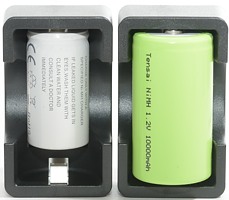
Here is the adapters with a C and a D cell.
Remember to select higher current when charging/discharging C/D cells, or it will take a long time.
[size=+2]Measurements[/size]
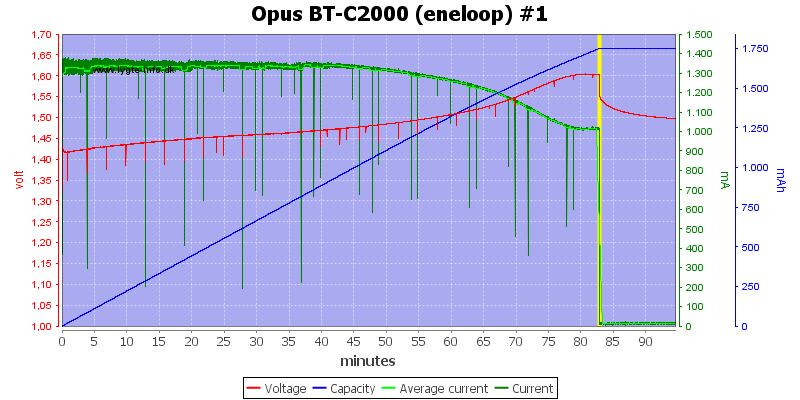
The charger cannot really sustain the 1400mA charge current, it might be due to heat that it reduces the charge current (It has temperature sensors both for the electronic and the batteries) or it might be because it cannot drive the full current when the battery is nearly full.
The termination looks fine.

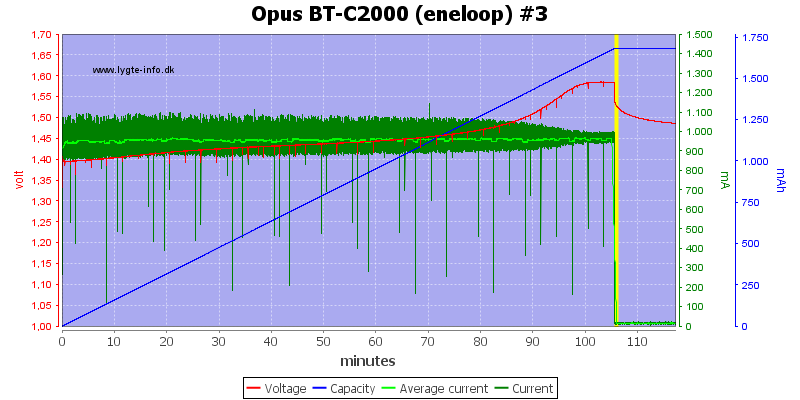
Slot #2 and #3 can only do 1000mA charge current, here the current is constant all the time.
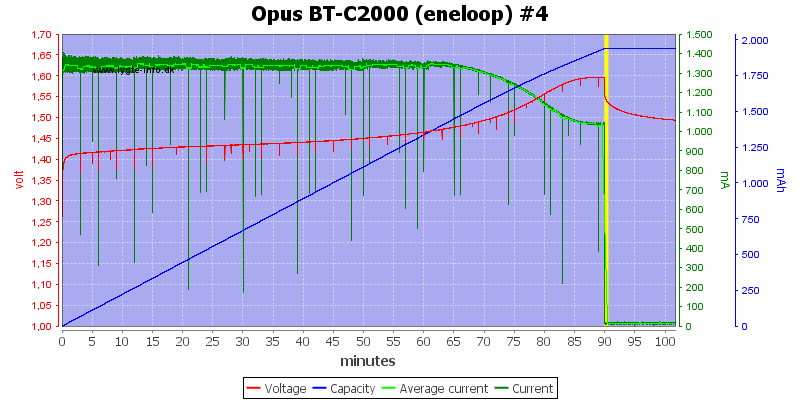
Slot #4 can also charge with 1400mA and it also reduces current.
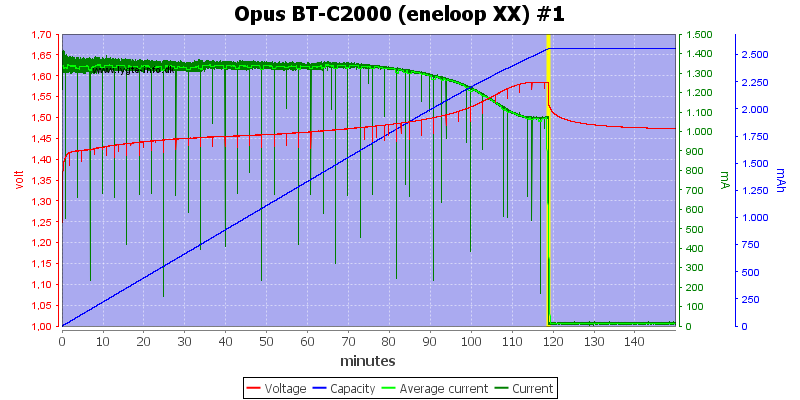
The eneloop XX has more capacity and takes longer to charge. The termination looks fine again.
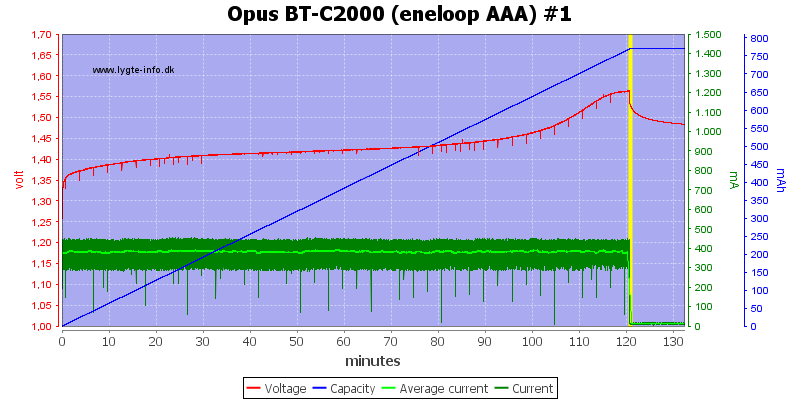
With AAA I uses the default 400mA charge current.
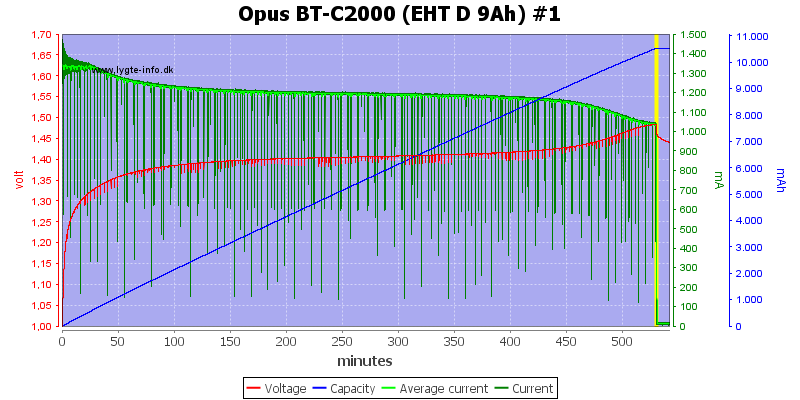
Testing with a D cell did also work (This cell has more than rated capacity).
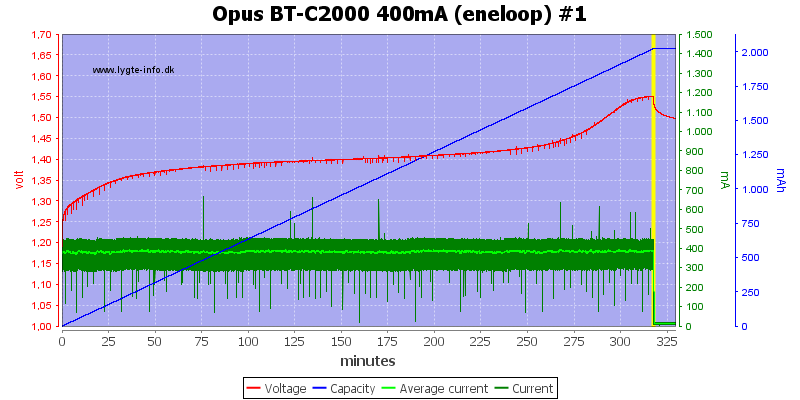
A 2000mAh eneloop at 400mA, forgetting to select charge current means 5½ hour charging time, instead of 2 hours.
The charger terminates perfectly, even with this low charge current, this is very good.
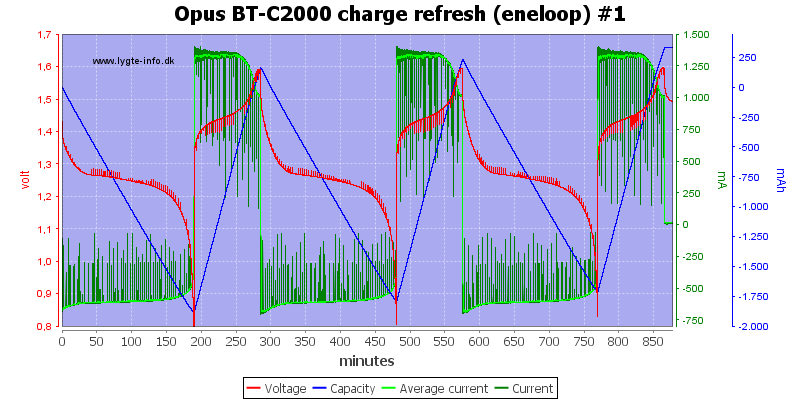
Doing a charge refresh shows the 3 cycles.
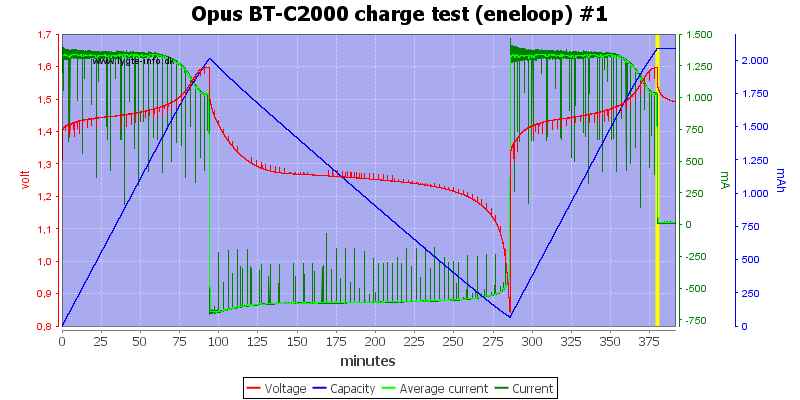
The charge test with a charge, a discharge and a charge again.
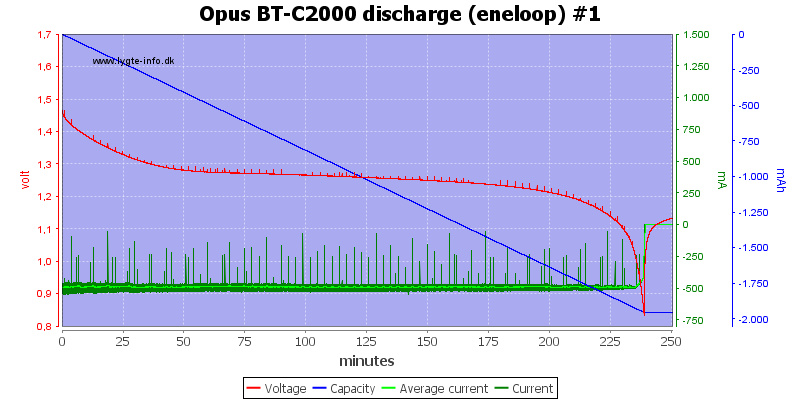
A simple discharge.
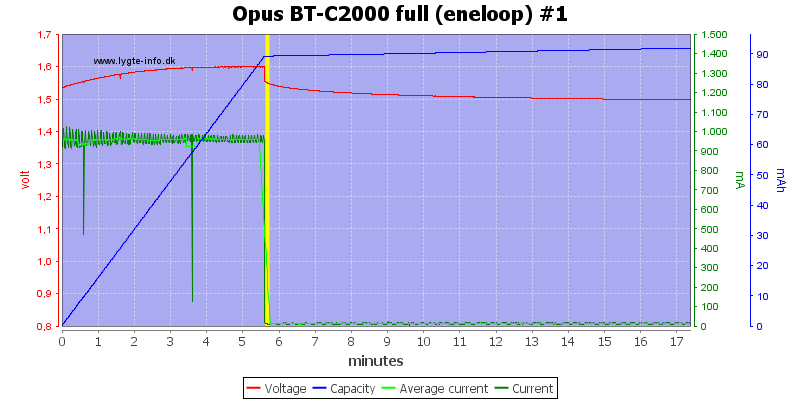
The charger can spot a full cell in 6 minutes with 1000mA charge current.
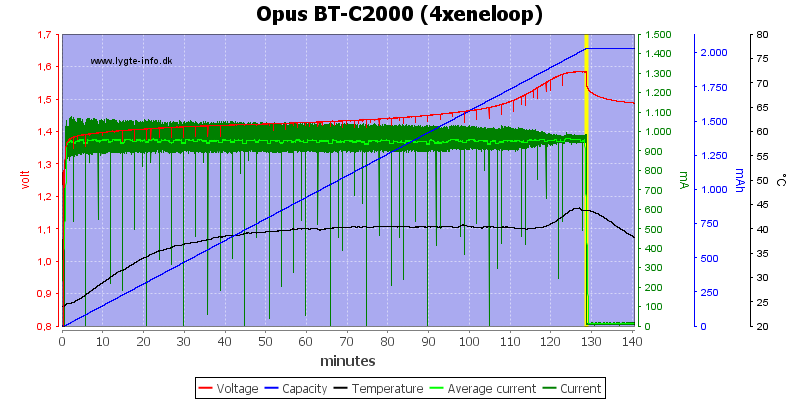
All slots together with 1000mA charge current. The thermo probe is on the battery in slot #3.
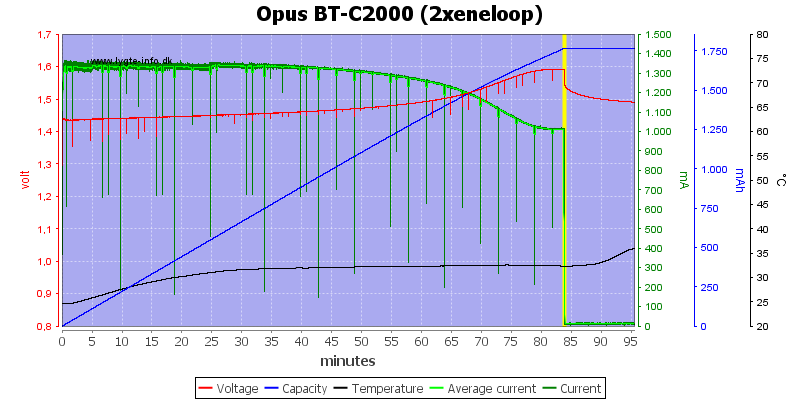
With two batteries and 1400mA charge current the temperature is much lower, there are two reason for that: the total current is lower and I did measure at slot #4.
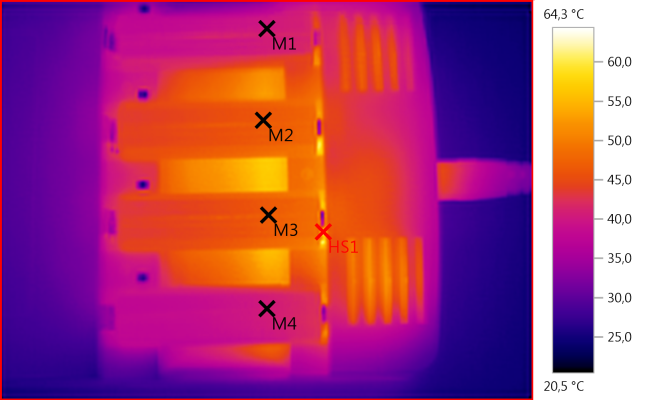
M1: 40,4°C, M2: 46,3°C, M3: 47,0°C, M4: 40,6°C, HS1: 64,3°C
The two batteries in slow #2 and #3 receives most heat from the charger, as can be seen on the temperature.
Note: This test was done at 1000mA charge current, using a lower charge current will also lower the temperature.
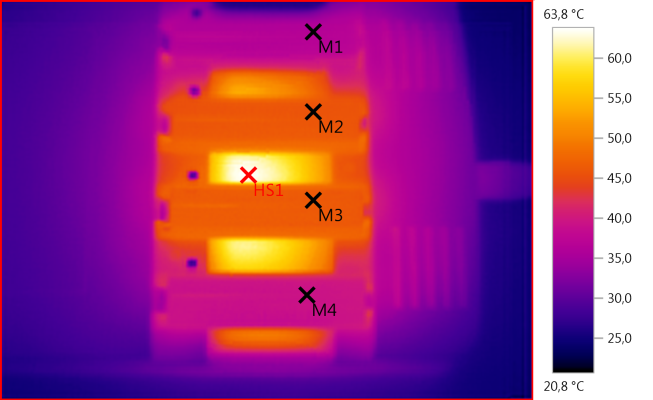
M1: 36,5°C, M2: 45,8°C, M3: 46,3°C, M4: 39,4°C, HS1: 63,8°C
With a thermo camera it is very obvious where the energy goes when testing a discharge.
The charger uses a fixed charge current and uses pwm to adjust the actual charge current.
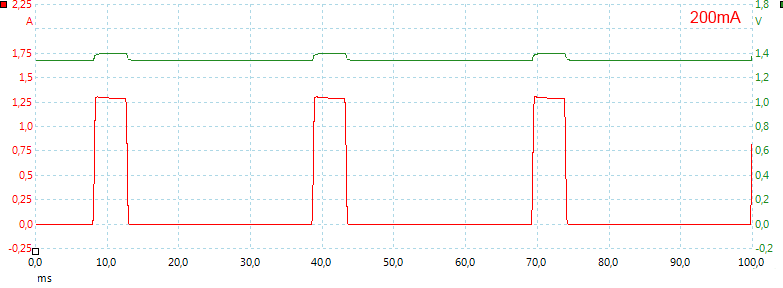
At 200mA the duty cycle is about 13% (It might change with battery voltage).
The pwm frequency is 33 Hz.
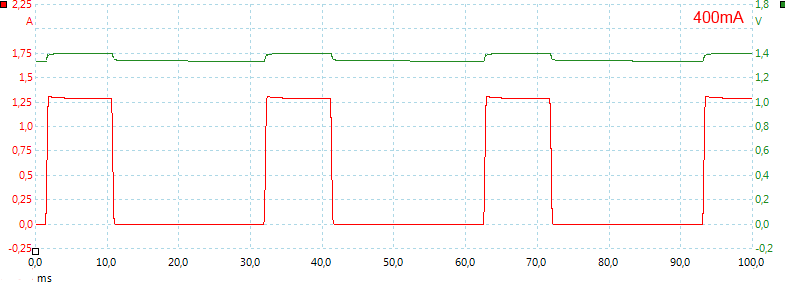
At 400mA the duty cycle is about 30% (It will probably change with battery voltage).
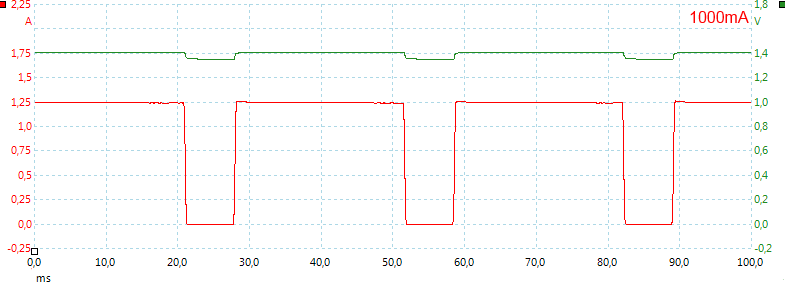
At 1000mA the duty cycle is about 77% (It will probably change with battery voltage).
The charger cannot reach the full current when I have connected the oscilloscope. This is because I has a 0.1 ohm resistor in series with the battery and this means the charger must supply 0.14 volt extra.
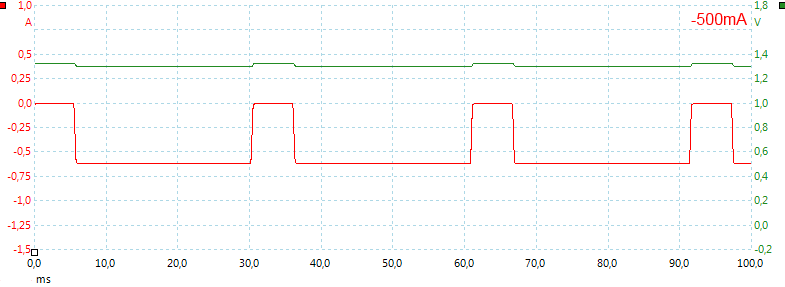
Discharge is also done with pwm. Here using a duty cycle of 87% to discharge with 500mA.
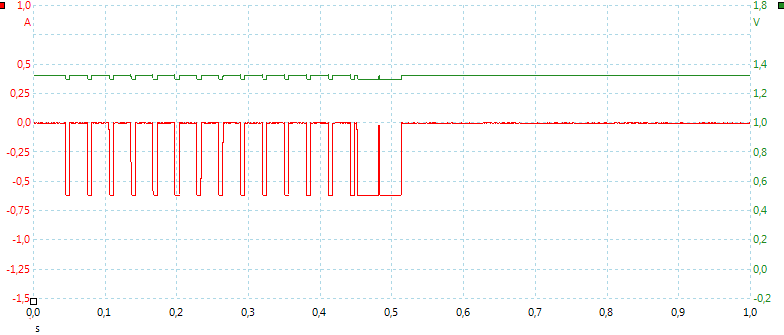
As expected the quick test is a couple of puls loads.
The Quick Test showed 0.167 ohm with the resistor and 0.064 ohm without resistor (The 0.003 difference is due to connections and tolerance on the resistor).
Testing with 2500 volt and 5000 volt between mains and low volt side on power supply, did not show any safety problems.
[size=+2]Conclusion[/size]
The charger has a lot of functionality and does a good job with charging and analyzing. The user interface is easy enough to use, but requires a few tries and some reading in the manual to really know what is going on (It is a bit difficult to guess that "discharge refresh" means 3 cycles).
I believe this is a good NiMH charger/analyzer.
[size=+2]Notes[/size]
The charger was supplied by DanaCo for review.
Here is an explanation on how I did the above charge curves: How do I test a charger
This charger is new on the market, with a design that looks very much like the BM200 charger. This is because the charger is an improved version of the BM200. I have not tested the BM200 and will not be able to say exactly what improvements it has.
The charger comes in a cardboard box with a little explanation about the charger on the outside.
Inside the box is the charger, a power supply, two C/D cell adapters and a manual.
The power adapter I got is the EU version, it has universal voltage 100-240VAC 50/60Hz and delivers 12V 1.5A.
When the charger is turned on, it first displayes the formware version (2.0 for the tested charger), then does a display test where all the text can be seen.
When the text is blinking , it is possible to select mode:
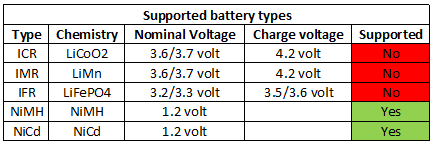
- CHARGE: Charge battery with 200 to 1000 (1400)mAh.
- DISCHARGE: Discharge battery with 100 to 500 (700)mAh.
- DISCHARGE REFRESH: Discharge and charge the battery 3 times.
- CHARGE TEST: Charge, discharge and charge the battery, show how much current was discharged.
- QUICK TEST: Measure the internal resistance of the battery.
After having selected mode, it is possible to select current.
When putting multiple batteries in the charger at the same time, it is possible to select mode and current simultaneous for all of them (Very nice).
When charging or discharging it is possible to use the DISPLAY button to select between V, mA and mAh (Can be Ah for large cells).
When the slots in the charger is empty, the display will show "null".
Here is an example where I have selected different functions for each slot.
Each time a button is pressed, the light turns on for a 30 seconds.
The charger uses an external 12 volt power supply (Specified input voltage range is 10V to 16v).
The charger has two minus connection points, but they are not used to select default charging current, it is always 400mA. The metal at the side is probably a temperature sensor.
AAA is placed very low in the charger, the AA has more air around them.
The slots are not equal, slot #1 and #4 can charge and discharge with higher current, but only if slot #2 and #3 are empty.
I.e.
Using only slot #1 and/or #4, the maximum charge current is 1400mA and maximum discharge current is 700mA.
In all other cases the maximum charge current is 1000mA and maximum discharge current is 500mA.
The included adapter are for use in slot #1 and #4 and makes it possible to charge/discharge C and D cells (Notice that internal impedance will give wrong result if used with these adapters).
Here is the adapters with a C and a D cell.
Remember to select higher current when charging/discharging C/D cells, or it will take a long time.
[size=+2]Measurements[/size]
- The LCD background light turns off 30 seconds after the last keypress.
- Discharge battery with less than 0.1mA when power is disconnected.
- Charge battery with about 15mA when power is connected and charge cycle is done.
- Charge will restart charging after power loss or battery insertion.
- The volt display matches my DMM within 0.02 volt when current is off.
- The voltmeter will measure from 0.2 to 1.8 volt and probably more.
- The current display shows a slightly high value when charging, I got 998mA on display and 982mA with a DMM and a cold charger.
- The current display shows a slightly low value when discharging, I got 501mA on display and 507mA with a DMM and a cold charger.
The charger cannot really sustain the 1400mA charge current, it might be due to heat that it reduces the charge current (It has temperature sensors both for the electronic and the batteries) or it might be because it cannot drive the full current when the battery is nearly full.
The termination looks fine.
Slot #2 and #3 can only do 1000mA charge current, here the current is constant all the time.
Slot #4 can also charge with 1400mA and it also reduces current.
The eneloop XX has more capacity and takes longer to charge. The termination looks fine again.
With AAA I uses the default 400mA charge current.
Testing with a D cell did also work (This cell has more than rated capacity).
A 2000mAh eneloop at 400mA, forgetting to select charge current means 5½ hour charging time, instead of 2 hours.
The charger terminates perfectly, even with this low charge current, this is very good.
Doing a charge refresh shows the 3 cycles.
The charge test with a charge, a discharge and a charge again.
A simple discharge.
The charger can spot a full cell in 6 minutes with 1000mA charge current.
All slots together with 1000mA charge current. The thermo probe is on the battery in slot #3.
With two batteries and 1400mA charge current the temperature is much lower, there are two reason for that: the total current is lower and I did measure at slot #4.
M1: 40,4°C, M2: 46,3°C, M3: 47,0°C, M4: 40,6°C, HS1: 64,3°C
The two batteries in slow #2 and #3 receives most heat from the charger, as can be seen on the temperature.
Note: This test was done at 1000mA charge current, using a lower charge current will also lower the temperature.
M1: 36,5°C, M2: 45,8°C, M3: 46,3°C, M4: 39,4°C, HS1: 63,8°C
With a thermo camera it is very obvious where the energy goes when testing a discharge.
The charger uses a fixed charge current and uses pwm to adjust the actual charge current.
At 200mA the duty cycle is about 13% (It might change with battery voltage).
The pwm frequency is 33 Hz.
At 400mA the duty cycle is about 30% (It will probably change with battery voltage).
At 1000mA the duty cycle is about 77% (It will probably change with battery voltage).
The charger cannot reach the full current when I have connected the oscilloscope. This is because I has a 0.1 ohm resistor in series with the battery and this means the charger must supply 0.14 volt extra.
Discharge is also done with pwm. Here using a duty cycle of 87% to discharge with 500mA.
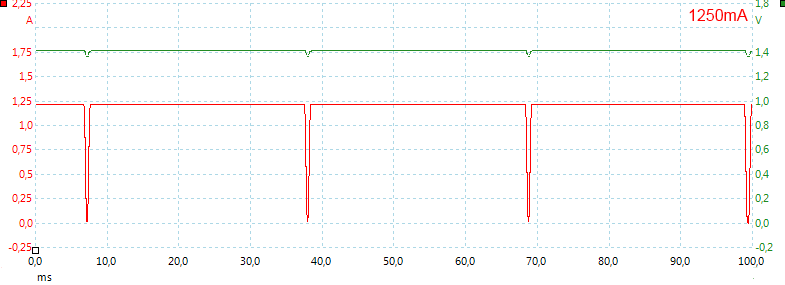
As expected the quick test is a couple of puls loads.
The Quick Test showed 0.167 ohm with the resistor and 0.064 ohm without resistor (The 0.003 difference is due to connections and tolerance on the resistor).
Testing with 2500 volt and 5000 volt between mains and low volt side on power supply, did not show any safety problems.
[size=+2]Conclusion[/size]
The charger has a lot of functionality and does a good job with charging and analyzing. The user interface is easy enough to use, but requires a few tries and some reading in the manual to really know what is going on (It is a bit difficult to guess that "discharge refresh" means 3 cycles).
I believe this is a good NiMH charger/analyzer.
[size=+2]Notes[/size]
The charger was supplied by DanaCo for review.
Here is an explanation on how I did the above charge curves: How do I test a charger
