
dfred
Enlightened
I have been hanging around CPF for a couple months, but this is my first time starting a topic. I've been consistently impressed with the quality of information and advice here, so I decided it was time to contribute something.
I've been looking for a compact lanyard which reduces the likelihood of fumbling a flashlight. I'm not a big fan of wrist lanyards as they always seem to get caught on stuff. I came across the Koppo Wrap, which I liked but it seemed like there must be a way to accomplish the same thing with less bulk. I started experimenting with various knot configurations that might produce something a little nicer. Most were either insecure, too bulky or both. I made some progress with seized jug hitches, but it was very difficult to tighten them sufficiently to get good purchase on the flashlight.
After several hours of experimentation I eventually arrived at a purely seized method, using constrictor knots which worked better than I imagined possible. Think of constrictor knots as pre-industrial cable-ties. There are several methods to tie them, but two common ones are as a hitch or threaded.
I settled on using 500# paracord for the lanyard and 1.5mm Sterling MINI cord for the constrictors. The lanyards pictured have been in use for about 4-6 weeks and are holding up well. I've really come to like how it feels in the hand and have added this to a few of my lights. For those of you unfamiliar with this style of lanyard, the middle and ring fingers go inside the loop and the index and pinky go outside.
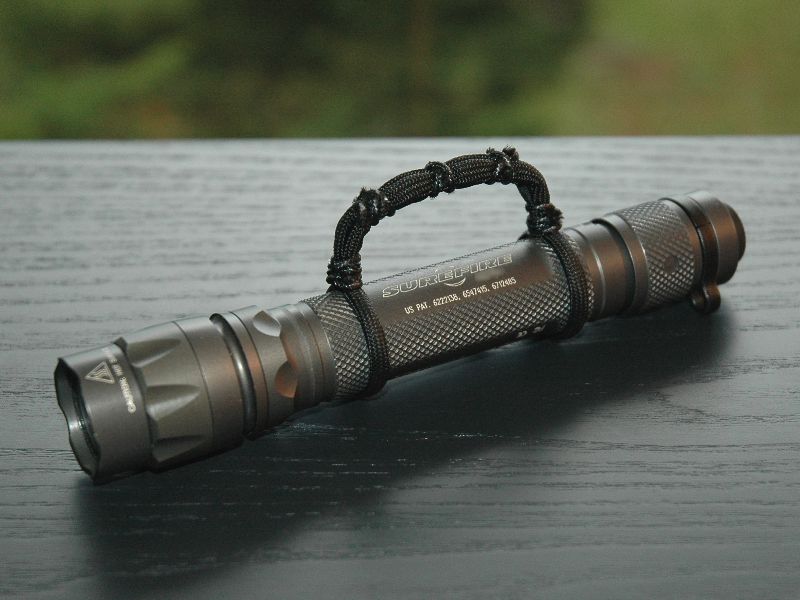
Note that lanyard is aligned with witness mark in flashlight body.
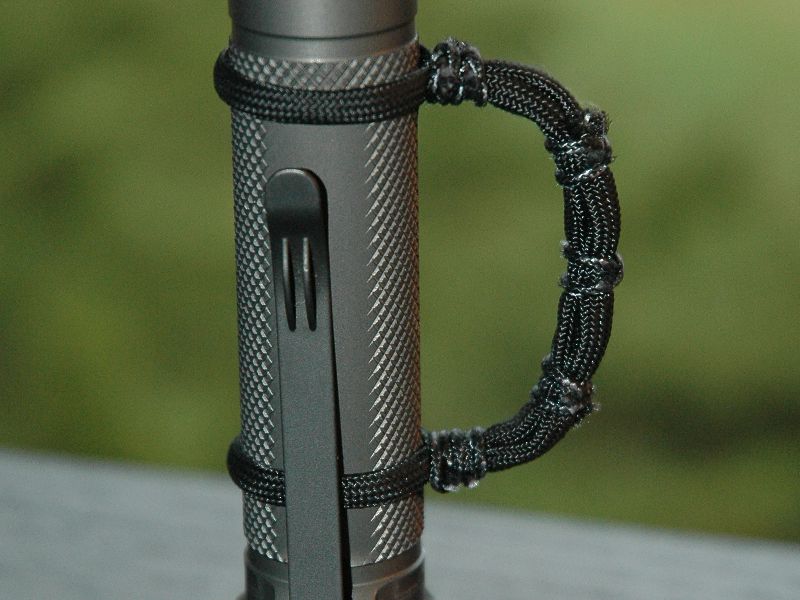
I find that the loop up inside the clip actually "latches" on the lip of my jeans pocket and makes clip carry more secure.
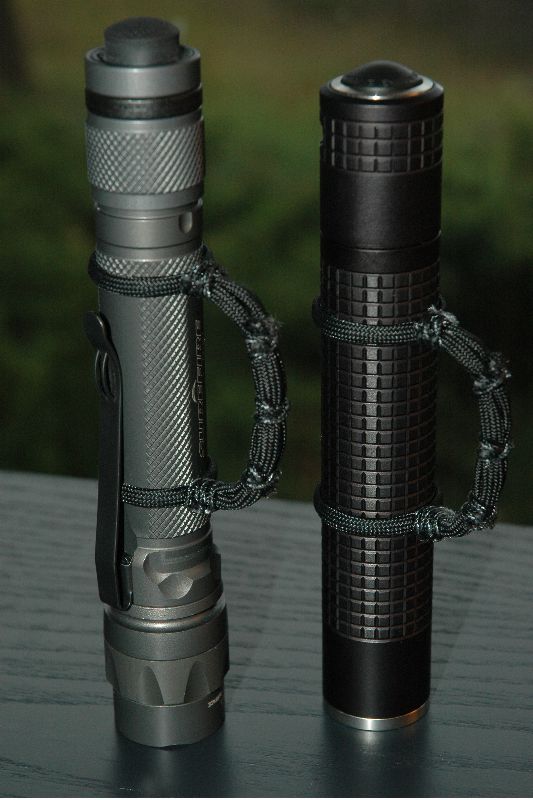
The T2 was my original inspiration for this project...")
While it might be a bit tricky for a knot newbie, some of the scouts, sailors and other knot savvy folks here might want to try replicating it.
Here are some explanatory pictures and notes.

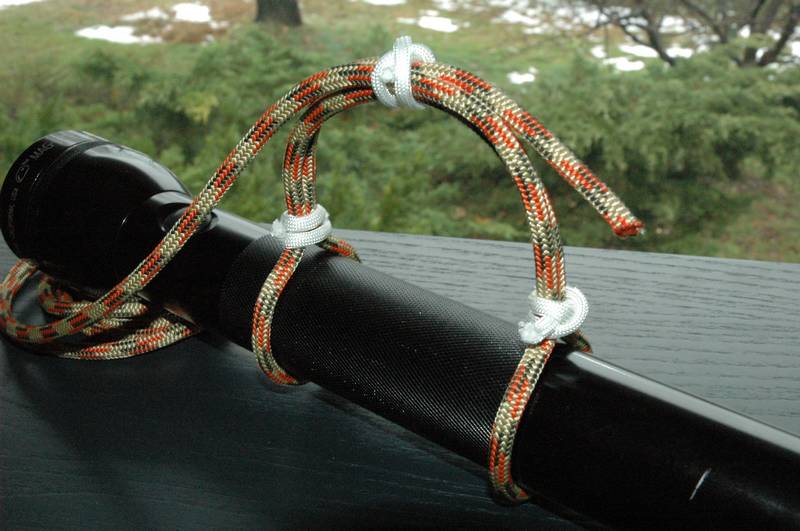
The above two pictures show the path of the lanyard around the flashlight and how the ends crossover at the top of the lanyard loop. Notice how the body loops go around the flashlight in opposite directions. This allows the ends to lay cleanly in the finished lanyard. I've used larger line here than would be practical and seized them with white paracord solely for illustrative purposes. See below for the actual order the constrictor knots should be tied.
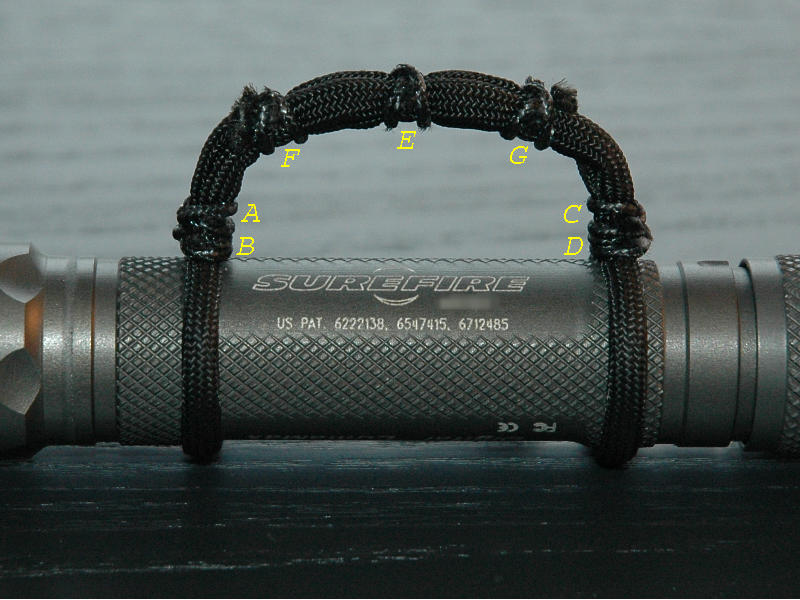
This picture shows the order the constrictor knots are tied.
The main problem this technique is trying to solve is how to get the loops around the flashlight very tight. You'll note that A and C are tied before B and D, respectively. That is, A is fully tightened with the paracord loop around the flashlight snug but not super tight, the idea is to leave only enough room so B can just barely be tied "underneath" A. If done correctly, this causes the loop around the flashlight to be tightened to an incredible extent when B is cinched. It takes some practice, but tied properly over good knurling it's nearly immovable.
Tightening C is your last chance to adjust the lanyard loop size, it'll probably take a few tries before you get a sense of how the lanyard changes size with the rest of the tying operations. The ends of the paracord are cut short on the "outside" of F and G. Resist the temptation to flame the ends of either the paracord or the constrictor knots. Just cut them as short as possible using good side-cutters or fingernail clippers.
It goes without saying that all these constrictor knots should be tied as tightly as possible. Short of breaking the line or cutting the sheath of the paracord, pull on them as hard as you can. A little hint about removing constrictor knots if you need to adjust things... You only have to cut the crossing loop on the top of the knot and it'll pop right off. Doing it this way will help prevent cutting whatever's underneath. But do note that repeatedly tying such a severe knot on the same spot on the lanyard could weaken it.
And finally here are some random thoughts on the advantages of the seized method vs. the wrap:
Advantages of "Seized Lanyard":
- More elegant
- Very good dimensional stability if properly tied
- Doesn't increase diameter of flashlight
- Minimal reduction in cooling efficiency
- Loop formed without lumpy sheet bend in the loop
- Can be aligned to witness marks to give better sense of flashlight orientation
- Can be tied on flashlights with clips (tie 90 degrees offset from clip)
Advantages of whipping-style wrap method:
- Easier to understand method of tying
- Could be removed and 2-3' of paracord used in emergency
- Easier to adjust
I've been looking for a compact lanyard which reduces the likelihood of fumbling a flashlight. I'm not a big fan of wrist lanyards as they always seem to get caught on stuff. I came across the Koppo Wrap, which I liked but it seemed like there must be a way to accomplish the same thing with less bulk. I started experimenting with various knot configurations that might produce something a little nicer. Most were either insecure, too bulky or both. I made some progress with seized jug hitches, but it was very difficult to tighten them sufficiently to get good purchase on the flashlight.
After several hours of experimentation I eventually arrived at a purely seized method, using constrictor knots which worked better than I imagined possible. Think of constrictor knots as pre-industrial cable-ties. There are several methods to tie them, but two common ones are as a hitch or threaded.
I settled on using 500# paracord for the lanyard and 1.5mm Sterling MINI cord for the constrictors. The lanyards pictured have been in use for about 4-6 weeks and are holding up well. I've really come to like how it feels in the hand and have added this to a few of my lights. For those of you unfamiliar with this style of lanyard, the middle and ring fingers go inside the loop and the index and pinky go outside.
Note that lanyard is aligned with witness mark in flashlight body.
I find that the loop up inside the clip actually "latches" on the lip of my jeans pocket and makes clip carry more secure.
The T2 was my original inspiration for this project...
While it might be a bit tricky for a knot newbie, some of the scouts, sailors and other knot savvy folks here might want to try replicating it.
Here are some explanatory pictures and notes.
The above two pictures show the path of the lanyard around the flashlight and how the ends crossover at the top of the lanyard loop. Notice how the body loops go around the flashlight in opposite directions. This allows the ends to lay cleanly in the finished lanyard. I've used larger line here than would be practical and seized them with white paracord solely for illustrative purposes. See below for the actual order the constrictor knots should be tied.
This picture shows the order the constrictor knots are tied.
The main problem this technique is trying to solve is how to get the loops around the flashlight very tight. You'll note that A and C are tied before B and D, respectively. That is, A is fully tightened with the paracord loop around the flashlight snug but not super tight, the idea is to leave only enough room so B can just barely be tied "underneath" A. If done correctly, this causes the loop around the flashlight to be tightened to an incredible extent when B is cinched. It takes some practice, but tied properly over good knurling it's nearly immovable.
Tightening C is your last chance to adjust the lanyard loop size, it'll probably take a few tries before you get a sense of how the lanyard changes size with the rest of the tying operations. The ends of the paracord are cut short on the "outside" of F and G. Resist the temptation to flame the ends of either the paracord or the constrictor knots. Just cut them as short as possible using good side-cutters or fingernail clippers.
It goes without saying that all these constrictor knots should be tied as tightly as possible. Short of breaking the line or cutting the sheath of the paracord, pull on them as hard as you can. A little hint about removing constrictor knots if you need to adjust things... You only have to cut the crossing loop on the top of the knot and it'll pop right off. Doing it this way will help prevent cutting whatever's underneath. But do note that repeatedly tying such a severe knot on the same spot on the lanyard could weaken it.
And finally here are some random thoughts on the advantages of the seized method vs. the wrap:
Advantages of "Seized Lanyard":
- More elegant
- Very good dimensional stability if properly tied
- Doesn't increase diameter of flashlight
- Minimal reduction in cooling efficiency
- Loop formed without lumpy sheet bend in the loop
- Can be aligned to witness marks to give better sense of flashlight orientation
- Can be tied on flashlights with clips (tie 90 degrees offset from clip)
Advantages of whipping-style wrap method:
- Easier to understand method of tying
- Could be removed and 2-3' of paracord used in emergency
- Easier to adjust
Last edited:

