wood vice or clamps....

Robocop

Moderator, *Mammoth Killer*
Joined
Nov 13, 2003
Messages
2,594
Location
Birmingham Al.
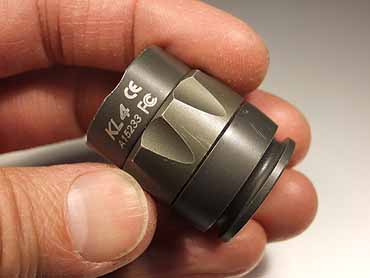
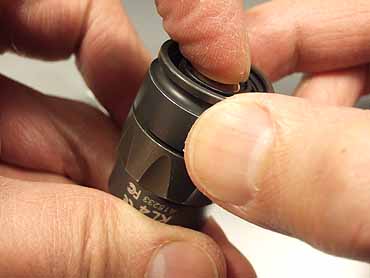
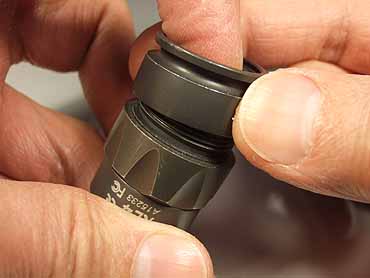
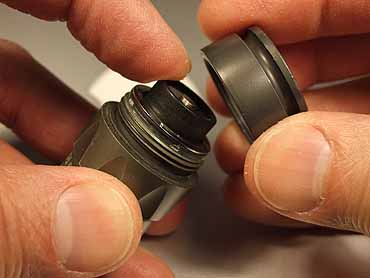
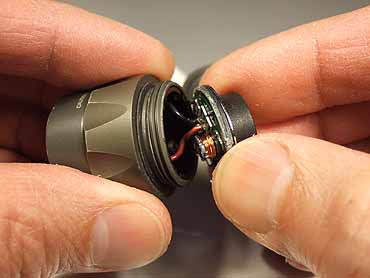
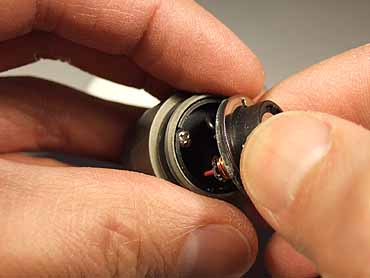
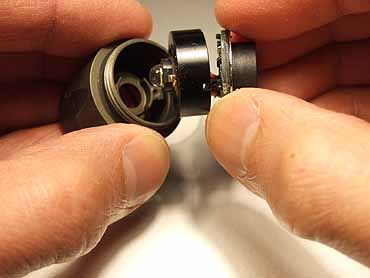
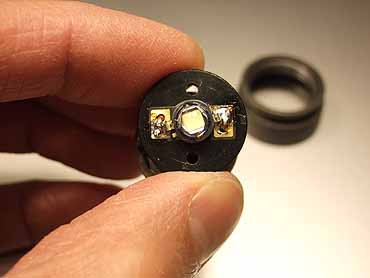
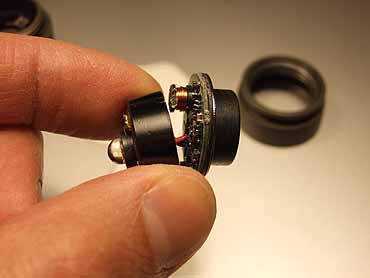
I have received a very low VF 5 watt emitter in trade and wish to swap out the old emitter in my TW4 as it should be a little brighter with better tint. Well to my suprise this bezel is driving me crazy trying to open it. I did get the upper most section off however this only allows access to the glass lens and not the internals.

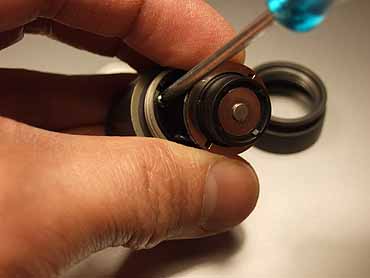
I have read of using wood clamps or a vice somehow and need some photos of some successful versions used by others. I have a few 2x4 sections and am trying to drill out a hole in each and use bolts screwed down to tighten. I am not even sure if this will work so any ideas of how others have done this would be appreciated....thanks.
 

Robocop

Moderator, *Mammoth Killer*
Joined
Nov 13, 2003
Messages
2,594
Location
Birmingham Al.
Sorry almost forgot however any photos of the internals would be nice also so I know what to expect if I do get it open. I would hate to find that I do open it and discover that an emitter swap is too risky for one with average skill with a soldering iron...hehe

I have been searching the google section through CPF all night and cant find any photos of a wood vice set up nor of the internals of a standard TW4
 

louie

Flashlight Enthusiast
Joined
Aug 31, 2002
Messages
1,106
Location
Seattle
Oke doke, KL4 takedown:
28463537347_44b3c3de75_o.jpg


Unscrew rear ring:
28463537237_b64949d473_o.jpg


Only the ring comes off. Plastic battery contact with circuit board stays behind:
28463537187_983b49dd2f_o.jpg

28463537177_ca3162cf79_o.jpg


Circuit board holder is attached to removable LED heatsink by the red & black wires:
41522962100_dbb2fefdfe_o.jpg


Pull gently on the circuit board to reveal the 2 philips-head screws holding the LED heatsink:
41522962050_60c7a36b01_o.jpg

28463537087_e6e21aea10_o.jpg


With screws removed, entire LED heatsink, wires and circuit board are removed:
28463537047_1322957826_o.jpg


Entire assembly and Lux5. I clamped the heatsink in my Panavise to effect the LED change. This KL4 came already opened and glue broken. Previously on KL1s, I've used a heat gun (carefully, on low) and the rubber strap wrenches/vise. Maybe a pipe vise with rubber strapping?
28463536967_1af941e210_o.jpg

28463536917_0dbb319bec_o.jpg


Good luck.
 
Last edited:

Robocop

Moderator, *Mammoth Killer*
Joined
Nov 13, 2003
Messages
2,594
Location
Birmingham Al.
Louie excellent photos and I very much apprteciate your time to post them.

I am working on a set up tonight to try and remove the lower bezel however as of yet can not get this thing to budge. I am now wondering if it is even worth the trouble as mine is an original TW4 handpicked for low vf. I like it as is however I have a very nice 5watt that I am not using with a little better tint.

Thanks again and I will keep you posted as to my results.
 

Beamhead

Flashlight Enthusiast
Joined
Jul 6, 2004
Messages
4,254
Location
gone "Squatchin" :p
I use the vise in my woodworking bench and heat, a tiny butane torch moving it around the bezel consistently for 60 seconds usually does the trick. Start out with the torch further away and at short intervals and slowly come closer and go longer if needed until it comes loose. Look at the pics that louie posted and aim the flame at the area wear the threads are inside.
HTH
 

Robocop

Moderator, *Mammoth Killer*
Joined
Nov 13, 2003
Messages
2,594
Location
Birmingham Al.
Well I am working on the shaping of the wood clamps now but it is slow going to say the least. I am trying to make 2 sections that clamp together with a half circle drilled out of each section. My plan is to make each circle a little smaller than the diameter and simply clamp them together with bolts and tighten until it no longer slips....we shall see but not tonight.

I want to ask why is it that SureFire seems to make their lights so crazy hard to open anyway?....Is it simply for better sealing from the elements or is it to keep people from studying or even simply messing with their internals?
 

mahoney

Enlightened
Joined
Jan 7, 2002
Messages
603
Drill a hole very close to the right size in a block of softwood, then cut it in half through the hole. Half-holes are hard to drill unless you have a forstner bit and a drill press. I use a bench vise or a handscrew to press the blocks back together around the light part, or both with 2 sets of blocks for really difficult jobs. After trying both ways, I think I prefer the "boil-in-bag" method over the heat gun to heat the glue joints, there's less risk of overheating the optic or lense. A teacup full of freshly boiled water and a good quality plastic bag, and enough time to make a cup of tea are all that's required and there's not much risk of damage unless the bag leaks. It's getting the light clamped up without getting burned and before it cools off that's the challenge.
 

Robocop

Moderator, *Mammoth Killer*
Joined
Nov 13, 2003
Messages
2,594
Location
Birmingham Al.
I actually used a vice to clamp the two wood sections together and drilled a hole between the seams so that it made a half circle on each section. My plan is to use a Dremel tool and fine tune the half circles to the shape of the bezel. I have drilled 4 holes through the sections and plan to bolt then down securely clamping the bezel inside.

I have used heat a few times and believe it or not always use my soldering iron. I place the tip on the outside near the threads to heat and just let it sit. When the body gets just too hot to hold with bare hands I remove the tip and try my luck. It seems to work most of the time and especially when I need to get to twisting before the section cools off. The small tip allows me to clamp first and heat while it is clamped so I can start twisting right after the heat is removed......I know I need a heat gun but again I have to make due with what is on hand.

If this clamp does not work I am going to try soaking it in mineral spirits or maybe fingernail polish remover. I searched old threads and saw where Chop who is an old school modder used this method with acetone and got good results. The only thing I can not figure out is when soaking how does the liquid even get inside to the threads. It seems like it would not penetrate down through the grooves but again he claimed it did work.
 

Robocop

Moderator, *Mammoth Killer*
Joined
Nov 13, 2003
Messages
2,594
Location
Birmingham Al.
I GOT IT.....and good lord I am not sure if I hate SF for sealing these so well or love them for sealing them so well. The wood vice worked well however it took me several steps to get it free. I thought that once I broke it free by moving it just a little it would simply unscrew....man was I wrong.

This head held on tight until the last thread was cleared and there was some serious cleaning to do of these threads afterwards. It was gunked up with some type of dried sealant however the deed is now done and I can swap the emitter later.

Now that I have this opened can anyone give some tips for the emitter swap? Is the factory emitter epoxied on? I wish to use the factory emitter on something else and do not want to destroy it on removal. I have torn the dome off others that were glued on. Also I have both standard heatsink paste and also the thermal epoxy. Should I simply use a little paste on the new emitter or glue it down with thermal epoxy? I know heat control is vital for the 5 watters so what if any difference is there between the simple paste and thermal epoxy?
 
Top