
MikeSalt
Flashlight Enthusiast
How did it all begin?
FlikLite
Rob's first famous design was the innovative FlikLite. This incorporated thick aluminium construction, four Nichia LEDs and a unique switching mechanism. To turn the light on, give it a flick, to turn it off, tap the bottom. This afforded extreme water-resistance, with a depth rating of 100 metres. This product has been discontinued.
What else has Rob produced?
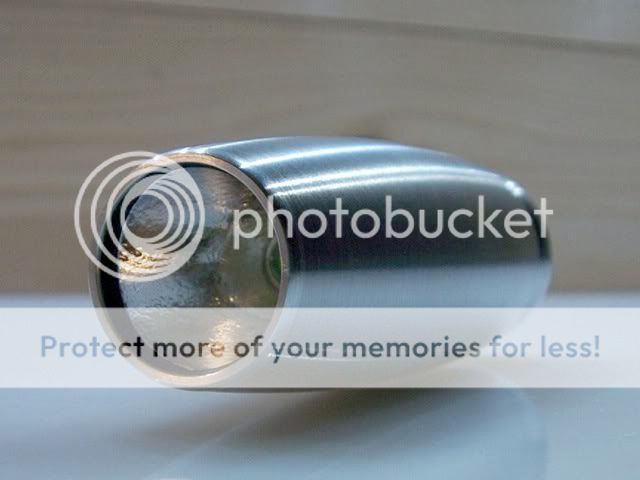
Orb
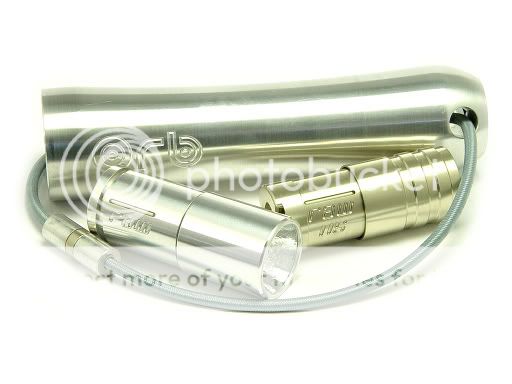
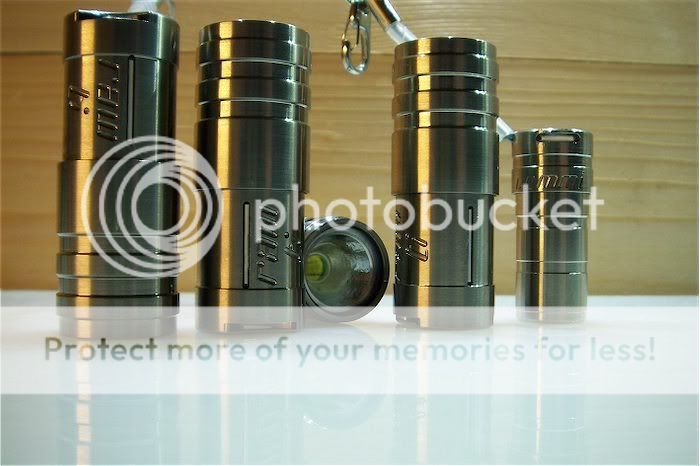
The larger torch in the photo is the original Orb. Its curvy, classic design is easily recognisable. This is currently unavailable, but a new, updated version will be produced in 2008.
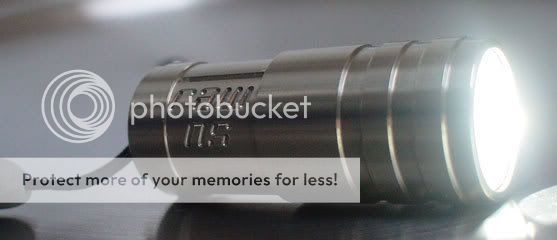
Orb Raw
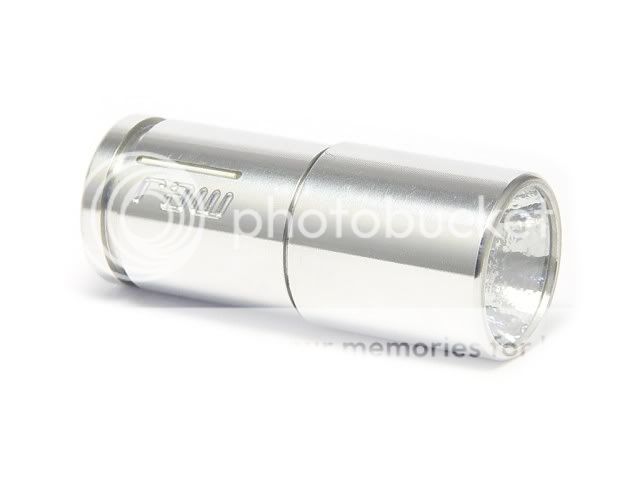
The Orb Raw is constructed from aerospace-grade aluminium. In its current available form, it has...
->Cree X-RE Q5 emitter with 160 lumen maximum output
->Direct (resistored) drive
->Two-stage reliable twist switch now fitted as standard (varying low-options available)
->Machined McGizmo textured aluminium reflector
->High-quality mineral-glass lens
->Raw NS style lanyard attachment
->Optional tritium locater
->Option of running on either CR2 primaries (40 lumens max) or RCR2 Li-ion rechargeable (160 lumens max). Runtime is 25 minutes on the 350mAh protected Li-ion cell
->Splash-resistant due to tight fit of components
->53mm length, 20mm diameter, 30 grams with Li-ion cell
Raw NS
The Raw NS is constructed from a material known as Nickel-Silver. This is a very beautiful material with excellent strength, good wear resistance and a hue of gold undertone. The smoothness of this material makes for silky-smooth threads between the head and the body. This flashlight is very small and therefore an excellent addition to your keyring. The output however is not so small, it is significantly higher than that of even the larger D-cell conventional flashlights. The Raw NS is currently available with the following specification...
->Cree X-RE Q5 emitter with 160 lumen maximum output
->Direct (resistored) drive
->Two-stage reliable twist switch with 15 lumen low mode
->Machined McGizmo textured aluminium reflector
->High-quality mineral-glass lens
->Rear mounted lanyard attachment with tail-standing capability
->Option of 0, 1, 3, 4 and 5 tritium locaters around the battery tube
->Runs on a 250mAh 14250 Li-ion cell providing 25 minutes on 'high' or 10 hours on 'low'
->Dunk-resistant due to the inclusion of O-rings between the head and body tube, and also between the mineral glass and body
->Modular design – PCB, reflector and mineral glass lens can be replaced by the user with care
->45mm length x 18 mm diameter, 40 grams with Li-ion cell
Raw Ti
In addition to the Raw NS, the Raw Ti is available with the following features...
->Titanium construction – virtually indestructible
->9 gram weight saving over the NS (weighs only 31 grams with cell)
->Superior resistance to various chemicals and salt-water
->Finer thread pitch for smooth operation of the twist switch
->Hypoallergenic
Raw Al
Please note, this is a limited run of 100 units. In addition to the Raw NS, the Raw Al is available with the following features...
->Aluminium construction - durable yet light
->16 gram weight saving over the NS (weighs only 24 grams with cell)
->Corrosion resistant
->Excellent heat-sinking capability
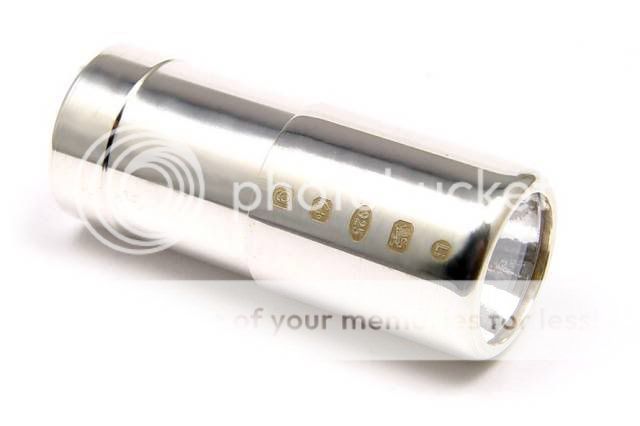
Raw Ag
This is an exquisite, specialty item made from British hallmarked Sterling Silver. Functionally identical to the Raw NS, the Raw Ag has a more classic style to give it a timeless appearance. An excellent gift for yourself or someone special.
Wee NS / Ti
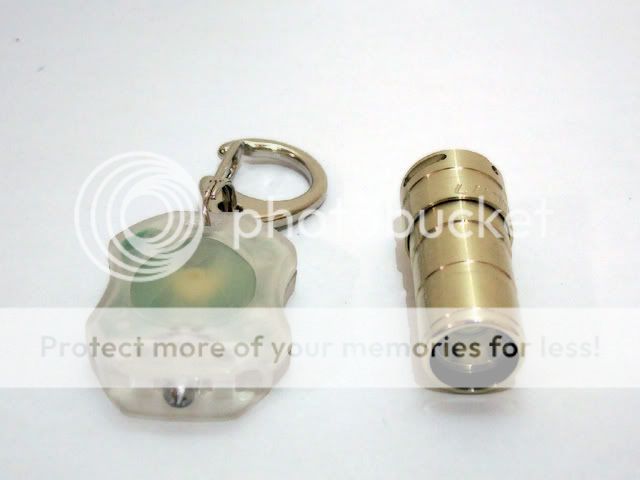
The Wee is a very special light indeed. Available in Nickel-Silver (NS) or Titanium (Ti), it is the smallest flashlight to contain a Cree X-RE emitter. This flashlight is approximately the same size as the head of a Fenix L0D! Just look at the size compared to an ordinary 5mm LED squeeze-light. The beam is brilliantly floody, fantastic for close-up work or reading.
As with all Lummi flashlights, the machining and finish is exemplary. Just go to CPF Reviews and look at the extreme close-up photos. Not a misplaced tooling mark to be found. So small, it goes virtually unnoticed on your keys, but so beautiful that you would probably wear it. The Wee NS is available with the following qualities...
->Cree X-RE Q4/Q5 emitter (option of 80/50/25 lumen output)
->Direct (resistored) drive
->Single stage, ultra-reliable twist switch
->Reflector is an integral part of the body
->High quality mineral-glass lens – recessed for protection
->Rear mounted lanyard attachment with tail-standing ability
->Option to include two ice blue tritium locaters in the tail
->Runs on an 90mAh 10180 Li-ion cell that providing 15/30/90 minutes runtime at 80/50/25 lumen output respectively
->Double O-rings at the window, and an O-ring behind the threads leads to excellent dunk-resistance
->Removable 'pill' – the emitter board can be removed with care and replaced with a pill of different output.
->34mm length x 15mm diameter, 20 grams with cell
In addition to this the Wee Ti possesses the following features...
->Titanium construction – virtually indestructible
->8 gram weight saving over the NS (weighs only 12 grams with cell)
->Superior resistance to various chemicals and salt-water
->Finer thread pitch for smooth operation of the twist switch
->Hypoallergenic
What is new on the horizon?
Orb 2008
The Orb 2008 will be much like the original Orb. It will however, have the following updated features...
->20mm McGizmo textured aluminium reflector
->Rechargeable, with a 1500 mAh protected 18500 3.7v Li-ion cell
->Possibly up to 10 tritium locaters around the circumference of the body.
->Cree X-RE or Seoul LED
>Orb (Smaller Orb - *working title*)
This will possibly become the replacement to the aluminium Orb Raw. It is constructed from aluminium and features an elegant tapering design. The earliest this will be available will be April 2008. It has the following features...
->Cree X-RE Q5 emitter (160 lumen maximum output)
->Two stage twisty (15 lumen on low)
->Protected RCR2 Li-ion rechargeable cell
->Optional tritium locaters
->O-rings included to make this 'dunk resistant'
->57mm length x 22mm diameter (19mm at narrow point of taper)
How do I remove the cell?
Due to the modular design of Lummi flashlights, care must be taken to ensure that it is only the cell that you remove, not all the other components. To do this, hold the flashlight horizontally, and then tilt the head downwards slightly. Unscrew the tail-cap/body-tube with an anti-clockwise motion. Once that is removed, gently slide out the cell, and then place the head face down on a flat, clean surface.
I have a rechargeable Li-ion cell. How do I recharge it?
Provided with your flashlight should be two or three rare-earth magnets. These are particularly strong, and electrically conductive. You need to place these on either the top or bottom of your cell (doesn't matter which) to make it the same length as a RCR123A cell. Now it will fit into any 123-sized Li-ion charger.
It is recommended to use the nano-charger available through Lummi. The nano-charger is a peak-detecting charger that works on 115 volt or 230 volt mains systems. In the UK, you must buy a shaving-plug adapter to use the nano with a 3-pin UK socket. Plug the charger into an electrical socket, and the green light should appear. On your Li-ion cell (with magnets now attached) there is an indented ring around the circumference of the positive end. This MUST face the green LED on the charger. Once you have this aligned, insert gently into the charger. If the cell is oriented the wrong way, the LED will go out, this is a protection mode, but may cause damage to your cell if left this way. Re-orient the cell and replace into the charger.
Charging is indicated by a red LED. If the LED is still green, check that the battery contacts and magnets are clean, thus ensuring good current flow. If they are clean, then this indicates that the cell is already charged.
When your cell has finished charging, the red light will go to green, and the charger stops pumping current into the cell. Remove the cell at this point.
How do I replace the cell?
Pick up the head of your flashlight and hold it almost horizontal, but with the output end facing downwards slightly. For the Wee, you slide the cell into the main body and put the tail-cap on, for everything else, you insert the cell into the body tube and then insert the body tube into the light. Ensure the positive end of the cell faces towards the head of the light. Screw with a clockwise motion, being careful not to cross-thread. If you feel unusually high resistance, unscrew and try again to avoid thread damage.
These are high end flashlights, I should not have to maintain them, right?
WRONG!
Even the most expensive cars need an oil change from time-to-time. That is exactly what you should think of your flashlight.
Lubrication
Flashlights need lubrication but it is absolutely essential to lubricate titanium flashlights! Lummi flashlights come pre-lubricated with either machine-grade graphite or NyoGel 779ZC synthetic lubricant. This should be good for 1000 on-off cycles before lubrication is required. However, when the time comes, you are encouraged to lubricate threads and O-rings with Nyogel 779ZC, available in 10g, 25g or 50g squeeze-tubes. NyoGel goes a long way, so you do not need a lot. It has excellent lubrication properties, even when the body of the flashlight gets hot.
Do not use petroleum-based lubricants such as Vaseline. The petroleum distillates cause deterioration of the material in the O-rings. Also, when the flashlight is used in 'high' mode, it gets hot. Vaseline will melt and leak from the flashlight.
Cleaning
Use a soft, damp, lint-free cloth on the outside of the flashlight to clean. To clean out any dirt caught in the engraving, use an old toothbrush and warm water. To clean threads prior to lubricating, remove electronics first to prevent damage to them, and allow the flashlight to dry before reinserting them.
Electrical Contact Maintenance
If your flashlight starts to exhibit intermittent behavior, it is probable that the electrical contacts are dirty. Use a pencil-mounted eraser to clean the contact points on the battery, spring and PCB to ensure good conductivity.
How do I take my flashlight apart and put it back together again?
Please note, this is not recommended, but you may wish to follow these instructions if you accidentally drop out the components when changing the cell. Also, the PCB/pill can be replaced with one containing an emitter of different output if you wish. These are available from Rob at Lummi.
Raw and Raw NS/Ti/Ag
Follow the instructions to remove the battery. Then, hold the head just above a non-static, flat surface. Tip the head until the lens faces upwards and the PCB, reflector and glass window should fall out. If they do not, lightly tap the head against the surface, whilst putting light pressure on the glass window. Do not force it, as damage to internal components will result.
To reassemble, place the PCB on a flat surface with the emitter pointed upwards. Onto this, place the reflector, ensuring the flange of the reflector mates properly with the emitter ring. Balance the glass on top of the reflector, and then lower the head over the whole assembly. Older designs use a split-ring spacer in addition to other components. See here for alternative assembly instructions. When the head is flush with the flat surface, slide everything to the edge of the surface and support the PCB with your finger. Push the PCB, reflector and lens up into the head whilst keeping it vertical. It is essential that this is done correctly, otherwise damage to internal components will result. Invert the head, place it onto a flat surface then follow the instructions for inserting a new cell.
Wee NS/Ti
Follow the instructions to remove the cell. Invert the head of the flashlight just above a flat, clean surface and the pill should drop out. If not, tap the head lightly against the flat surface until the pill drops out.
To reassemble, this takes a little knack. The best way I have found to put the cell on the flat surface with the positive end facing upwards. Balance the pill on top of the cell and then lower the flashlight body over the assembly. Look through the reflector to ensure that the emitter is seated properly. Slide it all to the edge of the surface, support the cell with a finger, and invert the whole assembly. Replace the tail-cap and the job is done.
Can Lummi flashlights be upgraded?
YES, by following the instructions for disassembly/assembly, you can put a different PCB/pill into your flashlight with an updated emitter. These are available direct from Rob. If you own an Orb Raw, or Raw NS/Ti/Ag you can even buy the bare PCB, and mount an emitter of your choice.
How to attach Wee Lanyard
Wee Lanyard Video
Where do I buy Lummi flashlights?
The best place is the Lummi website for fast, easy ordering. If your particular requirements are not available through the website, find the appropriate ordering thread here. Any further questions, please use the email address: [email protected]
FlikLite
Rob's first famous design was the innovative FlikLite. This incorporated thick aluminium construction, four Nichia LEDs and a unique switching mechanism. To turn the light on, give it a flick, to turn it off, tap the bottom. This afforded extreme water-resistance, with a depth rating of 100 metres. This product has been discontinued.
What else has Rob produced?
Orb
The larger torch in the photo is the original Orb. Its curvy, classic design is easily recognisable. This is currently unavailable, but a new, updated version will be produced in 2008.
Orb Raw
The Orb Raw is constructed from aerospace-grade aluminium. In its current available form, it has...
->Cree X-RE Q5 emitter with 160 lumen maximum output
->Direct (resistored) drive
->Two-stage reliable twist switch now fitted as standard (varying low-options available)
->Machined McGizmo textured aluminium reflector
->High-quality mineral-glass lens
->Raw NS style lanyard attachment
->Optional tritium locater
->Option of running on either CR2 primaries (40 lumens max) or RCR2 Li-ion rechargeable (160 lumens max). Runtime is 25 minutes on the 350mAh protected Li-ion cell
->Splash-resistant due to tight fit of components
->53mm length, 20mm diameter, 30 grams with Li-ion cell
Raw NS
The Raw NS is constructed from a material known as Nickel-Silver. This is a very beautiful material with excellent strength, good wear resistance and a hue of gold undertone. The smoothness of this material makes for silky-smooth threads between the head and the body. This flashlight is very small and therefore an excellent addition to your keyring. The output however is not so small, it is significantly higher than that of even the larger D-cell conventional flashlights. The Raw NS is currently available with the following specification...
->Cree X-RE Q5 emitter with 160 lumen maximum output
->Direct (resistored) drive
->Two-stage reliable twist switch with 15 lumen low mode
->Machined McGizmo textured aluminium reflector
->High-quality mineral-glass lens
->Rear mounted lanyard attachment with tail-standing capability
->Option of 0, 1, 3, 4 and 5 tritium locaters around the battery tube
->Runs on a 250mAh 14250 Li-ion cell providing 25 minutes on 'high' or 10 hours on 'low'
->Dunk-resistant due to the inclusion of O-rings between the head and body tube, and also between the mineral glass and body
->Modular design – PCB, reflector and mineral glass lens can be replaced by the user with care
->45mm length x 18 mm diameter, 40 grams with Li-ion cell
Raw Ti
In addition to the Raw NS, the Raw Ti is available with the following features...
->Titanium construction – virtually indestructible
->9 gram weight saving over the NS (weighs only 31 grams with cell)
->Superior resistance to various chemicals and salt-water
->Finer thread pitch for smooth operation of the twist switch
->Hypoallergenic
Raw Al
Please note, this is a limited run of 100 units. In addition to the Raw NS, the Raw Al is available with the following features...
->Aluminium construction - durable yet light
->16 gram weight saving over the NS (weighs only 24 grams with cell)
->Corrosion resistant
->Excellent heat-sinking capability
Raw Ag
This is an exquisite, specialty item made from British hallmarked Sterling Silver. Functionally identical to the Raw NS, the Raw Ag has a more classic style to give it a timeless appearance. An excellent gift for yourself or someone special.
Wee NS / Ti
The Wee is a very special light indeed. Available in Nickel-Silver (NS) or Titanium (Ti), it is the smallest flashlight to contain a Cree X-RE emitter. This flashlight is approximately the same size as the head of a Fenix L0D! Just look at the size compared to an ordinary 5mm LED squeeze-light. The beam is brilliantly floody, fantastic for close-up work or reading.
As with all Lummi flashlights, the machining and finish is exemplary. Just go to CPF Reviews and look at the extreme close-up photos. Not a misplaced tooling mark to be found. So small, it goes virtually unnoticed on your keys, but so beautiful that you would probably wear it. The Wee NS is available with the following qualities...
->Cree X-RE Q4/Q5 emitter (option of 80/50/25 lumen output)
->Direct (resistored) drive
->Single stage, ultra-reliable twist switch
->Reflector is an integral part of the body
->High quality mineral-glass lens – recessed for protection
->Rear mounted lanyard attachment with tail-standing ability
->Option to include two ice blue tritium locaters in the tail
->Runs on an 90mAh 10180 Li-ion cell that providing 15/30/90 minutes runtime at 80/50/25 lumen output respectively
->Double O-rings at the window, and an O-ring behind the threads leads to excellent dunk-resistance
->Removable 'pill' – the emitter board can be removed with care and replaced with a pill of different output.
->34mm length x 15mm diameter, 20 grams with cell
In addition to this the Wee Ti possesses the following features...
->Titanium construction – virtually indestructible
->8 gram weight saving over the NS (weighs only 12 grams with cell)
->Superior resistance to various chemicals and salt-water
->Finer thread pitch for smooth operation of the twist switch
->Hypoallergenic
What is new on the horizon?
Orb 2008
The Orb 2008 will be much like the original Orb. It will however, have the following updated features...
->20mm McGizmo textured aluminium reflector
->Rechargeable, with a 1500 mAh protected 18500 3.7v Li-ion cell
->Possibly up to 10 tritium locaters around the circumference of the body.
->Cree X-RE or Seoul LED
>Orb (Smaller Orb - *working title*)
This will possibly become the replacement to the aluminium Orb Raw. It is constructed from aluminium and features an elegant tapering design. The earliest this will be available will be April 2008. It has the following features...
->Cree X-RE Q5 emitter (160 lumen maximum output)
->Two stage twisty (15 lumen on low)
->Protected RCR2 Li-ion rechargeable cell
->Optional tritium locaters
->O-rings included to make this 'dunk resistant'
->57mm length x 22mm diameter (19mm at narrow point of taper)
How do I remove the cell?
Due to the modular design of Lummi flashlights, care must be taken to ensure that it is only the cell that you remove, not all the other components. To do this, hold the flashlight horizontally, and then tilt the head downwards slightly. Unscrew the tail-cap/body-tube with an anti-clockwise motion. Once that is removed, gently slide out the cell, and then place the head face down on a flat, clean surface.
I have a rechargeable Li-ion cell. How do I recharge it?
Provided with your flashlight should be two or three rare-earth magnets. These are particularly strong, and electrically conductive. You need to place these on either the top or bottom of your cell (doesn't matter which) to make it the same length as a RCR123A cell. Now it will fit into any 123-sized Li-ion charger.
It is recommended to use the nano-charger available through Lummi. The nano-charger is a peak-detecting charger that works on 115 volt or 230 volt mains systems. In the UK, you must buy a shaving-plug adapter to use the nano with a 3-pin UK socket. Plug the charger into an electrical socket, and the green light should appear. On your Li-ion cell (with magnets now attached) there is an indented ring around the circumference of the positive end. This MUST face the green LED on the charger. Once you have this aligned, insert gently into the charger. If the cell is oriented the wrong way, the LED will go out, this is a protection mode, but may cause damage to your cell if left this way. Re-orient the cell and replace into the charger.
Charging is indicated by a red LED. If the LED is still green, check that the battery contacts and magnets are clean, thus ensuring good current flow. If they are clean, then this indicates that the cell is already charged.
When your cell has finished charging, the red light will go to green, and the charger stops pumping current into the cell. Remove the cell at this point.
How do I replace the cell?
Pick up the head of your flashlight and hold it almost horizontal, but with the output end facing downwards slightly. For the Wee, you slide the cell into the main body and put the tail-cap on, for everything else, you insert the cell into the body tube and then insert the body tube into the light. Ensure the positive end of the cell faces towards the head of the light. Screw with a clockwise motion, being careful not to cross-thread. If you feel unusually high resistance, unscrew and try again to avoid thread damage.
These are high end flashlights, I should not have to maintain them, right?
WRONG!
Even the most expensive cars need an oil change from time-to-time. That is exactly what you should think of your flashlight.
Lubrication
Flashlights need lubrication but it is absolutely essential to lubricate titanium flashlights! Lummi flashlights come pre-lubricated with either machine-grade graphite or NyoGel 779ZC synthetic lubricant. This should be good for 1000 on-off cycles before lubrication is required. However, when the time comes, you are encouraged to lubricate threads and O-rings with Nyogel 779ZC, available in 10g, 25g or 50g squeeze-tubes. NyoGel goes a long way, so you do not need a lot. It has excellent lubrication properties, even when the body of the flashlight gets hot.
Do not use petroleum-based lubricants such as Vaseline. The petroleum distillates cause deterioration of the material in the O-rings. Also, when the flashlight is used in 'high' mode, it gets hot. Vaseline will melt and leak from the flashlight.
Cleaning
Use a soft, damp, lint-free cloth on the outside of the flashlight to clean. To clean out any dirt caught in the engraving, use an old toothbrush and warm water. To clean threads prior to lubricating, remove electronics first to prevent damage to them, and allow the flashlight to dry before reinserting them.
Electrical Contact Maintenance
If your flashlight starts to exhibit intermittent behavior, it is probable that the electrical contacts are dirty. Use a pencil-mounted eraser to clean the contact points on the battery, spring and PCB to ensure good conductivity.
How do I take my flashlight apart and put it back together again?
Please note, this is not recommended, but you may wish to follow these instructions if you accidentally drop out the components when changing the cell. Also, the PCB/pill can be replaced with one containing an emitter of different output if you wish. These are available from Rob at Lummi.
Raw and Raw NS/Ti/Ag
Follow the instructions to remove the battery. Then, hold the head just above a non-static, flat surface. Tip the head until the lens faces upwards and the PCB, reflector and glass window should fall out. If they do not, lightly tap the head against the surface, whilst putting light pressure on the glass window. Do not force it, as damage to internal components will result.
To reassemble, place the PCB on a flat surface with the emitter pointed upwards. Onto this, place the reflector, ensuring the flange of the reflector mates properly with the emitter ring. Balance the glass on top of the reflector, and then lower the head over the whole assembly. Older designs use a split-ring spacer in addition to other components. See here for alternative assembly instructions. When the head is flush with the flat surface, slide everything to the edge of the surface and support the PCB with your finger. Push the PCB, reflector and lens up into the head whilst keeping it vertical. It is essential that this is done correctly, otherwise damage to internal components will result. Invert the head, place it onto a flat surface then follow the instructions for inserting a new cell.
Wee NS/Ti
Follow the instructions to remove the cell. Invert the head of the flashlight just above a flat, clean surface and the pill should drop out. If not, tap the head lightly against the flat surface until the pill drops out.
To reassemble, this takes a little knack. The best way I have found to put the cell on the flat surface with the positive end facing upwards. Balance the pill on top of the cell and then lower the flashlight body over the assembly. Look through the reflector to ensure that the emitter is seated properly. Slide it all to the edge of the surface, support the cell with a finger, and invert the whole assembly. Replace the tail-cap and the job is done.
Can Lummi flashlights be upgraded?
YES, by following the instructions for disassembly/assembly, you can put a different PCB/pill into your flashlight with an updated emitter. These are available direct from Rob. If you own an Orb Raw, or Raw NS/Ti/Ag you can even buy the bare PCB, and mount an emitter of your choice.
How to attach Wee Lanyard
Wee Lanyard Video
Where do I buy Lummi flashlights?
The best place is the Lummi website for fast, easy ordering. If your particular requirements are not available through the website, find the appropriate ordering thread here. Any further questions, please use the email address: [email protected]
Last edited: