36 inch Gorilla

LightSward

Flashlight Enthusiast
Joined
Feb 1, 2009
Messages
1,164
Location
Portland, Oregon
:whistle: 
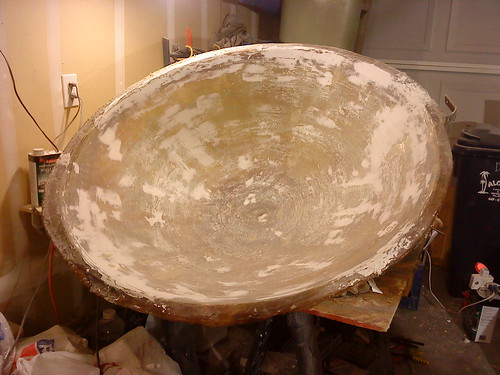
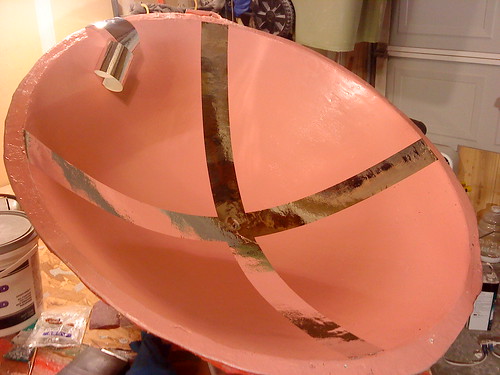
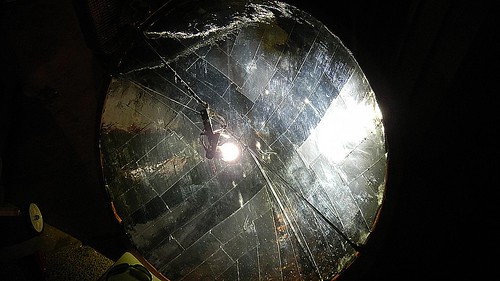
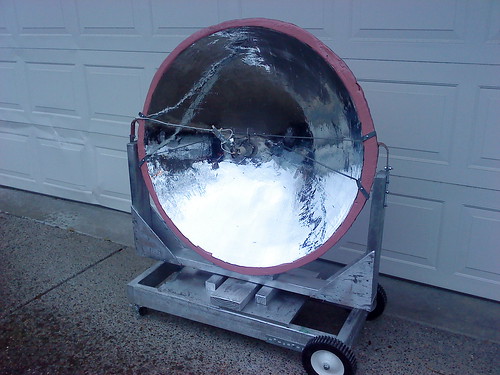
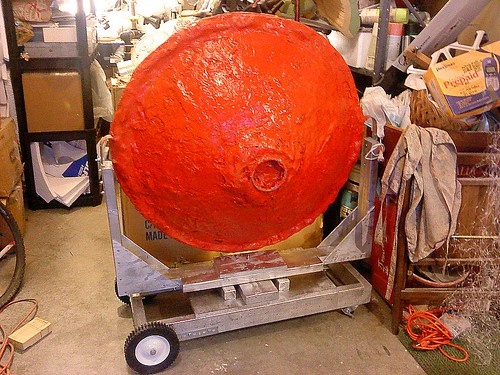
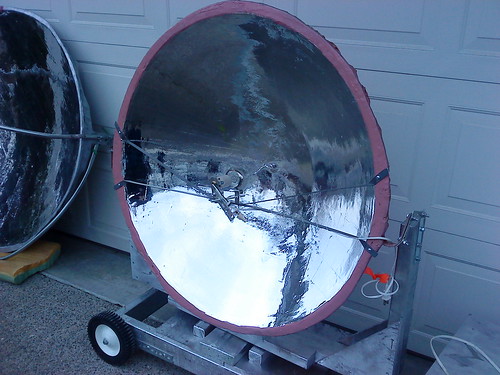
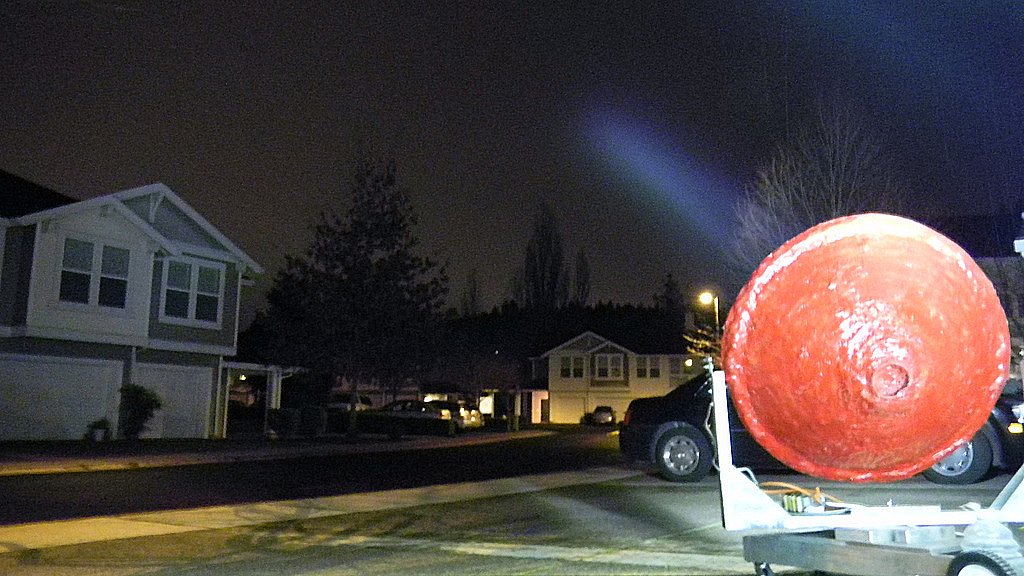
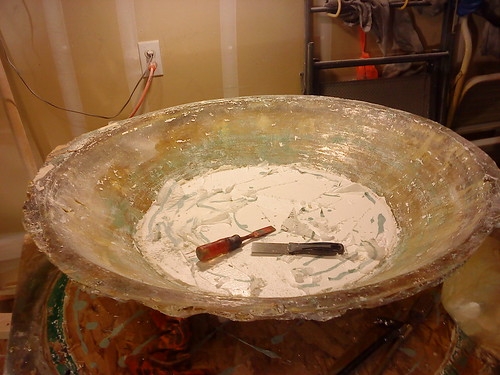
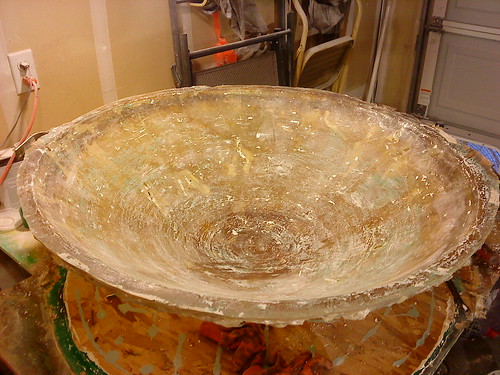
The 36 inch Gorilla is freed from the molding process. Here are some photos of the removal and initial prep work. The outside of the Gorilla reflector is not very pretty, I know what I will do on future reflectors to have a much nicer edge and reduced weight. I went over kill to prevent reflector 'wobble'. The gorilla reflector weighs about 20 pounds plus or minus. I'll get a final weight next few days.


Mold is removed from the 36 inch Gorilla
spaceout.gif
spaceout.gif
spaceout.gif
spaceout.gif
spaceout.gif
spaceout.gif
spaceout.gif
spaceout.gif

4268582800_6626c0ec0b.jpg

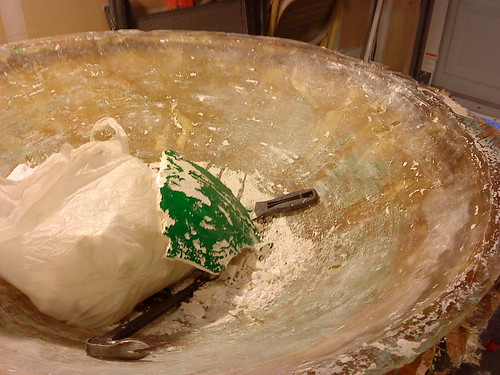
I removed the mold using destructive method. The use of hand rubbed candle wax and beeswax made all the difference in the easy removal of the mold. Once I settle on a good design, I will use a single concrete mold for production.


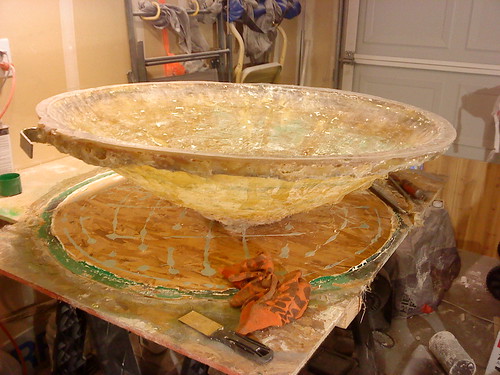
The top of the mold seen in early photo
spaceout.gif
spaceout.gif
spaceout.gif
spaceout.gif
spaceout.gif
spaceout.gif
spaceout.gif
spaceout.gif

4268583058_8e7b63ed2b.jpg

Here you can see the top of the mold, that is visible in previous photo.


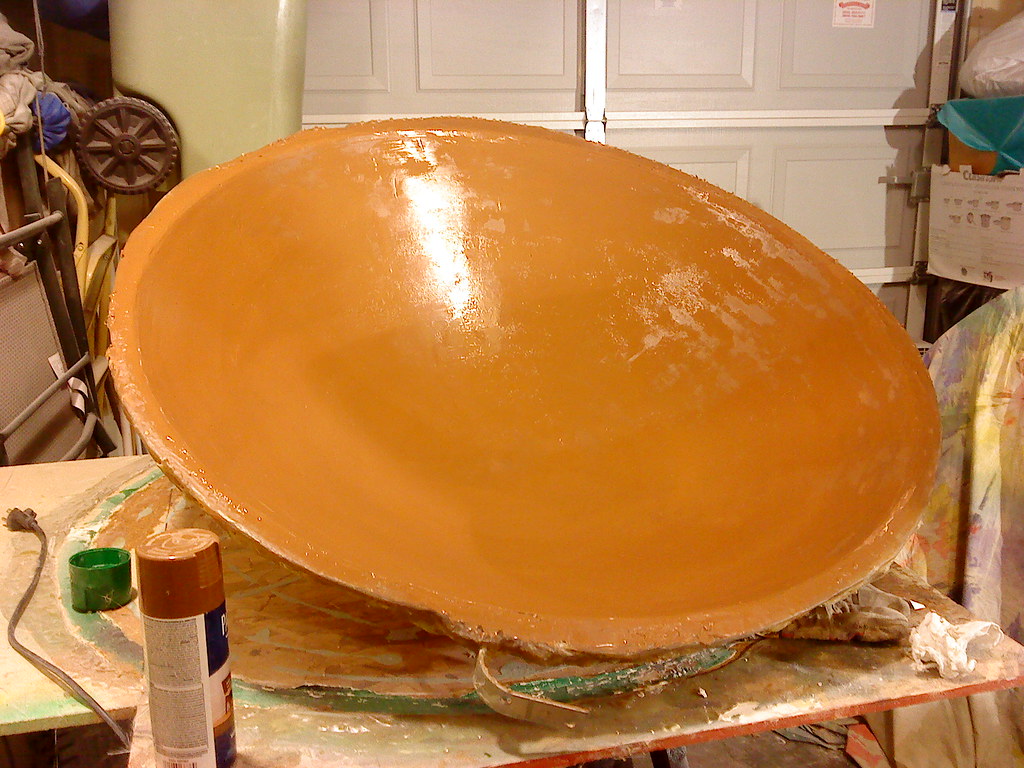
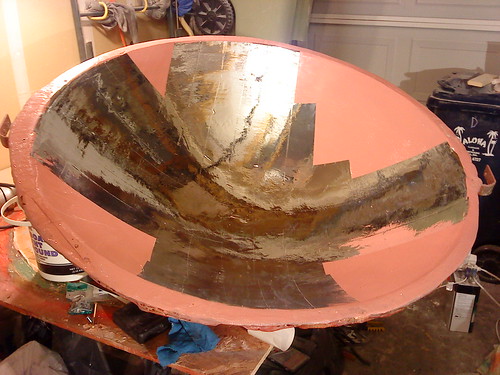
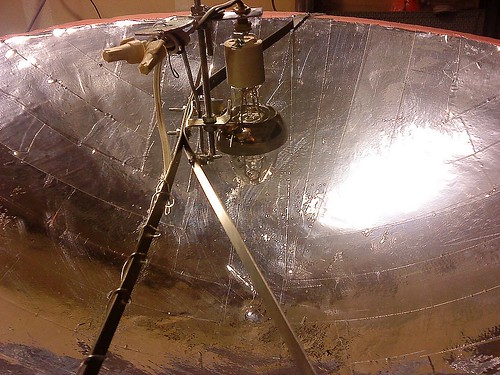
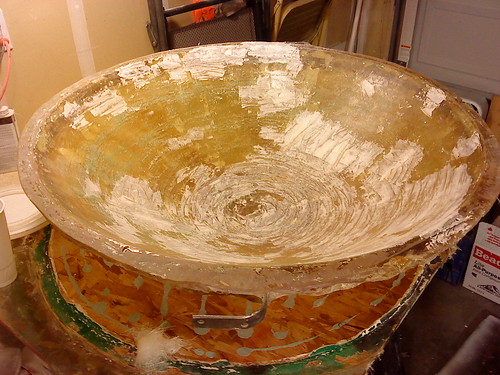
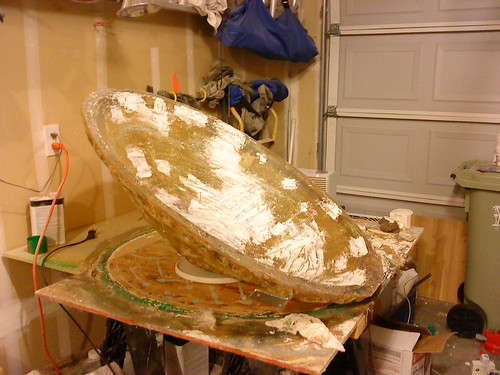
The 36 inch Gorilla is ready for edge shaping
spaceout.gif
spaceout.gif
spaceout.gif
spaceout.gif
spaceout.gif
spaceout.gif
spaceout.gif
spaceout.gif

4268583328_aee4920813.jpg

Here the Gorilla is ready for edge trimming, sanding and wax cleaning. The reflector surface came out smooth, the outside of the reflector shell is rough and lumpy...a result of some 'strengthening' experiments I tried. I want to keep the reflector rigid and not 'wobble', but lower weight to easily handle reflector.


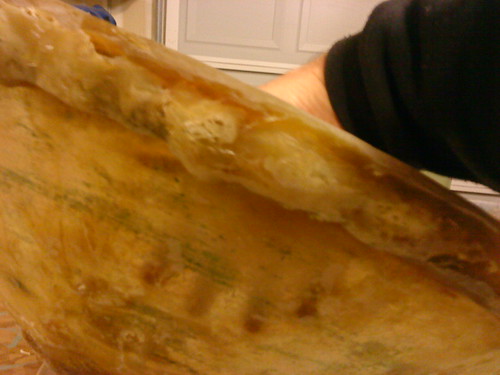
Fiberglass shell is translucent prior to coatings
spaceout.gif
spaceout.gif
spaceout.gif
spaceout.gif
spaceout.gif
spaceout.gif
spaceout.gif
spaceout.gif

4268583584_15b48091e7.jpg

This has been a great learning experience.


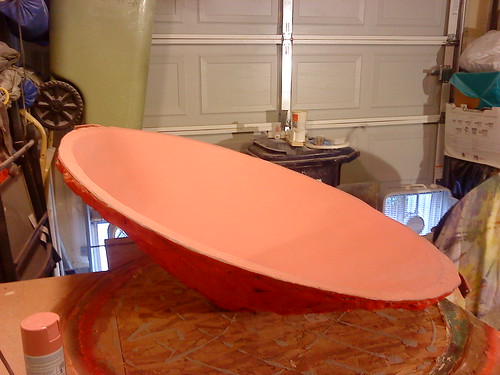
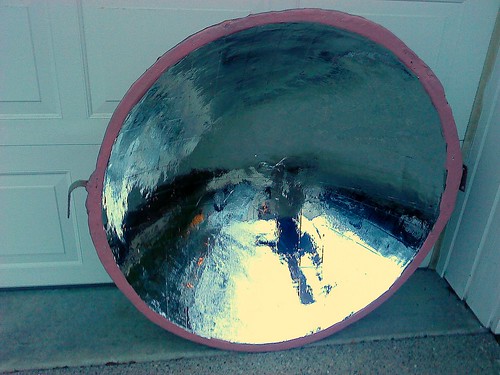
Finished spot filling, ready for sanding and final surface prep
spaceout.gif
spaceout.gif
spaceout.gif
spaceout.gif
spaceout.gif
spaceout.gif
spaceout.gif
spaceout.gif

4267839699_277641f92a.jpg

With all the reflector side spot filling complete, the reflector is left to "cure" overnight before final inspection and sanding


Checking smoothness of the Reflector surface to be...outside is left somewhat rough. My next reflector will be much prettier!
spaceout.gif
spaceout.gif
spaceout.gif
spaceout.gif
spaceout.gif
spaceout.gif
spaceout.gif
spaceout.gif

4267840059_0373949f68.jpg

The Gorilla reflector surface came off the mold quite smooth. I washed the wax off and the whole reflector with soap and water. After, I started spot filling small voids left during the glassing.
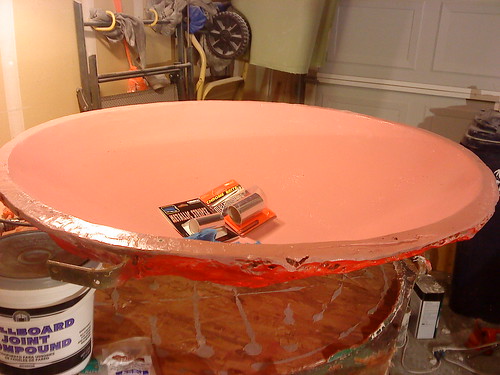
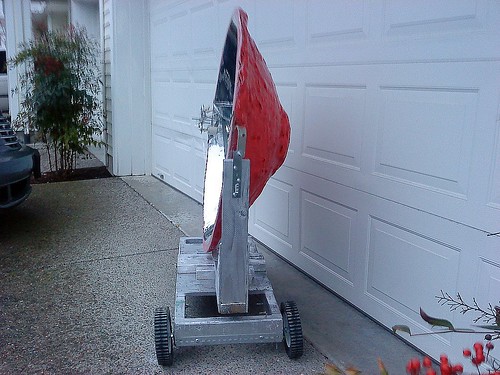


A side view
spaceout.gif
spaceout.gif
spaceout.gif
spaceout.gif
spaceout.gif
spaceout.gif
spaceout.gif
spaceout.gif

4267839917_f68179a50e.jpg

Here the reflector is rotated on a Lazy Suzie for spot filling and inspection.


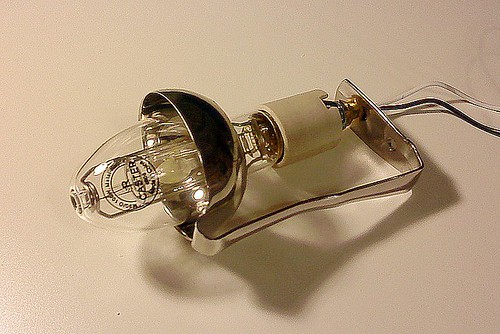
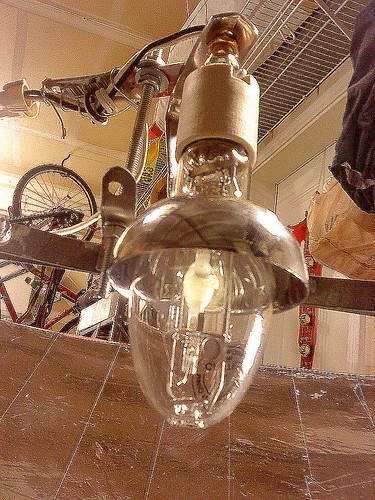
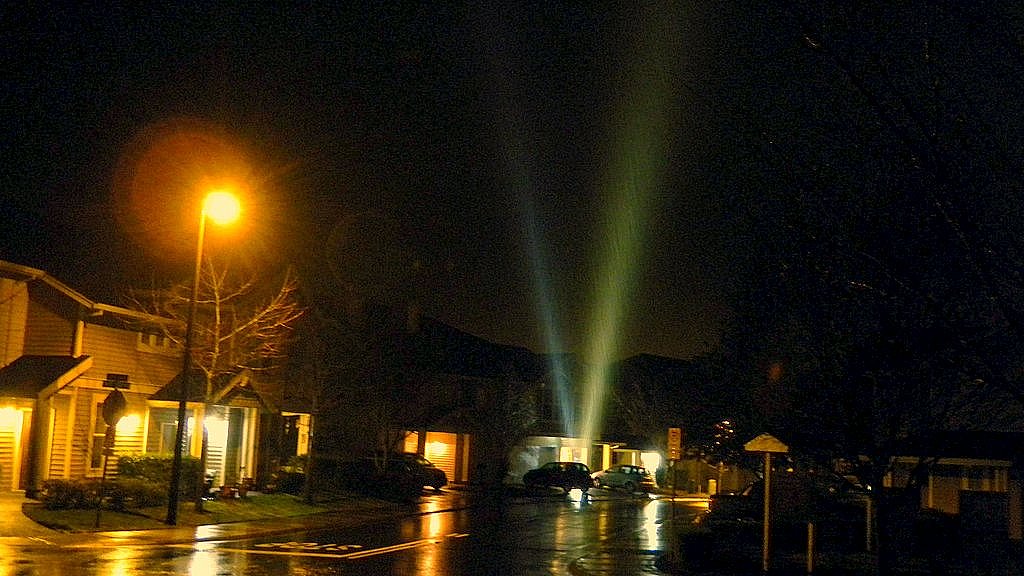
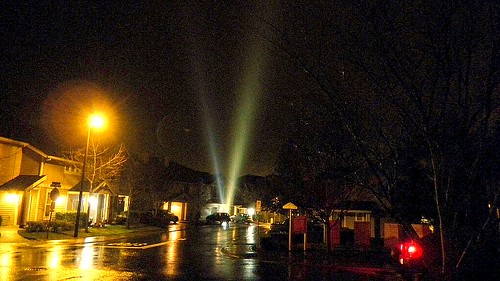
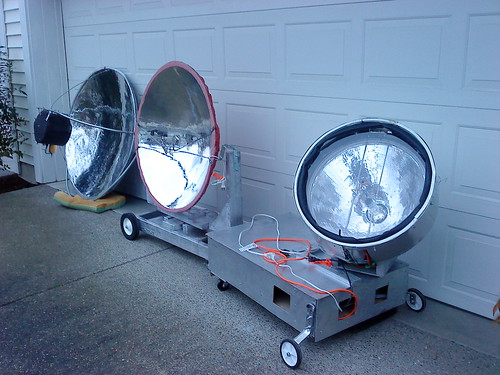
I will finish the basic set up tomorrow and place a 100 watt HID bulb in with spherical reflector for the back light.

:thumbsup::thumbsup::thumbsup::thumbsup::thumbsup::thumbsup:
 
Last edited:

LightSward

Flashlight Enthusiast
Joined
Feb 1, 2009
Messages
1,164
Location
Portland, Oregon
I am working in a narrow time slot before I have to clear out of the shop space I have been using...(..someones car really wants to be in the garage for the winter...I can't blame her...). :oops::whistle::tired::broke::rolleyes::cool:

...So here are the latest shots...I hope to have this thing in basic form, up and running next few days...then a photo shoot.


The 36 inch Gorilla gets some paint...


Basic HID lamp housing support structure fitted
spaceout.gif
spaceout.gif
spaceout.gif
spaceout.gif
spaceout.gif
spaceout.gif
spaceout.gif
spaceout.gif

4271285152_eca5bb8f91.jpg

The basic alignment and hardware configuration for the HID lamp and spherical reflector structure is fitted.


36 inch Reflector Receives final sanding
spaceout.gif
spaceout.gif
spaceout.gif
spaceout.gif
spaceout.gif
spaceout.gif
spaceout.gif
spaceout.gif

4270541101_403ae1e3ca.jpg

The 36 inch reflector is sanded using fine steel wool to create an almost 'glass' like surface.


36 inch reflector receives first treatment surface
spaceout.gif
spaceout.gif
spaceout.gif
spaceout.gif
spaceout.gif
spaceout.gif
spaceout.gif

4270541323_2c41c007f4_b.jpg

The 36 inch Gorilla reflector starts to look civilized with it's first surface sealing treatment.


I am very limited on money...so I am going to again use the slightly orange peel Chrome Tape reflective coating, (orange peel look even on window glass). When funds are better I will remove the Chrome Tape and use the $400.00 a pint paint, or have a paint shop do it for me. I realize this subtracts, from the Gorilla' and other searchlight's I have built, their true potential light focus and output.:candle::tinfoil::broke::poke:

Next: The 36 inch Gorilla reflector begins to shine light!
 
Last edited:

LightSward

Flashlight Enthusiast
Joined
Feb 1, 2009
Messages
1,164
Location
Portland, Oregon
The Gorilla is beginning to come 'alive'!


Final coats of paint applied
spaceout.gif
spaceout.gif
spaceout.gif
spaceout.gif
spaceout.gif
spaceout.gif
spaceout.gif
spaceout.gif

4273119885_737595ebb6.jpg

The 36 inch Gorilla Reflector receives final paint coats and sealers.


Two competing Chrome tapes are to be used
spaceout.gif
spaceout.gif
spaceout.gif
spaceout.gif
spaceout.gif
spaceout.gif
spaceout.gif
spaceout.gif

4273864768_9c123549ac.jpg

I'm still experimenting with two competing brands of Chrome Tape. They both seem to have their stre


First two strips of Chrome Tape applied
spaceout.gif
spaceout.gif
spaceout.gif
spaceout.gif
spaceout.gif
spaceout.gif
spaceout.gif
spaceout.gif

4273120201_6a5d64ae12.jpg

The Chrome Tape is applied in a cross pattern to minimize seams.


Chrome Tape Reflective Surface 2/3rds complete
spaceout.gif
spaceout.gif
spaceout.gif
spaceout.gif
spaceout.gif
spaceout.gif
spaceout.gif
spaceout.gif

4273120383_51d1dbbcd1.jpg

The Reflective Chrome Taping is two thirds complete and initial test performed. Should make a nice bright beam. The orange peel surface of the chrome tape makes for a slightly fuzzy 'hot spot'. When funds are:broke: available, I will have the reflector Silver Painted, which will make a much better reflector.


The next few days, I will finish the reflective surface and install the HID fixture. :twothumbs
 

LightSward

Flashlight Enthusiast
Joined
Feb 1, 2009
Messages
1,164
Location
Portland, Oregon
:tinfoil: I have completed the basic 36 inch Gorilla Searchlight, enough to test it.
Here are some photos:

36 inch Gorilla reflective chrome taping finished
spaceout.gif
spaceout.gif
spaceout.gif
spaceout.gif
spaceout.gif
spaceout.gif
spaceout.gif
spaceout.gif

4278662826_26176e876c.jpg

36 inch Gorilla reflective chrome taping is finished. My reflection is visible in the freshly finished searchlight reflector.


Close-up of 100 watt HID and spherical reflector light bounce
spaceout.gif
spaceout.gif
spaceout.gif
spaceout.gif
spaceout.gif
spaceout.gif
spaceout.gif
spaceout.gif

4278653678_77d3f61eca.jpg

View of 100 watt HID and spherical reflector light bounce readied for installation. The spherical reflector was made from a 'Ladle' purchased at Bi-Mart. It just happened to have ideal optics.


100 watt HID and spherical reflector and bracket
spaceout.gif
spaceout.gif
spaceout.gif
spaceout.gif
spaceout.gif
spaceout.gif
spaceout.gif
spaceout.gif

4278654474_9185259de2.jpg

Here is a view of the spherical reflector and 100 watt HID lamp bracketed to the main 36 inch reflector.


Reflector eye view of the 100 watt HID and spherical reflector
spaceout.gif
spaceout.gif
spaceout.gif
spaceout.gif
spaceout.gif
spaceout.gif
spaceout.gif
spaceout.gif

4278657574_553c78fcaa.jpg

Reflector eye view of the 100 watt HID and spherical reflector which places a large percentage of the light into the light beam.


36 inch Gorilla roars to life on second night test
spaceout.gif
spaceout.gif
spaceout.gif
spaceout.gif
spaceout.gif
spaceout.gif
spaceout.gif
spaceout.gif

4278650146_0eb5635da1.jpg

36 inch Gorilla roars to life on second night test


Light Beam from 36 inch Gorilla
spaceout.gif
spaceout.gif
spaceout.gif
spaceout.gif
spaceout.gif
spaceout.gif
spaceout.gif
spaceout.gif

4278639674_424e18ddac.jpg

View from behind the 36 inch Gorilla, as it beams the rainy night sky.


36 inch Gorilla light beam lights cloud
spaceout.gif
spaceout.gif
spaceout.gif
spaceout.gif
spaceout.gif
spaceout.gif
spaceout.gif
spaceout.gif

4278627502_980c57722d.jpg

36 inch Gorilla light beam streaks across the sky and lights a rain cloud.


36 inch 100 watt HID and 7 inch 35 watt HID compare
spaceout.gif
spaceout.gif
spaceout.gif
spaceout.gif
spaceout.gif
spaceout.gif
spaceout.gif
spaceout.gif

4277886059_cc69b79bbc_o.jpg

This garage door is 100 feet away from the 36 inch 100 watt HID on our left and 7 inch 35 watt HID on our right. Compare the beam spots.


36 inch 100 watt HID and 7 inch 35 watt HID compare
spaceout.gif
spaceout.gif
spaceout.gif
spaceout.gif
spaceout.gif
spaceout.gif
spaceout.gif
spaceout.gif

4277879069_3bb948fc20.jpg

36 inch 100 watt HID upper light beam on tree and 7 inch 35 watt HID lower light spot compare on trees over 450 feet away, (behind condos).


36 inch 100 watt HID and 7 inch 35 watt HID compare
spaceout.gif
spaceout.gif
spaceout.gif
spaceout.gif
spaceout.gif
spaceout.gif
spaceout.gif
spaceout.gif

4278642516_64f450ee93.jpg

36 inch 100 watt HID on our left and 7 inch 35 watt HID to our right compare in the rainy night sky.


36 inch 100 watt HID and 7 inch 35 watt HID compare
spaceout.gif
spaceout.gif
spaceout.gif
spaceout.gif
spaceout.gif
spaceout.gif
spaceout.gif
spaceout.gif

4277944705_3a3ee1d203_o.jpg

7 inch 35 watt HID to our left and 36 inch 100 watt HID on our right; compare in the rainy night sky.


36 inch 100 watt HID and 7 inch 35 watt HID compare
spaceout.gif
spaceout.gif
spaceout.gif
spaceout.gif
spaceout.gif
spaceout.gif
spaceout.gif
spaceout.gif

4278684356_32ff6d6ae2.jpg

7 inch 35 watt HID to our left and 36 inch 100 watt HID on our right; compare in the rainy night sky.
:laughing::twothumbs :candle::popcorn:


The 36 inch Gorilla Searchlight is very good at taking light and throwing it quite some distance. The 24 inch LightSward makes a nice slender concentrated beam, but shining on a distant object, it is not as bright as the 36 inch Gorilla with the same wattage bulb.

Note: I changed the orientation of the bulb as shown in the original design. It focused better and provided a better brighter beam.


The 36 inch Gorilla is alive and well!
 
Last edited:

LightSward

Flashlight Enthusiast
Joined
Feb 1, 2009
Messages
1,164
Location
Portland, Oregon
Fantastic! Great work!


:thumbsup: The reflector is quite strong. I decided the strength is sufficient to allow me to double the use of the 36 inch Gorilla reflector as reflector and searchlight frame and casing. I will modify the lamp support structure so everything will be flush or behind the reflector top lip, and support the lens on the built-in steel hoop part of the reflector. I've built a decent temporary 'Yoke" and support base for the light. It looks quite nice.

Here are some photos of the partly completed Searchlight components. I hope to have this searchlight equipped with automatic panning soon in time for a movie premiere at the Portland Hollywood theater, later this year!:twothumbs


Gorilla gets a temporary Yoke
spaceout.gif
spaceout.gif
spaceout.gif
spaceout.gif
spaceout.gif
spaceout.gif
spaceout.gif
spaceout.gif

4290380914_27505c3e64_b.jpg


spaceout.gif
spaceout.gif
spaceout.gif
spaceout.gif
spaceout.gif
spaceout.gif
spaceout.gif
spaceout.gif

4289637653_5828f11b66.jpg

You can see the temporary cart and yoke that will be used throughout the product development phase.


Thin profile
spaceout.gif
spaceout.gif
spaceout.gif
spaceout.gif
spaceout.gif
spaceout.gif
spaceout.gif
spaceout.gif

4290397262_9867bb2380.jpg

You can see the thin profile in this view. I changed the pivot point, to offset the center of gravity, after this photo was taken.


36 inch Gorilla, red backside
spaceout.gif
spaceout.gif
spaceout.gif
spaceout.gif
spaceout.gif
spaceout.gif
spaceout.gif
spaceout.gif

4290397880_2042a6c1f5.jpg

Red was the only color I had when I needed to paint the backside of the reflector. I kind of like it.


I will post more as they become available.
 
Last edited:

LightSward

Flashlight Enthusiast
Joined
Feb 1, 2009
Messages
1,164
Location
Portland, Oregon
Truly awesome! :twothumbs

(Does it have a pocket clip?)


Here are a couple recent photos.

Homemade Searchlights ready for Beam Shots
spaceout.gif
spaceout.gif
spaceout.gif
spaceout.gif
spaceout.gif
spaceout.gif
spaceout.gif
spaceout.gif

4292859188_a3e108e616.jpg

The 50 inch Monster, 36 inch Gorilla and the 24 inch Light Sward homemade searchlights ready for Beam Shots.


7, 36 and 50 inch searchlights compare
4292109731_946cb83376.jpg

The 7 inch, 50 inch and 36 inch searchlights warm up 100 feet from garage doors, and ready for focusing.


7, 36 and 50 inch searchlights compare
spaceout.gif
spaceout.gif
spaceout.gif
spaceout.gif
spaceout.gif
spaceout.gif
spaceout.gif
spaceout.gif

4292905744_276b0b0b84.jpg

The 7 inch, 50 inch and 36 inch searchlights light up a garage door 100 feet distance from lights.


36 inch Gorilla fills garage door area with light
spaceout.gif
spaceout.gif
spaceout.gif
spaceout.gif
spaceout.gif
spaceout.gif
spaceout.gif
spaceout.gif

4300139850_0b33d8c668.jpg

The bright spot of the 36 inch, 400 watt HID Gorilla, almost fills the garage door located at a 250 foot distance from searchlight.


36 inch Gorilla and 50 inch Monster tree shot
spaceout.gif
spaceout.gif
spaceout.gif
spaceout.gif
spaceout.gif
spaceout.gif
spaceout.gif
spaceout.gif

4300140566_67051e3deb.jpg

The Gorilla and Monster light beams shine on tree 450 foot distance from searchlights.


36 inch Gorilla and 50 inch Monster tree shot
spaceout.gif
spaceout.gif
spaceout.gif
spaceout.gif
spaceout.gif
spaceout.gif
spaceout.gif
spaceout.gif

4299394885_9232b6ddcc.jpg

The Gorilla and Monster light beams shine on tree 450 foot distance from searchlights.


36 inch Gorilla
spaceout.gif
spaceout.gif
spaceout.gif
spaceout.gif
spaceout.gif
spaceout.gif
spaceout.gif
spaceout.gif

4292118159_a5a55faee1.jpg

36 inch Gorilla Homemade Searchlight ready for Beam Shots.


36 inch Gorilla
spaceout.gif
spaceout.gif
spaceout.gif
spaceout.gif
spaceout.gif
spaceout.gif
spaceout.gif
spaceout.gif

4292155185_9b6f15a09f_o.jpg

The 36 inch Gorilla takes aim into the night sky.


50 inch and 36 inch searchlights light up the rain
spaceout.gif
spaceout.gif
spaceout.gif
spaceout.gif
spaceout.gif
spaceout.gif
spaceout.gif
spaceout.gif

4292852946_563ec97ff8_b.jpg

The 36 and 50 inch Searchlights light up an evening rain.


50 inch and 36 inch searchlights compete
spaceout.gif
spaceout.gif
spaceout.gif
spaceout.gif
spaceout.gif
spaceout.gif
spaceout.gif
spaceout.gif

4292853756_21079cb491.jpg

The 36 inch, 100 watt HID to our Right, compares to the 50 inch, 400 watt HID Searchlight.


50 inch and 36 inch searchlights compete
spaceout.gif
spaceout.gif
spaceout.gif
spaceout.gif
spaceout.gif
spaceout.gif
spaceout.gif
spaceout.gif

4292111893_87d6f84633.jpg

The 36 inch, 100 watt HID to our Left, compares to the 50 inch, 400 watt HID Searchlight.


50 inch and 36 inch searchlights compete
spaceout.gif
spaceout.gif
spaceout.gif
spaceout.gif
spaceout.gif
spaceout.gif
spaceout.gif
spaceout.gif

4292113233_bb70aae3e3.jpg

The 36 inch, 100 watt HID Gorilla to our Right, compares to the 50 inch, 400 watt HID Monster.


36 inch Gorilla and 50 inch Monster Beams
4300150866_53b7aaf63a.jpg


spaceout.gif
spaceout.gif
spaceout.gif
spaceout.gif
spaceout.gif
spaceout.gif
spaceout.gif
spaceout.gif

4299406467_8a0db0e3b8.jpg

36 inch Gorilla light beam appears brighter in this photo because it is shining overhead. The 50 inch Monster beam is shining away from viewer and looks dimmer because of the angle.


More to come!:twothumbs
 
Last edited:

LightSward

Flashlight Enthusiast
Joined
Feb 1, 2009
Messages
1,164
Location
Portland, Oregon
This is amazing work!:eek:oo:


Thanks! These projects have helped me keep my sanity during the Architectural contract and employment 'lull'. In the distant past, I worked in a movie set, theatrical products and mechanical engineering factory that was equipped and staffed to make a huge variety of products. It was not the usual boring factory. Always something new and interesting happening, and is where I learned some of the skills and design procedures I use building the searchlights. :popcorn: :candle: :eek: :) :whistle: lovecpf
 

LightSward

Flashlight Enthusiast
Joined
Feb 1, 2009
Messages
1,164
Location
Portland, Oregon
Th Gorilla and the other searchlights I built from scratch, have been huge successes!

Anyone interested in one of these searchlights, (can double as Solar Concentrators), let me know, and we can work out product finish details.:thinking: :cool: ;) :candle: :popcorn: I am working on various designs that will maintain strength and optical properties, yet lower the weight and costs. This is still in the product development phase and I will be compiling a cost(s) list with options during the next few weeks. I am working on improving the optical properties of the reflector by working on the shaping tools used during the manufacturing. I have found some minor shaping issues and am correcting those tool flaws.

LightSward
Happy lighting. :)
 
Last edited:

LightSward

Flashlight Enthusiast
Joined
Feb 1, 2009
Messages
1,164
Location
Portland, Oregon
:candle::poke::D

I am scouting some locations I can easily transport the 36 inch Gorilla, without drawing too much attention, for a 1000 yard beam shot...preferably a white barn nearby that I can reach from the top of our neighborhood mountain top. Hope to do this next few weeks...after it rains for a few days.
 

LightSward

Flashlight Enthusiast
Joined
Feb 1, 2009
Messages
1,164
Location
Portland, Oregon
:whistle: This particular reflector was made quite strong. I will probably make the production model about half the fiberglass and weight. Depending on the reflective finish, the materials costs is anywhere from $100 for chrome taped reflector to $500 for reflective chrome paint finished reflector. Depending on production run and searchlight finish, the cost for a finished professional looking searchlight with rotating mechanism will be anywhere from $500 for hundred watt HID and chrome tape to $1400 for chrome painted reflector finish and 1000 watt medium arc HID with panning mechanism and wheeled cart. I expect to make this be able to fit in a sedan, with minimal (dis)assembly. These are just preliminaries. :thumbsup: :thinking: As I finish development, I will have a better idea. There can be kits, in various stages of completion sold. The wheeled cart can be steel, wood, fiberglass, etc., depending on preference.
 

Walterk

Enlightened
Joined
Jan 21, 2010
Messages
755
Location
Netherlands
Great concept !

Two things came to my mind:
What If you coat (epoxy / polyurethane) and polish the inside of the reflector, and coat it with silver-leaf ? (Once the underground is smooth, the silver would make a fine gloss surface, to be protected with clear coating.)
What do you think? Or not worth the effort and cost?

As I have Cad-skills but understand only part of rays:
Once you have a cad-model for a parabolic shape, can it be stretched deeper/shallow, wide/small without problem or would it need recalculating the angles of rays in- and outwards?
 

LightSward

Flashlight Enthusiast
Joined
Feb 1, 2009
Messages
1,164
Location
Portland, Oregon
Great concept !

Two things came to my mind:
What If you coat (epoxy / polyurethane) and polish the inside of the reflector, and coat it with silver-leaf ? (Once the underground is smooth, the silver would make a fine gloss surface, to be protected with clear coating.)
What do you think? Or not worth the effort and cost?

As I have Cad-skills but understand only part of rays:
Once you have a cad-model for a parabolic shape, can it be stretched deeper/shallow, wide/small without problem or would it need recalculating the angles of rays in- and outwards?

:popcorn:
Thanks for the good words.

Coating the reflector with epoxy / polyurethane and coating with silver-leaf sounds like it could be a good idea...but I don't know much about it...I worked with gold leaf years ago. Is the surface mirror like? What is the cost?

As far as the CAD goes, I always recalculate the parabolic profile I am going to use from scratch, (for fun and ease of design), doesn't take but a few minutes. I always save and compare prior designs and compare to published designs.

A person can just take a section of an existing parabolic profile (published or home designed etc.,) and only use the portion relevant to the light source and desired characteristics of the beam, costs, etc. Then one could just use a copy / scanner, etc., and use zoom in / out and get the desired shape that way.

If you need a real deep reflector, just keep adding more design length to the design template. Look at the following easy design method I use, and just add more layers to the top portion of the reflector and extent the profile there. (Altering the shape by stretching a little may work okay, but the focal point and beam characteristics may be off.)

:cool:


naughty.gif
Re: Homemade 24" scratch built & designed reflector
Here is a basic CAD and/or by hand layout to design your own Parabolic Reflector.


EASY, EASY, CAD, and by hand; Parabolic Instructions. First time I did this, I just used a fabric measuring tape.


Basic idea:
4143088998_ebf36a594f.jpg

For basic example parabolic reflector: just select a reasonable range of dimensions such as 2 inch spacing as an example, go from there.

Here is a look at how I do it: (from a science book)
3492088197_7011fa2e20.jpg


spaceout.gif
spaceout.gif
spaceout.gif
spaceout.gif
spaceout.gif
spaceout.gif
spaceout.gif
spaceout.gif

3492950568_c403e585a9.jpg


My method and drawings follow:
4143094840_bf81eea7c5_o.jpg


First determine the basic parameters of the Parabolic Reflector. Bulb type, size of light emitter, desired beam configurations, use, costs and many more factors determine the size and basic dimensions of the reflector. Deep Dish or Shallow Mirror, storage, manufacturing ability, etc., then draw base line, focus point and bottom point of reflector..

spaceout.gif
spaceout.gif
spaceout.gif
spaceout.gif
spaceout.gif
spaceout.gif
spaceout.gif
spaceout.gif

4142337511_5b62378e32_o.jpg


Draw lines that will help you form the shape of the parabolic reflector. If you want a shallow mirror type reflector, you need most of your parallel lines close to the bottom, you may have to try a little trial and error. You should quickly realize what spacing you'll need.


4142336541_9f7963cdbe_o.jpg

Draw circles, radius equals selected parallel line distances from the base line. Where circle intersects line (at two points) place a dot at each intersecting point for line/ circle pair only.


4143091016_3d3f1787dd_o.jpg


Finish intersection and dot placements.

spaceout.gif
spaceout.gif
spaceout.gif
spaceout.gif
spaceout.gif
spaceout.gif
spaceout.gif
spaceout.gif

4143090014_7f211cb145.jpg

Remove circles. :twothumbs


spaceout.gif
spaceout.gif
spaceout.gif
spaceout.gif
spaceout.gif
spaceout.gif
spaceout.gif
spaceout.gif

4143088998_ebf36a594f.jpg

Remove parallel lines. Connect the dots, In CAD use spline or polyline function. By hand, connect the dots using a 'french' curve, finished.
You can also just copy and paste this curve and zoom in and out to get the right size. Rotate profile to make the 3-D reflector.

This is really easy, just looks difficult. You can use just the bottom of the parabolic reflector like the 50 inch Monster Searchlight I designed / built and the famous 60 inch carbon arc searchlights of WWII to name a couple.

I hope this helps. I am working on new designs all the time!:twothumbs

© All rights reserved.
 
Last edited:

Walterk

Enlightened
Joined
Jan 21, 2010
Messages
755
Location
Netherlands
Thx a lot for the tutorial ! Will try myself soon.

About how to do the application of silver leaf; hope someone with experience can reply on that.
 

LightSward

Flashlight Enthusiast
Joined
Feb 1, 2009
Messages
1,164
Location
Portland, Oregon
Thx a lot for the tutorial ! Will try myself soon.

About how to do the application of silver leaf; hope someone with experience can reply on that.

This is really a fun and easy way to design a reflector. :twothumbs :naughty:

Next few days I should be getting a beam shot of the 36 inch Gorilla, beaming across the Willamette river from I-5 to the Wells Fargo building or other suitable downtown Portland, Oregon building.

Stay tuned!:cool:
 

LightSward

Flashlight Enthusiast
Joined
Feb 1, 2009
Messages
1,164
Location
Portland, Oregon
:D Half mile Downtown Portland, Oregon Beam Shots came out well. I'll post the photos next few days. :thumbsup: :twothumbs

Police came by when I still had the searchlight on, and said they got a report someone was taking pictures. He didn't really seem to care. He was conversational and we just talked about the Homeless milling about, and then he took off.
:oops:
 

Latest posts

Top