QTC flashlight - from scratch (non battery-crush)

Phototropin

Newly Enlightened
Joined
May 18, 2012
Messages
13
Location
NSW, Australia
Love your work, it's coming along very well.

Does the light flicker at all? I have used QTC at work to make basic pressure sensors, and found that when I apply intermediate pressure I cannot get a stable resistance/conductivity measurement (keeps fluctuating and won't "settle"), so I'm limited to using it basically as an on/off switch instead instead of a variable resistor.

I did a quick google search for "Rapid QTC", and by the results (if it is indeed the same product) it appears to be a similar product to mine (silver nanoparticles in silicone I think). Does your QTC just look like a thin (~1mm) browny grey rubber?

Awesome looking light BTW, I hope you keep the final design as simple as that. (But maybe in Ti, Cu or brass... :devil:)
 

TheFraz

Enlightened
Joined
Aug 22, 2007
Messages
492
Location
Little Rock, AR
Thanks guys. As far as flickering, that was one of the biggest problems to overcome because the QTC reacts to such small changes in pressure. And if there is any binding it readjusts eventually as you are describing and loses stability. It has to be implemented just right to get it to work reliably and in a way that is pleasing to the eye. Lots of ideas seem good...until they are built lol. It's taken me about 13 prototypes to get a couple that work like I had imagined they should. Yes, the raw QTC looks like a tiny wafer of rubber. I plan to keep it simple looking in final stages...well, because I love minimalism :grin2:. It's just so hard to make something simple with a clean look and design that works, it's frustrating. Below is a video of the smaller of the prototype doing some small incremental brightness shifting to try and show the stability of the engine. The only thing that limits how smooth the light ramps is how smooth your hand can turn it (and as my hands are pretty big I struggle to get fine movements on this tiny light). But to reinforce the idea, I have left it on at around 50% brightness all night, then in the morning slowly ramped it down to see if there is a 'rebound.' There is not - it works great.


-Fraz
 

Phototropin

Newly Enlightened
Joined
May 18, 2012
Messages
13
Location
NSW, Australia
That's fantastic Fraz, very smooth. I have noticed in my tests that it takes a little while to "break in" the rubber, so will be interesting to see if your max and min output notches (if you were to mark the outside of the flashlight with those intensity bars referred to earlier) change over time as the rubber is put through repeat compression and decompression cycles.

I'll be keeping an eye on this thread, very cool TheFraz, very cool.
 

TheFraz

Enlightened
Joined
Aug 22, 2007
Messages
492
Location
Little Rock, AR
Finally finished the latest model. This one is quite a bit smaller at 4.5". It also is lighter, brighter, and uses a warmer LED. But the thing I like about it most is that it now requires a full turn to go from full off to full on. Much much better feel. Here are some pics - I'll try to post a video tonight after I grab something to eat (starving lol). The bottom one shows the size difference from the old model. Also, this new light will look different when I 'finish' it...still have a bit of cutting to do on the body before I coat it.

IMG_1132.jpg

IMG_1134.jpg


-Fraz
 

XFlash

Enlightened
Joined
Jul 8, 2004
Messages
378
Location
Oklahoma
Been enjoying this thread, love to watch a :)custom light in its progress.
I love this design, I want one also.
A low low is important to me, and this light seems to have one.
Thanks
:)
 

Walterk

Enlightened
Joined
Jan 21, 2010
Messages
755
Location
Netherlands
Looks great!
And I love the idea of low-tech ramping up the output.
It would be easy to build something with the same effect with using resistance wire, a build-in variable resistor.
Wonder how QTC holds over time. QTC is the bomb if they give life-time guarantee. And no losses converted to heat!


How reacts the QTC when you stack 4 pads on top of each other, would that just require more force to get zero resistance?
Then it could also act like a variable resistor, also useful when you don't use QTC for a ramping-switch.
Less losses and easy to incorporate in a build, re-adjustable in case you change to the-led-of-the-moment.

Would love to hear that!
 
Last edited:

TheFraz

Enlightened
Joined
Aug 22, 2007
Messages
492
Location
Little Rock, AR
Looks great!
And I love the idea of low-tech ramping up the output.
It would be easy to build something with the same effect with using resistance wire, a build-in variable resistor.
Wonder how QTC holds over time. QTC is the bomb if they give life-time guarantee. And no losses converted to heat!


How reacts the QTC when you stack 4 pads on top of each other, would that just require more force to get zero resistance?
Then it could also act like a variable resistor, also useful when you don't use QTC for a ramping-switch.
Less losses and easy to incorporate in a build, re-adjustable in case you change to the-led-of-the-moment.

Would love to hear that!

Thanks! So far the QTC is holding up great, and I've been turning it full off and on several hundred times a day to try and get it to wear out. But if if does eventually wear out, I've designed the engine where it should be very easy to replace the QTC with a new square. Simply take the old one out and drop a new one in - no tools required. However, I really don't think it will wear out during normal use only taking direct vertical (non-shearing) pressure. The company website claims something like one million compressions, and although that sounds a bit optimistic, I don't have any reason to not believe them. I haven't tried stacking the pads on top of each other, but yes I imagine it would work relatively the same but requiring more force to reach zero resistance.

Attached are a couple more videos showing the operation of the latest prototype. It now requires one full turn to reach full brightness. This makes it much easier to obtain a brightness level you're wanting - it also requires much less force to turn. It's a little difficult to tell in the video because of the camera's exposure changing as the light gets brighter (and the iPhone isn't the best camera), but you can get the idea. Also attached is a video showing the light being used outdoors.


-Fraz
 

^Gurthang

Flashlight Enthusiast
Joined
Jul 2, 2009
Messages
1,071
Location
Maine, deep in the Darkness of the North
Fraz,

I'm even more impressed w/ your abilities, the newest prototype is VERY impressive. I like your idea of a nearly full turn to go from off to full on, an elegant UI. I'll keep watching enviously of your work. Good luck.
 

TheFraz

Enlightened
Joined
Aug 22, 2007
Messages
492
Location
Little Rock, AR
Thank you for watching the progress :)
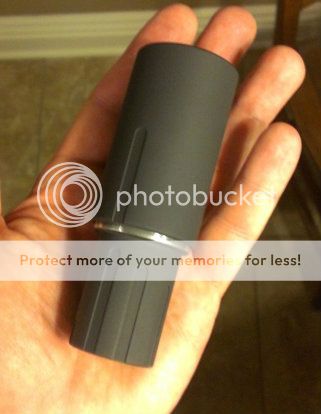
... persistence is definitely paying off on this one. I included a better quality video of the version 2.0 engine on the front post, but here it is again:


I really like the way it is turning out. Feel and size are much better now. I'm eagerly awaiting some new materials to come in for some new and interesting battery and materials combos. I've definitely learned how not to make a QTC light in a few dozen ways.

-Fraz
 

Mattaus

Flashlight Enthusiast
Joined
Mar 29, 2011
Messages
1,765
Location
Brisbane, Australia
I've been following this thread from the beginning so I'm super keen to see where this heads....but if I can just ask a few questions and make some observations:

1) Awesome UI. The ramping is so smooth!

2) Does it need to be so...'fat'? Seems like the head is way over-sized for the optics, or is that a trade-off for the QTC functionality?

3) What size cell is in use in the light above?

4) You're original design with the matching body sizes and notches was great - will that make a return?

I realise your latest version is a work in progress given the pen marks so I look forward to seeing it nearer completion!

Keep up the good work :)

- Matt
 

TheFraz

Enlightened
Joined
Aug 22, 2007
Messages
492
Location
Little Rock, AR
I've been following this thread from the beginning so I'm super keen to see where this heads....but if I can just ask a few questions and make some observations:

1) Awesome UI. The ramping is so smooth!

2) Does it need to be so...'fat'? Seems like the head is way over-sized for the optics, or is that a trade-off for the QTC functionality?

3) What size cell is in use in the light above?

4) You're original design with the matching body sizes and notches was great - will that make a return?

I realise your latest version is a work in progress given the pen marks so I look forward to seeing it nearer completion!

Keep up the good work :)

- Matt

Thanks for following Matt. To answer your questions,
1)Thanks!
2)It doesn't need to be quite so fat. It is that way now because of a few reasons. It uses a 26650 battery which makes it look a little thick, and it is short at around 4.5" which compounds that look even more (also I like overbuilt walls and tend to make them thicker than most). The head looks large because I am engineering this light a bit different from traditional design. All the guts, optic, heat sink, etc. go in from the tail end, so there is no bezel to screw on the top - I made it this way to limit the number of pieces in the design and the possible points of water ingress as much as possible. For this particular light however, I made the internal threading on the head a bit too long, thus the oversized look. Newer ones will have a shorter top section (I don't like the look of the shorter tail/body section as much).
3) 26650
4) Yes, the original design (or a variation of) will make a return when it is finished. This latest one was mainly an exercise in size reduction and engine tweaking to make it smoother. Aesthetics should look better going forward.

-Fraz
 

TheFraz

Enlightened
Joined
Aug 22, 2007
Messages
492
Location
Little Rock, AR
No problem - glad you still like the way they're going! Finished this latest one...looks different without the raw aluminum. Also the 'volume bars' for the brightness level now work, along with a marker bar on top to tell which level you have selected. Here's a pic:

Engine2-1.jpg
 

Mattaus

Flashlight Enthusiast
Joined
Mar 29, 2011
Messages
1,765
Location
Brisbane, Australia
No problem - glad you still like the way they're going! Finished this latest one...looks different without the raw aluminum. Also the 'volume bars' for the brightness level now work, along with a marker bar on top to tell which level you have selected. Here's a pic:

Engine2-1.jpg

:twothumbs
 

TheFraz

Enlightened
Joined
Aug 22, 2007
Messages
492
Location
Little Rock, AR
Thanks! I've got materials coming in this week for additional battery options - drawing out the plans now. Yes, no circuit board - so it is direct drive voltage-wise, with the QTC controlling amperage. Here is a video of the brightness control bars in action - it is finally a repeatable, stable, sustainable engine that can control the brightness with reasonable accuracy. The longest bar is 'off,' as well as 'high.' All the previous models had ghosts in the machine of some sort and would work correctly, but not exactly repeatable from one use to the next:


Please excuse my horrendous cinematography once again.
 

manoloco

Enlightened
Joined
Dec 29, 2006
Messages
690
Location
Lima, Perú
This is a very interesting thread, nice results TheFraz

Very interested to know more of it, specially if you decide to make it in other cell types and regulated.

Thanks for sharing your very nice work!
 
Top