How to open Fenix head?

gerry45

Newly Enlightened
Joined
Apr 20, 2007
Messages
69
Hi,


Just looking at new moreand more efficient leds. I have 4 short questions:

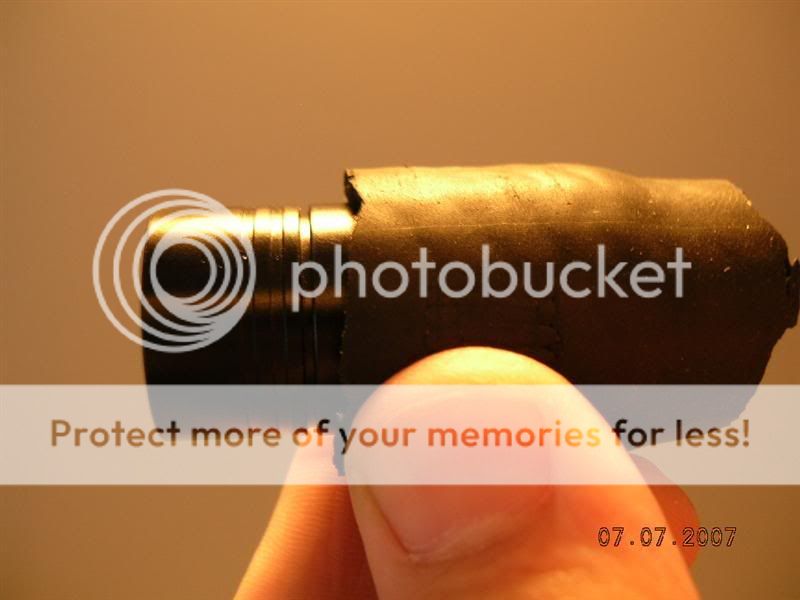
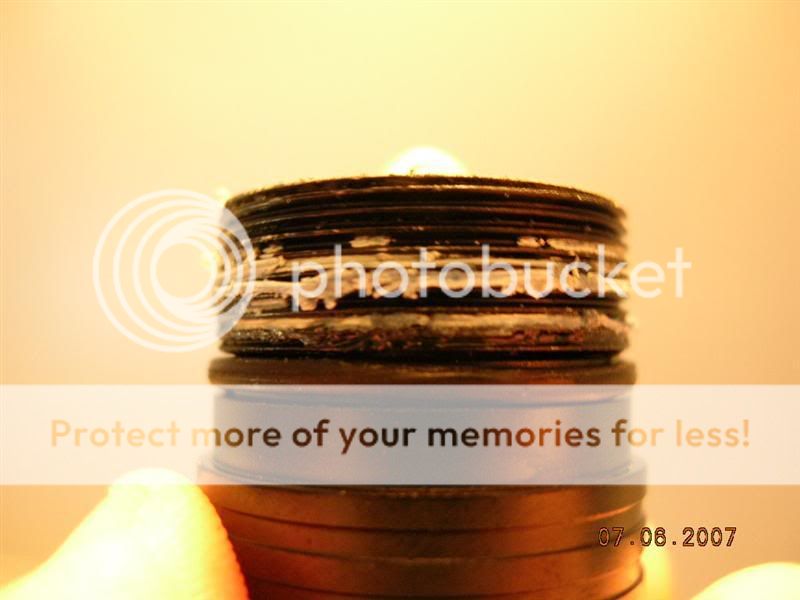
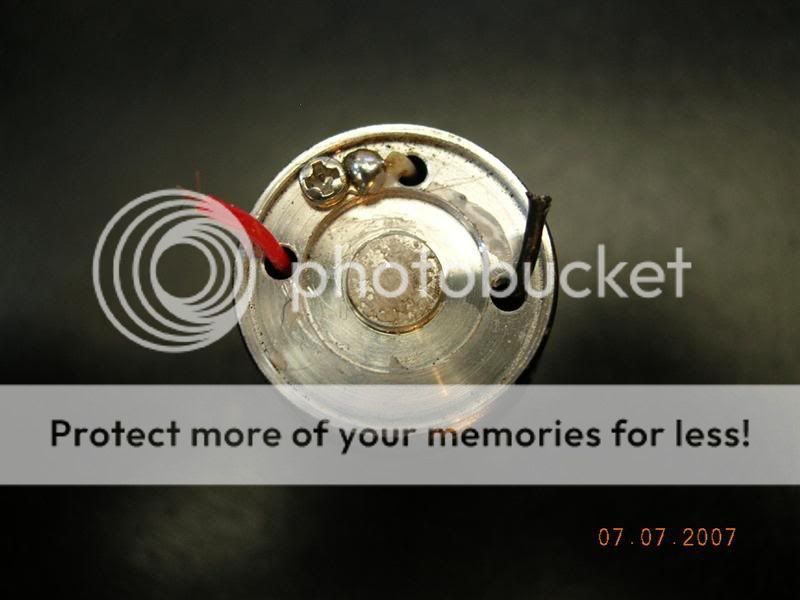
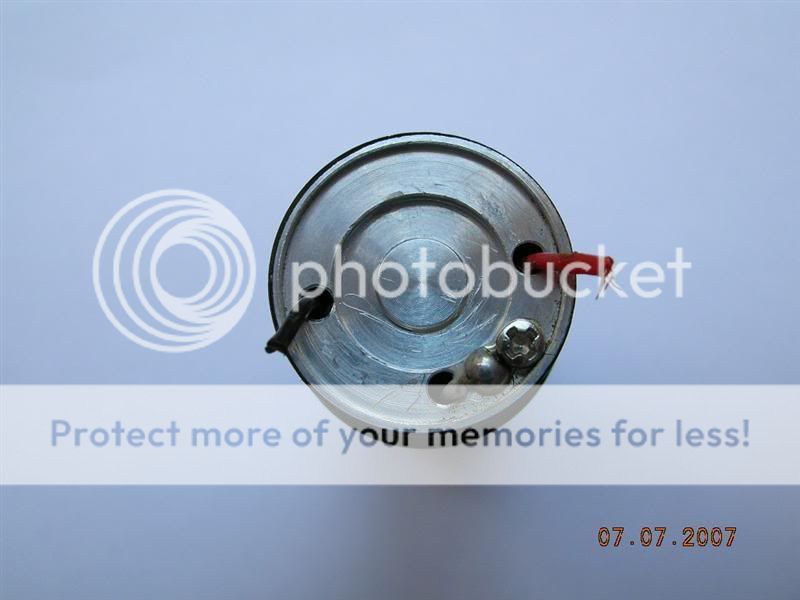
1. How to open my P2CDE without any damage?

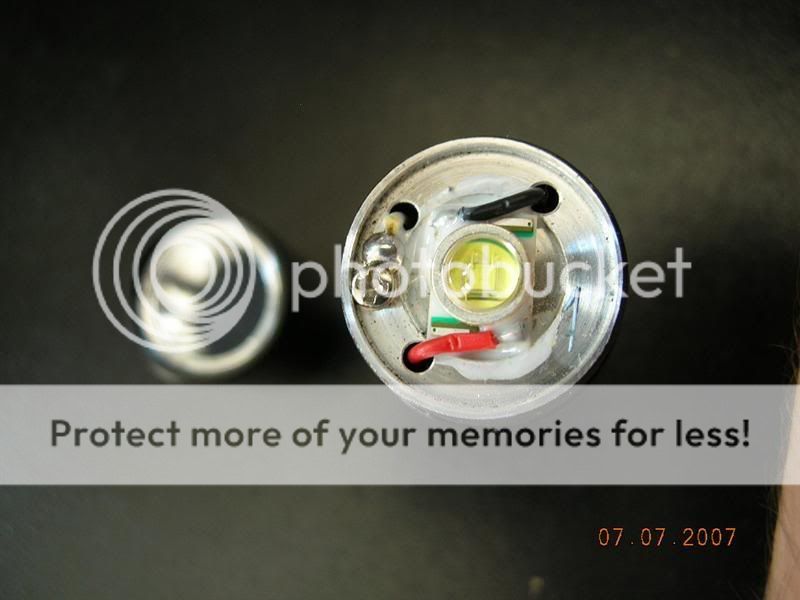
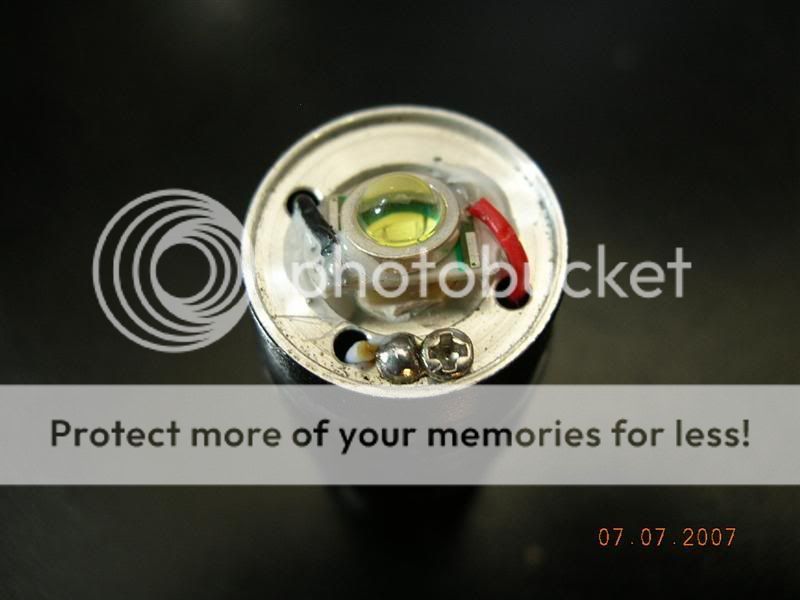
2. What kind/size of pcb is inside, star, disc?

3. What kind of led i currently have cool white, soft white?

4. What is best choice when ordering. Emitter alone or mounted on pcb?

5. Is there a tutorial that i missed somewhere?

Thanks!
 

Gunner12

Flashaholic
Joined
Dec 18, 2006
Messages
10,063
Location
Bay Area, CA
This might be better in the Modding Forum.

1. (I haven't modded so this is what I have read) They Loctited the head together so you might need to boil the head in a plastic bag to weaken the glue. Place the head in a vice(no too tight). Then insert split ring pliers in to the holes in the PCB and turn left(?) and it should come out.
2. I'm not sure of the size.
3. (Compare to sunlight, try a white sheet of paper) If the LED looks a bit blueish, then it is cool white. If it is yellowish then it is warm white. If it seems to be the same as sunlight, then it is neutral.
4. Fenix uses the emitter alone so that is what you should buy.
5. I don't think there are tutorials but there are some Fenix modding threads in the Modding section.
 

wintermute

Enlightened
Joined
Nov 16, 2004
Messages
681
I used 7/8" tubing and 2 pairs of channel locks to get my head loose. It protects the anodizing and provides a nice grip. A vice and 1 pair of channel locks would have been easier - a vice and a 6" or 8" bionic wrench would have been easiest.
 

gerry45

Newly Enlightened
Joined
Apr 20, 2007
Messages
69
Thanks a lot everybody,

i'll give the hairdryer a try with the 7/8 tubing. Great idea combo.

I really want to see what's in my P2CDE and a big 20% more light would be welcome.
 

mar3

Newly Enlightened
Joined
Jul 20, 2006
Messages
39
You will see something like that


l2d1xc6.jpg


l2d2rd8.jpg


L1/2D and P2D have same heads
 

wintermute

Enlightened
Joined
Nov 16, 2004
Messages
681
You'll see one length of the tubing on the part of the head bezel which holds the reflector, lens, etc. (this is 3/4" tubing, which will work...but it really tight - 7/8" would have been easier to work with and still done the job effectively.

DSCN3993Medium.jpg


Put another small piece on the other piece, which is only 1/2" long. If you have a vice - put the larger head piece in the vice and use a large pair of channel locks (or bionic wrenches if you have them!!) to twist.

Funny thing is, I didn't even realize when I finally got it loose. The threads are so tight, you might not feel the click as the glue comes loose. When you do get it loose, it will look like this (different then the pics above because mine still has the glue on it.

DSCN3989Medium.jpg


DSCN3990Medium.jpg


DSCN3988Medium.jpg


Friggin' thing was a pain in the butt...a real pain in the butt. But if you look through the end of the tubing at the smaller end, watch for the circuit board to twist - then you know one of two things are happening - either the whole thing is twisting, and you need to tighten your grip on the larger piece of the head bezel - or you have got it free.

Once loose, you need a new emitter to replace the one inside. I am replacing the P4 (which is kind of a green tint) with a Q4 with WC tint (cool and slightly blue - just like I like). Lots of the Q4s were delivered yesterday, so I hope to get mine today. :)

Besides Arctic Alumina Adhesive to attach the emitter, what else is everyone using to attach the emitter to the body??
 
Last edited:

rantanplan

Newly Enlightened
Joined
Jun 14, 2004
Messages
186
Location
Hannover, Germany
[...]
I am replacing the P4 (which is kind of a green tint) with a Q4 with WC tint (cool and slightly blue - just like I like). Lots of the Q4s were delivered yesterday, so I hope to get mine today. :)

Besides Arctic Alumina Adhesive to attach the emitter, what else is everyone using to attach the emitter to the body??

That´s what I´ve done yesterday. I got my Q4s and replaced the Cree in my LxD CE head later in the evening ... now its "whiter and brighter" ;).

I used Arctic Silver adhesive. After I had "removed" the old emitter and the white stuff, I realized that the emitter was placed on a small, round pedestal. Fenix used quite a lot of this white thermal(?) adhesive, which hid this fact. I had asked myself before, how Fenix managed the "problem" with the connector pads on the bottom ... and that´s the logic solution. Because of this raised platform, only the heat-transfering part of the emitter bottom has contact to the body. unfortunately I forgot to take some pictures ;).

Soldering the leads to the emitter was the usual PITA ;) ... but I managed it in the first try :rock: ...

I used self-locking pliers with some rubber to hold the part with the emitter and unscrewed the head with my hand (and some gloves with good grip) ... relatively easy compared to the boiling procedure of my Nuwai Q3 some years ago ;) ...
 

gerry45

Newly Enlightened
Joined
Apr 20, 2007
Messages
69
Really apreciate these pics.

Man, inside it looks really bad. I tought i just have to unscrew, unsolder and change a pcb.

Definitely not a modding friendly fl.

Is that epoxy all over?

Thanks again for the pics!
 
Last edited:

wintermute

Enlightened
Joined
Nov 16, 2004
Messages
681
Really apreciate these pics.

Man, inside it looks really bad. I tought i just have to unscrew, unsolder and change a pcb.

Definitely not a modding friendly fl.

Is that epoxy all over?

Thanks again for the pics!
I'll take some pics through all of the steps today to illustrate how easy it can really be.
 

flyingbrass

Newly Enlightened
Joined
Aug 25, 2006
Messages
49
Jostling around in a lockblock on my bike while running in Turbo was enough to loosen my L2D head. When I reached down to change from Turbo to low the front part kept turning. Very little glue had been used.

I'm glad it came loose because I found the beam is much nicer for my purposes when slightly defocused. The ring is gone with more light in the spill. Of course, the cost is reduced throw. One of these days I'll put in a better emitter. Since I've never done one before I'm looking forward to instructions with pictures.
 

big beam

Enlightened
Joined
Jan 14, 2006
Messages
521
Location
upstate ny
I just got mine apart today.I tried hot water and hair dryer NG.So I thought MO heat.I used a paint stripping gun.I think you should be careful because these things make a LOT of heat.Will set cardboard on fire in 3 or 4 secs.Using the normal tact(rubber and chanel locks) it came apart pretty EZ. Sad to say I don't have another emitter to put in it but I will.
DON
 

wintermute

Enlightened
Joined
Nov 16, 2004
Messages
681
Pics as I promised of my P4 -> Q4 LED swap in LxD head.

Start out:
DSCN4000Medium.jpg


Popped loose with a little metal pic:
DSCN4018Medium.jpg


Grungy - make sure you get rid of that old compound where the emitter sticks. I found my fingernail to work best:
DSCN4021Medium.jpg


All clean - used a little ethanol on a Q-tip to clean things up (being a microbiologist, I use ethanol for everything - isopropyl alcohol would work just the same)
DSCN4032Medium.jpg


Emitter in - Fenix really designed the top of this thing well - it would be very hard to NOT get it centered. I used a mixture of Arctic Alumina Adhesive with 25% Arctic Alumina Compound in case I wanted to go R4 next year (ya never know):
DSCN4035Medium.jpg


I'm not going to show the pic of my soldering of the wires to the emitter - it wasn't pretty. First one of these Cree emitters I have soldered, little buggers are a pain. I will say this though, I used a 15 watt soldering iron for this - and it was enough...I wouldn't use anything hotter for a project such as this.

Have fun. :D
 
Last edited:

qip

Flashlight Enthusiast
Joined
Jan 10, 2007
Messages
1,503
Location
u.s
tale of two fenix's ....my p3d head was a pain to unscrew my Lxd was easy as pie...the emitter from the p3d was easy as pie my Lxd was a nightmare as it was covered in adhesive more than the p3d it was just filled in the entire area caked in and though i removed the Lxd emitter my positive wire felt loose so i tried to unscrew the emitter module from the bottom part of its bezel and it too was locktite and in process long story short my wires are now inside module and i cant get them out + the module looks murdered argh vice grips ripping through rubber to get to aluminum


Last edited:

wintermute

Enlightened
Joined
Nov 16, 2004
Messages
681
...the module looks murdered argh vice grips ripping through rubber to get to aluminum
qip - 7/8" (perfect) or 3/4" (tight) tubing around the light, then apply vice grips, channel locks, vice, etc. The rubber tubing will protect the head so it looks like new.
 

qip

Flashlight Enthusiast
Joined
Jan 10, 2007
Messages
1,503
Location
u.s
ugh cant even use this lxd module , cant get the sucker loose the wires are inside the outside aluminum is all ripped up even the threading ...wanna sell me yours :sssh: ...now i gotta get another head
 

wintermute

Enlightened
Joined
Nov 16, 2004
Messages
681
yeah - that may have worked for you....but not for me. And not for a lot of others either...it all depends on how much glue they put in the threads. Maybe yours had very little...well, mine had a lot.
 
Top