Northern Lights
Flashlight Enthusiast
I found I needed to replace OEM tail cap springs with some modifications done to lights. Many times the new power supply was not the same length as the original.
For power packs a simple fix was to stuff the end with high-density foam as is found in packing material for electronic equipment shipping containers.
With any end cap jumping the spring with copper wire can lower the internal resistance. Copper is a better conductor of electricity than spring steel.
Longer spaces can be easily resolved with longer springs. With reduced end cap space due to longer battery systems it is difficult to obtain a wide short spring with sufficient tension to stabilize the batteries.
As in the Nuwai TM-800-X3, a 3 D cell light converted to 4 C cells this system works well. In these cases I do the following.
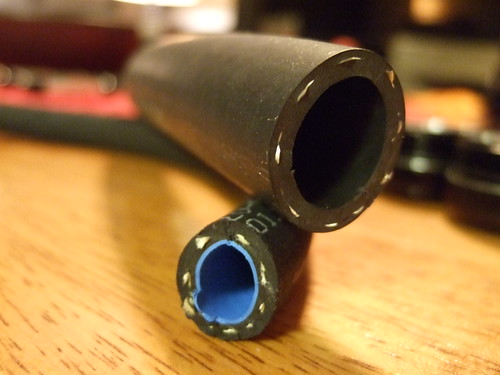
Find reinforced hose as in wash machine supply hoses or automotive fuel and oil line hoses, use and appropriate diameter. Cut to a length that when it is place in the tail cap it will apply sufficient pressure to snub and stabilize the batteries. To find the length you can use a simple ruler or make a small ball or cylinder shape in modeling clay and put that in the cap and screw it onto the batteries, remove it and it will be the thickness of the compressed insert. Cut the insert appropriately.
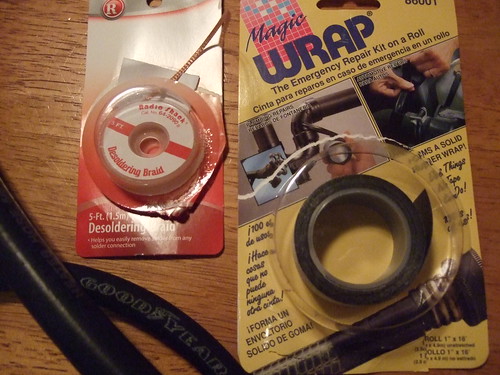
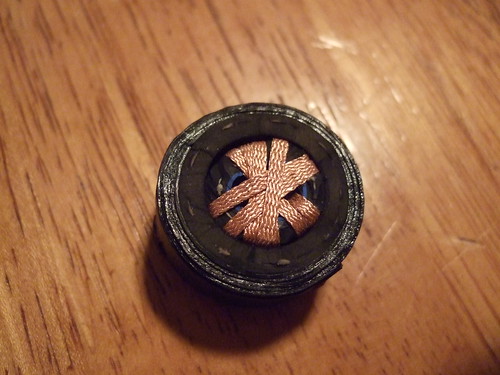
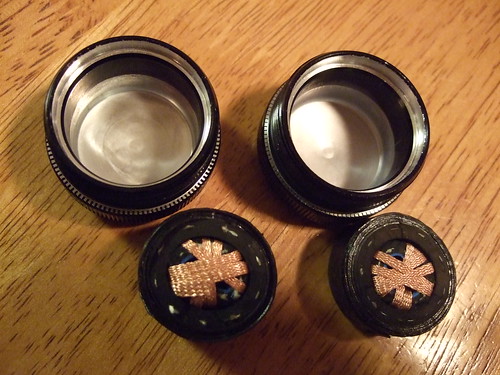
I then wrapped the section of hose in with one piece of copper braid, a piece of de-soldering braid, for three wraps and solder the ends together. I glue them into the center of the cap with silicone glue or any version of the Goop brand that is tougher but elastic glue. The glue must be elastic to absorb the compression. Put the glue into the center of the ring of braid. Do not insulate the braid from the tail cap by gluing the braid that runs over the end of the hose. You could also use some sort of friction retention like the above mentioned high density foam cut into pieces that hold the insert from the outer surface of the end cap. In the case of shorter inserts I use small enough diameter hose so that if I choose to revert to the original length batteries I can just place the old spring over it without removing it.

For power packs a simple fix was to stuff the end with high-density foam as is found in packing material for electronic equipment shipping containers.
With any end cap jumping the spring with copper wire can lower the internal resistance. Copper is a better conductor of electricity than spring steel.
Longer spaces can be easily resolved with longer springs. With reduced end cap space due to longer battery systems it is difficult to obtain a wide short spring with sufficient tension to stabilize the batteries.
As in the Nuwai TM-800-X3, a 3 D cell light converted to 4 C cells this system works well. In these cases I do the following.
Find reinforced hose as in wash machine supply hoses or automotive fuel and oil line hoses, use and appropriate diameter. Cut to a length that when it is place in the tail cap it will apply sufficient pressure to snub and stabilize the batteries. To find the length you can use a simple ruler or make a small ball or cylinder shape in modeling clay and put that in the cap and screw it onto the batteries, remove it and it will be the thickness of the compressed insert. Cut the insert appropriately.
I then wrapped the section of hose in with one piece of copper braid, a piece of de-soldering braid, for three wraps and solder the ends together. I glue them into the center of the cap with silicone glue or any version of the Goop brand that is tougher but elastic glue. The glue must be elastic to absorb the compression. Put the glue into the center of the ring of braid. Do not insulate the braid from the tail cap by gluing the braid that runs over the end of the hose. You could also use some sort of friction retention like the above mentioned high density foam cut into pieces that hold the insert from the outer surface of the end cap. In the case of shorter inserts I use small enough diameter hose so that if I choose to revert to the original length batteries I can just place the old spring over it without removing it.
Last edited: