
Hogo was right, it's very nerve-wracking. It's better to sell and buy another one, or give it to someone:
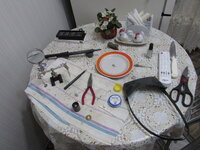
Well, I decided to take the risk. In general, if someone wants to repeat it, then they need a powerful soldering iron with a sharp tip, a special tool to lift the board (something like needle-nose pliers), desoldering braid, orthophosphoric acid, glasses with magnifying lenses and very steady hands
The main thing here is the size of the tip and the size of the braid, I found this video only after everything was done
In general, the procedure went like this:
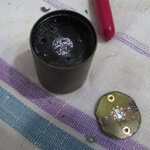
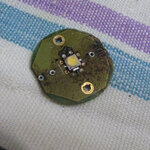
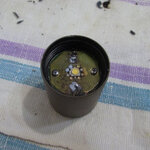
Unscrew the screws. Use braid to remove solder from 3 pins. Here I had a small problem - the braid does not suck out the solder until I add a lot of acid. It is necessary to remove all the solder so that you can pry the board and take it out, if the solder remains, then this will not work. The problem with the solder is that it is not on a flat surface, but in the gap between the driver wire and the bushing. These little bushings are 3 pieces. Then need to have a vice or a third hand to hold the head, at this moment pick up the board and pull it up, while melting the remaining solder with a soldering iron. Everything must be done very quickly so as not to heat the head. 2 wires fell out easily, the third one got stuck and I had to pull the board while heating the solder so that the board would separate. Then everything is easy - remove 1 diode and install another. And after then complications arose - you need to take a small drill and drill through the bushings in order to remove the solder from them, so that the holes are large and the wires go back to the bottom easily, but without damaging the bushings themselves. Then these protruding wires from the driver must be aligned with the holes so that they enter smoothly and at the same time. Take the board out, add some thermal paste, put the board in, tighten the screws and solder the wires back, and everything works great
Everything turned out messy for me, as it turned out that the remains of thermal paste in the bushings around the diode react perfectly with boiling acid and the acid itself leaves a stain on the surface of the board
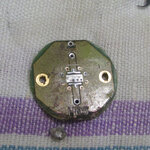
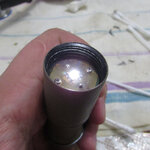
I changed the diode by placing a soldering iron under the board, some of the solder went to the bottom of the board, so I had to cut off the solder with a knife so that the back surface was flat again and pressed well. I tested it for 2 days - the flashlight does not heat up any more than it did with the original diode, the operating time is approximately what it should be, there is no increased self-discharge of the battery inside the switched-off flashlight, the flashlight continues to work normally in the freezer. I think the driver is ok and I didn't overheat it this time...
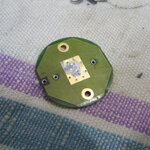
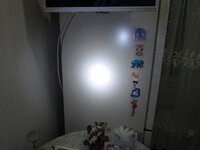
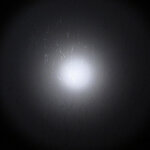
The beam turned out clean, without colored spots in the center of the beam. But still, I spent 2 hours, burned myself on the soldering iron, stank of acid all around, and mentally prepared to save money to buy a new head. So I don't advise doing something like this with the HDS without a strong intention and readiness to ruin everything
Since we got another light in with fried electronics from an emitter swap, I thought I would bring this up again as it is a costly problem and happens far too often.
While HDS does move at the speed of light (if Light is the name of a mummified tortoise buried under the Egyptian sands) we do eventually get most emitters as an option that folks request... it just takes a lot of patience.
From the HDS FAQ:
Your flashlight was not designed to be modified after it has been assembled. To make your flashlight as reliable as possible, all connections are soldered together and all of the electronics have been potted. This seals the electronics and makes your flashlight very rugged. There is no safe or cost effective way to swap LEDs.
The LED board is thermally, electrically and mechanically joined to the power supply as well as the metal superstructure. Thus, there is no good way to remove the LED board or otherwise modify it. Getting the LED board hot enough to melt the solder holding the LED to the board requires getting the whole head to the melting point of solder, which takes a lot of time and a lot of heat and will easily exceed the thermal ratings on all of the parts in the power supply, not to mention the LED itself. A broken light is the typical result.
Many people have tried to replace the LED on their light and have destroyed the power supply in the process. If you break the power supply, it will cost you the current price of a head less the cost of the reflector assembly to replace it. Even skilled modders have paid for new power supplies. So don't try to modify your light.
The least expensive way to upgrade the LED in your flashlight is to sell your flashlight on the used market and then purchase a new one. Our lights retain their value even after they have been well used and so there is a thriving used market for our flashlights. This is a testament to how durable our flashlights are and how good our warranty service is.
Or consider gifting your old flashlight to a family member or one of your friends.
Well, I decided to take the risk. In general, if someone wants to repeat it, then they need a powerful soldering iron with a sharp tip, a special tool to lift the board (something like needle-nose pliers), desoldering braid, orthophosphoric acid, glasses with magnifying lenses and very steady hands
The main thing here is the size of the tip and the size of the braid, I found this video only after everything was done
In general, the procedure went like this:
Unscrew the screws. Use braid to remove solder from 3 pins. Here I had a small problem - the braid does not suck out the solder until I add a lot of acid. It is necessary to remove all the solder so that you can pry the board and take it out, if the solder remains, then this will not work. The problem with the solder is that it is not on a flat surface, but in the gap between the driver wire and the bushing. These little bushings are 3 pieces. Then need to have a vice or a third hand to hold the head, at this moment pick up the board and pull it up, while melting the remaining solder with a soldering iron. Everything must be done very quickly so as not to heat the head. 2 wires fell out easily, the third one got stuck and I had to pull the board while heating the solder so that the board would separate. Then everything is easy - remove 1 diode and install another. And after then complications arose - you need to take a small drill and drill through the bushings in order to remove the solder from them, so that the holes are large and the wires go back to the bottom easily, but without damaging the bushings themselves. Then these protruding wires from the driver must be aligned with the holes so that they enter smoothly and at the same time. Take the board out, add some thermal paste, put the board in, tighten the screws and solder the wires back, and everything works great
Everything turned out messy for me, as it turned out that the remains of thermal paste in the bushings around the diode react perfectly with boiling acid and the acid itself leaves a stain on the surface of the board
I changed the diode by placing a soldering iron under the board, some of the solder went to the bottom of the board, so I had to cut off the solder with a knife so that the back surface was flat again and pressed well. I tested it for 2 days - the flashlight does not heat up any more than it did with the original diode, the operating time is approximately what it should be, there is no increased self-discharge of the battery inside the switched-off flashlight, the flashlight continues to work normally in the freezer. I think the driver is ok and I didn't overheat it this time...
The beam turned out clean, without colored spots in the center of the beam. But still, I spent 2 hours, burned myself on the soldering iron, stank of acid all around, and mentally prepared to save money to buy a new head. So I don't advise doing something like this with the HDS without a strong intention and readiness to ruin everything
Attachments
-
 IMG_8219.JPG538.2 KB · Views: 58
 -
 IMG_8216.JPG634.3 KB · Views: 52
 -
 IMG_8223.JPG333.9 KB · Views: 50
 -
 IMG_8218.JPG648.4 KB · Views: 49
 -
 IMG_8224.JPG478.3 KB · Views: 60
 -
 IMG_8225.JPG695.8 KB · Views: 56
 -
 IMG_8228.JPG511.2 KB · Views: 50
 -
 IMG_8227.JPG908.7 KB · Views: 57
 -
 IMG_8230.JPG257.5 KB · Views: 56
 -
 IMG_8233.JPG394.2 KB · Views: 59
 -
 IMG_8236.JPG869.6 KB · Views: 47
 -
 IMG_8237.JPG370.8 KB · Views: 54