
m4a1usr
Enlightened
After buying a Surefire 9AN Commander and looking at it's weaker points I decided to research some mod's that others might have accomplished to see how viable the 9AN can be with newer technology. Some mod's looked a bit beyond my capability, even though I have a Jewelers lathe, while others looked over the top in terms of what the light would end up becoming. I decided a simple LED upgrade was my goal and to design it so that both the B90 packs could be used as well as a set of 18650's.Turned out pretty darn well. Cost was minimal and this ole girl now has been resurrected to a decent modern version. You be the judge.
First came the parts selection which I was going to be using. I decided on a 35mm reflector from DealeXtreme. It would fit the stock head once that was properly machined for internal clearance. Initialy I thought the threads on the reflector would accept any of the P60/D26 pill's common to 18mm regulators but found out the threads on the reflector were designed for some pill I do not know about. No worries though as I ended up using a piece of 3/4 inch copper tubing.
I began with a XML U3 LED board and a 4-16 volt single mode regulator from FastTech. Both good enough to begin with. I can always unsolder the board and add something "hotter" if I want the output brighter. But for now one amp is enough and compared to the stock lamp assy the difference is like night and day.
First picture is of the stock components.

Second picture is of the head/ bezel.The hardest part was making a bezel removal tool. Turned out a 3/4 inch thread nut with 6 points was a pretty good begining. Slightly over sized, but with a rat's tail file it was modified well enough to fit the bezel. A M3 bezel removal tool was not going to work. Just took some time for "refinement".

Third picture is of the head already modified with the components installed. I soldered 22 gauge wires to the LED board than used some Artic Aluminia to electricaly insulate the wires since I planned on using the same adhesive to attach the LED to the backside of the reflector. After the adhesive set and was still tacky I made up another batch and gooped up the LED side, inserted it in and did my best at centering the LED. Than added a bunch more to the back side so it made good contact all around the sides. Should be more than enough of a heat conductor as is.

Fourth picture is of the backside of the completed build. You can see the adhesive around the end of the reflector extension. (3/4 inch copper tubing inside). I used a bunch of adhesive to glue in the reflector. After I installed the reflector and the glue was still not set I installed the lense to apply pressure to ensure the reflector was trued to the glass.

Fifth picture is of the negative polarity washer I needed to use to enable the light body to be used as a conductor. This allows using either the stock B90 packs or the pair of 18650's which was going to be my preference.

Sixth picture shows the washer where it is supposed to fit. The washer started as 1 1/4 inch diameter but had to be reduced down to 1 1/8th to fit. The ID was 1/2 inch and since I was going to use an insulating grommet I opened it up to 9/16.
Seventh picture is self explanatory. Just shows the clearance of the center spring.

This was a very fun project and turned out pretty nice even though I didnt plan it out very well. Wish I had taken more photo's of the head while the reflector was still out. Would have shown how deep the inside needs to get cut so the 35mm reflector fits. But I was in a hurry and really wanted to get the job done. I guess it really doesnt really matter though since fitting the reflector is an absolute requirement. Sure was tough to cut the inside at first because the stock reflector is actually integral to the 9AN head and it was perfect yet needed to be destroyed. It's not a seperate removable part like many other Surefire lights.
First came the parts selection which I was going to be using. I decided on a 35mm reflector from DealeXtreme. It would fit the stock head once that was properly machined for internal clearance. Initialy I thought the threads on the reflector would accept any of the P60/D26 pill's common to 18mm regulators but found out the threads on the reflector were designed for some pill I do not know about. No worries though as I ended up using a piece of 3/4 inch copper tubing.
I began with a XML U3 LED board and a 4-16 volt single mode regulator from FastTech. Both good enough to begin with. I can always unsolder the board and add something "hotter" if I want the output brighter. But for now one amp is enough and compared to the stock lamp assy the difference is like night and day.
First picture is of the stock components.

Second picture is of the head/ bezel.The hardest part was making a bezel removal tool. Turned out a 3/4 inch thread nut with 6 points was a pretty good begining. Slightly over sized, but with a rat's tail file it was modified well enough to fit the bezel. A M3 bezel removal tool was not going to work. Just took some time for "refinement".

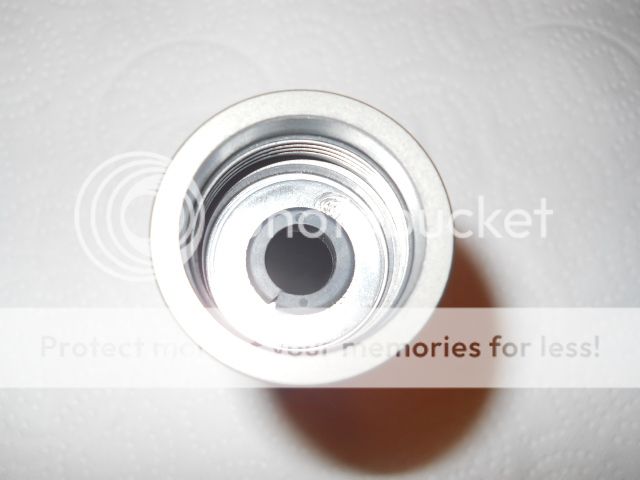
Third picture is of the head already modified with the components installed. I soldered 22 gauge wires to the LED board than used some Artic Aluminia to electricaly insulate the wires since I planned on using the same adhesive to attach the LED to the backside of the reflector. After the adhesive set and was still tacky I made up another batch and gooped up the LED side, inserted it in and did my best at centering the LED. Than added a bunch more to the back side so it made good contact all around the sides. Should be more than enough of a heat conductor as is.

Fourth picture is of the backside of the completed build. You can see the adhesive around the end of the reflector extension. (3/4 inch copper tubing inside). I used a bunch of adhesive to glue in the reflector. After I installed the reflector and the glue was still not set I installed the lense to apply pressure to ensure the reflector was trued to the glass.

Fifth picture is of the negative polarity washer I needed to use to enable the light body to be used as a conductor. This allows using either the stock B90 packs or the pair of 18650's which was going to be my preference.

Sixth picture shows the washer where it is supposed to fit. The washer started as 1 1/4 inch diameter but had to be reduced down to 1 1/8th to fit. The ID was 1/2 inch and since I was going to use an insulating grommet I opened it up to 9/16.

Seventh picture is self explanatory. Just shows the clearance of the center spring.

This was a very fun project and turned out pretty nice even though I didnt plan it out very well. Wish I had taken more photo's of the head while the reflector was still out. Would have shown how deep the inside needs to get cut so the 35mm reflector fits. But I was in a hurry and really wanted to get the job done. I guess it really doesnt really matter though since fitting the reflector is an absolute requirement. Sure was tough to cut the inside at first because the stock reflector is actually integral to the 9AN head and it was perfect yet needed to be destroyed. It's not a seperate removable part like many other Surefire lights.
Last edited:


