
geotorch
Newly Enlightened
- Joined
- Aug 25, 2014
- Messages
- 19
**UPDATE 3-2-2015**
Ok guys, I can officially say that the prototypes for this project are done! Here are some photos. I've got to finish up some last minute items and then I'll start getting ready for the kickstarter project (make a video, more pictures, reward tiers, etc.). If you want to know when I launch this then either post here or you can sign up for my newsletter on my website.
Robert
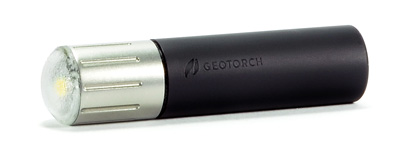
Black hard anodized body with stainless head:
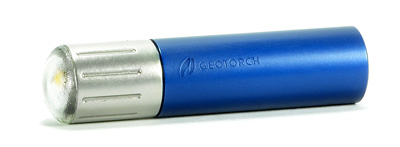
Blue anodized body with stainless head:
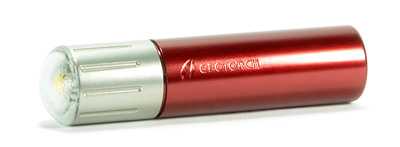
Red anodized body with stainless head:
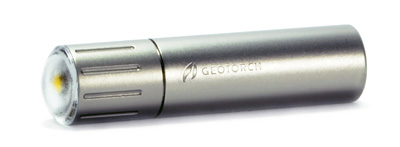
Grade 5 titanium:
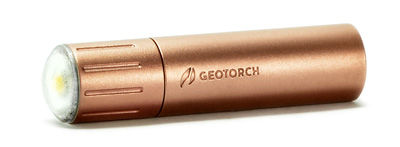
Copper:
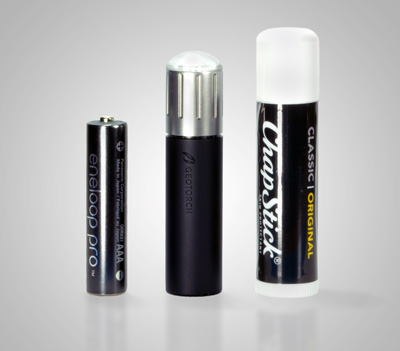
And here's a size comparison shot:
**UPDATE 2-17-2015**
Whoa, time flies when you're having fun! I've been up to a lot and wanted to give you guys a quick update.
- After carrying the parts around for a while that I showed in my last update, they started to look like crap. I tried to convince myself that they looked good, but they just didn't. Scratches, fingerprints, and dirt showed like crazy. It looked like grey plastic rather than metal. So, I went back to the drawing board and did a ton of research and made a bunch of phone calls. I chose a peening process that actually hardens the outer shell of material, rather than just blasting it away. The result is a bright and slightly textured finish that holds up very well to abuse. I've been carrying the stainless head around for a week and it doesn't have a scratch on it.
- As I mentioned before, the stamping supplier was having issues getting good results. After working with them for over three weeks we finally came up with a solution that worked. The result is a unique logo marking that is visible but doesn't get in the way.
- I chose the colors for the aluminum versions and got them anodized. I just got them back today and they look great.
- My 3D printed lenses didn't look very similar to what I envision the final part to be, so I fabricated my own. Much better now.
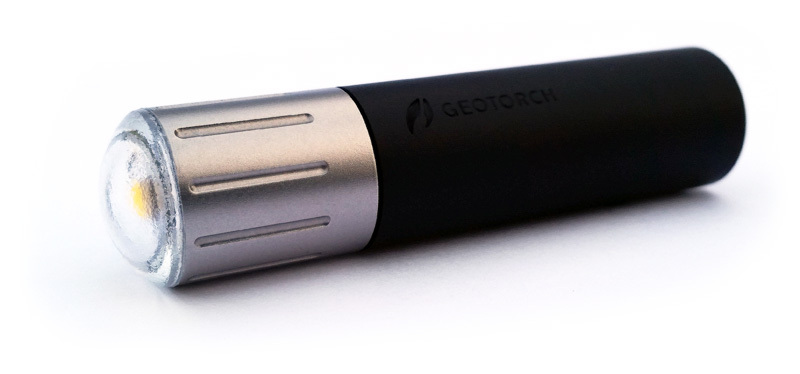
I'm nearly done with the prototyping phase and will then focus my attention on the actual kickstarter campaign. In the meantime, here's a preview of the HAIII version with the stainless head:
**UPDATE 1-23-2015**
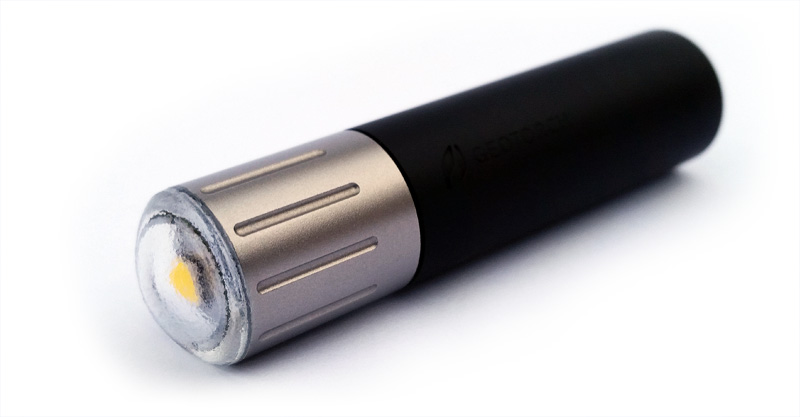
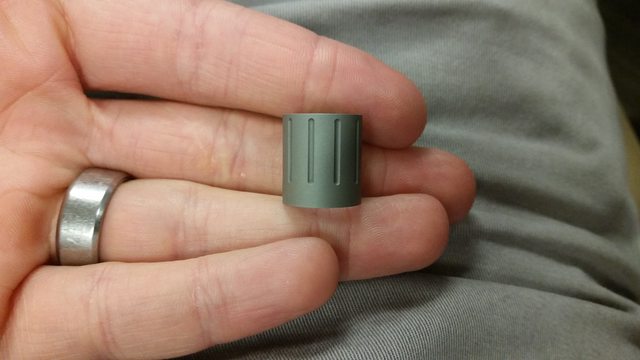
Hey guys, check out the finish on this stainless steel head. I like it, but I want to know what you guys think.
**UPDATE 1-22-2015**
Just a quick update. I talked with the shop that's stamping my logo for me today. They are a bit delayed because they decided to re-make the stamp in order to fix a few concerns they had. I'm really excited to get the parts back, I have seen pictures of their work and they do a great job. He said they are trying to get the parts done this Friday.
Also, if anyone would like to sign up in order to receive an email when we launch our kickstarter campaign, you can do so here: http://www.geotorch.com
I will also be updating this thread when we launch.
**UPDATE 1-7-2015**
Happy New Year!! Here's what I've been up to the past few weeks:
1. Here's a photo of the samples I got in from the shop (Front: Titanium, Middle: Copper, Back: Aluminum body and stainless head). NOTE: These are in an unfinished state. The lenses shown are 3D printed (one of the reasons I'm doing the kickstarter, I need money for a mold), they don't have the logo stamped in them yet (this will take a couple more weeks), the final satin finish has not been applied, and the aluminum has not been anodized. The electronics are also not installed yet. Once I get all of that done I can start putting together the kickstarter campaign.

2. I decided to call this light the DOME. I think naming this light has been harder than naming my own children. And my wife would tell you that I had a really hard time with that as well.
3. I consolidated my updates into this main post so that it is easier to find them. I also changed the title of this thread to better reflect what it's about.
Thanks!
Robert
**UPDATE 12-19-2014**
Runtime Charts")
I finally got a few runtimes performed on one of the drivers I built up. Overall, I'm VERY happy with the results. Eneloop Pro data coming soon.

*Note: In case you're curious, the calculated lumens value comes from the measured current through the LED. From there, I downgrade the lumens due to heat (per the Cree XH-G datasheet) and then I downgrade the lumens based on the expected lens efficiency. This method isn't perfect, but it should get me close enough. The final lumen rating and runtimes could vary from this chart, but hopefully not by a whole lot. One last note, this particular PCB was running a bit lower current (still within tolerance) than nominal. Nominally, I expect the brightness to be a bit higher and runtimes to be a bit shorter, but not by much.
The efficiency of the drivers ended up being a little higher than I was shooting for (woot!). Also, the regulation couldn't be better, IMHO. Again, I'm very happy with these results. This should end up being a very efficient light.
**UPDATE 12-12-2014**
I have some exiting updates:
1. I got a couple 3d printed lenses in and tested them out. The smooth all-around beam produced by not having the LED recessed into the head looks awesome! I was tempted to get rid of the dome lens and replace it with a flat glass lens with an anti-reflective coating. However, after testing out the dome lens, I decided to keep it. The appeal of having something new and different that works so well was just too tempting.
2. Because there seems to be enough interest in this project, I went ahead and got a machine shop working on a handful of first runs. Parts should be arriving in a few weeks, after which I will be doing the final finishing myself. I decided to get some alternate materials built up and I will most likely offer these options:
a. Aluminum hard anodized body with a stainless steel head (like the render)
b. Titanium body with a titanium head
c. Copper body with a stainless steel head
3. The latest revision of my driver arrived today. I will be assembling it and testing it out soon. This version has a bigger, better inductor which should improve upon the efficiency from my last version. Stay tuned for runtime charts.
Let me know what you guys think!
Robert
**Original Post 12-8-2014**
Hey everyone,
Before I get too far into this, I want to guage if there would be any interest in a "flood" style AAA flashlight. Here's a render that I created of my design:

Lens will be polycarbonate with diffusing texture. Cree XH-G LED, 5000K. Length will be about 2.3 inches. Diameter will be .56 inches.
I've tested my custom driver and I should be able to get 30 lumens OTF (regulated) for 2 hours on a regular alkaline.
Twist on, twist off functionality. Simple one mode operation. The flood beam at 30 lumens is perfect for lighting up the immediate surroundings with a really smooth beam, more like a lantern than a flashlight.
The body will be 6061-T6 hard anodized black with a satin bead blast finish. Head will be stainless steel with a bead blast finish.
Price should be $40 or lower.
Anyway, if there's enough interest, I'll move forward with getting a few made up. Considering doing a kickstarter so I can order the quantity required to sell at $40.
Robert
Ok guys, I can officially say that the prototypes for this project are done! Here are some photos. I've got to finish up some last minute items and then I'll start getting ready for the kickstarter project (make a video, more pictures, reward tiers, etc.). If you want to know when I launch this then either post here or you can sign up for my newsletter on my website.
Robert
Black hard anodized body with stainless head:
Blue anodized body with stainless head:
Red anodized body with stainless head:
Grade 5 titanium:
Copper:
And here's a size comparison shot:
**UPDATE 2-17-2015**
Whoa, time flies when you're having fun! I've been up to a lot and wanted to give you guys a quick update.
- After carrying the parts around for a while that I showed in my last update, they started to look like crap. I tried to convince myself that they looked good, but they just didn't. Scratches, fingerprints, and dirt showed like crazy. It looked like grey plastic rather than metal. So, I went back to the drawing board and did a ton of research and made a bunch of phone calls. I chose a peening process that actually hardens the outer shell of material, rather than just blasting it away. The result is a bright and slightly textured finish that holds up very well to abuse. I've been carrying the stainless head around for a week and it doesn't have a scratch on it.
- As I mentioned before, the stamping supplier was having issues getting good results. After working with them for over three weeks we finally came up with a solution that worked. The result is a unique logo marking that is visible but doesn't get in the way.
- I chose the colors for the aluminum versions and got them anodized. I just got them back today and they look great.
- My 3D printed lenses didn't look very similar to what I envision the final part to be, so I fabricated my own. Much better now.
I'm nearly done with the prototyping phase and will then focus my attention on the actual kickstarter campaign. In the meantime, here's a preview of the HAIII version with the stainless head:
**UPDATE 1-23-2015**
Hey guys, check out the finish on this stainless steel head. I like it, but I want to know what you guys think.
**UPDATE 1-22-2015**
Just a quick update. I talked with the shop that's stamping my logo for me today. They are a bit delayed because they decided to re-make the stamp in order to fix a few concerns they had. I'm really excited to get the parts back, I have seen pictures of their work and they do a great job. He said they are trying to get the parts done this Friday.
Also, if anyone would like to sign up in order to receive an email when we launch our kickstarter campaign, you can do so here: http://www.geotorch.com
I will also be updating this thread when we launch.
**UPDATE 1-7-2015**
Happy New Year!! Here's what I've been up to the past few weeks:
1. Here's a photo of the samples I got in from the shop (Front: Titanium, Middle: Copper, Back: Aluminum body and stainless head). NOTE: These are in an unfinished state. The lenses shown are 3D printed (one of the reasons I'm doing the kickstarter, I need money for a mold), they don't have the logo stamped in them yet (this will take a couple more weeks), the final satin finish has not been applied, and the aluminum has not been anodized. The electronics are also not installed yet. Once I get all of that done I can start putting together the kickstarter campaign.
2. I decided to call this light the DOME. I think naming this light has been harder than naming my own children. And my wife would tell you that I had a really hard time with that as well.
3. I consolidated my updates into this main post so that it is easier to find them. I also changed the title of this thread to better reflect what it's about.
Thanks!
Robert
**UPDATE 12-19-2014**
Runtime Charts
I finally got a few runtimes performed on one of the drivers I built up. Overall, I'm VERY happy with the results. Eneloop Pro data coming soon.
*Note: In case you're curious, the calculated lumens value comes from the measured current through the LED. From there, I downgrade the lumens due to heat (per the Cree XH-G datasheet) and then I downgrade the lumens based on the expected lens efficiency. This method isn't perfect, but it should get me close enough. The final lumen rating and runtimes could vary from this chart, but hopefully not by a whole lot. One last note, this particular PCB was running a bit lower current (still within tolerance) than nominal. Nominally, I expect the brightness to be a bit higher and runtimes to be a bit shorter, but not by much.
The efficiency of the drivers ended up being a little higher than I was shooting for (woot!). Also, the regulation couldn't be better, IMHO. Again, I'm very happy with these results. This should end up being a very efficient light.
**UPDATE 12-12-2014**
I have some exiting updates:
1. I got a couple 3d printed lenses in and tested them out. The smooth all-around beam produced by not having the LED recessed into the head looks awesome! I was tempted to get rid of the dome lens and replace it with a flat glass lens with an anti-reflective coating. However, after testing out the dome lens, I decided to keep it. The appeal of having something new and different that works so well was just too tempting.
2. Because there seems to be enough interest in this project, I went ahead and got a machine shop working on a handful of first runs. Parts should be arriving in a few weeks, after which I will be doing the final finishing myself. I decided to get some alternate materials built up and I will most likely offer these options:
a. Aluminum hard anodized body with a stainless steel head (like the render)
b. Titanium body with a titanium head
c. Copper body with a stainless steel head
3. The latest revision of my driver arrived today. I will be assembling it and testing it out soon. This version has a bigger, better inductor which should improve upon the efficiency from my last version. Stay tuned for runtime charts.
Let me know what you guys think!
Robert
**Original Post 12-8-2014**
Hey everyone,
Before I get too far into this, I want to guage if there would be any interest in a "flood" style AAA flashlight. Here's a render that I created of my design:
Lens will be polycarbonate with diffusing texture. Cree XH-G LED, 5000K. Length will be about 2.3 inches. Diameter will be .56 inches.
I've tested my custom driver and I should be able to get 30 lumens OTF (regulated) for 2 hours on a regular alkaline.
Twist on, twist off functionality. Simple one mode operation. The flood beam at 30 lumens is perfect for lighting up the immediate surroundings with a really smooth beam, more like a lantern than a flashlight.
The body will be 6061-T6 hard anodized black with a satin bead blast finish. Head will be stainless steel with a bead blast finish.
Price should be $40 or lower.
Anyway, if there's enough interest, I'll move forward with getting a few made up. Considering doing a kickstarter so I can order the quantity required to sell at $40.
Robert
Last edited:
