
candle lamp
Flashlight Enthusiast
The DDT40 is the latest high-output light from Imalent, using both 4xXM-L2 and 2xXP-L emitters, and running off 4x18650 or 8x(R)CR123A. It has a sensitive touch button interface and a remote control including other distinctive features. It supports built-in charging for 18650 and remote control. Note that my review sample is not a final shipping version.


Packaging is a cardboard box with cut-out packaging foam. Included inside is the light, user manual, warranty card, extra o-rings, holster, remote control, OLED screen protector and charging adapter.
.
.
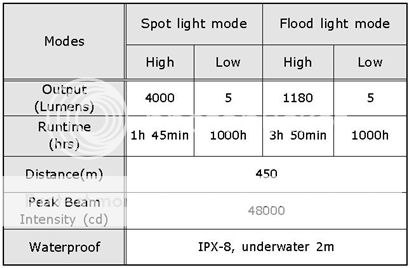
Manufacturer Specifications from Imalent website & user manual :
• Utilizes 4pcs CREE XM-L2 LED,and 2 pcs XP-L LED with a lifetime of up to 50,000 hours
• Backlit touch screen panel facilitates convenient and discreet and infinite brightness adjustment
• Remote control from 10 meters away
• Digitally regulated output - maintains constant brightness
• Electronic reverse battery protection
• Battery capacity indicator
• Working voltage : 2.8-9V
• Optimized deep metal reflector maintains great throw distance and spread with an ideal beam pattern
• Dimensions : 139mm(length)x68mm(head diameter)x50mm(tail diameter)
• Weight : 366g (battery excluded)
• Aerospace-grade aluminum alloy body
• Military Specification Type III- hard anodized
• Ultra-clear tempered glass lens resists scratches and impacts
• Accessories : O-rings, Holster, Screen protector, Remote controller
.
.
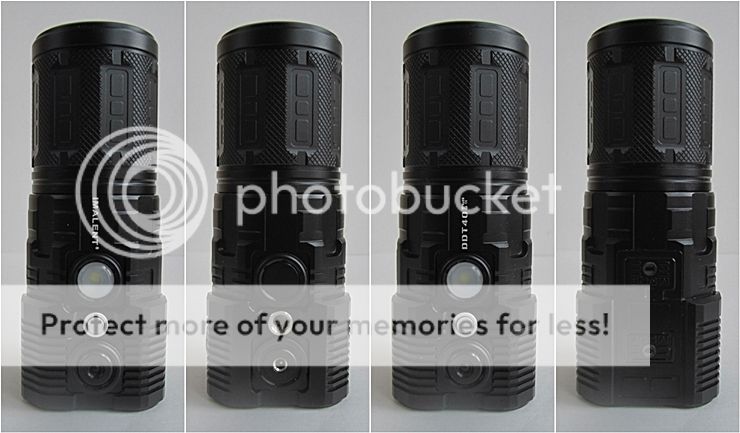
The hard (type III) anodizing is a slightly glossy black and consistent throughout with no chips on my sample. There are manufacturer, model name on the head. There are some knurling on the battery tube only.
.
.

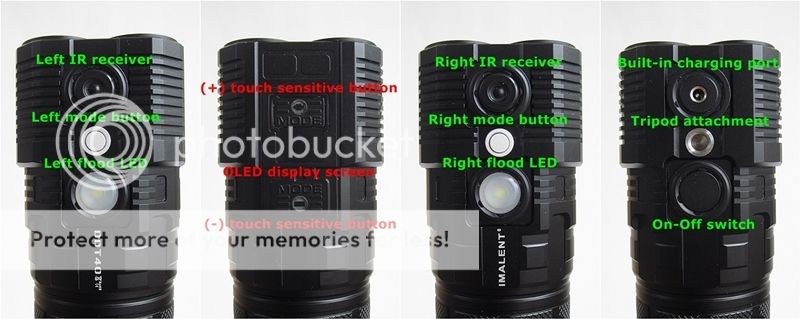
From left to right, XP-L LED with a diffused lens, mode button, IR receiver.
.
.
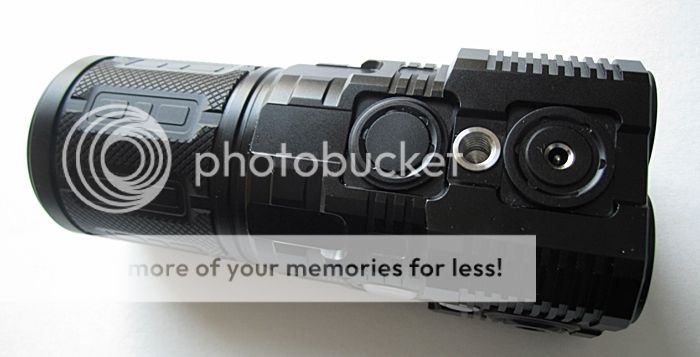
From left to right, on-off switch, standard tripod attachment, built-in charging port.
.
.
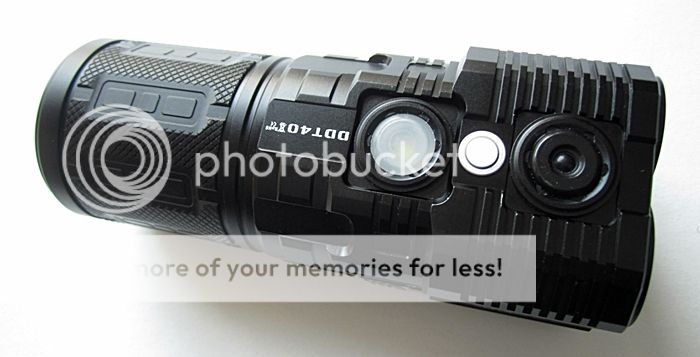
From left to right, XP-L LED with a diffused lens, OLED mode button, IR receiver.
.
.
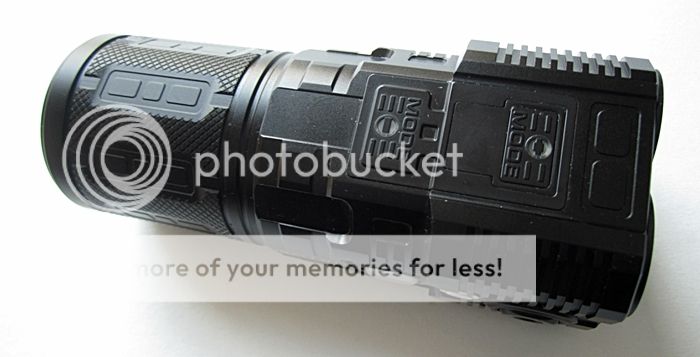
From left to right, (+) touch sensitive button, OLED display screen, (-) touch sensitive button.
.
.
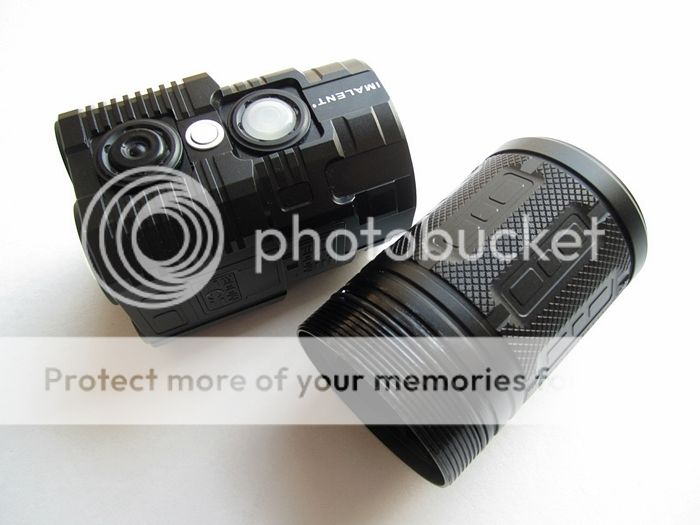
The light has mainly 2 parts (i.e. head and battery tube).
.
.
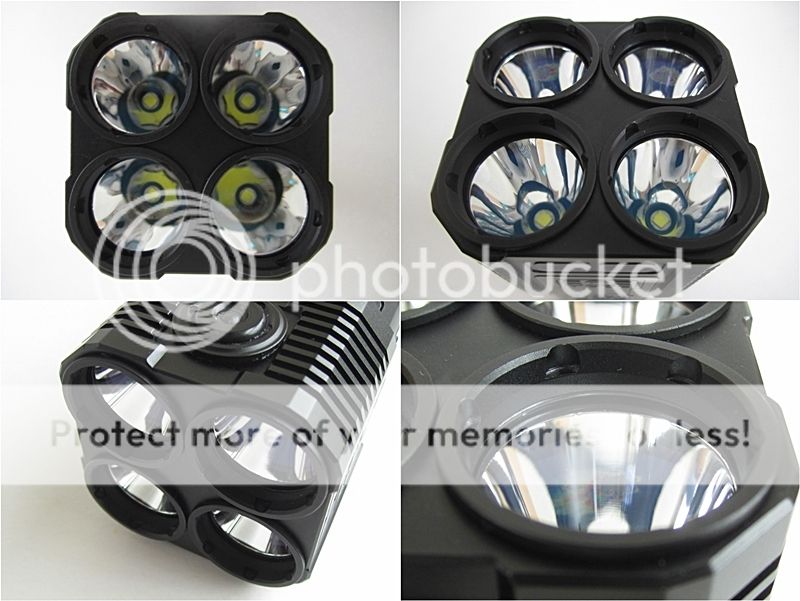
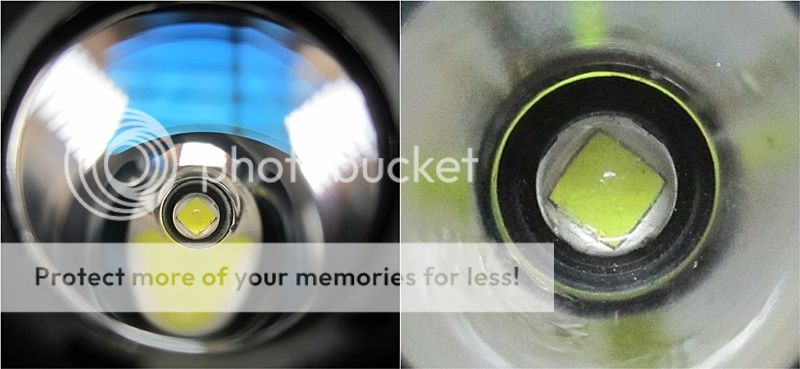
The front head has four independent XM-L2 emitters, each in their own SMO reflector compartment. There is an independent flat bezel ring on each lens. The light has independent smaller cooling fin on the corner of the head respectively. There is the o-ring between the lens and the reflector. Also I could find there's the waterproof o-ring around the bezel ring as well when I unscrew the bezel ring.
.
.
The light uses AR coating lens and the sky blue hue is reflected on it.
All metal reflectors are smooth. Each emitter is well-centered in its own reflector on my sample. There is an waterproof o-ring between the stainless bezel ring and reflector.
.
.

The both sides of the head show two XP-L emitters with diffused lens. It seems that each diffused lens is plastic.
.
.
The OLED display screen, when first activated, shows in the order of output lumens, battery voltage, compass and temperature quickly. At the same time, the two red sensitive touch buttons illuminate. After that, the OLED disply screen will show output lumens. A click on the OLED mode button can transfer in the order of output lumens -> battery voltage -> compass -> temperature -> cycle. Both OLED display and two red sensitive touch buttons will turn themselves off if there is no activity at the right mode button for 30 secs.
Note that you can activate the OLED display without turning the light on (i.e., whenever you click on the OLED mode button, you will see battery voltage -> compass -> temperature -> cycle).
The On-Off switch on the head is electronic. Switch feel is about typical for this class and not much different. The switching travel is not long, with average resistance and provides audible click when engaged.
.
.
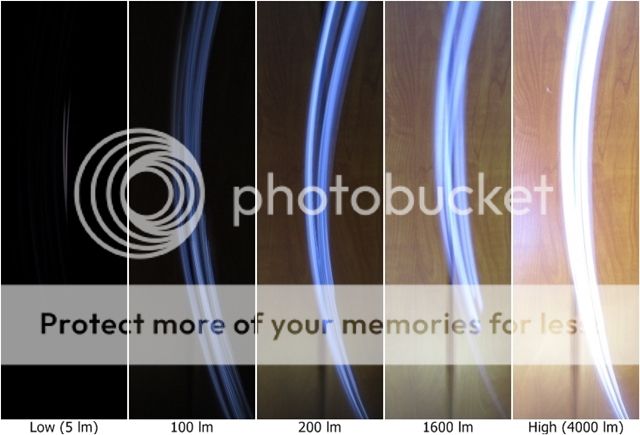
You can control the output using the (+), (-) sensitive touch buttons, as I will explain in the User Interface below. There are a lot of output levels much more than the above picture, between High (4000lumens) and Low (5lumens) for 4xXM-L2 spot beam. Actually I can see 15 levels on the screen display. The OLED display shows the output levels both in bar indicator and in numbers.
.
.
You can control the output using the same (+), (-) sensitive touch buttons for 2xXP-L flood beam. The OLED display shows the output levels in numbers only, without showing in bar indicator. Actually I can count 64 levels on the screen display.
.
.
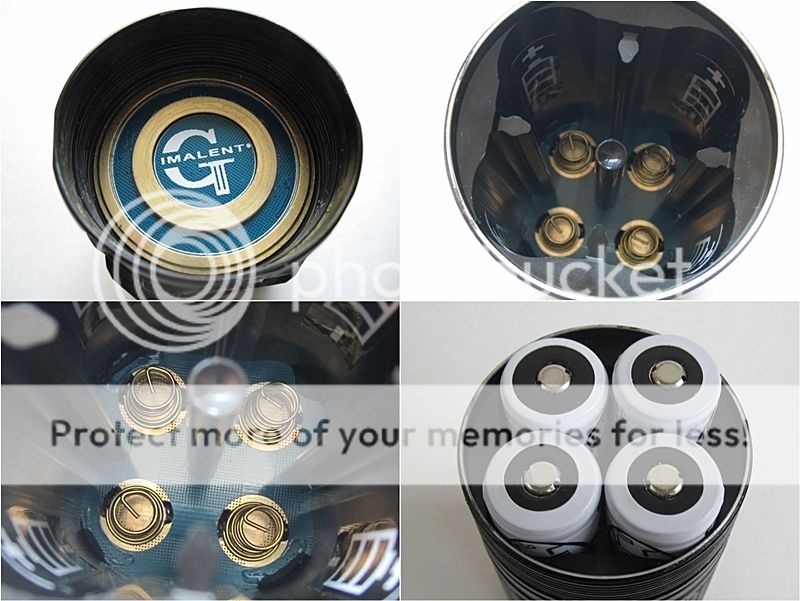
The head base of the light has a raised brass yellow positive contact ring to contact with all positive contacts of the batteries. The negative contact rim surrounds the positive contact. The light doesn't use a battery carrier. This makes the light more compact than others in this space. The DDT40 uses a 1S4P arrangement. The cells are arranged in parallel, so you can run a lower number of cells, but with increased current draw on each one. I don't recommend you try to run High output level on anything but the full complement of cells for 4xXM-L2 spot beam. Imalent confirm me the light has reverse polarity protection to protect from improper battery installation (i.e., the electronics of the DDT40 itself has in-built reverse polarity protection.)
.
.
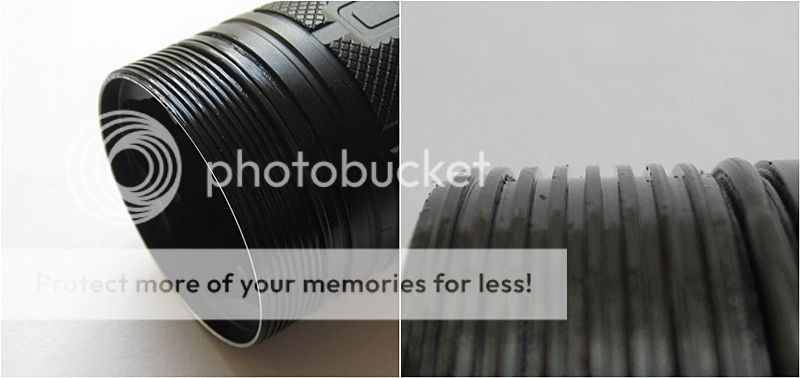
Screw threads are square cut and were nicely lubricated from the factory. They seem very good quality. Note that both male & female threads on the head & tube are anodized for head lock-out. They are smooth with no cross-threading or squeaking on my sample.
.
.

The battery tube continues the cylindrical shape. The light can tailstand very stably.
.
.
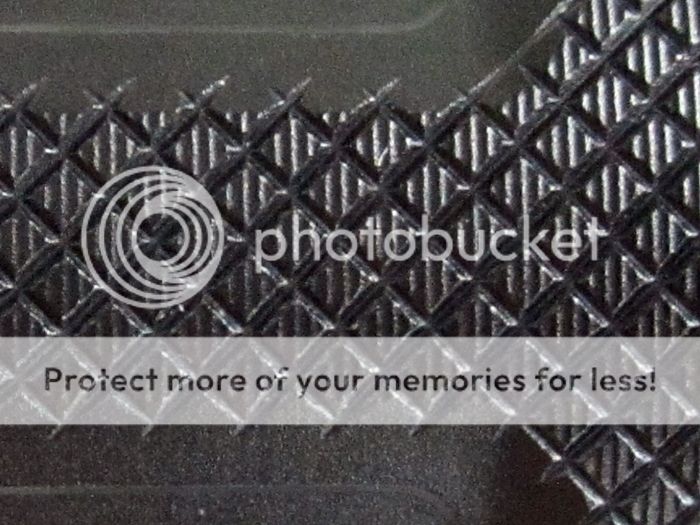
Knurling seem to be shallow and is not so aggressive. But overall grip is acceptable, as the exterior design of the head part enhance grip.
.
.
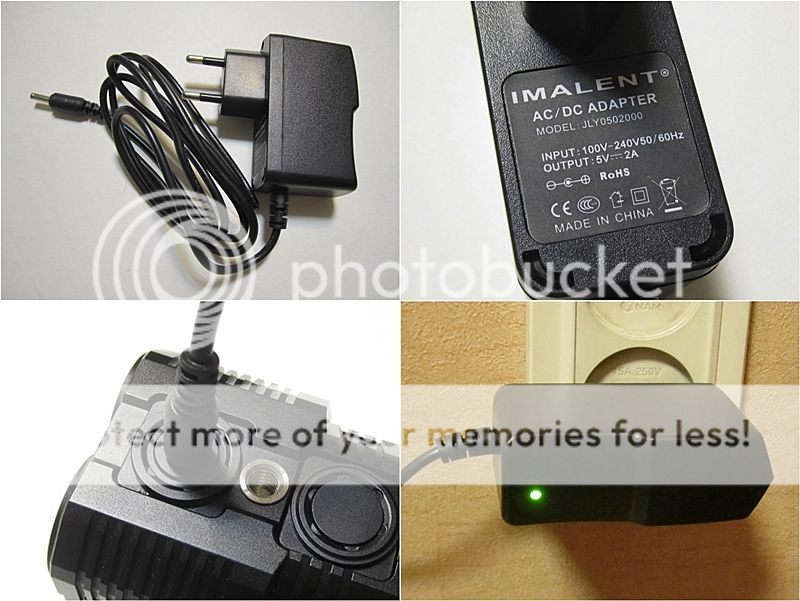
The AC/DC adapter connects to the head through a plug for charging 18650. The plug is snug and secure. When connecting the adapter to the power socket (or wall outlet), the LED indicator is on. To charge 18650, insert a plug into the charging port on the head. You can charge only one or two 18650 in the light. Note that you can charge neither CR123A nor RCR123A (i.e., CR123A and RCR123A are forbidden).
.
.
When inserting a plug into the charging port on the head, the battery symbol on the OLED display will flash and show the current voltage. The symbol will cycle between its 5 bars when charging. If there's error in charging such as wrong 18650 cells, the OLED display will flash "ERROR", and the light will stop charging. Once fully charged, the battery symbol on the OLED display will stop flashing and remain fully lit with showing 4.2V.
.
.
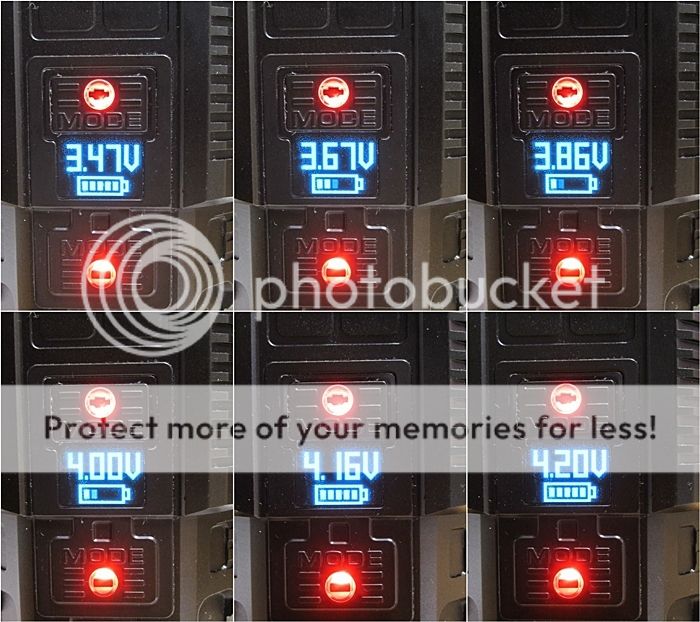
I did a simple charging test with four VicLite 18650 (2600mAh) protected cells in the light, and compared the values between DMM and OLED display.
The resting voltage at starting point of charging, under charging and after charging are
as follows :
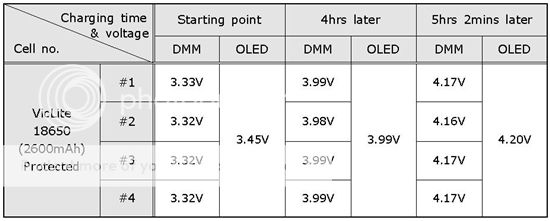
I noticed that the resting voltages on the OLED display at the start point of charging were 3.7% greater than DMM. It took about 5hrs 2mins to charge four cells when the OLED display showed 4.2V, while my DMM indicated about 4.17V (i.e., a bit low for full charging). Imalent says they will raise the final resting voltage to more 4.2V and make the light charge again if the cells are not fully charged half hour later after charged.
The resting voltages on the OLED display, four hours later, were the same as DMM.
.
.
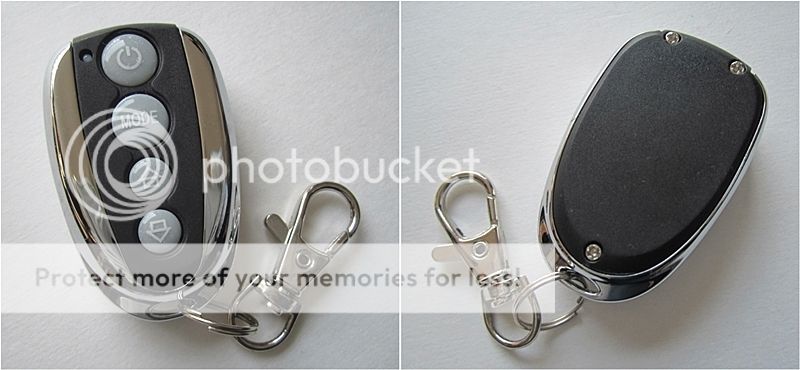
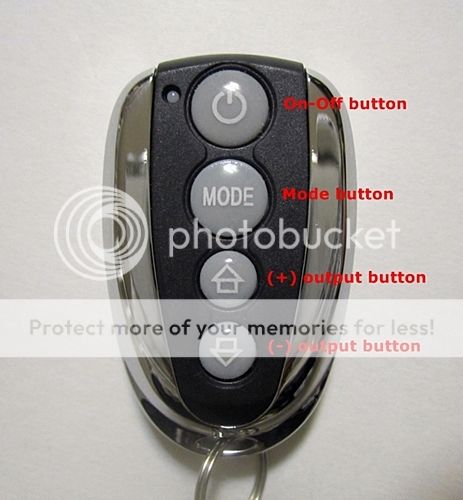
The remote control came with the light. It has an on-off button, mode button and output control buttons.
.
.
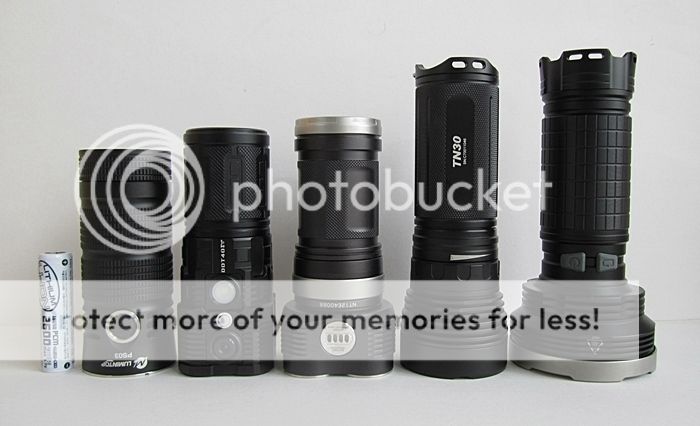
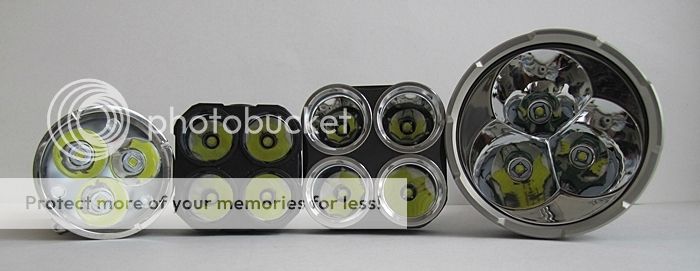
From left to right, VicLite 18650(2600mAh) protected, Lumintop PS03 (3xXM-L2 U2), Imalent DDT40 (4xXM-L2 U3, 2xXP-L), Niteye Eye40 (4xXM-L U2), Thrunite TN30 (3xXM-L2 U2),
Fenix TK75 (3xXM-L U2).
.
.
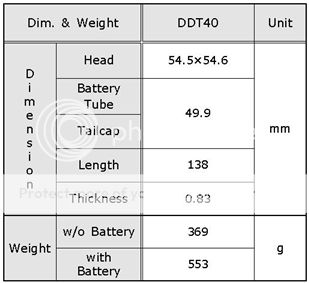
The head size & body weight excluding battery of the lights are as follows :
PS03 : 54.8mm / 313g, DDT40 : 54.5x54.6mm / 369g, EYE40 : 66.0x66.0mm / 509g,
TK75 : 87.9mm / 506g
.
.
Measured Dimensions & Weight
.
.
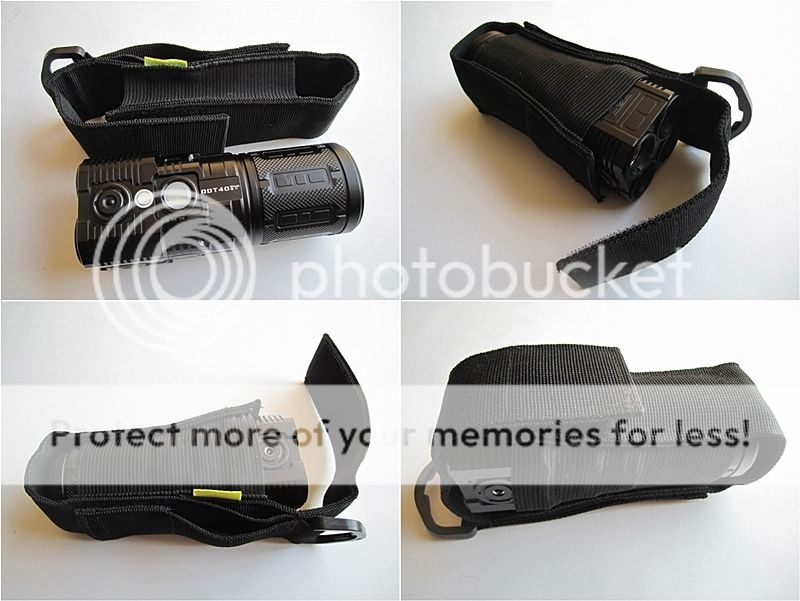
The light comes with a nylon holster with a velcro strap on the head. The light fits in the holster head-up and down. But it's easier to fit in the holster head-up.
.
.
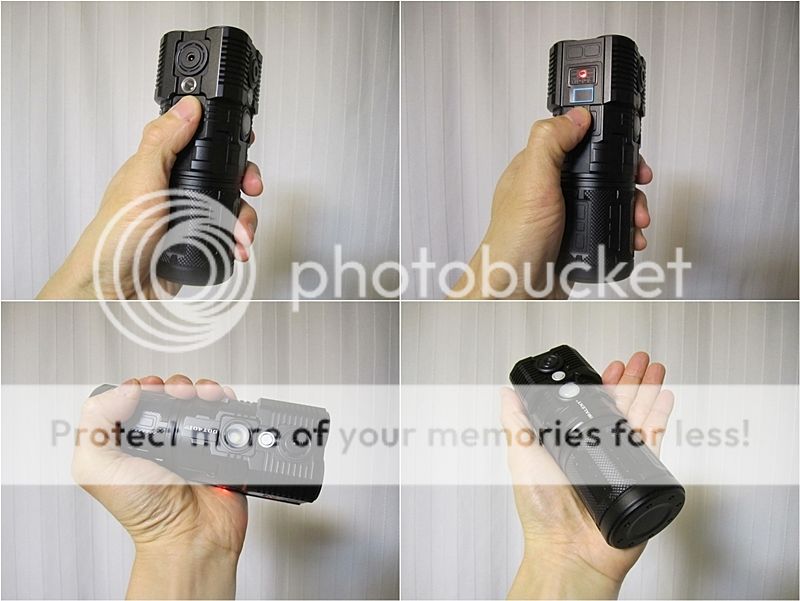
The light is a good size with a right weight to manage for 4x18650 class. The gripability seems acceptable. Handling & balance of the light is good. The overall build quality is very high.
.
.
User Interface
1. Using the light without the remote control
Turn the light on by a quick click of the On-Off switch in the head. Turn the light off by a sustained press-hold of the switch for about 0.5 sec.
Note that there is no mode memory for when you turn the light off-on (i.e., returns to the High level (4000 lumens) always) for 4xXM-L2 spot beam. But there is mode memory for 2xXP-L flood beam.
With the spot beam on, click the left mode button to transfer between spot and flood beam.
Strobe is accessed by pressing and holding the same button for more than 0.5 sec when the spot beam is on. Press and hold again to advance to beacon. Do it again to advance to SOS. Press and hold again to return to constant spot beam. It returns to Med. level (2000 lumens).
Note that there is no memory for the blinking modes.
As I mentioned above, the OLED display, when first activated, shows in the order of output lumens, battery voltage, compass and temperature quickly. At the same time, the two red sensitive touch buttons illuminate. After that, the OLED display will show output lumens. A click on the OLED mode button can transfer in the order of output lumens -> battery voltage -> compass -> temperature -> cycle. Both OLED display and two red sensitive touch buttons will turn themselves off if there is no activity at the right mode button for 30 secs.
With the spot or flood beam on, you can control the output using the (+), (-) sensitive touch buttons. Press and hold the (+) sensitive touch button to increase the output and vice versa.
Just release the button to set the output you want. You can adjust or control the output more smoothly by clicking the button frequently. Note that you can adjust or control the output while wearing gloves.
There is a "lock and unlock" of the OLED display and sensitive touch buttons. When you click the On-Off switch when on, you can't control the output after the OLED display and the two red sensitive buttons shut off. To toggle the display (including two red sensitive buttons) on or off at any time, simply click the On-Off switch again.
.
.
2. Using the remote control
The remote control only works when the light has been turned on first.
With the spot beam (4xXM-L2) on, you can turn the light off-on, change mode and adjust the output level by using the remote control until changing the batteries in the light. There is no mode memory for when you turn the light off-on (i.e., returns to the High level (4000 lumens) always) for 4xXM-L2 spot beam. But there is mode memory for 2xXP-L flood beam. Press the mode button to advance modes in the following repeating sequence : Spot beam -> Flood beam -> Strobe (spot) -> Beacon (spot) -> SOS (spot). Press Up() and Down() arrow keys to change the output level. Note that the output level control works when in Strobe or Beacon or SOS as well (i.e., press Up and Down arrow keys to control the relative output of these modes). There is no memory for the blinking modes.
When using spot beam, you will have much more discrete output levels in case of using the remote control than using the light. You will not be able to see the output lumens on the OLED display, when using the remote control. You can use the remote control within range of about 10m distance. Also it depends on the angle (i.e., the remote control works well within 160degrees).
.
.
PWM
The light shows no sign of PWM at any output levels for spot & flood beam. It seems the light is actually current-controlled. I notice there is no buzzing sound at all output levels in my sample.
.
.
Runtime

The DDT40 steps down on High after around 3 mins, and this seems to be a timed drop-down, not a thermal sensor feature. The light shows a gradual drop-off after a defined step-down in output (See green line).
The above runtime labelled as "Accumulated High (red line)" is an accumulated runtime for High output. It means I repeated restarts every 3 mins. Initial max. output can be obtained again by simply clicking the (+) sensitive touch button. The accumulated High shows a more sharp drop-off after a step-down in output than non-accumulated High (green line). The light shows a typical runtime pattern of the parallel arrangement in batteries.
.
.
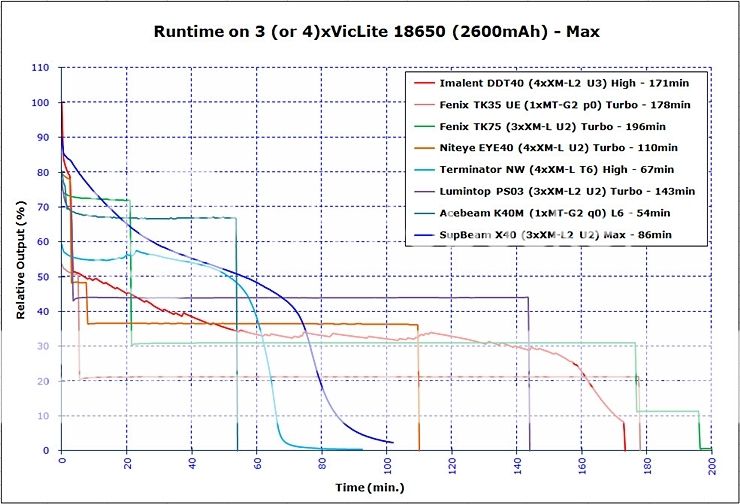
The DDT40 is brighter than other lights at very initial stage in this battery class.
.
.
Beamshot
1. White door beamshot (about 50cm from the white door) on max. output on 4x18650 (2600mAh) VicLite protected cell
- ISO100, F/10.0, 1/250sec, Auto white balance
.
.
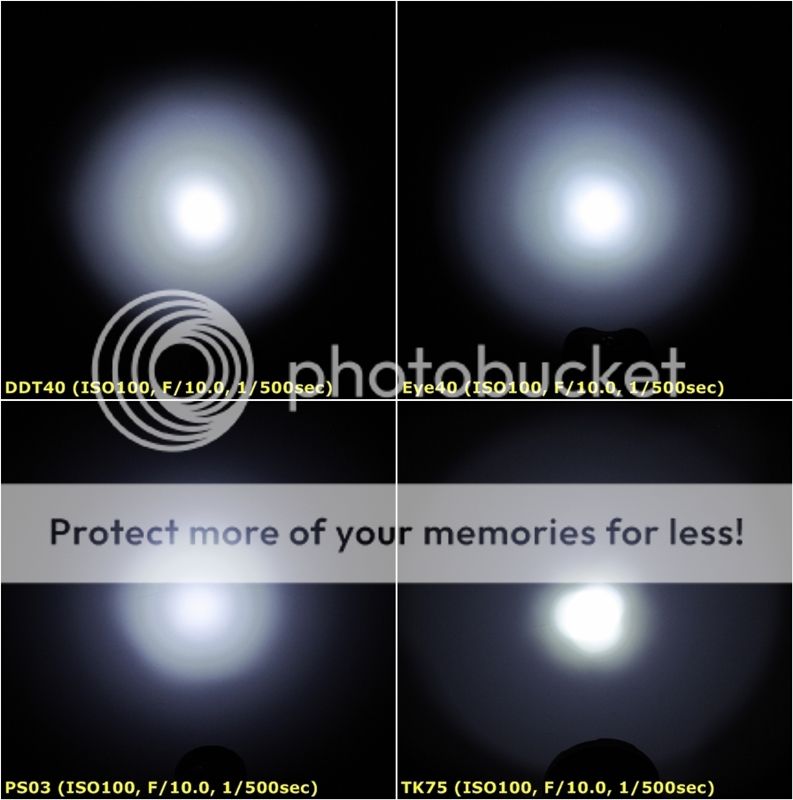
- ISO100, F/10.0, 1/500sec, Auto white balance
.
.
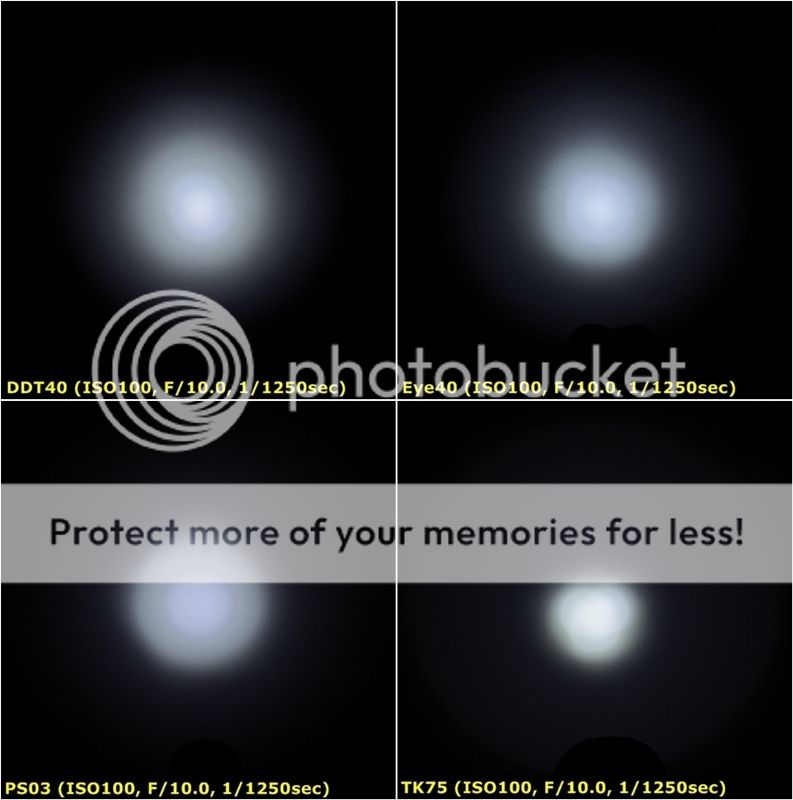
- ISO100, F/10.0, 1/1250sec, Auto white balance
.
.
2. Indoor beamshot (about 1.9m from the target) on max. output on 4x18650 (2600mAh) VicLite protected cell
- ISO100, F/2.8, 1/4sec, Auto white balance

.
.

.
.
3. Indoor beamshot (about 7m from the target) on max. output on 4x18650 (2600mAh) VicLite protected cell
- ISO100, F/2.8, 1/15sec, Auto white balance

.
.

.
.
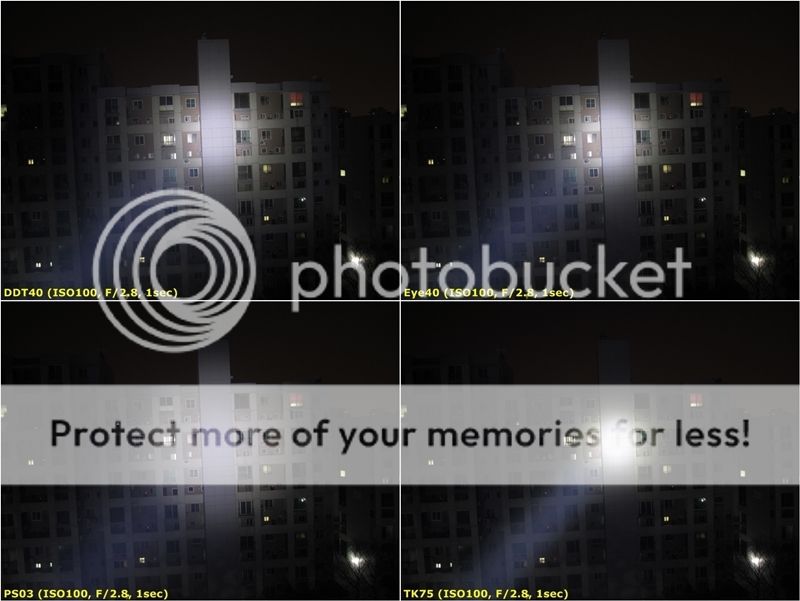
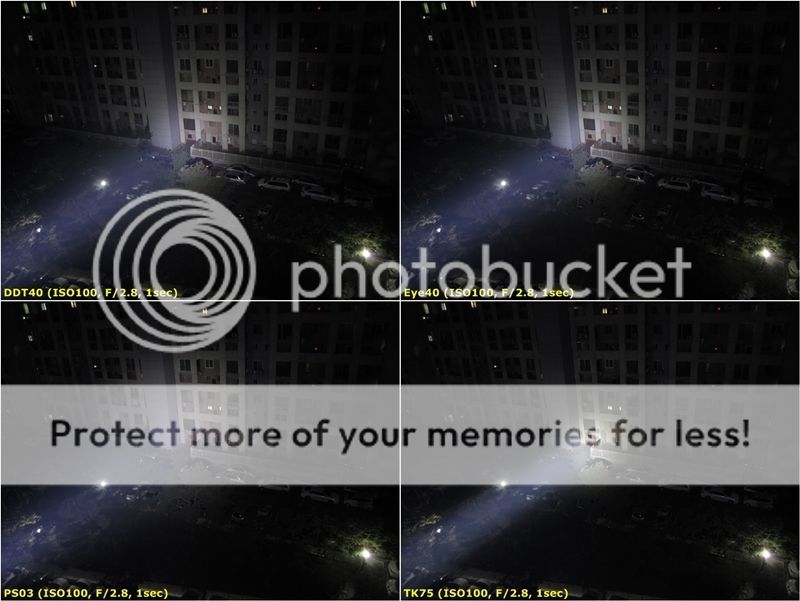
4. 55m Outdoor Beamshot on max. output on 4x18650 (2600mAh) VicLite protected cell
- ISO100, F/2.8, 1sec, Auto white balance
.
.
.
.
5. 60~65m Outdoor Beamshot on max. output on 4x18650 (2600mAh) VicLite protected cell
- ISO100, F/2.8, 1sec, Auto white balance
.
.
The overall beam pattern of the DDT40 is similar to Eye40, but similar hotspot and wider spill.
.
.

The light gives a lower Low output level (5lumens).
Imalent DDT40 was provided by Imalent for review.
Packaging is a cardboard box with cut-out packaging foam. Included inside is the light, user manual, warranty card, extra o-rings, holster, remote control, OLED screen protector and charging adapter.
.
.
Manufacturer Specifications from Imalent website & user manual :
• Utilizes 4pcs CREE XM-L2 LED,and 2 pcs XP-L LED with a lifetime of up to 50,000 hours
• Backlit touch screen panel facilitates convenient and discreet and infinite brightness adjustment
• Remote control from 10 meters away
• Digitally regulated output - maintains constant brightness
• Electronic reverse battery protection
• Battery capacity indicator
• Working voltage : 2.8-9V
• Optimized deep metal reflector maintains great throw distance and spread with an ideal beam pattern
• Dimensions : 139mm(length)x68mm(head diameter)x50mm(tail diameter)
• Weight : 366g (battery excluded)
• Aerospace-grade aluminum alloy body
• Military Specification Type III- hard anodized
• Ultra-clear tempered glass lens resists scratches and impacts
• Accessories : O-rings, Holster, Screen protector, Remote controller
.
.
The hard (type III) anodizing is a slightly glossy black and consistent throughout with no chips on my sample. There are manufacturer, model name on the head. There are some knurling on the battery tube only.
.
.
From left to right, XP-L LED with a diffused lens, mode button, IR receiver.
.
.
From left to right, on-off switch, standard tripod attachment, built-in charging port.
.
.
From left to right, XP-L LED with a diffused lens, OLED mode button, IR receiver.
.
.
From left to right, (+) touch sensitive button, OLED display screen, (-) touch sensitive button.
.
.
The light has mainly 2 parts (i.e. head and battery tube).
.
.
The front head has four independent XM-L2 emitters, each in their own SMO reflector compartment. There is an independent flat bezel ring on each lens. The light has independent smaller cooling fin on the corner of the head respectively. There is the o-ring between the lens and the reflector. Also I could find there's the waterproof o-ring around the bezel ring as well when I unscrew the bezel ring.
.
.
The light uses AR coating lens and the sky blue hue is reflected on it.
All metal reflectors are smooth. Each emitter is well-centered in its own reflector on my sample. There is an waterproof o-ring between the stainless bezel ring and reflector.
.
.
The both sides of the head show two XP-L emitters with diffused lens. It seems that each diffused lens is plastic.
.
.
The OLED display screen, when first activated, shows in the order of output lumens, battery voltage, compass and temperature quickly. At the same time, the two red sensitive touch buttons illuminate. After that, the OLED disply screen will show output lumens. A click on the OLED mode button can transfer in the order of output lumens -> battery voltage -> compass -> temperature -> cycle. Both OLED display and two red sensitive touch buttons will turn themselves off if there is no activity at the right mode button for 30 secs.
Note that you can activate the OLED display without turning the light on (i.e., whenever you click on the OLED mode button, you will see battery voltage -> compass -> temperature -> cycle).
The On-Off switch on the head is electronic. Switch feel is about typical for this class and not much different. The switching travel is not long, with average resistance and provides audible click when engaged.
.
.
You can control the output using the (+), (-) sensitive touch buttons, as I will explain in the User Interface below. There are a lot of output levels much more than the above picture, between High (4000lumens) and Low (5lumens) for 4xXM-L2 spot beam. Actually I can see 15 levels on the screen display. The OLED display shows the output levels both in bar indicator and in numbers.
.
.
You can control the output using the same (+), (-) sensitive touch buttons for 2xXP-L flood beam. The OLED display shows the output levels in numbers only, without showing in bar indicator. Actually I can count 64 levels on the screen display.
.
.
The head base of the light has a raised brass yellow positive contact ring to contact with all positive contacts of the batteries. The negative contact rim surrounds the positive contact. The light doesn't use a battery carrier. This makes the light more compact than others in this space. The DDT40 uses a 1S4P arrangement. The cells are arranged in parallel, so you can run a lower number of cells, but with increased current draw on each one. I don't recommend you try to run High output level on anything but the full complement of cells for 4xXM-L2 spot beam. Imalent confirm me the light has reverse polarity protection to protect from improper battery installation (i.e., the electronics of the DDT40 itself has in-built reverse polarity protection.)
.
.
Screw threads are square cut and were nicely lubricated from the factory. They seem very good quality. Note that both male & female threads on the head & tube are anodized for head lock-out. They are smooth with no cross-threading or squeaking on my sample.
.
.
The battery tube continues the cylindrical shape. The light can tailstand very stably.
.
.
Knurling seem to be shallow and is not so aggressive. But overall grip is acceptable, as the exterior design of the head part enhance grip.
.
.
The AC/DC adapter connects to the head through a plug for charging 18650. The plug is snug and secure. When connecting the adapter to the power socket (or wall outlet), the LED indicator is on. To charge 18650, insert a plug into the charging port on the head. You can charge only one or two 18650 in the light. Note that you can charge neither CR123A nor RCR123A (i.e., CR123A and RCR123A are forbidden).
.
.
When inserting a plug into the charging port on the head, the battery symbol on the OLED display will flash and show the current voltage. The symbol will cycle between its 5 bars when charging. If there's error in charging such as wrong 18650 cells, the OLED display will flash "ERROR", and the light will stop charging. Once fully charged, the battery symbol on the OLED display will stop flashing and remain fully lit with showing 4.2V.
.
.
I did a simple charging test with four VicLite 18650 (2600mAh) protected cells in the light, and compared the values between DMM and OLED display.
The resting voltage at starting point of charging, under charging and after charging are
as follows :
I noticed that the resting voltages on the OLED display at the start point of charging were 3.7% greater than DMM. It took about 5hrs 2mins to charge four cells when the OLED display showed 4.2V, while my DMM indicated about 4.17V (i.e., a bit low for full charging). Imalent says they will raise the final resting voltage to more 4.2V and make the light charge again if the cells are not fully charged half hour later after charged.
The resting voltages on the OLED display, four hours later, were the same as DMM.
.
.
The remote control came with the light. It has an on-off button, mode button and output control buttons.
.
.
From left to right, VicLite 18650(2600mAh) protected, Lumintop PS03 (3xXM-L2 U2), Imalent DDT40 (4xXM-L2 U3, 2xXP-L), Niteye Eye40 (4xXM-L U2), Thrunite TN30 (3xXM-L2 U2),
Fenix TK75 (3xXM-L U2).
.
.
The head size & body weight excluding battery of the lights are as follows :
PS03 : 54.8mm / 313g, DDT40 : 54.5x54.6mm / 369g, EYE40 : 66.0x66.0mm / 509g,
TK75 : 87.9mm / 506g
.
.
Measured Dimensions & Weight
.
.
The light comes with a nylon holster with a velcro strap on the head. The light fits in the holster head-up and down. But it's easier to fit in the holster head-up.
.
.
The light is a good size with a right weight to manage for 4x18650 class. The gripability seems acceptable. Handling & balance of the light is good. The overall build quality is very high.
.
.
User Interface
1. Using the light without the remote control
Turn the light on by a quick click of the On-Off switch in the head. Turn the light off by a sustained press-hold of the switch for about 0.5 sec.
Note that there is no mode memory for when you turn the light off-on (i.e., returns to the High level (4000 lumens) always) for 4xXM-L2 spot beam. But there is mode memory for 2xXP-L flood beam.
With the spot beam on, click the left mode button to transfer between spot and flood beam.
Strobe is accessed by pressing and holding the same button for more than 0.5 sec when the spot beam is on. Press and hold again to advance to beacon. Do it again to advance to SOS. Press and hold again to return to constant spot beam. It returns to Med. level (2000 lumens).
Note that there is no memory for the blinking modes.
As I mentioned above, the OLED display, when first activated, shows in the order of output lumens, battery voltage, compass and temperature quickly. At the same time, the two red sensitive touch buttons illuminate. After that, the OLED display will show output lumens. A click on the OLED mode button can transfer in the order of output lumens -> battery voltage -> compass -> temperature -> cycle. Both OLED display and two red sensitive touch buttons will turn themselves off if there is no activity at the right mode button for 30 secs.
With the spot or flood beam on, you can control the output using the (+), (-) sensitive touch buttons. Press and hold the (+) sensitive touch button to increase the output and vice versa.
Just release the button to set the output you want. You can adjust or control the output more smoothly by clicking the button frequently. Note that you can adjust or control the output while wearing gloves.
There is a "lock and unlock" of the OLED display and sensitive touch buttons. When you click the On-Off switch when on, you can't control the output after the OLED display and the two red sensitive buttons shut off. To toggle the display (including two red sensitive buttons) on or off at any time, simply click the On-Off switch again.
.
.
2. Using the remote control
The remote control only works when the light has been turned on first.
With the spot beam (4xXM-L2) on, you can turn the light off-on, change mode and adjust the output level by using the remote control until changing the batteries in the light. There is no mode memory for when you turn the light off-on (i.e., returns to the High level (4000 lumens) always) for 4xXM-L2 spot beam. But there is mode memory for 2xXP-L flood beam. Press the mode button to advance modes in the following repeating sequence : Spot beam -> Flood beam -> Strobe (spot) -> Beacon (spot) -> SOS (spot). Press Up() and Down() arrow keys to change the output level. Note that the output level control works when in Strobe or Beacon or SOS as well (i.e., press Up and Down arrow keys to control the relative output of these modes). There is no memory for the blinking modes.
When using spot beam, you will have much more discrete output levels in case of using the remote control than using the light. You will not be able to see the output lumens on the OLED display, when using the remote control. You can use the remote control within range of about 10m distance. Also it depends on the angle (i.e., the remote control works well within 160degrees).
.
.
PWM
The light shows no sign of PWM at any output levels for spot & flood beam. It seems the light is actually current-controlled. I notice there is no buzzing sound at all output levels in my sample.
.
.
Runtime
The DDT40 steps down on High after around 3 mins, and this seems to be a timed drop-down, not a thermal sensor feature. The light shows a gradual drop-off after a defined step-down in output (See green line).
The above runtime labelled as "Accumulated High (red line)" is an accumulated runtime for High output. It means I repeated restarts every 3 mins. Initial max. output can be obtained again by simply clicking the (+) sensitive touch button. The accumulated High shows a more sharp drop-off after a step-down in output than non-accumulated High (green line). The light shows a typical runtime pattern of the parallel arrangement in batteries.
.
.
The DDT40 is brighter than other lights at very initial stage in this battery class.
.
.
Beamshot
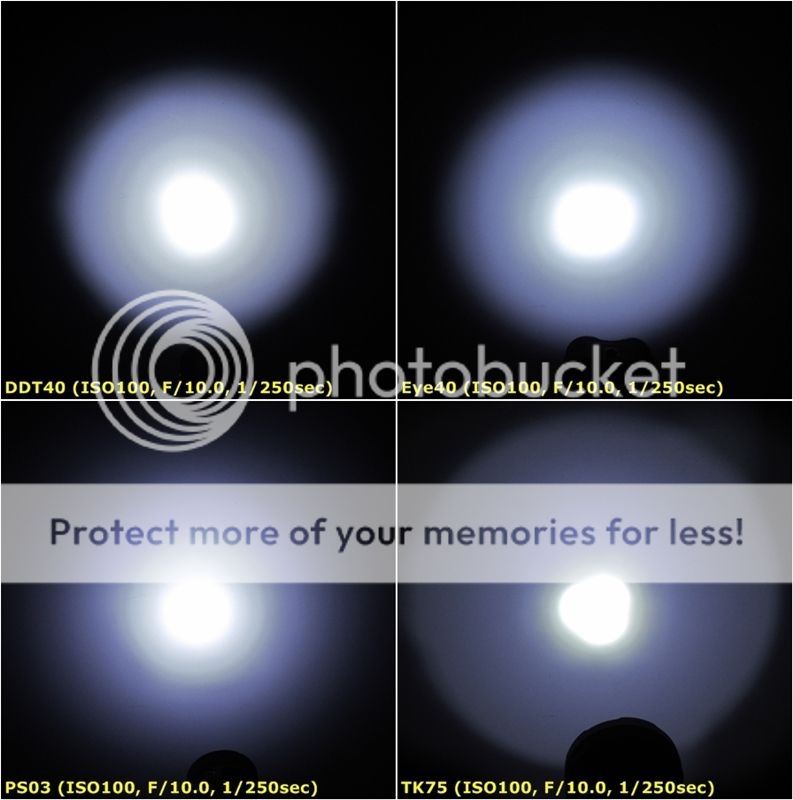
1. White door beamshot (about 50cm from the white door) on max. output on 4x18650 (2600mAh) VicLite protected cell
- ISO100, F/10.0, 1/250sec, Auto white balance
.
.
- ISO100, F/10.0, 1/500sec, Auto white balance
.
.
- ISO100, F/10.0, 1/1250sec, Auto white balance
.
.
2. Indoor beamshot (about 1.9m from the target) on max. output on 4x18650 (2600mAh) VicLite protected cell
- ISO100, F/2.8, 1/4sec, Auto white balance
.
.
.
.
3. Indoor beamshot (about 7m from the target) on max. output on 4x18650 (2600mAh) VicLite protected cell
- ISO100, F/2.8, 1/15sec, Auto white balance
.
.
.
.
4. 55m Outdoor Beamshot on max. output on 4x18650 (2600mAh) VicLite protected cell
- ISO100, F/2.8, 1sec, Auto white balance
.
.
.
.
5. 60~65m Outdoor Beamshot on max. output on 4x18650 (2600mAh) VicLite protected cell
- ISO100, F/2.8, 1sec, Auto white balance
.
.
The overall beam pattern of the DDT40 is similar to Eye40, but similar hotspot and wider spill.
.
.
The light gives a lower Low output level (5lumens).
Imalent DDT40 was provided by Imalent for review.
Last edited: