how do you protect li-ion batteries for a pack?

josepoyanuk

Newly Enlightened
Joined
Aug 12, 2010
Messages
24


I have remade the connections with your 12V 9A power supply. Now the transmiter is feed directly, the power supply also feeds the charger. A diode prevent from the battery from...exploding :)


MCmicromanpack.png
 

DIWdiver

Flashlight Enthusiast
Joined
Jan 27, 2010
Messages
2,725
Location
Connecticut, USA
The weight is in the data sheet, 0.1 Kg and change. Be careful not to bury the power supply in a pack or something, it will need good ventilation (free air) to keep itself cool and reliable.

Also, I think you need 2 diodes, so neither battery can try to charge the other :poof:.

Depending on how the battery charger works, this might or might not do what you want. A proper LiIon charger (and any Turnigy hobby charger is likely to be one) should stop the charge cycle once full charge is reached. LiIons should NOT be kept on a float charge. Once the charge cycle is ended, it might not start up again until you disconnect the battery from the charger. You'll have to try it out and see what happens.

FWIW, I've read that LiIons have the longest life if stored at 50% charge, not 100%. This suggests that frequent very shallow discharge/recharge cycles and constant charge to full capacity would not result in a battery lasting a long time.
 

josepoyanuk

Newly Enlightened
Joined
Aug 12, 2010
Messages
24
I will follow your advice and use two diodes. The weight for the charger is very low, I hope it really does a good job.
it is quite expensive, more than 50 dollars. Anyway the dimensions are the correct ones because it is sleek.

thank you, jose
 

rico-la

Newly Enlightened
Joined
Oct 12, 2012
Messages
18
bro,

I think I know what you mean...No, you only need one protection circuit for the pack, which will be made up of any number of batteries connected in parallel and then in series to make the voltage you want.

You do need to source the correct PCB for the number of cells you want to build.

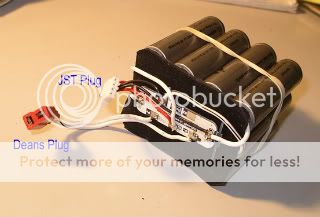
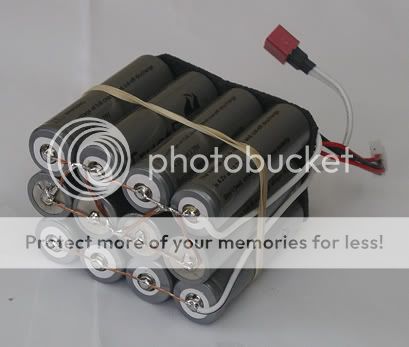
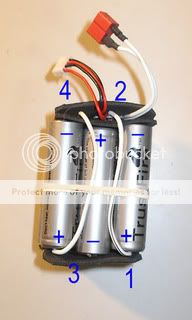
Probably easier to have a look at these pictures. This is a 10Ah 11.1V (3 cell) pack made up of 12*18650 batteries. Each cell is a row of 4 batteries connected in parallel, and then these rows or 'cells' are connected in series with the other rows to make up the 3 cells.

Compare the circuit diagram with the numbered leads in the photo. You will see how the four leads come up to the PCB.

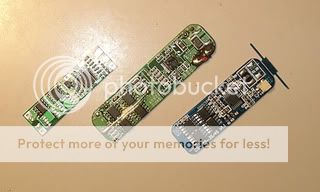
This PCB can be used for either a 3 cell or 4 cell pack. In a 3-cell the contact marked 'B3' is ignored.

The JST plug is for balance charging and has its 4 leads connected to the batteries using the solder pads of the PCB. If you want to balance charge then check the charger as it will have the polarity marked on the plug port. You then plug in the JST to see what plug lead needs to go to what cell join.


batterypack.jpg
battery3bottom.jpg

battery2.jpg
batterycircuit.jpg

PCBexamples.jpg


Some examples of 3-cell PCBs above. The one on the left is 3 Amp limited while the two on the right are 5Amp.

Quick question regarding this diagram and using 4s pcb's for 3s packs.

I bought a tenergy ryd-03/4s, along with 4x tenergy 3568100 3.7v 2400mah lipo cells. The plan was a 4s pack, but one of the tabs broke of a cell, and i tried to solder a lead on it, until i became uncomfortable getting that close to the actual pack. Sanded/tinned/ tried everything, but just wasn't going to take a lead.

So a google search turned up this thread, and i wired up my pack in the same config you have, but with the above fore-mentioned pcb/cells. But, even though measured through the unprotected cell i get the right voltage, and all cell contacts to the pcb read the right voltage, as well as all being ~3.8 +/- 100mv (one is 3.9v), i dont get any power on the charge/discharge leads. The cells were charged last night, one by itself on a tenergy b6s+, the other two as a 2s pack on the same charger. The pack was protected w/ balance leads, and the single i just alligator clipped to the +/- charger leads. The 2s pack had only been fully discharge/charged once, and pretty much the cells are within range of similarity to be called identical in health/charge/usage.


I'd hook it up to the charger, but i'm a bit heasitent to do so, but i don't think theres any risk, just want a second opinion as to if its safe to do so before hand. I would assume the charger would detect the fault before anything got
out of hand, or it charged a miswired pack.

Heres a few pics of the pack, the pcb with a heat-sink on it is a sepic, which i will tune to 5v, and has a female usb lead for charging usb devices. The switch is to switch between that (sepic regulator), and the charge/discharge barrel connector. Discharge just meaning i could plug a barrel connector to the same port i charge from, while the switch is in charging position, and bypass the sepic regulator. Just don't want the sepic exposed to the charger when the pack is charging.

20130305008.jpg
20130305007.jpg
20130305006.jpg
20130305005.jpg
20130305004.jpg
20130305003.jpg
20130305001.jpg


Bad pcb? This model pcb doesnt work in a 3s config? 3s with a 4s pcb won't work with poly lithium cells?


Any comments/suggestions are most welcome :naughty:
 

Klem

Enlightened
Joined
Mar 26, 2010
Messages
581
Location
Perth Australia
...Nice build, interesting idea but perhaps you could watch your colour coding of the various wires. It could confuse you later or someone else who might want to work on it. Can I also suggest you be careful with your soldering as neatness will give you less heat on the PCB and less chance of shorts. Apart from that, it looks great! Well done!

There is constructive criticism, and just plain old criticism. I know which one is more appreciated and gets more results.

(Some free advice from someone who teaches for a living).
 

josb

Newly Enlightened
Joined
Aug 25, 2008
Messages
64
Location
The Netherlands, Eindhoven
Yes Klem, there is a difference in how someone writes things and a teacher does it different from a plain old technician :whistle:

I got the hint :wave: but he asked for any comments/suggestions.
 

rico-la

Newly Enlightened
Joined
Oct 12, 2012
Messages
18
thanks!

You are all right, sloppy soldering, and color coding should be a priority, i was working with jst's i had to frankenstein together since some wires were too short, and the black + jst lead was in fact on the tail end where it should be, though the wrong color obviusly since it was salvaged from another balance lead.

Still, it was just a quick test, i got some proper balance leads, and am going to clean up the pcb, and try again tonight. Unless the pcb is bad, it should have worked the way it was setup, but i'm going to get that pack dialed in first, then worry about a 5v regulator. And i'd rather use a RC lipo 5v ubec like i did on another project in lieu of that sepic. Much smaller and neater, not to mention more effecient. I hae a bit more practice after doing exactly that with a 4s 3500mah lipo with a 3a ubec to charge a tablet with a high current draw, relatively speaking in terms of usb (1.5a).

Thanks for the advice, it won't go unheeded, i know theres some serious fire hazards if your sloppy when working with lipos, that pack kinda had me sketched out and i disassembeled it the next day and ordered the right parts to do it safely.

I'll update either way once i try and get that particular 3/4s pcb to work, i have another 4s pcb i can try if not. Going to do it nice and clean with some xt60's, and a 6" 4 wire jst this time.

Dont feel your advice is/was too harsh, that was a fairly dangerous wiring job, and in retrospect, not something i am proud of.
 

jambraun

Newly Enlightened
Joined
Oct 14, 2015
Messages
2
This is a re-post from http://www.candlepowerforums.com/vb/showthread.php?218420-Li-ion-lipo-battery-pack-building-and-soldering-123/page2...I think this thread is more pertinent.

Hope you don't mind me re-opening this thread. I think I see two different examples...1 makes sense to me and the other scares the crap outta me. I know I'm inexperienced and that 3-cell/4-battery pack looks short circuited to me let alone I have no idea how you'd connect it to a PCB, so thankfully I'm starting a little simpler, mostly like the close up one with the double wires connected to the PCB.

I'm trying to wire together a 14.8v Li-Ion battery pack (simple enough) and properly connect it to a PCB. Here's what I'm using:

http://www.batteryspace.com/pcbfor148vli-ionbatterypack5alimitwithfuelguagesocket.aspx
http://www.batteryspace.com/prod-specs/2778.pdf

My question is, how do I properly wire my battery pack to the PCB? In my first attempt I enlisted the help of an experienced solder tech that gave me the basics and helped me build my pack but I don't believe we connected it to the PCB properly. The pack was built using 4 li-ion 3.4v batteries in series to up the voltage to 14.8v, and then wires were soldered from the pack at each point to the PCB. The PCB registered full voltage on the fuel gauge so I know the PCB was able to detect power properly, but I feared since the battery pack was already wired in serial and we only had wires coming off the pack at the designated points, that there was actually no protection being provided. I've since dismantled the battery pack because I wasn't comfortable with the configuration.

Can someone offer suggestions on how the battery pack should actually be constructed for use with a PCB so that the protection is offered during charge and discharge? Maybe someone already has an example and can post a photo of the pack construction and PCB wiring together?

--Jarred
 

DIWdiver

Flashlight Enthusiast
Joined
Jan 27, 2010
Messages
2,725
Location
Connecticut, USA
There's a diagram in post #8 that shows it pretty clearly. It shows 3 cells connected to a board meant for 3 or 4 cells. The green lines are wires and batteries. A small vertical line next to a large vertical line is a cell, with the larger line the + side. Everything else is wires.

Any number of cells in parallel act like a single cell of larger capacity, even though technically it should be called a battery (to be pedantic, a battery is a group of cells).

The pictures show three batteries in series, with each battery being four cells in parallel.
 

dssguy1

Newly Enlightened
Joined
Oct 7, 2015
Messages
111
I'm also sorry to continue to resurrect this thread but I am going to make 3s1p, 2s1p and 2s2p battery packs for some heated coats out of 18650s. I was planning on using battery sleds and charging the batteries either externally on my VP2 or possibly in the pack occasionally via typical properly rated smart chargers with 5.5mmx2.1mm barrel connections.

I was going to just do Protected batteries to avoid having to stick with the same batteries in the pack forever. Being able to pull them out and pop in new ones when I need to quickly change over. I read someone say you couldn't use protected batteries in series because you would trip their circuits. Is that correct? Now that I think about it, it might make sense.

Help, I am about to click "BUY"!!

---OK I did more research and it looks like I can use protected if I plan on taking them out of the pack and charging them separately.
 
Last edited:
Top