So was it 5/64" or 1/16"? Just have to know if me or xxo was correct. For ego reasons. Lol. If I remember 5/64 is for D cell lights. But it's been a while since I removed a switch.As far as the switch coming out, it should slide out the back. Or some models you need to remove a circlip from the front and it slides out that way. Corrosion can also cause issues when sliding out the back.
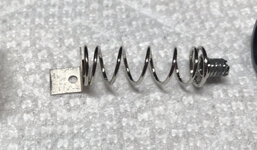
Another thing while you have it apart, the switch uses a pretty thin spring, which current needs to flow through. Whenever I remove a switch, I bypass that spring with desoldering braid to lower the resistance. Can't hurt even if you're switching to an led
So was it 5/64" or 1/16"? Just have to know if me or xxo was correct. For ego reasons. Lol. If I remember 5/64 is for D cell lights. But it's been a while since I removed a switch.
As far as the switch coming out, it should slide out the back. Or some models you need to remove a circlip from the front and it slides out that way. Corrosion can also cause issues when sliding out the back.
Another thing while you have it apart, the switch uses a pretty thin spring, which current needs to flow through. Whenever I remove a switch, I bypass that spring with desoldering braid to lower the resistance. Can't hurt even if you're switching to an led
VicV,
Yesterday, do you remember that in one of your Post, you stated;
"On older c cell lights, I believe it's a 1/16" Allen key."
Then XXO posted;
"A 5/64 Allen key should be the right size."
After those two Post I went back to the toolbox, then Posted;
"You mentioning 1/16" Allen did the trick!
I took my Allen knife set and started from the Bottom - Up (in size order), instead of Top - Down and the 5/64" fit with a lot of slop or slack."
You then posted;
"So was it 5/64" or 1/16"? Just have to know if me or xxo was correct."
To which I posted;
"1/16" spun inside the head. 5/64" had a lot of slop, but fit just enough that by slowly increasing the torque it gave up and started spinning."
______
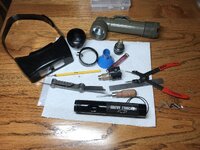
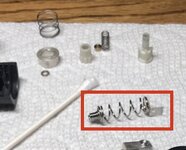
Well, Sir, this evening I started the process of disassembling the Switch Assembly (the primary reason for joining Candle Power and making this post is because the switch does not work) in order to;
1) Clean and remove all dust and debris from the inside
2) Lubricate all contact surfaces with OxGard to improve connectivity and prevent any corrosion to the contact points
3) (now that I learned about it from watching a video yesterday about disassembling, lubricating the switch pieces with Electrical Switch grease, reassemble, and reinstall) Lubricate the switch pieces with switch lubricant.
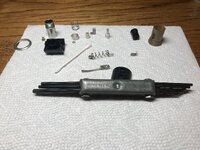
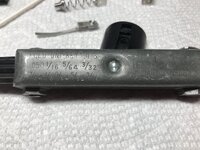
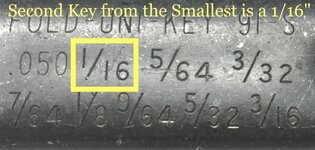
While cleaning the various switch pieces and polishing the corrosion off of certain contact point with copper polish, by chance I picked up my Allen Knife and started cleaning and polishing the back side. Well guess what I saw for the first time in 45 to 50 years Doctor VicV; I saw ALL of the sizes of the Allen Knife and discovered that the sizes start with 0.050! That means that the 1/16" Allen is the SECOND Allen. That means that YOU were absolutely correct!
Winner, Winner, Chicken Dinner!
This Mag was built some time from 1992 to 1995. That means that when you said; "
On older C Cell lights, I believe it's a 1/16" Allen key.", you knew exactly what you were talking about.
When I have successfully restored this little jewel I will share pictures of it.
Thanks!