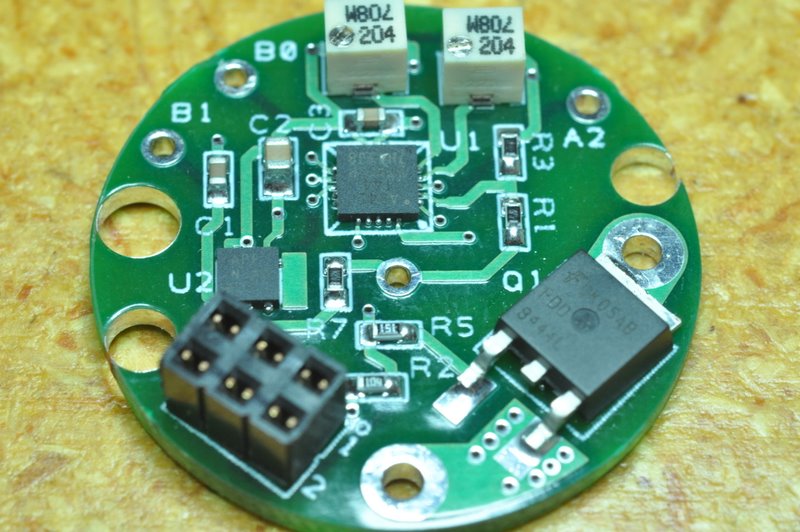
• You must be a Supporting Member to participate in the Candle Power Forums Marketplace.

    You can become a Supporting Member.

Sold/Expired SALE: JM-PhD-D1 PWM Hotwire Regulator

LuxLuthor

Flashaholic
Joined
Nov 5, 2005
Messages
10,654
Location
MS

Roland

Newly Enlightened
Joined
Jun 4, 2008
Messages
183
Yes. Sorry. I didn't get a quote for shipping to the Netherlands. I'll have my wife get a quote while she's out next week.
That is fine. Perhaps you could also ask Fivemega how he does it, he always gets good and cheap USPS international shipping.
 

JimmyM

Flashlight Enthusiast
Joined
Aug 30, 2006
Messages
2,853
Location
Boston, MA, USA
That is fine. Perhaps you could also ask Fivemega how he does it, he always gets good and cheap USPS international shipping.
First Class International mail is usually the cheapest. A few bucks. $4-$7 usually. I'll get back to you next week. In any case, I'll ship your regulator as soon as I get home.
 

Alan B

Flashlight Enthusiast
Joined
Nov 19, 2007
Messages
1,963
Location
San Francisco Bay Area
First Class International mail is usually the cheapest. A few bucks. $4-$7 usually. I'll get back to you next week. In any case, I'll ship your regulator as soon as I get home.

You can get shipping quotes from the usps website. First class airmail should be best under 12 ounces (or whatever they call it, they keep changing the names). They also have some flat rate priority mail boxes that might be good to consider. The padded envelopes occasionally get run through machines and the contents get flattened.
 

petrev

Flashlight Enthusiast
Joined
Jun 12, 2005
Messages
1,535
Location
SW England
Hi Jimmy

Put me down for 2 - hopefully your JM-PhD-C1 will be along shortly too !

Now Vlow - Cut-Off set points ? ? ?

Can you and Lux etc. check this for me ?
Errors etc? so I can correct it and then you may want to link to it in post #1
for a guide ?
My best guess for Regulator settings for Vlow - set as CellVlow x Cells

Corrected and updated with reference to JM, LL and AlanB comments
abatterylow3.gif

Based on info from AW threads
LiFe and LiMn based on these graphs and 5-10A rate ! and an old test I did

FMA A123 Datesheet
a123tests.jpg


e-Moli Testing RC-Tester WattFlyer.com
aemoli26700adc.png


Have a good trip and I will let you know my setups when everyone has checked my Vlow chart ! ! !

Cheers
Pete
 
Last edited:

Alan B

Flashlight Enthusiast
Joined
Nov 19, 2007
Messages
1,963
Location
San Francisco Bay Area
Oh God. Don't look too close! Your board was one of the first I made. Be merciful.

Under the microscope the board looks fine. A few tiny beads of solder noted, but far too small to be a problem, and they appear to be stuck in place. A few of the joints appear to have a bit more solder than they need, but again not enough to be a problem. I would say it looks fine, especially for a first board.

Even at 5x the view in the stereo microscope is pretty amazing. It is set up for 1x and 3x objectives, 10x eyepieces and 0.5x barlow, so I get 5x and 15x with everything in place. 5x has enough field of view to cover the entire board and then some, and a very long working distance with the barlow.

I also got a USB camera on the microscope but it is pretty low end and the field of view is less. Those views didn't look all that useful. I did take some nice photos directly with a Nikon 60mm macro lens, perhaps later I'll get time to post that.
 

cnjl3

Enlightened
Joined
Jan 22, 2006
Messages
723
Location
Deep in the heart of Texas
Like it? I love it. Today I had some time to take some DMM readings.
I don't own the right Fluke so I have to use the formula method:
VbulbRMS = sqrt (VbattDC * Vbulb)
Vbat under load is 15.16V and Vblub 10.56V which per the formula my driver yields DC RMS voltage of 12.65V. You set and wrote the voltage on the back of my driver as 12.6V so my DMM readings plugged into the above formula is close enough for me:) I have tried both bulbs '625 and the 1166 and both are nice and white with the same driver setting.
party.gif

P.S.
I was wondering - what formula do I use to measure amps?

Glad you like it, Carlos.

I have to travel for work next week I fly out Sunday), so no orders will be filled until after the Memorial day weekend. I'll be checking in here frequently though.
I have 90 boards made. Just one more set of 10 to do. I barely have any bridging on the Tiny84s now. Maybe 3 bridged chips in the last 3 or 4 sets. Tombstoning is still present. Maybe 3 or 4 tombstones in each set. They're easily fixed, so I don't mind so much.
In any case. Almost all the boards are built. So come and get 'em!
 
Last edited:

JimmyM

Flashlight Enthusiast
Joined
Aug 30, 2006
Messages
2,853
Location
Boston, MA, USA
Under the microscope the board looks fine. A few tiny beads of solder noted, but far too small to be a problem, and they appear to be stuck in place. A few of the joints appear to have a bit more solder than they need, but again not enough to be a problem. I would say it looks fine, especially for a first board.
I've improved my washing of the boards. I've really gotten the hang of the paste stencil. I've completely eliminated bridging on the Tiny84s which was a real tedious task to resolve. The amount of paste is reduced a LOT. The components now have nice fillets. Future designs will incorporate leassons learned on these boards. Like pad sizes for the 20QFN package.
The water based paste is really the way to go.
 

Alan B

Flashlight Enthusiast
Joined
Nov 19, 2007
Messages
1,963
Location
San Francisco Bay Area
Like it? I love it. Today I had some time to take some DMM readings.
I don't own the right Fluke so I have to use the formula method:
VbulbRMS = sqrt (VbattDC * Vbulb)
Vbat under load is 15.16V and Vblub 10.56V which per the formula my driver yields DC RMS voltage of 12.65V. You set and wrote the voltage on the back of my driver as 12.6V so my DMM readings plugged into the above formula is close enough for me:) I have tried both bulbs '625 and the 1166 and both are nice and white with the same driver setting.
party.gif

P.S.
I was wondering - what formula do I use to measure amps?

The same formula would work if you could measure peak current, but that is not as simple as measuring peak voltage.

You could use a scope and measure peak current and duty cycle and calculate from that.

I believe you can also measure peak voltage, average voltage and average current and calculate RMS current from those.
 

Alan B

Flashlight Enthusiast
Joined
Nov 19, 2007
Messages
1,963
Location
San Francisco Bay Area
I did this quickly and hopefully correctly:

rmsCurrent = squareRoot ( meanCurrent * meanCurrent * batteryVoltage / meanVoltage )

You can measure meanCurrent, meanVoltage and batteryVoltage with a regular averaging meter. (Mean is the average).

This is valid only for a clean square wave going from zero to batteryVoltage. Waveform distortion such as a battery under heavy load will cause some inaccuracy.
 

LuxLuthor

Flashaholic
Joined
Nov 5, 2005
Messages
10,654
Location
MS
Got the rest of them today, Jimmy. All are beautiful. Now I need to get out my hacksaw and some soldering. Did some preliminary tests on first one....VERY EXCITING!!!
 

JimmyM

Flashlight Enthusiast
Joined
Aug 30, 2006
Messages
2,853
Location
Boston, MA, USA
Got the rest of them today, Jimmy. All are beautiful. Now I need to get out my hacksaw and some soldering. Did some preliminary tests on first one....VERY EXCITING!!!
Oh, good. Glad you got 'em. I am dying to get some "official" test results. Especially with some of the 24V bulbs.
If the one I sent for testing goes south before you've finished your testing regimen, go ahead and use one form your 6 to finish. I'll take care of anything that fails.
 

JimmyM

Flashlight Enthusiast
Joined
Aug 30, 2006
Messages
2,853
Location
Boston, MA, USA
Taken with a Nikon 60mm macro lens on a D90.
Nice pic.
There have definitely been improvements in joint consistency. I see the overloaded joints on the passives as well as the semi-lifted FET gate lead.
Not a bad start, true. But experience building these boards has definitely led to improvements.
Alan, when you build your SMD boards. Less is more. Use the smallest amount of paste you can. Will you be using a stencil? Mine are 4 mil. You will get very nice fillets with no overloading or voids in your solder. I'd say preheat them at 170C for 2-3 minutes, then hot air pencil them ay 280C. Use a larger nozzle to reflow each passive in its entirety. If you reflow one joint before the other you'll get tombstoning. It's kinda funny. It just stands the component right up.
 

LumenHound

Flashlight Enthusiast
Joined
Apr 16, 2005
Messages
1,797
Location
Toronto
Now that's just beautiful.

Can't wait to get mine.

This is really going to change the whole hotwire bulb = battery pack voltage mantra in a big way.
 
Top