
( Sold Out ) SF M6 Softstart / 3 level Incan Driver Switch And M6 McClicky
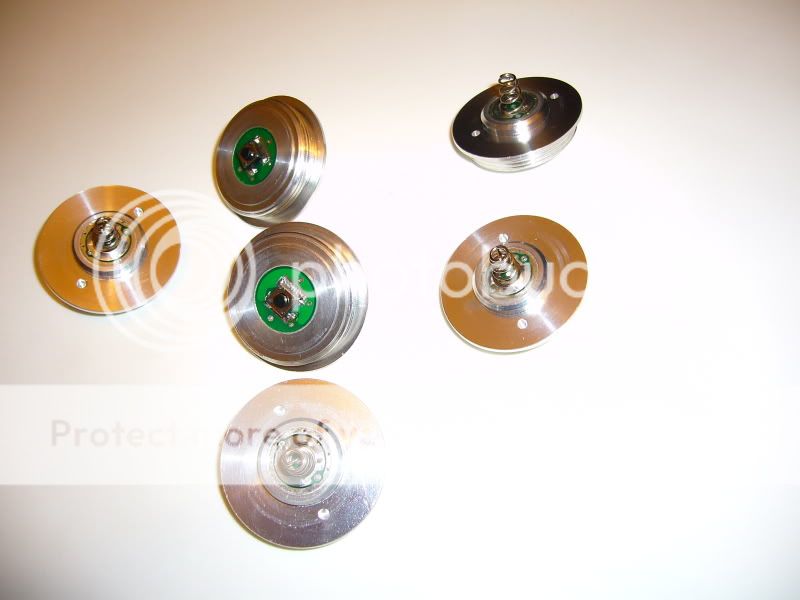
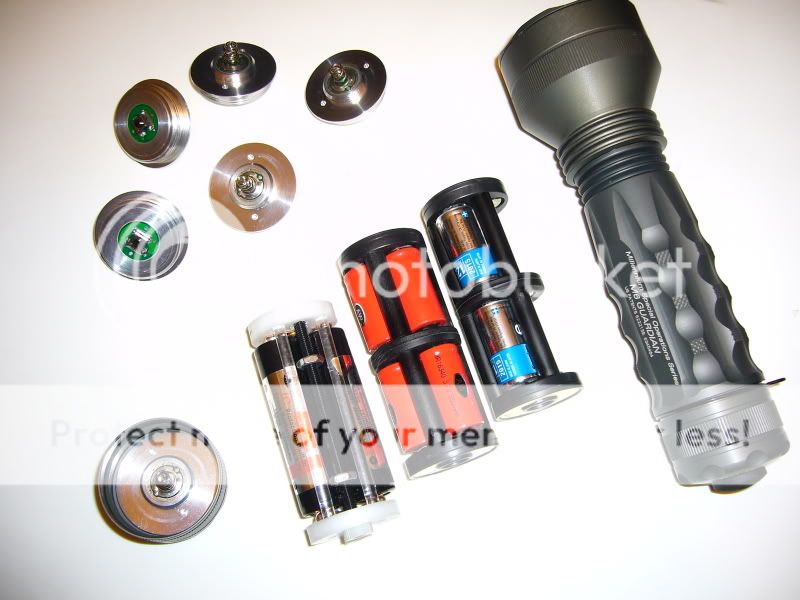
Here comes the soft start / 3 level incan driver switch for the SF M6. The switch offers a solution for running high power lamps with bulb saving soft start feature + 3 level brightness setting to increase runtime + a push button operation. The switch modules are built to fit the SF M6 tail cap and will retain the original fit and water-tightness of the stock tail cap. Lock out function with just a quarter turn of the tail cap - for transporatation and storage. A simple drop in design that is easy to install and is 100% reversible. The switch works exactly like my Mag C/D smart incan drivers with the same UI. It will work in the M6 with stock MN20/21 on primary CR123As or any rechargeable setup ( lamps / batteries combination ) that will fit the M6. These switches will easily handle 75+W of power. No momentary function *
Features :
- Soft Starting to prolong bulb life and ease amperage draw on the batteries during power up
- 3 brightness level ( PWM controlled ) - 30% - 60% - 100%
- Last brightness setting memory ( default level - 30% )
- Flashing mode
- Simple UI ( click - ON ( low ) - Med - High - click & hold anytime - OFF - click & hold 1.5 seconds - Flashing )
- Works with both primary and rechargeable setups
- Input voltage range : 6V - 35V* ( Vin = Vout ) * = max. battery pack voltage
- Drive hotwire lamps up to 75W
- aluminium housing to withstand heat / heat dissipation
- Power efficiency 99%
- Low resistance
- 'tactile feel' push button switch
- custom made high tension spring that 'll handle 8+ amp. without deforming / losing tension
- Lock out function with just a 1/4 turn ( recommend for storage and transportation )
- low standby current ~12uA
Price : $63.00 each ( Sold Out )
Registered Shipping ( worldwide ) : $6.00
PayPal : [email protected]
*** M6 Clicky version ( mechanical single stage forward clicky ) featuring a McClicky is also available.
Price : $36.00 each ( Sold Out )
Spare McClicky switch $7.00 each
Installation Instructions :


( click thumbnail to enlarge )
Steps :
1. Tools required - plier, tweezer;
2. Wrap some masking tape on the tips on the plier so they won't leave any marks on the stock tail cap components during the exacting process;
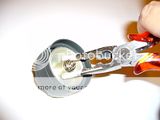
3. Pull out the alum. cup with the plier as shown. It won't take too much force because the cap is held in position by a plastic retaining pin only;
4. With the cup removed, you 'll see a black plastic retaining ring. Here is the hard part - you'll need to apply some lubricant in the threads and let it seep / sit for a couple hours before doing anything. The threads may not be loctited but it is dry so it'll need some lubricant or oil to help removal. I had to apply lubricant twice before I can get it out unscratched. OR you can put the tail cap inside a ziplock bag and boil it for a few minutes before removal ( a member found his cap was glued and boiling will help loosen it up ). Then use the same plier to unscrew ( anticlockwise ) the retaining ring out;
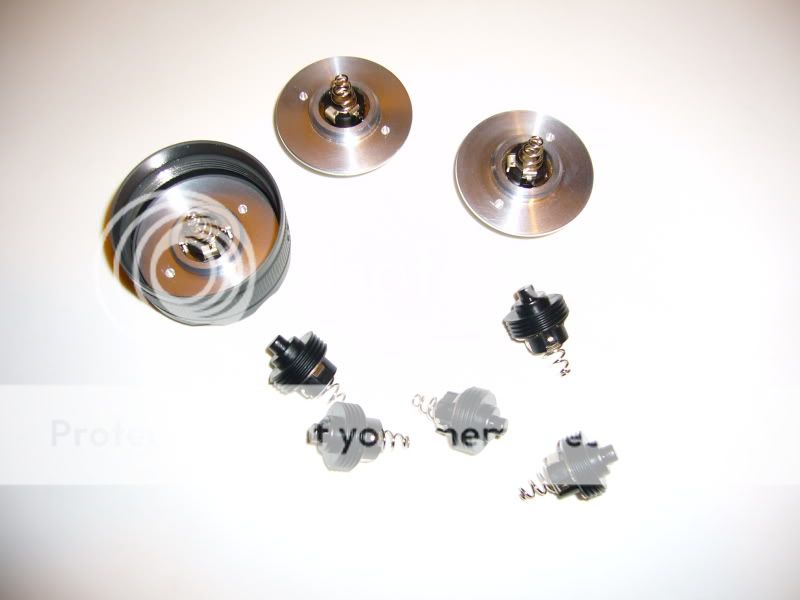
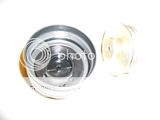
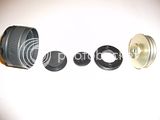
5. With the plastic retaining ring removed, you 'll see five component as shown;
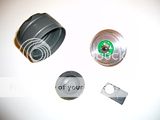
6. Peel a rubber pad ( included ) and stick it to the inside of rubber boot;
7. drop in the switch and tighten using a tweezer. Make sure the switch sits in the center of the rubber boot;
8. Done and start having fun
.
..
...
Here comes the soft start / 3 level incan driver switch for the SF M6. The switch offers a solution for running high power lamps with bulb saving soft start feature + 3 level brightness setting to increase runtime + a push button operation. The switch modules are built to fit the SF M6 tail cap and will retain the original fit and water-tightness of the stock tail cap. Lock out function with just a quarter turn of the tail cap - for transporatation and storage. A simple drop in design that is easy to install and is 100% reversible. The switch works exactly like my Mag C/D smart incan drivers with the same UI. It will work in the M6 with stock MN20/21 on primary CR123As or any rechargeable setup ( lamps / batteries combination ) that will fit the M6. These switches will easily handle 75+W of power. No momentary function *
Features :
- Soft Starting to prolong bulb life and ease amperage draw on the batteries during power up
- 3 brightness level ( PWM controlled ) - 30% - 60% - 100%
- Last brightness setting memory ( default level - 30% )
- Flashing mode
- Simple UI ( click - ON ( low ) - Med - High - click & hold anytime - OFF - click & hold 1.5 seconds - Flashing )
- Works with both primary and rechargeable setups
- Input voltage range : 6V - 35V* ( Vin = Vout ) * = max. battery pack voltage
- Drive hotwire lamps up to 75W
- aluminium housing to withstand heat / heat dissipation
- Power efficiency 99%
- Low resistance
- 'tactile feel' push button switch
- custom made high tension spring that 'll handle 8+ amp. without deforming / losing tension
- Lock out function with just a 1/4 turn ( recommend for storage and transportation )
- low standby current ~12uA
Price : $63.00 each ( Sold Out )
Registered Shipping ( worldwide ) : $6.00
PayPal : [email protected]
*** M6 Clicky version ( mechanical single stage forward clicky ) featuring a McClicky is also available.
Price : $36.00 each ( Sold Out )
Spare McClicky switch $7.00 each
Installation Instructions :


( click thumbnail to enlarge )
Steps :
1. Tools required - plier, tweezer;
2. Wrap some masking tape on the tips on the plier so they won't leave any marks on the stock tail cap components during the exacting process;
3. Pull out the alum. cup with the plier as shown. It won't take too much force because the cap is held in position by a plastic retaining pin only;
4. With the cup removed, you 'll see a black plastic retaining ring. Here is the hard part - you'll need to apply some lubricant in the threads and let it seep / sit for a couple hours before doing anything. The threads may not be loctited but it is dry so it'll need some lubricant or oil to help removal. I had to apply lubricant twice before I can get it out unscratched. OR you can put the tail cap inside a ziplock bag and boil it for a few minutes before removal ( a member found his cap was glued and boiling will help loosen it up ). Then use the same plier to unscrew ( anticlockwise ) the retaining ring out;
5. With the plastic retaining ring removed, you 'll see five component as shown;
6. Peel a rubber pad ( included ) and stick it to the inside of rubber boot;
7. drop in the switch and tighten using a tweezer. Make sure the switch sits in the center of the rubber boot;
8. Done and start having fun
.
..
...
Last edited:
")
