
Dr. Jones
Newly Enlightened
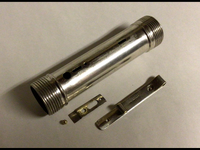
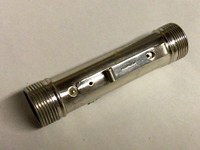
Through the kindness of a friend, I've acquired a long-sought nickel plated Junior Belt-Clip Daylo, catalog No. 2639. It takes two C cells and originally had a Mazda #1197 bulb, since replaced with an 11-lumen #245. Its stablemates, both also sporting belt clips, were the No. 2629, identical save for a gunmetal finish, and the larger No. 2657, which required 2 D cells and used a Mazda 1198 bulb. The two smaller models were listed at $1.65 each in Eveready's 1919 catalog, with the larger model coming in at $2.00.
It's my understanding that a quantity of these were provided, gratis, to U.S. Army officers and troops during WWI by the Eveready Company (fighting primarily with the French, I never had nor saw one until after the hostilities) and were also sold for an indeterminate period of time after the war to the public. They were apparently quite popular with the troops and are certainly a handy piece of duffle; they're the antecedent of all the flashlights with similar clips that we enjoy and use today.
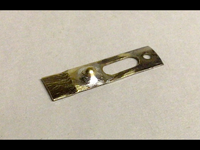
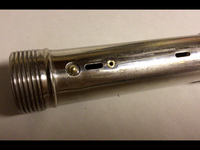
The clip on these models functioned as the switch; one simply slid the clip forward over a protrusion connected to the internal negative contact blade, depressing it and thus making contact with an insulated brass disc on the reflector/bulb assembly, completing the circuit. While the clip is retracted into the "off" position, the small protrusion can be pushed in with the thumb for a momentary light, or for signaling purposes.The example I have was missing this protrusion, which was likely a small round-headed rivet staked through a hole in the contact blade. I was unable to source a suitable rivet, so decided to use a 5mm solid brass ball bearing instead.
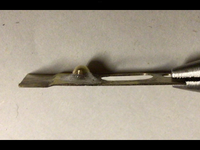
I decided that I would attach the ball to the contact blade by means of silver-bearing solder, which provides exceptional conductivity as well as great strength. This required me to remove both the clip and the contact blade, so I carefully drilled out the three copper rivets retaining them. The contact blade had been bent up a bit over the years, so it was straightened, then given a buffing with fine steel wool to remove a century's worth of light corrosion and oxidation, as was the interior of the flashlight's body. The blade was then placed in a clamp on the bench and the ball soldered in place by means of a small butane torch. It's important to only use a bit of solder, just enough to make a nice fillet around the ball; otherwise the solder will prevent the ball and blade from sitting flush against the inside top of the body, which is necessary for proper alignment.
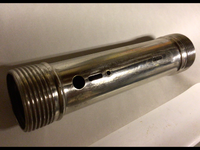
The contact blade was then reattached to the flashlight body with a copper rivet, size 2.5mm diameter x 2mm length. The end of a length of 1" steel bar stock was clamped securely in a bench vise for use as an anvil and the body, with the blade and its rivet temporarily held in place with a piece of cellophane tape, was slid over it. A few taps with a small hammer on an appropriate punch to begin spreading the rivet, then finished up with a short piece of drill rod to flatten it out, and the blade was tightly secured. The clip was then reattached in similar manner, using two 2.5mm diameter x 3mm length rivets. I was careful during this procedure not to peen the rivets over too tightly, lest the clip be unable to slide freely.
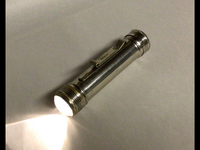
The flashlight was reassembled and, mirabile dictu, it worked! The movement of the clip was fairly stiff, but I prefer it that way, as then it won't accidentally turn on in my haversack when off stealing artifac… excuse me, on an adventure afield; nothing worse than being deep in some ancient, snake-infested megalith when your torch goes out and you discover your flashlight is dead, although having a Thuggee high priest trying to kill you while hanging high over a river filled with crocodiles, all for some stupid rocks, comes in at a close second.
It's my understanding that a quantity of these were provided, gratis, to U.S. Army officers and troops during WWI by the Eveready Company (fighting primarily with the French, I never had nor saw one until after the hostilities) and were also sold for an indeterminate period of time after the war to the public. They were apparently quite popular with the troops and are certainly a handy piece of duffle; they're the antecedent of all the flashlights with similar clips that we enjoy and use today.
The clip on these models functioned as the switch; one simply slid the clip forward over a protrusion connected to the internal negative contact blade, depressing it and thus making contact with an insulated brass disc on the reflector/bulb assembly, completing the circuit. While the clip is retracted into the "off" position, the small protrusion can be pushed in with the thumb for a momentary light, or for signaling purposes.The example I have was missing this protrusion, which was likely a small round-headed rivet staked through a hole in the contact blade. I was unable to source a suitable rivet, so decided to use a 5mm solid brass ball bearing instead.
I decided that I would attach the ball to the contact blade by means of silver-bearing solder, which provides exceptional conductivity as well as great strength. This required me to remove both the clip and the contact blade, so I carefully drilled out the three copper rivets retaining them. The contact blade had been bent up a bit over the years, so it was straightened, then given a buffing with fine steel wool to remove a century's worth of light corrosion and oxidation, as was the interior of the flashlight's body. The blade was then placed in a clamp on the bench and the ball soldered in place by means of a small butane torch. It's important to only use a bit of solder, just enough to make a nice fillet around the ball; otherwise the solder will prevent the ball and blade from sitting flush against the inside top of the body, which is necessary for proper alignment.
The contact blade was then reattached to the flashlight body with a copper rivet, size 2.5mm diameter x 2mm length. The end of a length of 1" steel bar stock was clamped securely in a bench vise for use as an anvil and the body, with the blade and its rivet temporarily held in place with a piece of cellophane tape, was slid over it. A few taps with a small hammer on an appropriate punch to begin spreading the rivet, then finished up with a short piece of drill rod to flatten it out, and the blade was tightly secured. The clip was then reattached in similar manner, using two 2.5mm diameter x 3mm length rivets. I was careful during this procedure not to peen the rivets over too tightly, lest the clip be unable to slide freely.
The flashlight was reassembled and, mirabile dictu, it worked! The movement of the clip was fairly stiff, but I prefer it that way, as then it won't accidentally turn on in my haversack when off stealing artifac… excuse me, on an adventure afield; nothing worse than being deep in some ancient, snake-infested megalith when your torch goes out and you discover your flashlight is dead, although having a Thuggee high priest trying to kill you while hanging high over a river filled with crocodiles, all for some stupid rocks, comes in at a close second.
Attachments
-
 A9B58A77-4296-468E-960C-AE0ABFED7C92.png3 MB · Views: 36
 -
 8B590753-C8E7-41BF-92E7-894039549E30.png3.4 MB · Views: 32
 -
 B36D2079-1EA5-4DA3-9050-E894DC8514CC.png2.2 MB · Views: 31
 -
 7544D78C-FD31-4F50-B6A1-DFD7EC8966C6.png2.2 MB · Views: 31
 -
 4C2D938D-F0D6-43EE-A1AA-0F29A7A3186A.png2.9 MB · Views: 37
 -
 EF5B6605-5CF8-432C-AF56-75BFBEC53DD2.png3.3 MB · Views: 34
 -
 65838923-2858-4D76-9F0C-EFEAD40CA783.png2.5 MB · Views: 35
Last edited:
")