Quark head disassembly / internals / emitter board - PICTURES!

Ggmesquita

Newly Enlightened
Joined
Jul 23, 2009
Messages
48
Location
Sao Paulo, Brazil
Hey uplite, thank you for sharing this!
I really wanted to remove my Quark 123`s clip even though 4Sevens says it is not possible.
After unscrewing the bazel with two pair of pliers, I`ve removed all the glue and cleaned the threads. Than applied some Nyogel and voila:cool:
It is perfect, cause now I have a Quark 123 with removable clip! I wonder why does 4Sevens even glue that in the first place.
I`ve also cleaned the window, that came with a small spot on it.
Another interesting thing regarding the window is that at first I thought that thing about the window having an AR coating on the inside and a sapphire coating on the outside was questionable. But whet I was cleaning it using a cloth, I could clearly feel that the cloth slided much more easily on one side (the outer side), so now I believe it.
This is great! lovecpf
 

bee-man

Newly Enlightened
Joined
Jan 10, 2006
Messages
92
But whet I was cleaning it using a cloth, I could clearly feel that the cloth slided much more easily on one side (the outer side), so now I believe it.

Can anyone offer another way to test and distinguish the sapphire coating from the anti-reflective side? When I disassembled my light, the lens fell out and I lost the original orientation.

Ggmesquita, when you removed your lens, did you make a conscious effort to remove and install the lens in the same direction? Or did you re-install it based on what you "felt" was correct?

Thanks Uplite, I just neutralized my R2.
 

Dan FO

Enlightened
Joined
Feb 10, 2009
Messages
637
Location
FL
Another interesting thing regarding the window is that at first I thought that thing about the window having an AR coating on the inside and a sapphire coating on the outside was questionable.

Seiko builds some of their watch crystals that way. It's called Sapphlex.
 

Ggmesquita

Newly Enlightened
Joined
Jul 23, 2009
Messages
48
Location
Sao Paulo, Brazil
Can anyone offer another way to test and distinguish the sapphire coating from the anti-reflective side? When I disassembled my light, the lens fell out and I lost the original orientation.

Ggmesquita, when you removed your lens, did you make a conscious effort to remove and install the lens in the same direction? Or did you re-install it based on what you "felt" was correct?

Thanks Uplite, I just neutralized my R2.

Yeah, before disassembling I`ve marked the outer side with a CD marker. I can tell you for sure that the side which a dry cloth would slide easier is the outer side. The inner side feels not as slippery.

I don`t know any other way to test this.
 

bee-man

Newly Enlightened
Joined
Jan 10, 2006
Messages
92
Thanks Ggmesquita. I'll have to reopen my light and try your method, since I would hate to scratch the AR side of the lens.
 

Blindasabat

Flashlight Enthusiast
Joined
Jan 24, 2006
Messages
2,204
Location
Michigan
Don't AR coatings reflect greenish? My old AR glasses always did. Looking at the lenses, reflections had a strong green tint to them.
 

wyager

Flashlight Enthusiast
Joined
Feb 10, 2010
Messages
1,114
I wonder if ajray ever got to the chip... I think it would be cool to mess with it. It's probably just some super simple 8 pin PIC or something, which means very little room to add or modify the instructions....
 

homebrewguy

Newly Enlightened
Joined
Mar 5, 2010
Messages
2
I got my driver out of my Quark AA Head!:twothumbs

After I accidentally cut my led+ wire by accident, I thought that it wouldn't hurt to try to get the driver out and solder a new wire in.

Turns out the pcb on the battery+ side is glued down to the head...

I stuck a flat precision screwdriver in a gap on the edge of the board on the battery contact side until I heard a crack, I guess it was a good thing they didn't use a flexible adhesive to mount it on with!
After that I just tapped the head on my table and the whole thing came out!
The driver is semi-potted on the top with translucent red rubber.

I'd post some pics but all I have is a crappy webcam...
And that's mounted on laptop screen...


EDIT: Going to borrow friend's cam

will have pics in a bit
 
Last edited:

ti-force

Flashlight Enthusiast
Joined
Jan 14, 2009
Messages
1,266
Location
Georgia, U.S.
Uplite,

I hope you don't mind me posting these pictures in your thread. I recently disassembled my Quark 123-2 R5, that has a Regular UI. I took pictures of it, and before you guys call me crazy for actually separating the driver, you must know that I replaced the Regular UI with a Shiningbeam 1.4A 3-mode driver. BTW, can anyone tell me where I can buy some of that red epoxy/glue? That stuff is excellent for holding things together to prevent moving. It's also pliable, so it's less likely to stress crack and it makes it easier to remove if needed. Anyway, here are the pics:


IMG_8362mod.jpg

IMG_8364mod.jpg

IMG_8365mod.jpg

IMG_8367mod.jpg
IMG_8368mod.jpg

IMG_8369mod.jpg


This is a top view of the bottom board after being separated:


IMG_8391mod.jpg


This is a bottom view of the top board after being separated:

IMG_8394mod.jpg


Emitter on star board removed:

IMG_8383mod.jpg


Underside of where emitter mounts. That metal piece you see is the screw that's used as a contact point during mode changing i.e., where the white wire is soldered on the top side. As you know, the two main modes are accessed by tightening or loosening the bezel. For anyone who's wondering how this works, the screw is tapped into the metal on the head of the light and since the body is part of the electrical circuit (negative contact), this gives the white wire a direct contact to battery negative. When the head is tightened, the body of the light makes the battery negative contact with the copper ring around the outside of the bottom of the driver board (unscrew the body and look up into the head and you will see what I'm talking about). When you loosen the head, the battery negative contact is broken because the body is no longer touching the copper ring, but since the threads are bare, battery negative is still connected to the head, and that's when the white wire becomes the battery negative contact, which in turn switches the mode. At least that's my understanding of it anyway, and it's just a basic explanation because there is certainly more than that going on inside the components of the driver. :

IMG_8382mod.jpg
 
Last edited:

jcw122

Enlightened
Joined
Jun 19, 2009
Messages
445
This awesome, thanks for all the photos! I have no interest in modding, but it's great to see what's inside :cool:
 

motherfletcher

Newly Enlightened
Joined
Mar 7, 2010
Messages
69
Location
Sydney
Thanks for all the info and all the pics guys! I just completed my first successful 'mod'. After several failed attempts with cheaper lights, I feel quite fortunate. Swapped the emitters in my 123 R5 tactical and AA2 R2 regular so now I finally have the AA2 R2 tactical that I wanted lol. I didn't have many rubber bands lying around so I had to improvise. lost some anno along the way :mecry: but the result was worth it hehe.

I would post pics but there's probably nothing new to see...
 

ti-force

Flashlight Enthusiast
Joined
Jan 14, 2009
Messages
1,266
Location
Georgia, U.S.
Thanks for all the info and all the pics guys! I just completed my first successful 'mod'. After several failed attempts with cheaper lights, I feel quite fortunate. Swapped the emitters in my 123 R5 tactical and AA2 R2 regular so now I finally have the AA2 R2 tactical that I wanted lol. I didn't have many rubber bands lying around so I had to improvise. lost some anno along the way :mecry: but the result was worth it hehe.

I would post pics but there's probably nothing new to see...

Yeah $h!t happens sometimes, but congrats on your successful mod. In the future, you can cut a couple pieces off of an old leather belt and use that instead. :thumbsup:
 

motherfletcher

Newly Enlightened
Joined
Mar 7, 2010
Messages
69
Location
Sydney
Oh yeah didn't think of that. Thanks for the tip!
I found that several layers of paper was very effective for gripping onto the knurled sections too

I assume the turbo head is separated in the same way too? Need to think up some more projects lol
 

ti-force

Flashlight Enthusiast
Joined
Jan 14, 2009
Messages
1,266
Location
Georgia, U.S.
Oh yeah didn't think of that. Thanks for the tip!
I found that several layers of paper was very effective for gripping onto the knurled sections too

I assume the turbo head is separated in the same way too? Need to think up some more projects lol

That's correct, but it isn't quite as easy because the Turbo head has an angle on the back side of it, and it's got those grooves cut into it, which makes for less surface are to bite on, but it's done the same way. Click here :D.
 

SeanHatfield

Newly Enlightened
Joined
Mar 10, 2011
Messages
53
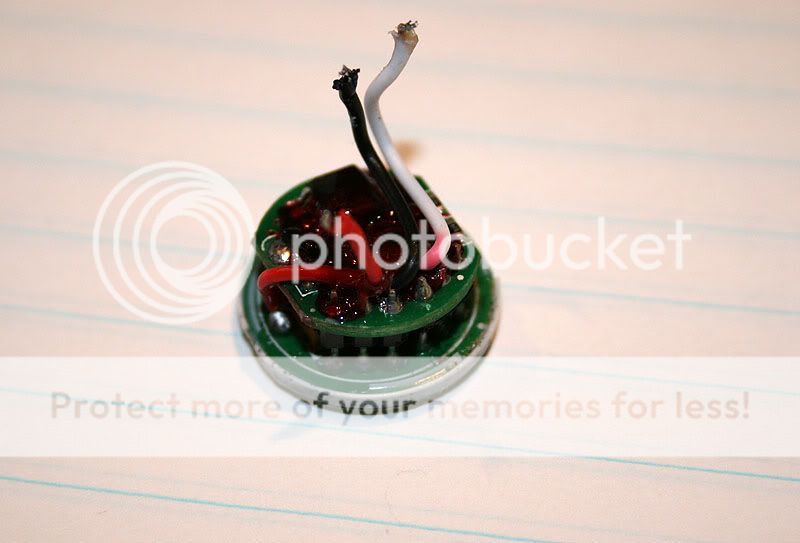
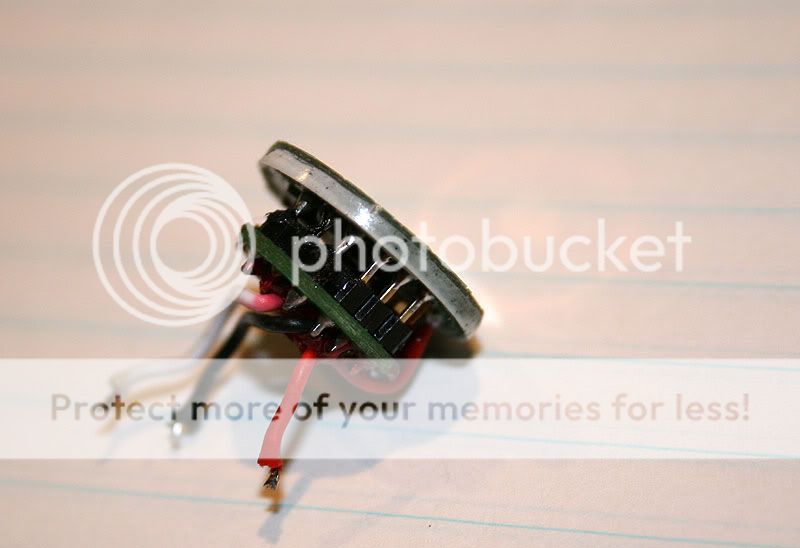
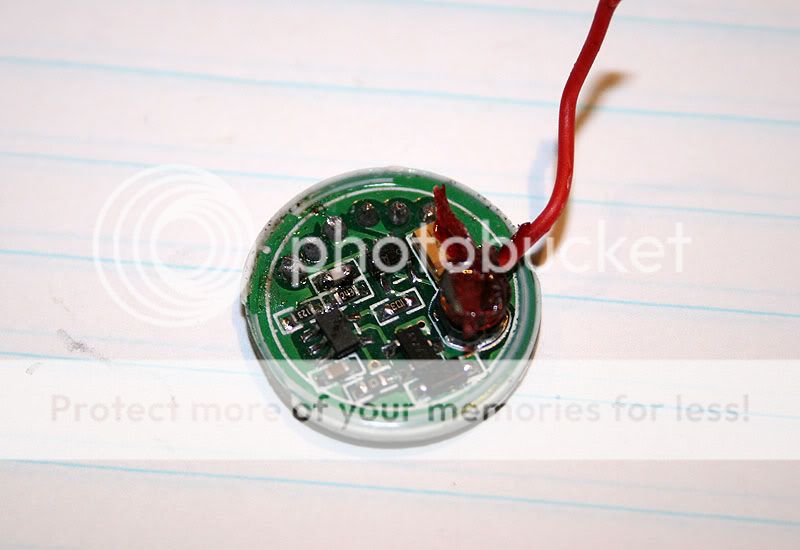
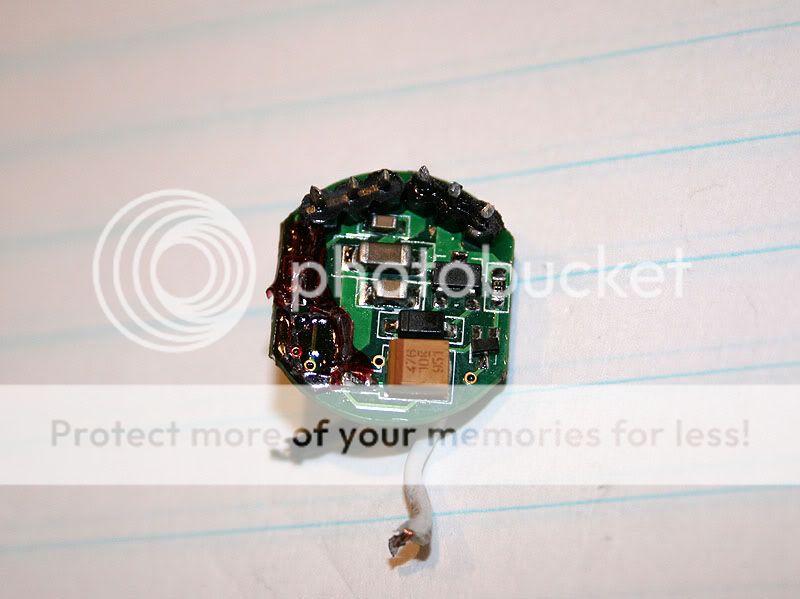
Some more detailed pictures from my Quark Tactical low-voltage head:

The bigger base board:
img0922v.jpg

Same, with backlight:


Smaller board, top side (facing LED):


Smaller board, bottom side (facing bigger board):


The red stuff can be removed by dissolving it in acetone, but acetone also softens/dissolves the wire insulation from the three wires.
 

Mr. LED

Enlightened
Joined
Mar 27, 2011
Messages
723
Location
Canada
Hi guys! Sorry for diggin up an old thread. I will swap a neutral emitter from a Quark 123ˆ2 tactical into my regular Quark. I would like to know if I have to replace the thermal paste under the emitter board, or can I just swap and reuse the old paste? If reused, will it have any thermal conductivity problem? Thank you.
 

ti-force

Flashlight Enthusiast
Joined
Jan 14, 2009
Messages
1,266
Location
Georgia, U.S.
Hi guys! Sorry for diggin up an old thread. I will swap a neutral emitter from a Quark 123ˆ2 tactical into my regular Quark. I would like to know if I have to replace the thermal paste under the emitter board, or can I just swap and reuse the old paste? If reused, will it have any thermal conductivity problem? Thank you.

Is it an actual paste, or is it rubbery? If it's a paste you should be fine reusing it as long as you don't get any dirt or trash or anything in the paste. You want the paste to be as thin as possible between the aluminum mcpc and contact point on the light. If you can't reuse, you should be able to find some thermal paste at your local Radio Shack. I've purchased Arctic Silver 5 from them before, but some people can't swallow the $10 or whatever it is price tag for this particular thermal paste. I would imagine they probably have a cheaper option.
 

pinetree89

Enlightened
Joined
Mar 10, 2011
Messages
212
Bump for an awesome thread.

Just replaced the emitter in my AA2 Tactical Quark. I had an S2 version and majorly lost the tint lottery with a very green emitter. I tried out one of the 90+ CRI XP-Gs at first. Didn't bother to reflow the emitter, just used the 10mm board it came on from illumination supply and soldered in the + and -.

Wasn't really pleased with the 90+ CRI XP-G, too yellow, and too dim. I guess my flashlight pallet isn't refined enough to appreciate this emitter. Finally settled on a run of the mill XP-G R5 cool white that I had and am happy with it's cool white tint. Much better than the green of the S2. I found myself not even using this light the green became such a turn off which gave me enough courage to crack open the head and do the emitter swap.

The most difficult part was unscrewing the head. I found a two-pack of strap wrenches at Harbor Freight which made the job really easy and didn't mar the head at all. I attempted to use rubber bands and pliers, but it didn't really work for me and ended up putting a small nick in the head.

Thanks OP for the pics and everyone else for your invaluable contributions. I now have a Quark AA2 that I can enjoy.
 

samirfuzzywuzzy

Newly Enlightened
Joined
Nov 2, 2013
Messages
8
Sorry to dig this thread from its death but this is the only place that some one tore up the quark head. My question is what size is the ring near the reflector, the one that would be replaced with a gitd ring? and what the best quality gitd ring I can get to put in it?
 
Top