Elektro Lumens is the brand of lights made by Wayne Johnson, and he's been doing solid American-made lights for quite some time now. Wayne's taken three XM-L emitters and stuffed them into a (relatively) compact body, powered by a high capacity and high discharge 26650 lithium ion cell.
Thanks to Wayne at Elektro Lumens for lending the Big Bruiser for review.

I'll be reviewing the Big Bruiser in two sections: first, I'll discuss the light objectively (the facts about the light itself), then I'll discuss the light subjectively (my impressions about the light's performance when used for specific applications). This light is designed to push out a flood of lumens into a large area, so I'll be reviewing it as a compact flood light. If you have any other specific applications you'd like the light tested for, let me know and I'll see what I can do.
Objective
Here are the specs on the Big Bruiser:
--------
from elektrolumens.com
Packaging
My review sample came wrapped in several layers of bubble wrap, nestled in a box full of packing peanuts, but I can't attest to how Wayne normally sends out his lights. There was no fancy packaging on my review sample, but I was very happy with how securely it was shipped.
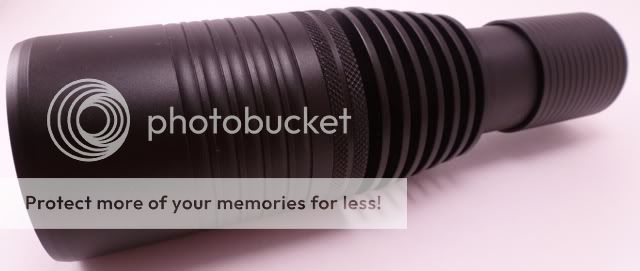
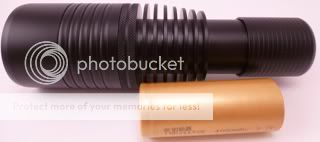
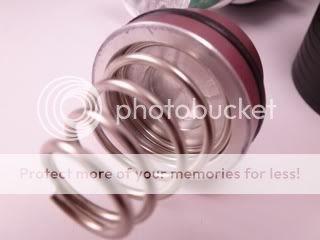
Construction Quality
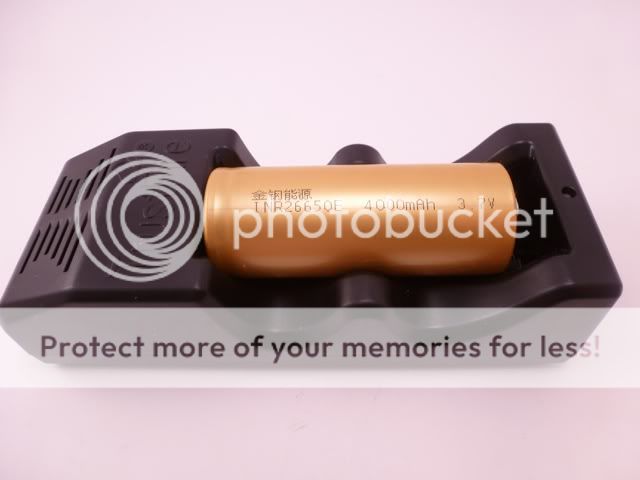
The Elektro Lumens lights I have are far and above the most solidly constructed lights I've used. The Big Bruiser is a hefty piece of aluminum. Below is a shot comparing it's size to a 26650 lithium ion battery.
Next, let's take a look at the exterior, from front to back.


The Big Bruiser uses a three Cree XM-L emitters, well centered in a three-part optic with hex diffusion. The facets act as a way to disperse the light, smoothing out the beam pattern, at the cost of throw distance. The lens over the reflector is set a good distance back behind the bezel, so it's well protected from most scratches and impacts.


You can see that neat the base of the head there are some shallow ribs cut into the light, as far as I can tell mostly for style. Behind those are two bands of very light knurling that add a little grip to the head. Behind the knurling, the Big Bruiser has several very large fins for dissipating heat into the air and your hand. The Bruiser does get very hot as you use it, but I have not had it get too hot to hold, even during the run time test, so the heat sink and fins are doing their job. These fins get smaller towards the back, giving a smooth transition from the head to the body. The tail cap has small grooves cut into it for extra grip when turning the light on/off or doing battery changes. The battery tube is only accessible through the tail cap, so if you try to unscrew the head for the battery change, you'll end up just exposing the innards.


On the Big Bruiser, the button does not protrude from the tail cap, but is recessed by a few millimeters. The Elektro Lumens logo is etched into the tail, and is the only branding/lettering on the light. Because the base of the tail is large and flat, the Big Bruiser can tail stand.
Time to take the light apart.
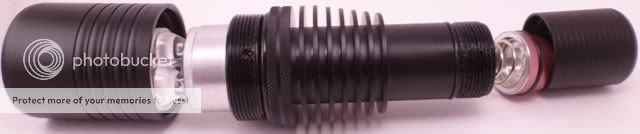
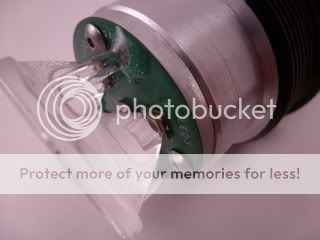
Inside the head, the button is held in place when the spring on the button presses against the battery, which then pushes the button against the inside ridge around the back of the tail cap.
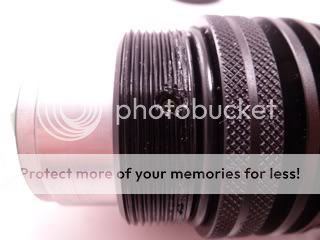

All of the threads are clean cut, anodized, and well-lubricated. The o-rings are appropriately positioned to resist water, we'll see soon if they do. You can also see the set screw that holds the heat sink in place.
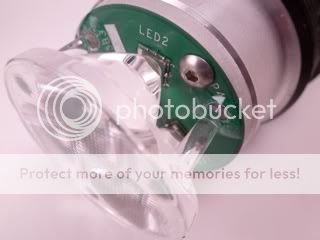
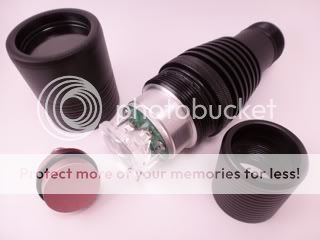
The optic is directly attached to the circuit board here, with three pillars glued down so that the three bases of the optic are centered over the three emitters. The board is directly connected to the very large heat sink.

These shots show the how intense this light is. Both were taken with the same camera settings and same background lighting, and that's why the LEDs look so blue in this picture, the background light is incandescent.

If you feel comfortable leaving the innards exposed, the nature of the optic used here makes for a very good candle mode, throwing a ton of light all over the room.
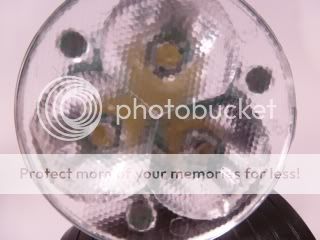

The optic has a sort of hex pattern of facets at the end, so that the beam is smoothed out.

The head of the light has a lot of threads that make secure it very well to the body, and you can see that there is a cylindrical piece screwed down in to keep the lens and o-ring in place.

The tail cap has a small ridge around the inside which the o-ring presses up against when the button is in place.

Here you can see the button close up, with a solid spring. Most of the button is colored pink, but the inside is left bare to make electrical connection with the body.
The button slides into the tail cap, and slides up and down inside the tail cap when you press it. Because the button's loost in the tail cap, I recommend doing battery changes tail-down.


As you can see, the body is completely anodized except the back edge, where it makes connection with the button. So, the spring pushes the button away from the body, but when you tighten the tail cap or press the button, the bare part of the button makes contact with the bare part of the body, and the light turns on. Loosening or tightening the tail cap increases or decreases the distance of travel needed for the button to activate the light. The tail cap cannot be loosened enough to completely prevent accidental activation. This means no "lock-out", so if you're transporting the light, you'll have to take out the battery to be sure. However, because of the stiffness of the spring, it takes lots of force to turn on the light when the tail cap is well loosened, so for most purposes that should suffice.
Also, you can see the thickness of the body here. This light is going to be very sturdy.

Here's the best shot I could get of the nut inside the far end of the battery tube, which acts as the positive battery terminal. This design allows the use of either button-top or flat-top cells.
Dimensions
Length: 163.3mm (on, fully tightened)
Head Diameter: 50.6mm
Body Diameter: 32.5mm
Tail Cap Diameter: 35.5mm
Body Inner Diameter: 27.2mm
User Interface
The UI of the Big Bruiser is just about as simple as it gets. Tighten the tail cap for constant on, loosen the tail cap to turn it back off. Press the big pink button for momentary on. The tighter the tail cap, the less pressure you need to activate momentary on using the button.
By tightening the tail cap to just before the point it goes to constant on, you can activate momentary on by a very light touch. However, at this point the button tends to stick occasionally, so I plan to add a little lubrication here to smooth things up. During normal operation, there is no sticking or catching with the button.
Action Shots
Light in Hand


White Wall
(ISO 100, f/3.3, 1/20")

This is a good representation of the tint of the Big Bruiser. To my eyes, it is a very very cool white with no traces of blue, pink green, or any other color, just cool white. Also, the beam is much floodier than this just shows, the entire wall was lit up when I took this shot. The Bruiser does have this large, soft, hot spot, which makes the flood hard to capture on the white wall. You'll see this in the outdoor shots.
BeamSlice
(ISO 100, f/3.3, 1/125")

Indoor Shots (control first)
(ISO 100, f/3.3, 1/20")


Outdoor Shots (control first)
(ISO 100, f/3.3, 1")

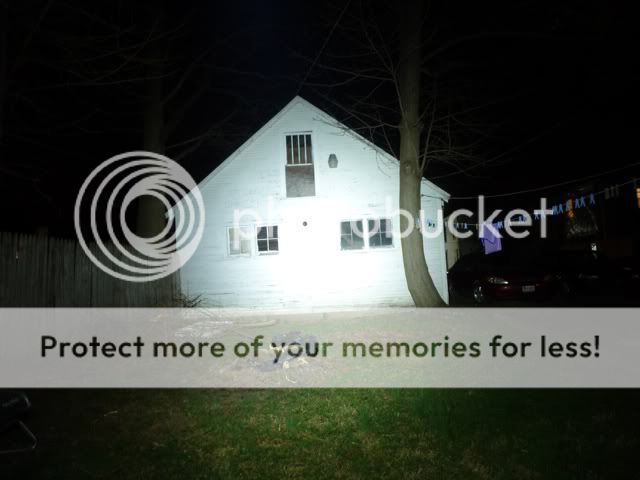
Flood Shots
(ISO 100, f/3.3, 5")


Performance
The Big Bruiser is not regulated, and if I understand correctly, the only piece of circuitry is a single resistor in series with the LED. This means no PWM, and very little chance of any erratic behavior.
This light has no protection built in, so I only recommend using protected 26650 cells. It also has high current requirements, so you'll want to use high quality cells.
Also, because three XM-L emitters are packed into this small head, and it uses an optic with built-in diffuser, this light has an extremely floody beam.
When using the Big Bruiser, it does it get warm very quickly, but even after being on in my hand for half an hour it was not hot enough to be uncomfortable to hold.
I have noticed a little bit a flickering on occasion. I've been in contact with Wayne, and he's informed me there was an error at the machine shop and he's corrected it. He graciously offered to swap me Bruisers, but I was able to sand my Bruiser down just a bit and now it works fine.
Current Draw
The current was measured at the tail cap using a fresh 26650 battery (the one provided by Wayne) a few seconds after turning the light on.
Current Draw: 6.22 A
Runtime
Note: The vertical axis of this chart represents a relative brightness measurement using a home made light box. The horizontal axis is time in hours:minutes:seconds. Runtimes are stated in hours:minutes:seconds. The runtime test was conducted with a single 26650 INR lithium ion cell.
Time to 50%: 0:40:43
Full Runtime: 0:49:23
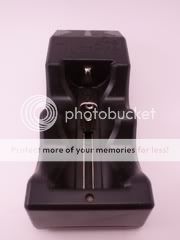
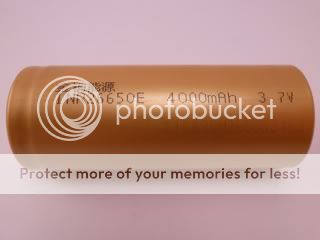
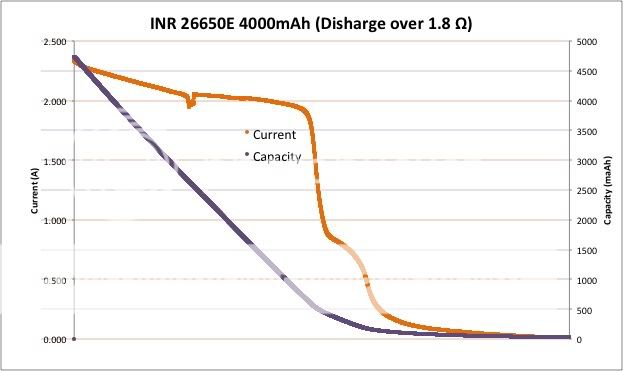
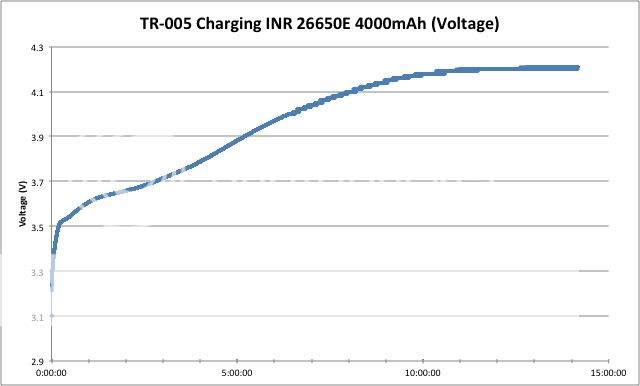
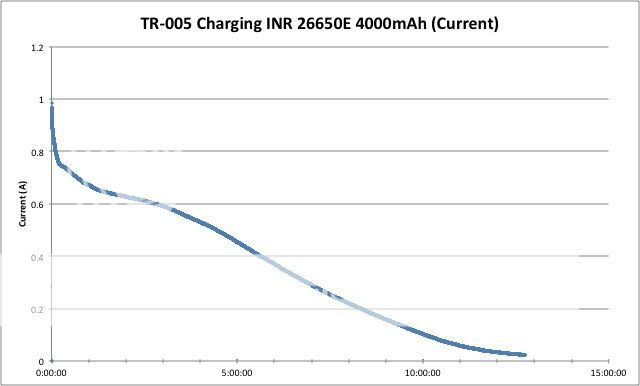
After turning off at about 50 minutes, the light will flash intermittently and dimly, about once every 10 seconds or slow, getting farter apart in time. The battery Wayne provided does appear to have a protection circuit built in, but due to this behavior my belief is that the cell dropped to a voltage where, including the voltage sag, it could not sustain any more output. When the current stops, the battery starts to recover from the voltage sag, until it has enough voltage for another quick flash. Also, while this battery has a 4000mAh rating printed on it, I measured it to be 4739mAh. You can see more details on the battery/charger in the mini-review below, since this is not a very common battery size. I don't know if this is the battery that Wayne will continue to offer for the Big Bruiser, but this is what he provided for me to do the review.
Subjective Review
General
Quick break down:
+Beam is not lumpy, due to diffusing optic
+3000 lumens!
+Extremely solid construction
+Pocket-able flood light
+Great heat management
+Good looks
+Maintains output over time very well
+Optic well recessed from bezel
+Firm tail stand + candle mode
+Plain white tint
-Awkward to use momentary activation
-Only one brightness level
-Button not attached to tail cap
-Nut instead of spring as positive contact
-Uncommon battery size, no support for primary cells
-Pocket lint gets stuck in the huge fins
-Short run time
My favorite thing about the Big Bruiser is that it's a pocket-able, 3000 lumen flood light. It won't fit in a regular pocket, but if you have cargo pockets (and a good belt") ) you can toss the Bruiser in there and have the ability to completely light any area you need to, indoors or out. Also, with a light whose main attraction, it's important that it's able to maintain that high output for the majority of it's run time. I'm happy to see that even though the Big Bruiser isn't regulated, it actually has a very impressing output graph, maintaining greater than 50% brightness for about 85% of the battery life.
) you can toss the Bruiser in there and have the ability to completely light any area you need to, indoors or out. Also, with a light whose main attraction, it's important that it's able to maintain that high output for the majority of it's run time. I'm happy to see that even though the Big Bruiser isn't regulated, it actually has a very impressing output graph, maintaining greater than 50% brightness for about 85% of the battery life.
My main dislike about the Big Bruiser is that I can't find a way to comfortable hold it when I want to use the momentary activation. When I fully tighten the tail cap for constant on, I can hold it very comfortably using either under- or over-hand grip. However, when I try to use the overhand grip and press the button for momentary activation, it's hard to get enough force on the button to make it work, because the button is recessed into the tail and I can't bend my thumb that far. This may just be because I have abnormally large hands, but I'd like to see the button protrude a few mm beyond the tail, like on the EDC-XML.
I love how great this light looks. I like the solid black, with the only branding being the logo etched into the tail cap. The trend these days seems to be to slap a bunch of printed words/logos on the side, and I'm glad Elektrolumens hasn't done that. At first, I thought I wouldn't like the pink of the button, but when I saw it in person I found it actually looks quite good.
The simplicity of the UI is something I like and don't like at the same time. I miss having low levels available to preserve battery life, but I love knowing exactly what's gong to happen every time I turn the light on: it will turn on.
On my sample, the button is loose in the tail cap, so you have to be carful not to drop it during battery changes, and I do my battery changes tail down to avoid this problem. However, Wayne has informed me he's looking into ways to secure the button inside the tail so this won't be an issue in future versions.
The Big Bruiser gets pretty hot after a long period of constant use, but that's a good sign, because the heat sink and fins are doing their job: getting heat away from the emitter, and giving it to your hand to deal with.
The tint of the Bruiser is just plain cool white (although I believe I've heard that you can request other tints, if you desire). I've noticed that in a lot of XM-L lights with reflectors, they have the tendency to through the blue light to the outside and be more yellowish in the middle. The use of a diffusing optic on the Big Bruiser keeps all the light mixed together, so it is a uniform, plain white throughout. I've noticed no hint of any other blue, purple, green, yellow, etc.
As a side note, if you get the Bruiser, I'd suggest making sure you get at least 2-3 of the batteries too (as soon as Elektrolumens has them in stock), because it does go through them so fast, and they take a while to charge because of their large capacity.
Overall, a very powerful, sturdy, simple light. I can think of many uses for the Big Bruiser, but there is one obvious place where it excels...
Flooder
This is where the Big Bruiser really shines. It's small enough to carry with you easily, and will toss 3000 lumens out into a huge area, lighting it up well enough to do whatever you need to do.
One of the best decisions made in the production of this light was to use optics instead of a reflector. With other 3xXM-L lights I've seen, the reflector causes some pretty ugly beam patters, even when heavily textured. The Bruiser's optics in a sort of hex diffusions pattern, so while you can still tell by the beam that there are three emitters, it is not distracting at all, and the light is spread around very evenly. Also, if you're in a relatively calm/safe environment, the ability to tail stand and remove the head makes this a great mega-candle, because the optic is open on the sides and will throw some light out in all directions. (I say a calm environment because taking the head off exposes the innards of the Bruiser, making it more susceptible to damage.)
The beam shots here really speak for themselves, so there's not much more I can say, other than to repeat how great it is to have such a flood of light that you can carry with you so easily.
Long Term Impressions
I'll fill this part in after carrying the light for a while. If nothing get's added here, either I find nothing else worth noting about the light, or I end up not using it often. I probably won't be able to do much for long term impressions, because the light is only loaned to me for a limited period of time.
Thanks to Wayne at Elektro Lumens for lending the Big Bruiser for review.
I'll be reviewing the Big Bruiser in two sections: first, I'll discuss the light objectively (the facts about the light itself), then I'll discuss the light subjectively (my impressions about the light's performance when used for specific applications). This light is designed to push out a flood of lumens into a large area, so I'll be reviewing it as a compact flood light. If you have any other specific applications you'd like the light tested for, let me know and I'll see what I can do.
Objective
Here are the specs on the Big Bruiser:
--------
from elektrolumens.com
- Three Cree XM-L LEDs, 1000 lumens each, a total of 3000 lumens!
- 35mm Tri-optics, compact, medium smooth beam
- 43mm Mineral glass lens
- Twisty on/off/momentary tail cap switch. Simple, allows short compact design
- Uses one 26650 or 26700A LIMN battery (Not included)
- Dimenstions: 26.4 x 70mm
- Charger recommendations:
- Trustfire TR-005 works well
- About 20 minutes continuous run time.
- Dimensions (Approximate)
- Head diameter: 2"
- Body diameter: 1.25"
- Length:6"
- Approximate weight without battery: 13 oz.
Packaging
My review sample came wrapped in several layers of bubble wrap, nestled in a box full of packing peanuts, but I can't attest to how Wayne normally sends out his lights. There was no fancy packaging on my review sample, but I was very happy with how securely it was shipped.
Construction Quality
The Elektro Lumens lights I have are far and above the most solidly constructed lights I've used. The Big Bruiser is a hefty piece of aluminum. Below is a shot comparing it's size to a 26650 lithium ion battery.
Next, let's take a look at the exterior, from front to back.
The Big Bruiser uses a three Cree XM-L emitters, well centered in a three-part optic with hex diffusion. The facets act as a way to disperse the light, smoothing out the beam pattern, at the cost of throw distance. The lens over the reflector is set a good distance back behind the bezel, so it's well protected from most scratches and impacts.
You can see that neat the base of the head there are some shallow ribs cut into the light, as far as I can tell mostly for style. Behind those are two bands of very light knurling that add a little grip to the head. Behind the knurling, the Big Bruiser has several very large fins for dissipating heat into the air and your hand. The Bruiser does get very hot as you use it, but I have not had it get too hot to hold, even during the run time test, so the heat sink and fins are doing their job. These fins get smaller towards the back, giving a smooth transition from the head to the body. The tail cap has small grooves cut into it for extra grip when turning the light on/off or doing battery changes. The battery tube is only accessible through the tail cap, so if you try to unscrew the head for the battery change, you'll end up just exposing the innards.
On the Big Bruiser, the button does not protrude from the tail cap, but is recessed by a few millimeters. The Elektro Lumens logo is etched into the tail, and is the only branding/lettering on the light. Because the base of the tail is large and flat, the Big Bruiser can tail stand.
Time to take the light apart.
Inside the head, the button is held in place when the spring on the button presses against the battery, which then pushes the button against the inside ridge around the back of the tail cap.
All of the threads are clean cut, anodized, and well-lubricated. The o-rings are appropriately positioned to resist water, we'll see soon if they do. You can also see the set screw that holds the heat sink in place.
The optic is directly attached to the circuit board here, with three pillars glued down so that the three bases of the optic are centered over the three emitters. The board is directly connected to the very large heat sink.
These shots show the how intense this light is. Both were taken with the same camera settings and same background lighting, and that's why the LEDs look so blue in this picture, the background light is incandescent.
If you feel comfortable leaving the innards exposed, the nature of the optic used here makes for a very good candle mode, throwing a ton of light all over the room.
The optic has a sort of hex pattern of facets at the end, so that the beam is smoothed out.
The head of the light has a lot of threads that make secure it very well to the body, and you can see that there is a cylindrical piece screwed down in to keep the lens and o-ring in place.
The tail cap has a small ridge around the inside which the o-ring presses up against when the button is in place.
Here you can see the button close up, with a solid spring. Most of the button is colored pink, but the inside is left bare to make electrical connection with the body.
The button slides into the tail cap, and slides up and down inside the tail cap when you press it. Because the button's loost in the tail cap, I recommend doing battery changes tail-down.
As you can see, the body is completely anodized except the back edge, where it makes connection with the button. So, the spring pushes the button away from the body, but when you tighten the tail cap or press the button, the bare part of the button makes contact with the bare part of the body, and the light turns on. Loosening or tightening the tail cap increases or decreases the distance of travel needed for the button to activate the light. The tail cap cannot be loosened enough to completely prevent accidental activation. This means no "lock-out", so if you're transporting the light, you'll have to take out the battery to be sure. However, because of the stiffness of the spring, it takes lots of force to turn on the light when the tail cap is well loosened, so for most purposes that should suffice.
Also, you can see the thickness of the body here. This light is going to be very sturdy.
Here's the best shot I could get of the nut inside the far end of the battery tube, which acts as the positive battery terminal. This design allows the use of either button-top or flat-top cells.
Dimensions
Length: 163.3mm (on, fully tightened)
Head Diameter: 50.6mm
Body Diameter: 32.5mm
Tail Cap Diameter: 35.5mm
Body Inner Diameter: 27.2mm
User Interface
The UI of the Big Bruiser is just about as simple as it gets. Tighten the tail cap for constant on, loosen the tail cap to turn it back off. Press the big pink button for momentary on. The tighter the tail cap, the less pressure you need to activate momentary on using the button.
By tightening the tail cap to just before the point it goes to constant on, you can activate momentary on by a very light touch. However, at this point the button tends to stick occasionally, so I plan to add a little lubrication here to smooth things up. During normal operation, there is no sticking or catching with the button.
Action Shots
Light in Hand
White Wall
(ISO 100, f/3.3, 1/20")
This is a good representation of the tint of the Big Bruiser. To my eyes, it is a very very cool white with no traces of blue, pink green, or any other color, just cool white. Also, the beam is much floodier than this just shows, the entire wall was lit up when I took this shot. The Bruiser does have this large, soft, hot spot, which makes the flood hard to capture on the white wall. You'll see this in the outdoor shots.
BeamSlice
(ISO 100, f/3.3, 1/125")
Indoor Shots (control first)
(ISO 100, f/3.3, 1/20")
Outdoor Shots (control first)
(ISO 100, f/3.3, 1")
Flood Shots
(ISO 100, f/3.3, 5")
Performance
The Big Bruiser is not regulated, and if I understand correctly, the only piece of circuitry is a single resistor in series with the LED. This means no PWM, and very little chance of any erratic behavior.
This light has no protection built in, so I only recommend using protected 26650 cells. It also has high current requirements, so you'll want to use high quality cells.
Also, because three XM-L emitters are packed into this small head, and it uses an optic with built-in diffuser, this light has an extremely floody beam.
When using the Big Bruiser, it does it get warm very quickly, but even after being on in my hand for half an hour it was not hot enough to be uncomfortable to hold.
I have noticed a little bit a flickering on occasion. I've been in contact with Wayne, and he's informed me there was an error at the machine shop and he's corrected it. He graciously offered to swap me Bruisers, but I was able to sand my Bruiser down just a bit and now it works fine.
Current Draw
The current was measured at the tail cap using a fresh 26650 battery (the one provided by Wayne) a few seconds after turning the light on.
Current Draw: 6.22 A
Runtime
Note: The vertical axis of this chart represents a relative brightness measurement using a home made light box. The horizontal axis is time in hours:minutes:seconds. Runtimes are stated in hours:minutes:seconds. The runtime test was conducted with a single 26650 INR lithium ion cell.
Time to 50%: 0:40:43
Full Runtime: 0:49:23
After turning off at about 50 minutes, the light will flash intermittently and dimly, about once every 10 seconds or slow, getting farter apart in time. The battery Wayne provided does appear to have a protection circuit built in, but due to this behavior my belief is that the cell dropped to a voltage where, including the voltage sag, it could not sustain any more output. When the current stops, the battery starts to recover from the voltage sag, until it has enough voltage for another quick flash. Also, while this battery has a 4000mAh rating printed on it, I measured it to be 4739mAh. You can see more details on the battery/charger in the mini-review below, since this is not a very common battery size. I don't know if this is the battery that Wayne will continue to offer for the Big Bruiser, but this is what he provided for me to do the review.
Subjective Review
General
Quick break down:
+Beam is not lumpy, due to diffusing optic
+3000 lumens!
+Extremely solid construction
+Pocket-able flood light
+Great heat management
+Good looks
+Maintains output over time very well
+Optic well recessed from bezel
+Firm tail stand + candle mode
+Plain white tint
-Awkward to use momentary activation
-Only one brightness level
-Button not attached to tail cap
-Nut instead of spring as positive contact
-Uncommon battery size, no support for primary cells
-Pocket lint gets stuck in the huge fins
-Short run time
My favorite thing about the Big Bruiser is that it's a pocket-able, 3000 lumen flood light. It won't fit in a regular pocket, but if you have cargo pockets (and a good belt
) you can toss the Bruiser in there and have the ability to completely light any area you need to, indoors or out. Also, with a light whose main attraction, it's important that it's able to maintain that high output for the majority of it's run time. I'm happy to see that even though the Big Bruiser isn't regulated, it actually has a very impressing output graph, maintaining greater than 50% brightness for about 85% of the battery life. My main dislike about the Big Bruiser is that I can't find a way to comfortable hold it when I want to use the momentary activation. When I fully tighten the tail cap for constant on, I can hold it very comfortably using either under- or over-hand grip. However, when I try to use the overhand grip and press the button for momentary activation, it's hard to get enough force on the button to make it work, because the button is recessed into the tail and I can't bend my thumb that far. This may just be because I have abnormally large hands, but I'd like to see the button protrude a few mm beyond the tail, like on the EDC-XML.
I love how great this light looks. I like the solid black, with the only branding being the logo etched into the tail cap. The trend these days seems to be to slap a bunch of printed words/logos on the side, and I'm glad Elektrolumens hasn't done that. At first, I thought I wouldn't like the pink of the button, but when I saw it in person I found it actually looks quite good.
The simplicity of the UI is something I like and don't like at the same time. I miss having low levels available to preserve battery life, but I love knowing exactly what's gong to happen every time I turn the light on: it will turn on.
On my sample, the button is loose in the tail cap, so you have to be carful not to drop it during battery changes, and I do my battery changes tail down to avoid this problem. However, Wayne has informed me he's looking into ways to secure the button inside the tail so this won't be an issue in future versions.
The Big Bruiser gets pretty hot after a long period of constant use, but that's a good sign, because the heat sink and fins are doing their job: getting heat away from the emitter, and giving it to your hand to deal with
.The tint of the Bruiser is just plain cool white (although I believe I've heard that you can request other tints, if you desire). I've noticed that in a lot of XM-L lights with reflectors, they have the tendency to through the blue light to the outside and be more yellowish in the middle. The use of a diffusing optic on the Big Bruiser keeps all the light mixed together, so it is a uniform, plain white throughout. I've noticed no hint of any other blue, purple, green, yellow, etc.
As a side note, if you get the Bruiser, I'd suggest making sure you get at least 2-3 of the batteries too (as soon as Elektrolumens has them in stock), because it does go through them so fast, and they take a while to charge because of their large capacity.
Overall, a very powerful, sturdy, simple light. I can think of many uses for the Big Bruiser, but there is one obvious place where it excels...
Flooder
This is where the Big Bruiser really shines. It's small enough to carry with you easily, and will toss 3000 lumens out into a huge area, lighting it up well enough to do whatever you need to do.
One of the best decisions made in the production of this light was to use optics instead of a reflector. With other 3xXM-L lights I've seen, the reflector causes some pretty ugly beam patters, even when heavily textured. The Bruiser's optics in a sort of hex diffusions pattern, so while you can still tell by the beam that there are three emitters, it is not distracting at all, and the light is spread around very evenly. Also, if you're in a relatively calm/safe environment, the ability to tail stand and remove the head makes this a great mega-candle, because the optic is open on the sides and will throw some light out in all directions. (I say a calm environment because taking the head off exposes the innards of the Bruiser, making it more susceptible to damage.)
The beam shots here really speak for themselves, so there's not much more I can say, other than to repeat how great it is to have such a flood of light that you can carry with you so easily.
Long Term Impressions
I'll fill this part in after carrying the light for a while. If nothing get's added here, either I find nothing else worth noting about the light, or I end up not using it often. I probably won't be able to do much for long term impressions, because the light is only loaned to me for a limited period of time.
Last edited: