Preon P2 cool white to warm white mod (2900k)

papershredder

Newly Enlightened
Joined
May 31, 2013
Messages
132
See this new thread with a HOWTO step-by-step and more photos:
http://www.candlepowerforums.com/vb/...-and-beamshots


Well, I was fooling around in the closet the other day with some cheap grocery store incandescents and I decided that the color was quite pleasing. So, I modded my Preon P2 from an XP-G2 cool white to XP-G2 2900K warm white. This is about the same color as incandescent bulbs. I understand that foursevens had some limited run lights similar or the same as this, but I was not able to find any in stock. Plus I already had the cool white P2.

oANQCYb.jpg


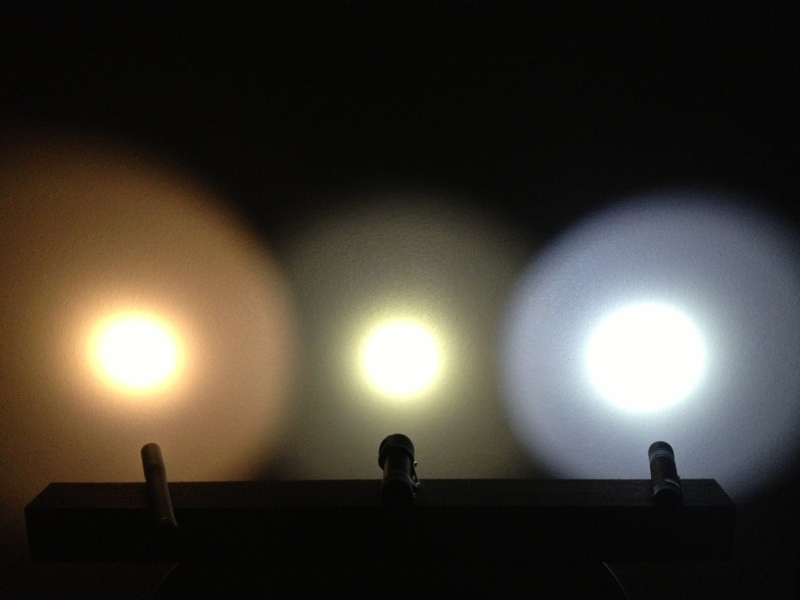
From the left, Preon P2 w/ 2900K, Zebralight SC52w (It's not green, that's just the white balance on my phone camera,) SB Flashlights / L3 Illumination L10 cool white.
I'm kind of regretting picturing the SC52w, as it's not showing up well, but I want to have something in the middle as far as color goes. Oh well. :shrug:


vE1ax5T.jpg


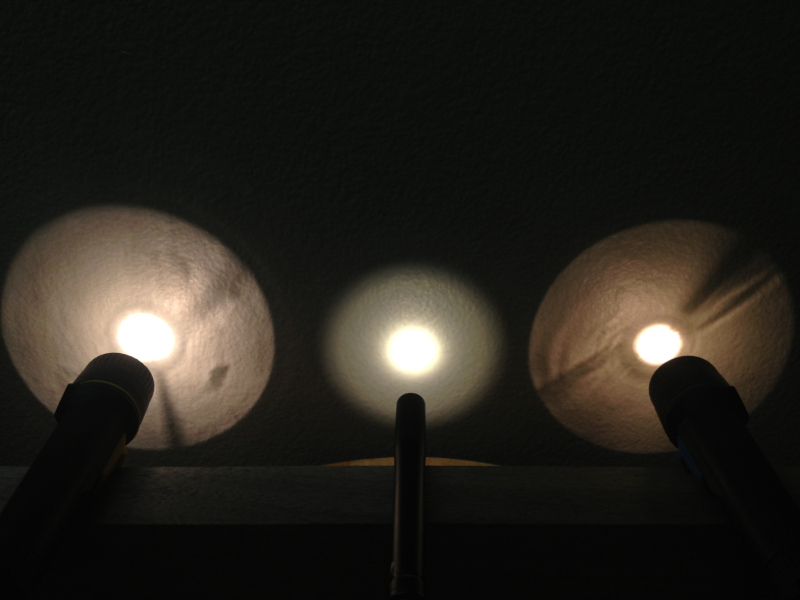
From the left: cheap grocery store incandescent, Preon P2 with 2900K emitter, cheap grocery store incandescent.

As far as the actual work to mod it goes, I used retaining ring pliars to open the light. The PCB where the battery positive terminal touches has two holes. I put the pliers in there and unscrewed the "pill" without trouble at all.
The lens and reflector could also be removed by tipping them out at that point.

The LED was soldered onto a PCB with a plastic retaining and centering ring squished into the pill. After removing the retaining/centering bit, I was able to desolder the leads and remove the LED on its PCB.
I reflow soldered a bare LED onto a new PCB of similar dimensions, applied new thermal paste, soldered the power leads back on, and reinstalled the retaining/centering plastic part.

The work with the flashlight was pretty quick. I probably spent the most time soldering the leads back onto the new PCB. This Preon P2 is pretty friendly if you want to change the emitter. Thanks Foursevens!
Tools needed were a soldering iron, a hot air reflow station, retaining ring pliars, solder, flux, some isopropyl alcohol, paper towels, a haemostat for holding the power leads while soldering, and normal pliers to get that retaining/centering ring out.

I think I'll pick up another head or full light and put a ~3600K led in there. That's about midway from incandescent to what's typical for "neutral white."
 
Last edited:

papershredder

Newly Enlightened
Joined
May 31, 2013
Messages
132
Nice mod! Thanks for posting the procedure. I would love to see a step by step tutorial with pictures.

I think I'm going to get another and do a 4000k mod. I'll post photos of that.

I don't suppose there is any interest out there for these? I would not mind churning out ten or so.
 

papershredder

Newly Enlightened
Joined
May 31, 2013
Messages
132
I've got two more Preon P2's in the mail and a 4000K, 5000K and a Nichia 219 emitter as well. I'll try the Nichia before the 5000K and if it does not work out, then it's going to be the 5000K.

The interesting thing that I've found is the availability of the Cree emitters is not so great if you want to purchase a handful. For instance, I can get 3000K (including high CRI), 4000K, and 5000K and 6300K no problem. Can I get 3600K? Not without ordering 1000 units, to the tune of about one and a half thousand dollars.

Mouser has something like 300 XPGBWT emitters, but if you narrow it down to what they stock, it comes out to 18. Same thing with the other distributors.

The XP-G, as opposed to the XP-G2, Preon P2 stock on the internet is dwindling. The cost of the XP-G2 is about 7 dollars more.

If those other two mods go well, I think I'll offer a limited quanity of Preon P2 / P1 for pre-order with the buyer's choice of emitter.
 

papershredder

Newly Enlightened
Joined
May 31, 2013
Messages
132
Good luck and I hope it goes smoothly.

No it did not.

I got the two new lights. I put my retaining ring pliers into the first PCB and cranked on it. SNAP!
I broke the adhesive keeping one of the two PCB in the pill.
After a small application of heat, I tried the second pill. Same result. SNAP!
Both pills were stuck in their heads at this point with the PCB's poking out and held in by wires.
I don't know why my first light that I already modified was so easy. There was thread locker on there but it was trivial to break... must have been the Chinese knock-off brand =)
(Dear manufacturers, please consider not using thread locker. I don't think it's applicable to this sort of product. (Knock-offs of knock-offs, I guess.))

Not to be daunted, I was able to get some small wire snips into the head and cut the wires going to the LED board. Thus, I was able to get both power electronic boards out of each head.
I yanked the rest of the wire coming from the LED board out. Those wires were going through two holes in the pill body, so I figured I could get my retaining ring pliers into those holes and get the pill body out.

After ten minutes with my angle grinder, I had some retaing ring pliers that could reach in there.
I had to boil the heads and ease the pill body out of each head.

I cleaned up the pill bodies with solvents and removed any burrs I created with my mechanical work. Then I soldered new wires onto the power electronic boards and threaded them through the pill body.
I reassembled the power electronic boards into the pill body with adhesive.

I tested out the two pills and they both still worked with the original cool white emitter. I'm glad they survived my machinations.

During all this, I hand-reflow soldered a 4000K Cree, a 5000K Cree, and a Nichia 219 onto an 8mm star PCB. That went well despite having the shakes due to over-caffination and lack of sleep. Those were XP-G packages.

Next step is to clean up the lenses and reflectors. Then I'll be soldering in the new boards populated with those emitters. Hopefully the Nichia will be driven well. The Nichia's I've seen seem pretty close to 5000K to me, so it's either the 5000K Cree or the Nichia 219.


This is a lot of work...
 

Tiresius

Enlightened
Joined
Sep 19, 2009
Messages
965
Location
Fresno, CA
Go with the high CRI 2900k XP-G2 version. They're to die for. I did a swap for a friend's P-Rocket and he loves the color and rendition. My triple 219 got jealous fast after seeing that one. A non-high CRI does not perform the same.
 

gunga

Flashaholic
Joined
Nov 29, 2006
Messages
8,080
Location
Vancouver, BC, Canada
Yes. Be careful. I don't bother modding preons/Maratacs etc because most of the ones I've tried to mod were very well glued. I've ruined a few trying to mod em.

:(
 

Tiresius

Enlightened
Joined
Sep 19, 2009
Messages
965
Location
Fresno, CA
Yes. Be careful. I don't bother modding preons/Maratacs etc because most of the ones I've tried to mod were very well glued. I've ruined a few trying to mod em.

:(

I managed to pull apart mines with everything intact. The trick behind it is to use a heat gun for less than 10 seconds. It should be hot enough that the glue inside will be soft enough for you to twist it off. If it takes a lot of energy, you're close to pulling everything apart. Apply a little more heat and VOLA!!! the head is screwed out.

Here's mines where the whole unit came off with no problem. http://www.candlepowerforums.com/vb/showthread.php?361233-47-s-Preon-0-XP-G2-5000k

Getting the black isolator disc was the real problem as you do not want to damage it. It is both the centering tool and a way to prevent the emitter from moving about when re-assembling everything.
 

gunga

Flashaholic
Joined
Nov 29, 2006
Messages
8,080
Location
Vancouver, BC, Canada
Cool. Thanks for the tip. I was using a cup Warmer. Actually caused 1 reflector to bubble and still couldn't open it. I'm not that into preons etc so no mods for me!
 

papershredder

Newly Enlightened
Joined
May 31, 2013
Messages
132
I finished a P2 tonight with a 4000K Cree.

I was playing with the Nichia 219. It runs dimmer, as you all know. It seemed to generate a little more heat too. I spent some time in the dark with some colored objects. I could not notice much of a difference between a 5000K cree and this Nichia. The color temp seemed darn near similar, albeit the Nichia has a bit of a rosy tint. (I've got the ole' red-green color blindness, so that is likely coming into play slightly. Think about my red and green cones overlapping slightly more than yours in spectrum. That's a fairly accurate explaination, at least in outcome, maybe not in cause...) I've not looked at the datasheet yet. Probably a higher voltage drop. The retaining/centering plastic that foursevens uses does not fit around that Nichia well.

The difference between the 4000K Cree and 5000K Cree seems smaller, perhaps about half that of going from 3000K to 4000K. Lots of yellow and red/orange in that 3000K.

Got a stock one in the mail, that's the 6300K. I'm going to do one up at 5000K. That'll round me out at the ~3000K high CRI (built), 4000K (built), 5000K (todo) and 6300K (stock.)

Looks like I can get additional emitters in 4750K and 4500K... maybe future work. I'm also thinking about getting the heads sent out for lasering to get the color temps printed on there. That'd make a neat collection.

I don't think I'm going to make any of these for sale. It's a lot of work modding these and what I'd charge to make it worth my while... let's just say you could get one of those custom titanium lights everyone drools over around here for the same cost. =)
I'll be focusing instead on coming up with good instructions to share. The 5000K mod I do will come with pictures. The best outcome for you guys is if I bust that PCB out of the pill again. =)
 
Top