Eagletac D25 series driver/light engine removal

supra1988t

Newly Enlightened
Joined
Jul 6, 2008
Messages
52
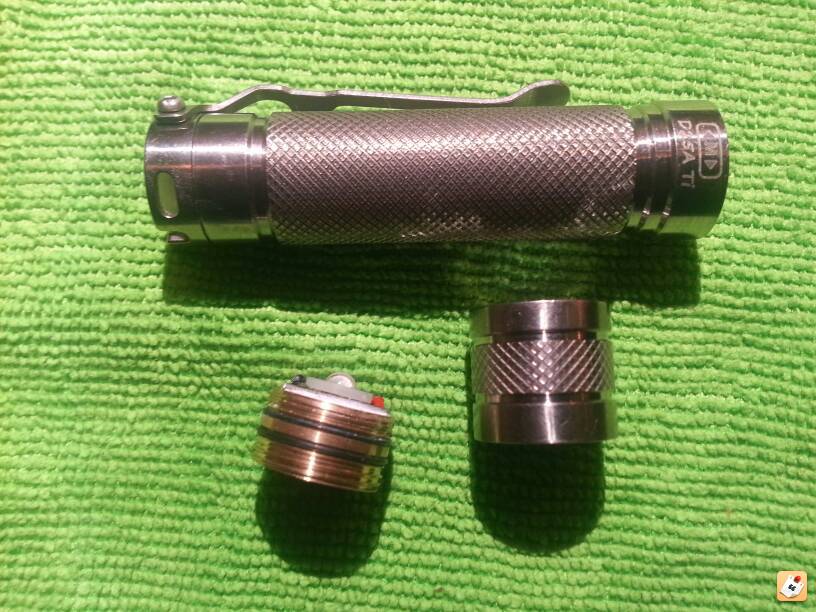
Anybody know how to remove the driver/light engine from the Eagletac D25 series? I have a Ti clicky that I would like to put a High CRI emitter in. I have heard of people just doing it through the bezel but I am green with a soldering iron and would prefer to get the pill out for easier access, plus Id like to anodize the entire body. Its hard to tell if its pressed/glued in or threaded. Any experience with these is helpful.

Thanks


Tiresius

Enlightened
Joined
Sep 19, 2009
Messages
965
Location
Fresno, CA
Your best bet is to pull from the bezel side. The head is actually a solid unit and there is no pill. The top half of the head consists of the lens, reflector and emitter seated on a pcb board. Below it is the closed end of the cup with two holes drilled for the wires to go through. On the other side is the driver and contact board pressed into the unit. It is lightly glued together in my samples given to me.
 

supra1988t

Newly Enlightened
Joined
Jul 6, 2008
Messages
52
Great, thanks for the reply. So the brass threaded section is pressed or glued into the titanium head? Looks like I'll have to try from the top/bezel end.
 

lockdoc

Newly Enlightened
Joined
Jun 26, 2009
Messages
97
Location
Spanish Fort, Alabama
a7e6y8a3.jpg


Mine unscrewed and was pita because of the glue. I definitely recommend heating the head beforehand.
Changing the led by removing the bezel was for the older female head models. Looks like you have a new model with the male head and brass light engine. The only way to change the led on yours is to unscrew the light engine.

Sent from my SCH-I605 using Tapatalk
 
Last edited:

supra1988t

Newly Enlightened
Joined
Jul 6, 2008
Messages
52
Awesome, thanks for the pic! Any tips on how to grip the brass without damaging the the threads or driver board?
 

chance91

Newly Enlightened
Joined
Aug 10, 2010
Messages
40
Awesome, thanks for the pic! Any tips on how to grip the brass without damaging the the threads or driver board?

If you had access to some thicker abs plastic you could use that in a vice. Vice with rags or someing is iffy. Other options would be a strap wrench or rubber coated pliers. I have one for spark plug boots.
 

lockdoc

Newly Enlightened
Joined
Jun 26, 2009
Messages
97
Location
Spanish Fort, Alabama
I cut two 4 inch pieces of rubber from a old strap wrench and wrapped around the light while using two pairs of channel lock pliers to unscrew.

Sent from my SCH-I605 using Tapatalk
 

supra1988t

Newly Enlightened
Joined
Jul 6, 2008
Messages
52
Welp, Im an idiot - D25C Ti disassembly failure

Well in an attempt to swap emitters in my D25C clicky I decided to try to unthread the brass from titanium head. I heated the head by placing it in a bag in boiling water to soften the glue, wrapped the two parts with rubber and used pliers and channel locks. My first attempt resulted in the channel locks piercing two layers of rubber and scratching the titanium all to hell. Well now Im pissed off and figure if Im going to scratch it up Im definitely going to get it apart. My second and even more careless attempt (with two added layers of rubber) resulted in stripping some off the pcb board along with some brass from the threads. This also tore a black wire making the light inoperable. I may try to solder a new wire in but Ive never soldered on a pcb board before. The board that makes contact with the battery fits back into where it was ripped from and still threads into the body with no problem so maybe I can getting working again but boy am I pissed at myself. Heres the damage and what the internals look like, hopefully someone can learn from my mistakes.


Redhat703

Enlightened
Joined
Sep 23, 2005
Messages
396
Re: Welp, Im an idiot - D25C Ti disassembly failure

I feel your pain:). However, you only need to re-solder the black wire back to the pcb board which is not a hard part at all.
We all learn from mistakes.
 

Tiresius

Enlightened
Joined
Sep 19, 2009
Messages
965
Location
Fresno, CA
Re: Welp, Im an idiot - D25C Ti disassembly failure

You need to apply quite a bit of heat to get that glue off the threads. I usually use a heat gun at 500+ Fahrenheit for a couple of seconds in short increments to prevent the rubber and driver from frying. After a good 7 seconds, I test to see if I can twist it off. If no avail, apply a little more heat carefully to prevent damages.

That wire can be easily soldered back on. Don't let that be the hard part. The driver itself reminds me of one of those 1250mah drivers they used to power XR-E emitters.
 

Mr. Tone

Flashlight Enthusiast
Joined
Jul 2, 2009
Messages
2,350
Location
Illinois
Re: Welp, Im an idiot - D25C Ti disassembly failure

What type of emitter swap were you trying to do?
 
Last edited by a moderator:

geraldL

Newly Enlightened
Joined
Aug 4, 2013
Messages
78
Can anyone tell me what part of the internals is the one responsible for controlling current to the emitter? (With reference to the wonderful photos taken) I'm not doing any modding but I just want to learn more about flashlights - my obsession.
 

jonwkng

Flashlight Enthusiast
Joined
Jun 12, 2013
Messages
1,994
Location
Singapore
Can anyone tell me what part of the internals is the one responsible for controlling current to the emitter? (With reference to the wonderful photos taken) I'm not doing any modding but I just want to learn more about flashlights - my obsession.

Hi Gerald,
You might want to start at this great sticky that Charles (download) made - http://www.candlepowerforums.com/vb...nner-s-Guide-to-explain-simple-LED-flashlight

supra1988t, thanks for sharing the pictures. When it comes to modding stock lights, I suppose even the great and experienced modders have ruined or damaged lights in the course of disassembly. And fried their fair share of emitters. Well, look on the bright side, you've got access to the emitter for the HCRI swap that you were planning. As mentioned, putting the light together again shouldn't be difficult. :D
 

Mr. Tone

Flashlight Enthusiast
Joined
Jul 2, 2009
Messages
2,350
Location
Illinois
The emitter Im trying to swap in there is a T6-4C XM-L2 http://www.fasttech.com/product/1425001

Im pretty new to modding as you can probably tell, can anyone tell me what type of wire to use to replace the broken one? Thanks.

Ok, I wish I could tell you about the wire. Hopefully someone else that knows will chime in and tell you. I think Illumination Supply has the kind of wire people use for flashlight drivers and stuff on their website, though.
 

Tiresius

Enlightened
Joined
Sep 19, 2009
Messages
965
Location
Fresno, CA
You have two options for wires: PTFE or Silicone wires. PTFE if you're looking for very abrasive resistant wires but in this case, I'd recommend silicone wires. PTFE is very sturdy and dislike flexibility. I picked up mines at Illumination Supply. Go with the 24 or 22 AWG wires. I went with 26 and the silver strands inside are too small.

Silicone is more flexible and seems to be the better choice for your application. They're both high heat resistant and will not melt under until 500 degree F.
 

supra1988t

Newly Enlightened
Joined
Jul 6, 2008
Messages
52
Re: Welp, Im an idiot - D25C Ti disassembly failure

You have two options for wires: PTFE or Silicone wires. PTFE if you're looking for very abrasive resistant wires but in this case, I'd recommend silicone wires. PTFE is very sturdy and dislike flexibility. I picked up mines at Illumination Supply. Go with the 24 or 22 AWG wires. I went with 26 and the silver strands inside are too small.

Silicone is more flexible and seems to be the better choice for your application. They're both high heat resistant and will not melt under until 500 degree F.

Thanks.

SI that a trimpot i am seeing in the center of the board?

Could be


Boss

Newly Enlightened
Joined
Feb 28, 2012
Messages
39
Does anyone know what the trim pot does? I have mine apart and I'm tempted to give it a couple turns :)

Pertaining to the OP, I heated mine with a mini butane torch and used an exacto to pry the driver from the pill. Comes off fairly easy with heat.
 
Last edited:
Top