I cooked my SWM

Joined
Mar 10, 2011
Messages
208
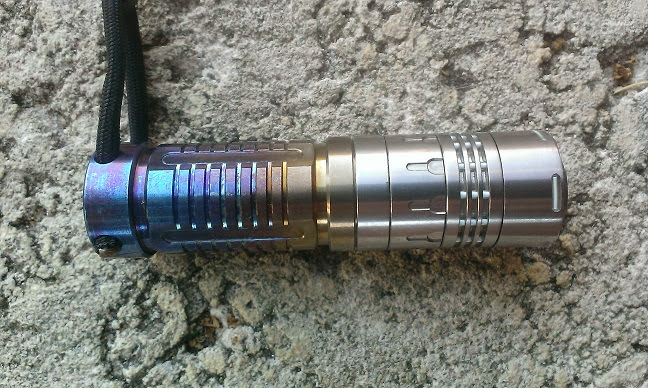
I got the idea from 'LEDobsession' turning a part from his ring blue with heat. I think I have seen one (maybe 2) flashlights done as well. I haven't checked but I'm thinking this is popular for knife collectors as well. So this is nothing new or ground breaking. I really should have studied up a bit on the best way to do it because I didn't quite get the result I was after. My first attempt was with a heat gun after I don't know how many minutes I came to the conclusion that it wasn't hot enough, so into the kitchen I went and cooked it on the stove. It took a little longer than I thought to heat up but once it started turning colour it changed fairly quickly. I've previously tried to disassemble the head before but was unsuccessful so I could do the whole light, just the battery tube. Given the head wasn't going to change colour I tried to make a slow blend of colour over the length of the tube with the darkest blue at the tail and the other end near same as the head. Well, it turned out I got a little more blue than I bargained for.

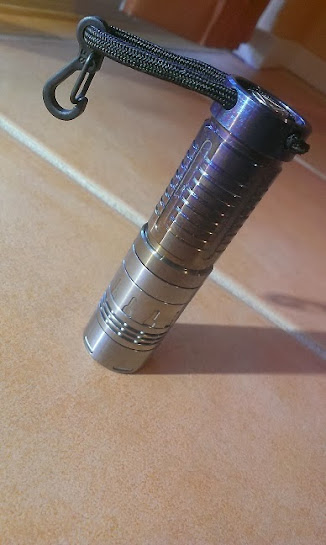
I also made my own style of lanyard with a clip and short piece of paracord. I walked around work all day with it hanging of my pants. It was very comfortable, it didn't get in the way, particularly when sitting or getting in/out of the car and I was starting to feel at ease that I wouldn't lose it because it didn't budge the whole day (of course, I took it off to show a workmate).

Anyway, pics of my half**ss'd attempt

IMAG1362.jpg

IMAG1359.jpg
IMAG1356.jpg
IMAG1355.jpg
IMAG1353.jpg

pinkpanda3310-albums-custom-lst2-picture19923-imag1362.jpg

pinkpanda3310-albums-custom-lst2-picture19922-imag1359.jpg
pinkpanda3310-albums-custom-lst2-picture19920-imag1355.jpg

pinkpanda3310-albums-custom-lst2-picture19921-imag1356.jpg
pinkpanda3310-albums-custom-lst2-picture19919-imag1353.jpg
 
Last edited:

f22shift

Flashlight Enthusiast
Joined
Jun 4, 2007
Messages
2,019
Location
Singapore, NY,SH,BJ
it looks fine. you could heat up the control ring and the fin if you take out the trits.
maybe just blue the control ring to balance it out more.
 
Joined
Mar 10, 2011
Messages
208
I have tried disassembling the head but couldn't do it. Even if I could, I don't know if the trits are glued as well??? Similarly with the control ring, if the magnets are glued in I bet it would be a PITA to get them out. I wouldn't be able the heat the magnets because it will reduce the strength of the magnets which could have implications to their function. Otherwise I might've done just like you said.
 

f22shift

Flashlight Enthusiast
Joined
Jun 4, 2007
Messages
2,019
Location
Singapore, NY,SH,BJ
I have tried disassembling the head but couldn't do it. Even if I could, I don't know if the trits are glued as well??? Similarly with the control ring, if the magnets are glued in I bet it would be a PITA to get them out. I wouldn't be able the heat the magnets because it will reduce the strength of the magnets which could have implications to their function. Otherwise I might've done just like you said.

oh someone made your light.
hmm, not sure how they sealed. i have to remember to post up my v10r disassembly video.
you have to take off the bezel first then the fin can also unscrew off.
then the control just comes off without unscrewing (underneath is just the grease, i replaced mine with something thicker for my own preference)
the magnets on the control ring (2 of them) are removable. they are even slightly adjustable but i noticed no difference in the ramping.

so yes if you could disassemble, you can just do the ring without the magnets.

the fins, hmm there are two way to hold in there that people mentioned on here. either epoxy fill the gap or cut small pieces of a O-ring to stuff in the space.

let me put some warnings.
if you disassemble, never touch the reflector. use a small room that you have used an air cleaner in(no dust). a low moisture day too(don't want to trap in moisture). i learned to be less OCD about getting very tiny dust in there.
trits are fragile and easy to lose(use UV light if you do drop on the ground). be careful if you decide to take the trits out of the fin.

but the bezel would come off first. maybe wrap some rubber bands on the bezel and the piece below it.

regardless it's still quite a nice turnout if you decide not to do more.
 
Joined
Mar 10, 2011
Messages
208
I found an idea that piqued my interest and tried it on this light. Since there was more blue than I bargained for... sand some of it off! So I sanded the ridges in the middle of tube and a little off the tail rim.

picture.php
picture.php
picture.php
picture.php
picture.php


I like it much better now:thumbsup: You might notice there are some new slots in the tail end as well. Since I wasn't having much luck enlisting a modder to add trits for me I decided to splurge and buy a milling table for the drill press at work. I did a few experimental runs on a piece of aluminium trying to find the right router bit then plunged head first into milling the titainium tube. It is nowhere near comparable to JHanko's work or SOYCD (the head and switch) but I figure they have 2 things on me- 1. better skills (experience) and 2. better equipment. The pictures don't really show the detail of the workmanship but even if I had a camera that did macro shots I wouldn't post the pics. Getting the mill table has spurred me to look at metal lathes but I'm having a hard time justifying the cost. I rotary table for the drill press would be nice but that plus the cost of the table I might as well spend that little bit more and get a lathe. I think I'll just stick with the table for now. I can't see it getting a whole lot of use.
picture.php
picture.php
 
Joined
Mar 10, 2011
Messages
208
My obsession with altering this light continues

Please excuse the sticky tape holding the trits in the tail. Waiting on some norland.

picture.php

picture.php
gvVqgF7giYgTOsakz8lV8EChbnwdzuaVfFej6p0bXi0=w388-h218-p-no
 
Last edited:
Top