
Hi fellow CPF members!
I am new here lurking and learning for several months. Many thanks to the efforts of all at posting pictures and easy to follow tutorials. I have really come to admire many of your customized parts and builds.
Now for me, as a newbie, I am trying my hand at a custom M@g mod using techniques described in various threads by poster such as Northernlights, Nereus, Modamag, 3rd shift, Icarus, bluecrow76, magmodmike. The specs of my build are:
M@g 2D (custom "bored") host with switch modified to momentary action
5* Cree Q5 "premium" stars (DX)
5 x Fraen 19mm reflectors (Arrow FRC-N1-XR79-0R )
Maxflex3 boost driver (Taskled)
8AA modamag adapter (Sandwich Shoppe)
PES heatsink ((Sandwich Shoppe)
This is nothing new, but I felt it was a managable first for me and I felt up for the challenge. Initially, I intended to build a 4*Cree Q5 mod. I successfully trimmed down the Cree stars to squeeze 4 comfortably within the m@g head (sorry, no pic – I already disassembled it!). I connected them in series, powered them up from 8AA NiMh cells pushing out ~11 volts and driven with a maxflex3 boost driver. Everything worked very nicely and the maxflex3 UI circuit gave several options to control illumination levels and maximum output that was easily controlled by the modified momentary switch. It was at least as bright (if not brighter) than my Terralux 300M in a M@g 3D host running off 9AA NimH cells pushing.

So far, so good….BUT….I wanted MORE light (surprising??) So, after more tinkering, I found that I could fit 5*19mm Fraen reflectors into the head. The Cree Q5 stars needed extensive filing to get them to fit. (Picture below are from my cell phone, apologies for the blurry images!)
5*19mm Fraen reflectors fitting into m@g head

Cree Q5 star - filed down left vs stock right


2*Q5 stars side by side

4 x Cree Q5 stars in M@g head


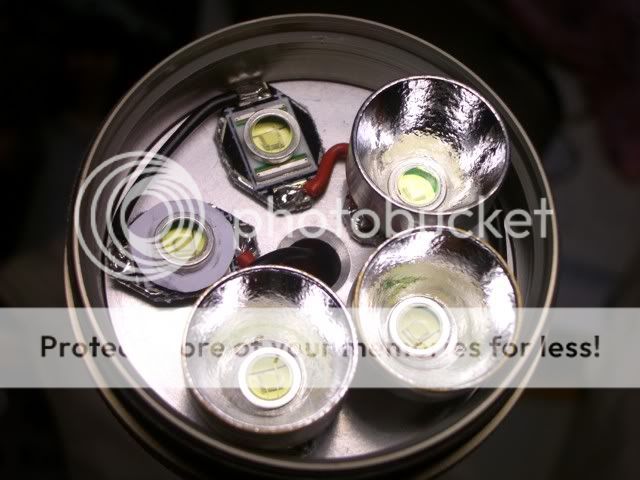
4*Cree Q5 + 4*19mm Fraen reflectors – is there room for 1 more???


5*Cree Q5 stars – don't quite fit!!!


As you can see, the 5th star (arrow) doesn't quite fit between the others (arrows). So, my question is this: how much more can I file these down? I am afraid to go beyond the +/- contacts for fear of creating a short circuit. Can I cut the star something like the picture below? I know others have made these mods using bare emmiters, however, DX only sells them mounted to a PCB.

Finally, is it bad to have the contacts of adjacent stars so close together - maybe I should insulate them from short circuiting by coating with AA?
Any comments/critiques are welcomed.
Thanks!!!
Hill
**************************************************
Update 11/24/08
Finally finished my build - well enough to get if fired up at least.
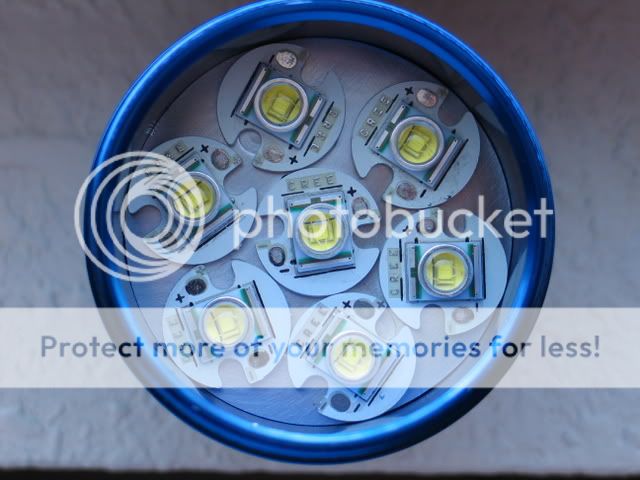
I managed to file down the stars enough to comfortable squeeze 5 into the M@g head. I also had to file down the very edge of the 5 Fraen reflectors since they were just a bit too wide to fit.
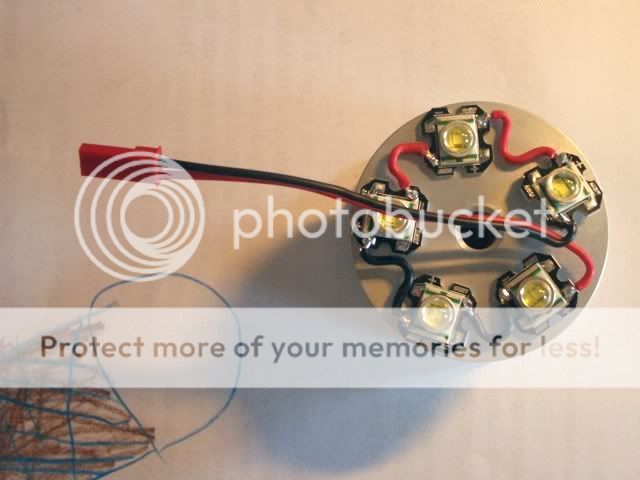
5 stars all wired in series


19mm Fraen reflectors (stock left vs modified right)


Head assembly all together and ready for action!


Fired it up and it works great!!! I haven't run it too long since the maxflex3 is not heatsinked yet.
And finally, my VERY crude but functional "soldering station" (credit for customized wire holder goes to CPF)

********************UPDATE 11/25/08***************************
And now for some beam shots (still with cell phone so only used as comparison) comparing against a Terralux 300M in M@g 3D with 9AA adapter. Lights aimed at ceiling ~3ft away. Maxflex3 was set to maximum current output (1200 mA according to Taskled specsheet)
Terralux (LEFT) vs 5*Cree Q5 (RIGHT)
5*Cree Q5 Level 1

5*Cree Q5 Level 2

5*Cree Q5 Level 3

5*Cree Q5 Level 4

5*Cree Q5 Level 5

Also did a lux reading from the ceiling bounce using this cheapo meter from DX. Keep in mind that this is done to compare these two only, so don't take too much stock in the actual numbers!
Terralux 300M ~500 lux
5*Cree Q5 ~ 1000 lux on Level 5 (max)
So, my mod is giving me ~2x output of the stock Terralux drop in (rated ~500 lumens). I would guess I'm getting ~ 1000 lumens total.
Also, took measure of current draw at all five illumination levels (L1 to L5) with Maxflex set on 350 mA, 500mA, 700mA, 1000mA, and 1200mA maximum drive level.

Thanks for reading!!
Hill

Build thread continued here
I am new here lurking and learning for several months. Many thanks to the efforts of all at posting pictures and easy to follow tutorials. I have really come to admire many of your customized parts and builds.
Now for me, as a newbie, I am trying my hand at a custom M@g mod using techniques described in various threads by poster such as Northernlights, Nereus, Modamag, 3rd shift, Icarus, bluecrow76, magmodmike. The specs of my build are:
M@g 2D (custom "bored") host with switch modified to momentary action
5* Cree Q5 "premium" stars (DX)
5 x Fraen 19mm reflectors (Arrow FRC-N1-XR79-0R )
Maxflex3 boost driver (Taskled)
8AA modamag adapter (Sandwich Shoppe)
PES heatsink ((Sandwich Shoppe)
This is nothing new, but I felt it was a managable first for me and I felt up for the challenge. Initially, I intended to build a 4*Cree Q5 mod. I successfully trimmed down the Cree stars to squeeze 4 comfortably within the m@g head (sorry, no pic – I already disassembled it!). I connected them in series, powered them up from 8AA NiMh cells pushing out ~11 volts and driven with a maxflex3 boost driver. Everything worked very nicely and the maxflex3 UI circuit gave several options to control illumination levels and maximum output that was easily controlled by the modified momentary switch. It was at least as bright (if not brighter) than my Terralux 300M in a M@g 3D host running off 9AA NimH cells pushing.
So far, so good….BUT….I wanted MORE light (surprising??) So, after more tinkering, I found that I could fit 5*19mm Fraen reflectors into the head. The Cree Q5 stars needed extensive filing to get them to fit. (Picture below are from my cell phone, apologies for the blurry images!)
5*19mm Fraen reflectors fitting into m@g head
Cree Q5 star - filed down left vs stock right
2*Q5 stars side by side
4 x Cree Q5 stars in M@g head
4*Cree Q5 + 4*19mm Fraen reflectors – is there room for 1 more???
5*Cree Q5 stars – don't quite fit!!!
As you can see, the 5th star (arrow) doesn't quite fit between the others (arrows). So, my question is this: how much more can I file these down? I am afraid to go beyond the +/- contacts for fear of creating a short circuit. Can I cut the star something like the picture below? I know others have made these mods using bare emmiters, however, DX only sells them mounted to a PCB.
Finally, is it bad to have the contacts of adjacent stars so close together - maybe I should insulate them from short circuiting by coating with AA?
Any comments/critiques are welcomed.
Thanks!!!
Hill
**************************************************
Update 11/24/08
Finally finished my build - well enough to get if fired up at least.
I managed to file down the stars enough to comfortable squeeze 5 into the M@g head. I also had to file down the very edge of the 5 Fraen reflectors since they were just a bit too wide to fit.
5 stars all wired in series
19mm Fraen reflectors (stock left vs modified right)
Head assembly all together and ready for action!
Fired it up and it works great!!! I haven't run it too long since the maxflex3 is not heatsinked yet.
And finally, my VERY crude but functional "soldering station" (credit for customized wire holder goes to CPF)
********************UPDATE 11/25/08***************************
And now for some beam shots (still with cell phone so only used as comparison) comparing against a Terralux 300M in M@g 3D with 9AA adapter. Lights aimed at ceiling ~3ft away. Maxflex3 was set to maximum current output (1200 mA according to Taskled specsheet)
Terralux (LEFT) vs 5*Cree Q5 (RIGHT)
5*Cree Q5 Level 1
5*Cree Q5 Level 2
5*Cree Q5 Level 3
5*Cree Q5 Level 4
5*Cree Q5 Level 5
Also did a lux reading from the ceiling bounce using this cheapo meter from DX. Keep in mind that this is done to compare these two only, so don't take too much stock in the actual numbers!
Terralux 300M ~500 lux
5*Cree Q5 ~ 1000 lux on Level 5 (max)
So, my mod is giving me ~2x output of the stock Terralux drop in (rated ~500 lumens). I would guess I'm getting ~ 1000 lumens total.
Also, took measure of current draw at all five illumination levels (L1 to L5) with Maxflex set on 350 mA, 500mA, 700mA, 1000mA, and 1200mA maximum drive level.
Thanks for reading!!
Hill
Build thread continued here
Last edited:


 high would only be possible in bursts