Materials For Belt Flashlight Holster

MrAl

Flashlight Enthusiast
Joined
Sep 9, 2001
Messages
3,248
Location
New Jersey
Hello there,

I am wondering what kind of material is good for making a flashlight holster. That is, what weight material.
For example, 600D would be 600 denier, and say 10oz would be a different measure of the weight of the material.
You think 600D would be enough or should it really be 1000D or maybe something else?
I know some guys make there own here.

Thanks much.
 
I guess it would depend on how you're carrying it. 600D seems a bit light for a hip holster, but that is just my opinion.
All my holsters are much heavier than that. Not sure if they're 1000D or what, but certainly heavier than 600D.
However, 600D would be fine as a simple carry pouch IMO. (That's the stuff they use for bookbags /light day packs right? )

I only have 3 holsters -
1 that is double thick with padded insul in between. I actually use that for my work phone. In use 3yrs still looks new.
1 that is sewn around what appears to be a formed plastic pocket with a snap top. It carries a 3C only need it 3x per week for work.
1 that is double thickness with a plastic spine for stiffness. It has a velcro top. Haven't used it in a while, but it carried a 2C and wore well.

ymmv
Hey thanks for the info that sounds very interesting.

Double thick sounds good, with something in between like the plastic.
I'll have to think about that.
I did plan on using Velcro for the latching mechanism as I find that strong Velcro really works good.

I wonder if there is a way to measure an existing holster material. I have one with thick material I'd like to find out the weight (or denier) of the fabric.
 
Hello again,

I made a small holder and I see it is not as easy as it looks. In fact, it takes time to figure out the sizing and what order to sew everything together, and the overall design itself has to be figured out.
I am starting with some rather meek material (probably around 400D), but it can be just a prototype for now as I get heavier material in the future.
What's really cool is you are not limited in what shape or size you can do, and you can even leave room for other things like extra batteries, pen or pencil, you can even include your cell phone if you like. No limit except if it gets too big it may be a bit cumbersome.

I'll try to post a picture soon. It's not the prettiest thing on earth but it's more or less just a prototype and this is the first time I attempted something like this in a very long time. I made a leather case for a programmable calculator a long time ago but that was a very long time ago.

Oh, and not sure how much people like real leather holsters for their lights, or even that fake leather which is a lot cheaper.

Thanks to everyone for any ideas or suggestions.
 
Hey that's cool, I'd love to see the proto.
I don't know what weight/thickness my holsters are, and any labels that may have been on them have long sense been lost/cut/ripped/tossed and gone.

BTW, I just found another one that I've had since the late 90s that I used every day for years in stupid harsh-wear environments. I haven't worn it in a few of years (have a different EDC now) but has sat on my desk right in front of me every day. If it was a snake it would have bit me. LOL
I carried an EDC folding knife in it for work/play. It shows real signs of wear but no holes. It has some sort of synthetic cloth lining the inside of it. Velcro closure. And whatever it's called when they stitch a piece of material over the seams? The Velcro hook is stitched to the top of the pocket. The inside of the flap closure has the loop, but it is the whole lid making the holster close from 4" to just over 6" if I wanted it to.
It's the only holster I have that does that.

The pleather ones aren't worth the effort IMO. The woven synthetics are great and wear very very well. Light, moisture resistant/proof and cheaper/easier to work with and modify.

Hello again,

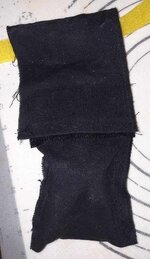
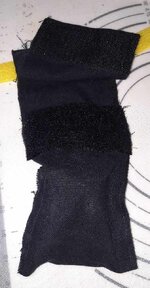
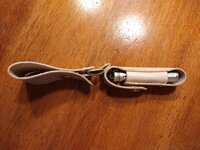
Here are two pics of the prototype. You can see there is some fraying going on and some thread sticking out as I did not get to clean it up much yet I wanted to test it first by wearing it with some 3d objects inside.
Inside I have a small device about the size of a small flashlight and you can see it causes a bulge in the front. I don't mind that though it's just fine as long as it holds the stuff inside.

One pic is the front with the flap closed and the other with the flap open.
The yellow band is just to indicate where the belt goes through it will normally be a much wider belt.
The entire thing is 4 inches wide but the bulging makes the lower part look more narrow.
One thing to note is I made the belt loop just as wide as the whole thing, 4 inches. That's so it's harder to rip off the belt. I think it is strange that a lot of holders only have a narrow belt loop so I made this one wide.
The Velcro is the 2 inch wide sew on type, and wow it is strong. Takes a lot to separate the two halves to open the pouch. Oh and yeah, this turned out to be more of a pouch than a true flashlight holster, but it holds a small flashlight just fine. Room for at least one extra battery also.

I'll probably make one more elaborate next. I find that everything you do and read gives you more ideas.
As I was saying, it's not pretty but it works well. Next some extra material or some thicker material.

These things are really cool to make but it takes an awful lot of planning to get it right.
 

Attachments

  • Holster_20240926_082627.jpg
    Holster_20240926_082627.jpg
    80.4 KB · Views: 43
  • Holster_20240926_082538.jpg
    Holster_20240926_082538.jpg
    65.1 KB · Views: 51
That seems like it will work.

The engineer in me comes out; LOL
When you get to the real deal, there's a name for the thing/process of sewing a thin piece of material over the edges to help with fraying...but I can't remember what it's called.
Sharp corners wear quicker. Curving them is harder to sew but last a lot longer.
Double stitching.
Make the flap as long as the pocket.
Sew a large piece of velcro on the total inside cover flap to allow for different sized bits to be kept snug inside. It almost doubles the size of the pouch/holster with minimal added material.

Big thumbs up!

Hi,

Yes it is a little comical when you think about it. It's amazing the variability you can get here through there are almost no limits. I also was not too worried about appearance just yet I just wanted to see how this process works out in the basic form. And, I need something that fits my devices correctly rather than some off the shelf thing that probably isn't good enough.

This all started when one of my flashlight holsters ripped badly. It was made of super strong material thicker than anything I have on hand yet it ripped pretty bad. I could not believe it could rip that bad, almost the whole side ripped. Any more and the light would have fallen out and possibly have been lost. With material that thick I would have never thought this could happen. What this tells me is they need periodic inspection to check for tears or other wear.

Now that I have this experience, I can tune into the finer points like fixing up the edges and stuff like that.
I like the idea of rounded corners, or corners sewed in a rounded path instead of a sharp 90 degree turn.
There are so many ways to strengthen this kind of construction.
 
Material type and construction quality certainly means something. As you point out, possibly losing a valuable 'tool', light or otherwise isn't just an inconvenience (assuming there's a backup) but can be costly to replace.
The fact that you can custom make what works for you is a major plus!

You could start a side hustle. MrAl's pocket customs. "The Best Sling for Your Favorite Tool" "Cheap Holsters Make for Dark Nights"🤣
Hi,

That's an interesting idea. A custom made holder is really nice. I'll wait till I get better at it though I haven't done this kind of thing in a long time.

I am finding out more about this as I go. I didn't think a thing like this could be so complicated. Working with material that bends every which way takes some getting used to, not like working with wood. I don't envy professional tailors one bit.

I added a second layer of material to the prototype and I feel more confident about the durability now.
Since the Velcro is kind of harder to sew, I tried some good fabric glue. It's very strong stuff when used with regular material like canvas, I could make a holder just using that for the joints, but when it comes to gluing Velcro onto the fabric although it is strong it just isn't strong enough. Sewing seems to be the only way, and then I can add more stitching too for better strength.

So no change in the design, just added second layer which makes it much stronger. I have some 1000D material on order now though so I may do the entire thing over again with the tougher stuff, albeit with some added features.

Oh funny thing, I found out that the second layer forms another 'pocket' so now there are two pockets instead of one. The added one does not have Velcro though, but that could be used for lesser items, or maybe add some Velcro by hand. Funny thing is, once you sew the whole thing together it's hard to add some things like that because you can't get under the pouch fabric, it's inside the pouch, and there is no way to use a sewing machine in a sleeve that narrow. It has to be done by hand or else I have a hell of a lot of stitching to remove first :)
 
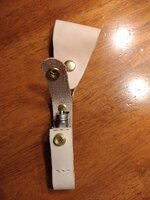
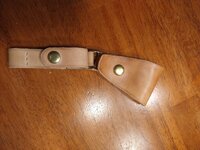
I made a holster for my Surefire Titan out of 2/3 oz leather. Leather is a bit more of an investment in tools and whatnot, but it's fun. It's got a belt loop that snaps onto my belt, and it's a small drop holster with a button snap.

I might have a good piece of advice:

For patterning, GET SOME PAPER. Growing up, my grandmother could sew anything, and made clothing from scratch, so I had a lot of exposure to patterning. Mock everything up with paper, figure it all out, then use that as your template for materials.

Thicker paper mimics the bends and flow of leather really well. A lighter paper should mimic nylon well, too.

When it comes to sewed goods, 85% of your work time should be in your patterning. Only after that's all set, do you cut your materials and sew it all together.

Hi there,

Thanks for your advice this is what I was hoping to hear. I need all the tips I can get because not only have I not done this in a long time, this is the first time I made a holster of any kind. I have made knife sheaths before but used rivets and leather. This time I wanted something lighter weight than leather but still tough.

Yes, I'll make up some paper patterns and go from there. I also have some heavy card stock which would help with the thicker material. Good idea :)

On yes, 85 percent for sure, with me I think it's been 185 percent ha ha because I like to be sure. These materials are not cheap.

It's amazing though what we can create doing this kind of thing. Fit any flashlight or combination of flashlights, batteries, etc.

Oh, I should mention that I saw some fluids for sale that are made to prevent material edge fraying. That's a bit of a problem with some of the materials I have. I think it's like fabric glue. It's applied to the edges and it holds the edge fibers from pulling apart, which they sometimes do very easily.

The main problem I have now is that sewing the Velcro onto the material seems to be hard to do. I was hoping to glue it on, but can't find any glue that will hold it well enough. It has to be pulled hard to separate the two Velcro halves during normal use. I like the strength of Velcro, but maybe a few snaps would work I don't know yet.
 
Last edited:
You might be surprised how light leather can be. This is 2/3 oz vegetable tanned leather, so the Titan is probably 10X heavier, haha.

If you're using nylon, that fabric tape for the edges if fairly popular, as it can fray from the edges. From the US made nylon stuff I have that's made well, it looks like they put the two ends of fabric, overlapping, between the tape, then run two stitch lines for the length. So, probably oversize each panel so you have maybe 3/8" excess along all the edges.

Make sure, when you're sewing it all together, you sew it inside out. That will better allow you to pinch your edges and sew them with the tape.

For VERY SMALL SCALE situations, you can burn the edges of nylon. There are specialized tools that melt/cut edges (lasers being the neatest and most insanely expensive).

Another option, if you're adventurous, is you can go SUPER old school, and use cotton duck. You can heat up paraffin or bee's wax, and work it into the fabric if you want to waterproof it. It's a very traditional way of making satchels, holsters, etc, and then waterproofing them. Sometimes linseed oil was used (though, that almost always needs heavy metal driers, so not my favorite solution). For duck, people just kind of roll the edges and sew them, as it doesn't fray AS much, but there's still some technique to that sandwiching.

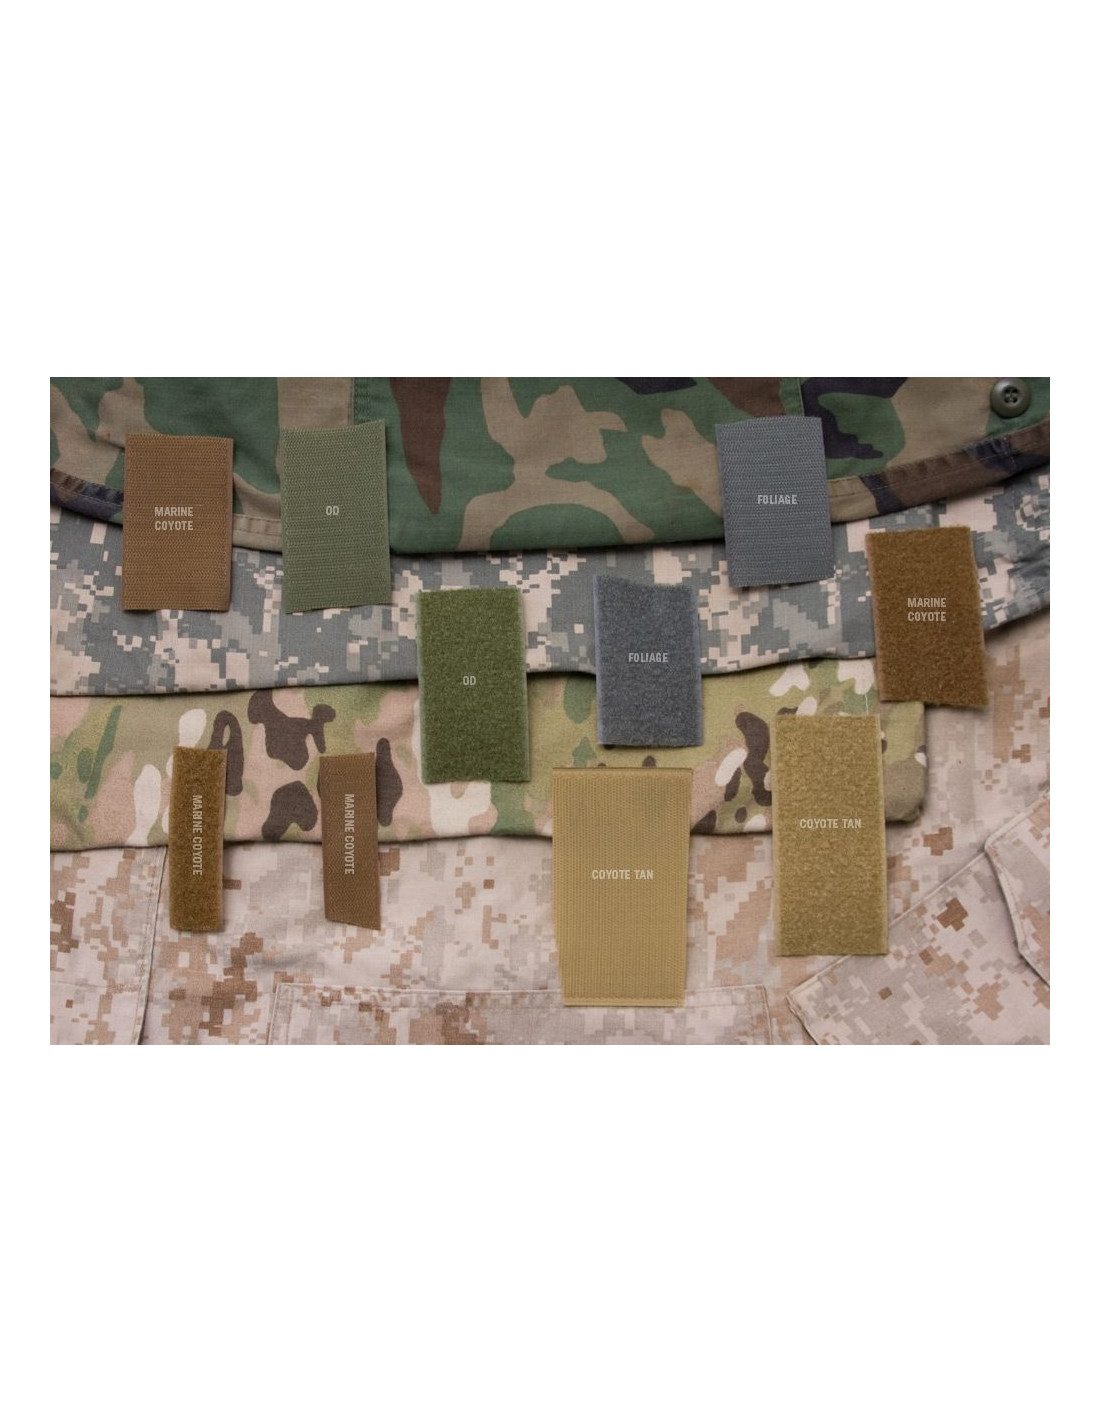
Velcro can work, but make sure you've purchased Velcro made to be sewn in. That should come on a soft fabric tape, and you can do a few different stitches to hold it: fully lengthwise in rows, box stitching (that seems to be best?), or I've seen people do a combo of stitched edges with box stitching along everything. Snaps are nice, but you want practice setting snaps, and either the cool, expensive press thing, or a quality kit.

I think I have these two snap components for line snaps.
The anvil:

What you hammer:

You'd need a soft, solid mallet (I have a leather maul, but a leather hammer works well). You COULD probably use a wood mallet if you didn't mind mangling it up.

Some people insist you just SMASH that snap in one fell swoop, but I've found lightly tapping and "rolling" to start, and THEN giving a solid, firm smack works well.

Getting a scrap piece of quartz or granite to hammer on (maybe with a rubber mat between the stone and your table) helps a LOT to make sure the force doesn't just move THROUGH the snaps. I bought a granite cutout from a countertop place for like $40? It's heavy and kind of insane, but MAN does it make snap setting good. If you can get a smaller/broken piece, it might be cheaper. If you have a stone counter, you could probably just use that, though, I don't know if I'd love the risk of chipping it by hammering a steel anvil into it, haha.

But, don't be afraid to pattern with simple office paper. It's fairly flexible, and cheap. You can put your flashlight down on a "back panel" template, and then press the paper along it.

Leather is nice in that it CAN mold around corners/edges. I'm not sure how you handle that with fabric. As you can see from my pics, I sort of skirted hard edges by design, cause I didn't want to wet mold, and wanted a way for debris to drop out.
 

Attachments

  • IMG_20220104_170733879.jpg
    IMG_20220104_170733879.jpg
    455.7 KB · Views: 29
  • IMG_20220104_190923155.jpg
    IMG_20220104_190923155.jpg
    554.6 KB · Views: 29
  • IMG_20220104_170719317.jpg
    IMG_20220104_170719317.jpg
    694.7 KB · Views: 28
I've made some similar things, wallets and cellphone holsters. We have a local store that specializes in outdoor product materials, so it was easy to just go there and examine what they had, all the nylion fabrics, buckles, Velcro, webbing, etc. Sadly, they now do only mail order since the pandemic, making it hard to know what to get.

A few things I learned:
-expect to make several prototypes!
-you can double over fabric to make it thicker and have one clean edge.
-webbing strap material can work as an internal stiffener/padding and as a structural element along with fabric.
-Beware of coated fabric, which can break down after a few years. Trouble is, it can get gooey or dry and flake off. Make any coating lined with fabric somehow.
- Velcro actually comes in many different grip strengths for a given size. Unfortunately, there are so many sizes and colors that specifying grip strength and stocking selections is rare. I feel it has to be sewn on - I like to sew the whole perimeter and an "X" through it. Velcro can wear out.
- edge finishing tape is called grosgrain tape, and it's usually folded in half over an edge and sewn.

Less enthused people may be happy with a ready made product like Ripoffs:
 
You might be surprised how light leather can be. This is 2/3 oz vegetable tanned leather, so the Titan is probably 10X heavier, haha.

If you're using nylon, that fabric tape for the edges if fairly popular, as it can fray from the edges. From the US made nylon stuff I have that's made well, it looks like they put the two ends of fabric, overlapping, between the tape, then run two stitch lines for the length. So, probably oversize each panel so you have maybe 3/8" excess along all the edges.

Make sure, when you're sewing it all together, you sew it inside out. That will better allow you to pinch your edges and sew them with the tape.

For VERY SMALL SCALE situations, you can burn the edges of nylon. There are specialized tools that melt/cut edges (lasers being the neatest and most insanely expensive).

Another option, if you're adventurous, is you can go SUPER old school, and use cotton duck. You can heat up paraffin or bee's wax, and work it into the fabric if you want to waterproof it. It's a very traditional way of making satchels, holsters, etc, and then waterproofing them. Sometimes linseed oil was used (though, that almost always needs heavy metal driers, so not my favorite solution). For duck, people just kind of roll the edges and sew them, as it doesn't fray AS much, but there's still some technique to that sandwiching.

Velcro can work, but make sure you've purchased Velcro made to be sewn in. That should come on a soft fabric tape, and you can do a few different stitches to hold it: fully lengthwise in rows, box stitching (that seems to be best?), or I've seen people do a combo of stitched edges with box stitching along everything. Snaps are nice, but you want practice setting snaps, and either the cool, expensive press thing, or a quality kit.

I think I have these two snap components for line snaps.
The anvil:

What you hammer:

You'd need a soft, solid mallet (I have a leather maul, but a leather hammer works well). You COULD probably use a wood mallet if you didn't mind mangling it up.

Some people insist you just SMASH that snap in one fell swoop, but I've found lightly tapping and "rolling" to start, and THEN giving a solid, firm smack works well.

Getting a scrap piece of quartz or granite to hammer on (maybe with a rubber mat between the stone and your table) helps a LOT to make sure the force doesn't just move THROUGH the snaps. I bought a granite cutout from a countertop place for like $40? It's heavy and kind of insane, but MAN does it make snap setting good. If you can get a smaller/broken piece, it might be cheaper. If you have a stone counter, you could probably just use that, though, I don't know if I'd love the risk of chipping it by hammering a steel anvil into it, haha.

But, don't be afraid to pattern with simple office paper. It's fairly flexible, and cheap. You can put your flashlight down on a "back panel" template, and then press the paper along it.

Leather is nice in that it CAN mold around corners/edges. I'm not sure how you handle that with fabric. As you can see from my pics, I sort of skirted hard edges by design, cause I didn't want to wet mold, and wanted a way for debris to drop out.
Hi,

Velcro on a soft fabric tape? Where did you see that? I'll check it out.

I worried about getting the snaps on right because I've had trouble with rivets in the past using the hammer and die method. Sometimes the top cap digs in deeper on one edge than the other, and the thing falls apart too.

Yes I am going to start with some regular paper and maybe some card stock.

I have a lot of that fake leather, I wonder how well that would hold up.
 
I've made some similar things, wallets and cellphone holsters. We have a local store that specializes in outdoor product materials, so it was easy to just go there and examine what they had, all the nylion fabrics, buckles, Velcro, webbing, etc. Sadly, they now do only mail order since the pandemic, making it hard to know what to get.

A few things I learned:
-expect to make several prototypes!
-you can double over fabric to make it thicker and have one clean edge.
-webbing strap material can work as an internal stiffener/padding and as a structural element along with fabric.
-Beware of coated fabric, which can break down after a few years. Trouble is, it can get gooey or dry and flake off. Make any coating lined with fabric somehow.
- Velcro actually comes in many different grip strengths for a given size. Unfortunately, there are so many sizes and colors that specifying grip strength and stocking selections is rare. I feel it has to be sewn on - I like to sew the whole perimeter and an "X" through it. Velcro can wear out.
- edge finishing tape is called grosgrain tape, and it's usually folded in half over an edge and sewn.

Less enthused people may be happy with a ready made product like Ripoffs:

Hi,

Yes I worry about the 1000D fabric I got as it appears to have some sort of coating, but it's not a thick coating it appears as if the fibers were soaked in something like really coated like I've seen in the past with some duffle bags. The stuff on the duffle bags would start to peel off and get all over the place.

The Velcro I have is very very strong, but it appears to have some sort of plastic backing. It's not the sticky stuff though I would never try to sew that.

Thanks for the tips I am logging all of this so I can go over it as I am making the next prototype.
 
Hi,

Velcro on a soft fabric tape? Where did you see that? I'll check it out.

I worried about getting the snaps on right because I've had trouble with rivets in the past using the hammer and die method. Sometimes the top cap digs in deeper on one edge than the other, and the thing falls apart too.

Yes I am going to start with some regular paper and maybe some card stock.

I have a lot of that fake leather, I wonder how well that would hold up.
Many places will sell it, but I've found these guys have reasonable prices, shipping, and don't sell Chinese fake stuff:


110% make sure to do all your drafting and prototyping in paper. Nylon is cheap compared to leather, but there's no sense in wasting tons of materials for no reason. You CAN also sew paper if you'd like. Paper is SO cheap in comparison to everything else.


Also, I'm not sure about the point about the coating peeling off, but I'm wondering if that's in relation to an oxidized layer from the nylon? Being plastic, nylon will degrade over time with exposure to UV and/or ozone, so I'm guessing that might be an oxidized layer flaking off. Alternatively, I am wondering if it's maybe a UV protectant layer? I know some places do treat plastics with a UV layer so they don't degrade as quickly, but I don't know if that flakes off (I tend to not use a lot of synthetics).

That's another consideration for materials. Natural materials (leather, hemp, cotton, wool, etc.) tend to be very good in resisting UV, ozone, and heat, while synthetics tend to not be great in those categories. Since it's for a flashlight, I'd assume UV won't be a big deal, but if this is something you're going to use to carry it around in the day, that's something to be aware of. If you are going to use this for a light that gets very hot, though, be VERY aware that nylon (and many synthetics) can and will melt, and that dripping, molten wax can cause some nasty injuries.
 
The fabric coating I'm referring to is traditionally urethane on the backside of the nylon weave to waterproof it. Very common years ago in tents and such, but non-breathable. Now there are several expensive breathable coatings or layers (Gore-Tex) to try to get water resistance and breathability. I'm not so worried about my flashlight breathing in the holster, so coated fabric is fine. I think urethane is tricky to make stable over a long time, so sometimes the coating turns sticky and sometimes it dries up and flakes off. Maybe it's better now than years ago.
 
Many places will sell it, but I've found these guys have reasonable prices, shipping, and don't sell Chinese fake stuff:


110% make sure to do all your drafting and prototyping in paper. Nylon is cheap compared to leather, but there's no sense in wasting tons of materials for no reason. You CAN also sew paper if you'd like. Paper is SO cheap in comparison to everything else.


Also, I'm not sure about the point about the coating peeling off, but I'm wondering if that's in relation to an oxidized layer from the nylon? Being plastic, nylon will degrade over time with exposure to UV and/or ozone, so I'm guessing that might be an oxidized layer flaking off. Alternatively, I am wondering if it's maybe a UV protectant layer? I know some places do treat plastics with a UV layer so they don't degrade as quickly, but I don't know if that flakes off (I tend to not use a lot of synthetics).

That's another consideration for materials. Natural materials (leather, hemp, cotton, wool, etc.) tend to be very good in resisting UV, ozone, and heat, while synthetics tend to not be great in those categories. Since it's for a flashlight, I'd assume UV won't be a big deal, but if this is something you're going to use to carry it around in the day, that's something to be aware of. If you are going to use this for a light that gets very hot, though, be VERY aware that nylon (and many synthetics) can and will melt, and that dripping, molten wax can cause some nasty injuries.
Hi,

Oh is that the kind of Velcro with the 'blank edging' ? That's where there is no hook and loop close to the edge so you can sew it there. I think I've seen that somewhere before. That looks much easier to sew I'll have to check that out.

The coating the new stuff I got is for waterproofing. Not sure what it is made of yet.
 
The fabric coating I'm referring to is traditionally urethane on the backside of the nylon weave to waterproof it. Very common years ago in tents and such, but non-breathable. Now there are several expensive breathable coatings or layers (Gore-Tex) to try to get water resistance and breathability. I'm not so worried about my flashlight breathing in the holster, so coated fabric is fine. I think urethane is tricky to make stable over a long time, so sometimes the coating turns sticky and sometimes it dries up and flakes off. Maybe it's better now than years ago.
Hi,

The new material I got is water proof. Not sure what kind of coating it has though I don't think it said in the ad.
It's not a heavy layer though, like a thin sheet of plastic would look. It's more like the coating was very thin and just seeped into the threads before it dried, making them have a slight sheen to them, but only on one side.

The duffle bag I got some time ago was really nasty. At first it was great, but then after a couple years that coating started to flake off and made a mess. The little bits and pieces got all over the floor and under stuff. Nasty to clean it all up.
After most of it came off, I had a nice duffle bag again :)
 
Top