practical emergency daylight

wingsuitpilot

Newly Enlightened
Joined
May 17, 2009
Messages
7
Ok folks. Total newbie to the hobby here but I went straight to psycho for constructs. This thing is crude. 40 watts. No lenses, no optics beyond tapered machined bore. This is intended as just an emergency area light. 4x Optek 10-watts on a dual fancooled heatsink pushing 565 lumens each for 2260 lumens total. The whole thing was designed around the thermal needs of these monsters. No wonder nobody's using em in consumer appliances...120 degree spread plus an absolutely ridiculous heat conduction requirement. Without fans the heatsink gets too hot to touch inside of 35 minutes. But ya know, I had a power outage recently and I used this thing wired up on the bench to light the entire apartment like broad daylight. Doesn't seem to really need any optics for this purpose, it pukes out such a violent amount of light that focusing or containing it just seems superfluous. Having the emitter head anywhere in your field of view is like looking at a welding arc. Estimating 3 hour lifespan when built into a double-barreled dual 6-D maglight housing running 18V to 4 1000mA powerpucks. Pics as soon as I figure out how to post em.
 

Gunner12

Flashaholic
Joined
Dec 18, 2006
Messages
10,063
Location
Bay Area, CA
Nice! Love to see some pics.

To post pictures, you'll have to host your pictures on a picture hosting site like Flicker or Image Shack and then use the
insertimage.gif
button and post the link to the picture. Also the rules say no pictures above 800x600, so make sure the pictures are of the right size. You can link the pictures to a higher resolution one, bit no pictures above 800x600 on the post itself.

You might like this LED.

:welcome:
 

wingsuitpilot

Newly Enlightened
Joined
May 17, 2009
Messages
7
Ok you wanted it, you got it, lets see if this flickr thing works.
I scoped out those monster Luminus chips... interesting how tech converges, I also built a single chip 10-watt conversion on a smaller heatsink for a friend and the end result wound up looking a lot like their development kit except with a reflector/shock mount pinning the chip to the surface and a lexan hull around the whole thing.
Anyway this is it... only real problem with developing this thing is that it takes so much juice to run it even D alkalines are challenged. Probably gonna wind up buying a bunch of 12000 mAH NiMHs to power it. I tried a stack of 16 AA's and it runs, but the internal resistance of the cells is such that it wastes 90% of the power as heat, force-drawing 3.5A through the cells for a little over 5 minutes before they caved in and started to die. When I pulled the plug at the 7 minute mark the cells were almost red hot and one had ruptured already.
3542764560_8e1a6c3e2d.jpg


And beamshots? We don't need no steenkin' beamshots! I may eventually try to find optics I can adapt to this thing to see if I can get that coveted "shaft of blue light" effect when pointed into a night sky, but in a darkened apartment pointed at the ceiling this thing lights the whole place. I put it up against a 100watt incandescent shop light thats mounted to the mill I made this with and it made the bulb look like a dead maglight, I'd call it roughly equivalent to a bluish-white 250-300 watt bulb. Not bad for my first really serious light hack. Theres really no beamshot possible till I get some kinda optics on it, it simply fills everything for a 120 degree spread with enough light to easily read and write by. The perforated front plate was milled out of what used to be an obsolete test fixture at a plastics plant for a product we no longer make... you find the coolest scrap in the junk room...
 

wingsuitpilot

Newly Enlightened
Joined
May 17, 2009
Messages
7
(Choking and spluttering in outrage) WTF!
Nice!
No, I will not even try to compete with that! Seriously, I wanted to double up on mine, if I mill some border pieces theres room on the heatsink for 4 more Optek 10's, and the dualfan setup is most likely enough to handle the doubled heat loading but the power draw would put it up there in "extreme toy" class as opposed to usable tool. I wanted to be able to measure the runtime in hours, not seconds. This one is actually V 2.0. I built one out of a single 6-D mag with 88 5mm white LEDs using clustered heads from cheap convenience store LED lights a couple years ago. It also had no real beamshot, just a massive flood maybe 10X brighter than standard incan mag. No regulation, just leds and batteries...the source heads were intended to run on 3x AAA 4.5v so ganging em was easy, just ran em in series for 9V in 3 parallel clusters. The discharge behavior mimicked the original lights, but 200X longer, I'd get a couple hours of full bright followed by days of very slow dimming-as the voltage dropped off the discharge curve slowed down so dramatically it was almost deathproof, I left it turned on leaning against a wall once just to see how long, and it was still producing usable light 6 days later. I eventually became dissatisfied with it because the size and bulk weren't justified by the light output. It spent 99% of its time at less than max, and it turned out to be annoying owning a light that was so stingy with the batteries that they spent forever at half power, but that thing woulda been awesome for cave exploration. It was the ultimate in runtime but for the size and weight of it, it felt weak. So this time I decided to build one that was a bit closer to normal battery kill time but made a whole lot more photons. The idea is a "toss it in the back of the jeep" appliance but I'm gonna have to strap 2 6D mags together to pull it off. Anything less is gonna die in minutes.
 

Bobby.T

Newly Enlightened
Joined
May 16, 2009
Messages
2
Ok so maybe this is a stupid question, but if you want something to serve as a backup light for an apartment, why not grab a cheap car battery for ~$30 and build around that?

You can also get battery tenders for cheap to keep the thing topped off and ready to go. Aside from the massive capacity, they'll handle whatever crazy current you want to pull.

I mean it's not like you're carrying around these miniature fusion reactions you're building, right?
 

wingsuitpilot

Newly Enlightened
Joined
May 17, 2009
Messages
7
Ok light fans, here it is.
Done except a few details... needs a stand, a bit of armor around the sides to protect the fans, and a few more vent holes.

End specs: 40 watt Ryobi
4X, Optek OVTL09LG3W cool white 10-watt emitters running on 4 1000mA powerpucks. 2X 240 mA 12V CPU fans off a 7812 voltage regulator. Ryobi 18V host, 2.4 aH lithium, runtime of 30-33 minutes per pack.

My only gripe with it besides weight and balance issues is the runtime. The fans are a big waste of power and I might go to a couple lm317 regulators, see how far I can turn down the fans without it overheating.

I've tested it with fans fed off a different power source and got 40-45 minutes runtime. So cutting the current 480 mA cooling cost down should get another 5-10 minutes.

http://farm4.static.flickr.com/3338/3626940823_d4546eb585.jpg?v=0
http://farm3.static.flickr.com/2484/3626940855_2b9348a5df.jpg?v=0
http://farm4.static.flickr.com/3652/3626940863_a6c3276e48.jpg?v=0

3626940823_d4546eb585.jpg


3626940855_2b9348a5df.jpg


3626940863_a6c3276e48.jpg

Would like input from the really serious builders on here.
I'm thinking of increasing sophistication and setting it up with a temp sensor, current driver package that'll cut the current or turn up the fans when the heatsink heats up. Or a simpler setup where the fans don't even kick in for a few minutes after its turned on...why waste power cooling a cool heatsink? Only question is just how fast does heat accumulate with no fans?
Any suggestions?
 

Gryloc

Enlightened
Joined
Jan 20, 2006
Messages
596
Location
Cincinnati, Ohio & North Lewisburg, Ohio
Hey there. You have a very nice build there. I was just wondering, but is that light even practical? I am a power junky myself, but when I thing emergency light, I think efficiency. I guess I do not know what your requirements are during a power outage, but I thought just several hundred lumens of light would be sufficient to light up a medium sized room comfortably. I have personally worked with LED arrays that output everything between 1000 lumens to over 4000 lumens, and sometimes that seems plain excessive for living casually with (reading a book, sitting at the couch, etc). It would be great if used while working at the workbench messing with electronics or flashlights, though. It would also be wonderful to work as a lantern to light up a large area while camping. I think that if you match the lumen output (at most) of whatever lamp used during the times you have power would make much sense. Most bulbs list the typical lumen output on its packaging, or you can search the internet for an estimated lumen output (Wikipedia was useful to me). Your rig looks impressive, and it looks like something you would show off.

Anyway, it would be best to test heatsink temperatures with the fans turned on and off. It is difficult to tell you how to set up your fans without this info. Keep in mind the properties of the LED emitters that you have chosen. Check out the datasheets to see what the maximum operating temperatures are (avoid these high temps), as well as find how the efficiency and life is affected by elevated temps. You will have to compromise efficiency and life with runtime and other factors (like noise or complexity). Maybe you will not need the fans to run at full speed to keep the heatsink at a certain temperature, or they may not need to kick in for a while. Maybe you can extend the runtimes by lowering the current to the emitters. Emitter efficiency increases as the current decreases. So, as you deliver more current, the efficiency will naturally drop. In addition, as the temps increase, the output will degrade a bit. The trick is finding that sweet spot. The datasheets will help you finding that compromise.

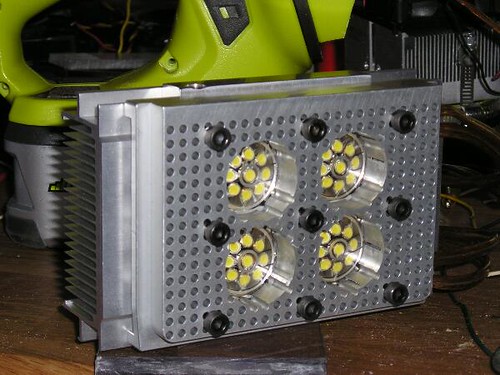
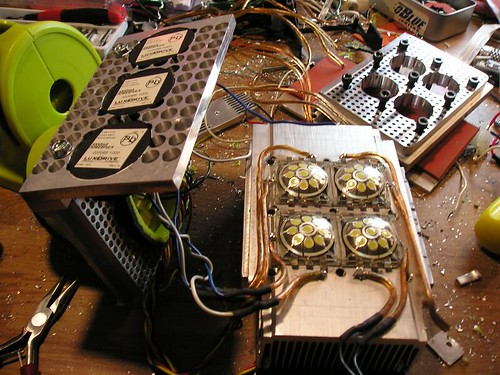
One of the LED clusters I have is mounted directly to a copper plate to spread the heat, then this copper plate is bolted to a massive extruded heatsink (using a bit of thermal paste between the two metal surfaces). Finally, I added some of those temperature sensing CPU cooling fans to regulate temperatures as everything warms up. Some of these cooling fans have external thermistors you can attach to the heatsink to monitor temperatures, and they will automatically regulate the temperature. However, the temperatures will only be properly regulated if the fans can even move the correct amount of air to remove the heat. In my case, the old and inefficient emitters produced way too much heat than my massive heatsink and basic temperature sensitive Thermaltake fan (80mm^2 size) could handle, so after a few minutes, the fan is at full speed and the temps still rise. The thermistor placement affected how quickly the speed increased. I wish I knew the fan speed vs. temp curve for those fans. Anyways, you may have better luck than me since you have two fans in your array for 40W max, while I had one fan for LEDs consuming 60-100W.

Play with the sweet spot first (compromise output versus runtime considering efficiency and heat), then try to cool it next. With a 40W load, you should be able to regulate temps with the fans with your massive heatsink as long as the surface area of the heatsink is sufficient as well as the airflow is unrestricted. You have an untested custom lantern, so trial and error will get you that perfect emergency light! I wish I could help you with circuitry that will automatically dim as temps reach a critical level (which can be fixed using the correct LED current levels from the start and fan selection) or the battery capacity drops.

I hope I am being helpful. If you want the model of the fans I used, I can find it for you. I havent read your every word in your thread, so I probably missed some details. Sorry for that. :crazy:

Cheers,
-Tony
 

snarfer

Enlightened
Joined
Feb 21, 2008
Messages
241
I would start by putting a thermocouple on it and seeing what the real temperature is. Also I wonder if all that copper and aluminum is actually helping. Your heatsink might be too thick.
 

wingsuitpilot

Newly Enlightened
Joined
May 17, 2009
Messages
7
Actually theres no copper... I had some to use, but chose not to... mostly for weight reasons, (even all-aluminum it weighs 4 lbs total, counting battery pack) plus the aluminum was more than sufficient heat conductionwise. The only part thats actually heat-sinking is the aluminum extrusion in the center, the rest is structural/armored hull.
A lot of builds I see on this forum depend on thermal mass and wide range of thermal cycle, designers apparently counting on the batteries dying before the LEDs can fry... the 3x P7 mag builds for example. This thing definitely needed all that mass... I tested the chips on a pentium 2 heatsink/fan combo, smaller, half the size bulk and mass... it almost fried in less than 10 minutes. Lacking temp testing gear, I built around rule-of-thumb, literally... if its too hot to put my thumb on the chip, the junction temp is too high for my taste. This heatsink is overkill, but will keep the chips from frying and even after burning two packs back to back for over an hour, heatsink is only lukewarm.
 
Last edited:

snarfer

Enlightened
Joined
Feb 21, 2008
Messages
241
the put your thumb on it test may be stricter than absolutely necessary. you can buy a tester with thermocouple at radio shack for fifty dollars or at many other places for half that. highly recommended tool.
 
Top