Tobias Bossert
Newly Enlightened
Replacement of cavers carbide lamp by LED lamps
1.Purpose of this treat
2.Development of a headlamp optimized for caving
3.Amount of light required
4.Color temperature and beam pattern
5.Batteries and electronics
6.Optics and housing
1.Purpose of this treat
Candlepowerforums is substantial work, sometimes too extensive to find exactly what you need. The purpose of this treat is to bring together all those information required to develop an optimized headlamp for utilization in caves.
I start this treat with a lot of additional information and hope, that I can learn from feedback and proposals the members of Candlepowerforums can give me.
I'm member of a cavers club in Austria. We plan to build our own headlamps for our club but not to sell them: we have NO commercial interest. But we think the 'high tech' products from www.lupine.de and www.scurion.ch are much too expensive for hobby cavers, so one aim is to develop cheep but never the less optimized alternatives.
2.Development of a headlamp optimized for caving
When I started my first expedition into a big alpine cave in 1965 I used a carbide hand lamp, as usual at that time. In those days it was impossible to achieve sufficient light output with battery flashlights for expeditions of several days. In the early 1970s cavers changed to carbide headlamps. Up to now most cavers still use carbide lamps, since these are extremely reliable, easy to maintain and provide sufficient light even for large rooms in big caves. Duration of expedition doesn't matter, its a question of amount of carbide you take along (about 400g per day).
Since some years, many manufacturers provide battery headlamps based on white LED. Unfortunately none of them really comply with what is required during a several days cave expedition. But indeed the technology is advanced enough to develop a headlamp satisfying these requirements.
3.Amount of light output required
The old lamps e.g. combine up to 250g of carbide with about 140g of water to produce an amount of 100g acetylene (~ 100 liters). Four sizes of burners are used commonly, consuming 7, 10, 14 or 21 l/h of acetylene. The flame delivers about 67, 92, 133 or 200 lm at a color temperature of about 2300K. The burner alone would throw a nearly isotropic pattern, only downwards a cone of about 60 degree is shaded by the burner itself. The burner is mounted in front of the helmet and uses a small reflector. During normal use, this reflector gets blackened quickly, so about 60% of the light can be used only. Most cavers in Europe use burners with 14 or 21 l/h providing a total luminous flux of about 80 to 120 lm. These lamps consume about 33 to 50 g/h of carbide. But the carbide lamp itself has an overall weight (carbide/water-container plus tube plus head lamp) of another 1000 g too.
It would be nice to get the same total luminous flux from the new technique too.
Actual white LEDs are promoted to deliver 100 lm/W. That's not true. The following table demonstrates the achievable luminous output of four actual types off SSC P4.

Table 1 – Achievable luminous output with actual white SSC P4 LEDs
The electrical power required to replace the good old carbide lamp depends. Carbide lamps deliver a rather uniform spatial pattern, thus you have to compare with bare LED covered by plain glass only. In the worst case using the S_42182_S_SS0_I to replace a burner with 21l/h you will need 3,2 W drawn from the battery and in the best case using the W_42182_U_SVN_I to replace a burner with 14 l/h you will need 1,3W.
So 'paulr' http://www.candlepowerforums.com/vb/showpost.php?p=2176679&postcount=2 was right with his estimations!
First thought: take SSC U bins, they are brightest! Really?
4.Color temperature and spatial pattern
We are not interested in the physiological sensation looking directly into the light source but rather in the amount of light being reflected from the objects we want to see. SSC U bin covers equivalent temperatures from 4500 to 7000K, quite different from our used carbide flame having 2300K. The reflection factor of typical materials found in caves depends on wavelength. Bluish materials are rare, e.g. loam is rather beige. Therefore it might be possible, that the "bright" U bins with 6700K subjectively will be less bright inside a cave than an objectively less bright S2 bin with 3000K.
Color temperature
First I tested those five LED types given in table 1 at home. Against a pure white wall indeed all U bins are the brightest subjectively. Against a wall colored with 'apricot white' the S bin with 4000K subjectively seems to be at least as bright as the best U bin, in this case 5300K. Against a pine wood ceiling, the S2 bin with 3000K appears brightest.
Studies are carried out in alpine caves at the moment to determine the subjectively brightest LED type amongst those of table one. The tests cover both, plain LED (uniform spatial pattern) and narrow beam (10 deg), because it is not determined in advance, that the findings will be the same. I will supplement the results when finished!
>> Questions to everyone:
Are there better LEDs out for 3000 to 4000K than SSC P4 bin S and S2?
Where can I buy W_42182_U_SUN_.. or ...SUM..., that's 4500 to 5000K and nevertheless U bin?
Spatial pattern
The carbide lamp didn't allow realizing a narrow beam. This is one significant improvement using LED technique, now you can look down into deep pits too. But during walking and climbing inside a cave, you rather would prefer uniform spatial pattern than any beam. Everyone who ever tried to make a night walk with a beam lamp knows what I mean: You either risk stumbling or you will get a stiff neck! Therefore the new electric headlamp should provide both, all-round light (covering hemisphere in front of you) and spotlight (as narrow as achievable), switched alternatively.
5.Batteries and electronics
In October 2007 I started the project and asked the members of candlepowerforums for applicable converter boards for my project. But this was on the wrong forum I think (flashlight electronics – batteries included). Now I can demonstrate three practical solutions, cheep, efficient and optimized for cavers headlamps. But the optimum solution depends upon the battery type to be used.
Batteries
Professional 'high tech' headlamps use Li-Ion rechargeable batteries. This is the best solution technically: Li-Ion provide the highest energy density (more than twice of alkaline and Ni-MH) and are able to deliver high drain currents even at low temperatures. But the problem arises from cavers negligence: They use the lamp until it gets dark and after the trip all the stuff ends up in the cellar, neither being cleaned nor recharged – this normally will be made up for 15 minutes before starting to the next expedition. Therefore I decided not to propose them to use Li-Ion rechargeable batteries.
The second-best solution would be Li-FeS2 primary batteries. But if you start remembering your stuff just some hours in front of leaving to the trip and have not enough batteries at home, you will fail, because there is no shop providing these strange batteries on the way to the cave.
Alkaline batteries would be the most practical solution in my mind. They are extremely cheep and available everywhere. But the characteristic of alkaline cells depends strongly upon the cell size! As you can derive from the studies of 'Silver Fox' http://www.candlepowerforums.com/vb/showthread.php?t=64660 the realistically achievable energy density of alkaline cells drained with low to medium currents is nearly independent of the cell size (50 to 90 Wh/kg depending on brand). This doesn't surprise because the chemistry is the same for small and large cells. But the realistically achievable power per weight is much higher with smaller cells (AA-size above 20 W/kg but D-size below 8 W/kg only). Thus it makes more sense to use 6 AA cells than 1 D cells having the same weight.
The achievable energy depends upon the power drained: the heavier the load, the smaller the drainable energy content. I made two tests in my household refrigerator: two battery packs (6 AA and 8 AA in series) were discharged with 1,5 W continuously down to 3,5V. This means, the first pack is loaded by 0,25 W and discharged to 0,6 V each cell and the second pack by 0,188 W and to 0,45 V. The weight of the second pack is 133% of first one, but delivers 142% of total energy. My conclusion is that these additional two cells could be carried much more comfortable in the backpack than in battery belt at the helmet or worn in the chest pocket!
At the end I decided to propose using batteries of AA size. Most cavers I know will use alkaline types which you can purchase at every supermarket. But the electronics will also accept Li-FeS2 primary and Ni-MH rechargeable batteries of AA size too.
As estimated above, at least 1,3 W will be required continuously to get an equivalent luminous flax as a carbide lamp. Inside alpine caves temperatures are about 0 to 6°C. Under such circumstances alkaline AA cells deliver about 1,5 to 2,2 Wh when drained with less than 250 mW continuously and if the converter board allows to unload the cells completely. Rough estimation: average cell consumption will be 0,7 to 1 cell per hour when using at least 6 cells in a battery pack. For a 9 hours trip with continuous light you will waste 6 'good' or 9 'cheep' AA alkaline batteries. The consumption expressed in weight is about 18 to 25 g/h. Remember: this will replace 33 to 50 g/h of carbide consumption, a reduction of 50%! And the device itself is much lighter than the carbide lamp too. Additionally we can hope LED efficiency still will increase in future ...
Electronics
We need thee levels of output current:
Working light, about 350 mA, used continuously all over the day
Pause light, below 35 mA, used during breaks
Spot light, amara (as much as realistically achievable) used only for short term
First I tested some of those multi mode buck converter boards from Kaidomain and DealExtreme. But I came back to the single mode types, because these are more flexible for my own modifications. At the end three boards are shortlisted: Taskled CC1W, Kaidomain sku.2982 and Dealextreme sku.3256. All three easily can be modified to match the requirements of cavers headlamps.
Taskled CC1W
By far this is the best board tested, but also the most expensive too ($15 + shipping). It has excellent manufacturing quality and George gives extensive support, answering your questions spontaneously! This board also provides the best efficiency. The output current can be varied by paralleling resistors to R2 or R3 labeled on the board.
I provide you with measured curves for three modes, each of them with shortened polarity protection diode:
Blue – original board (no resistors in parallel) => I = 350 mA, average efficiency 88%
Green – dimmed down with R2 || 560 ohm => 35 mA, average efficiency 72%
Red – boosted with R3 || 180 kohm => up to 620 mA, average efficiency 87%
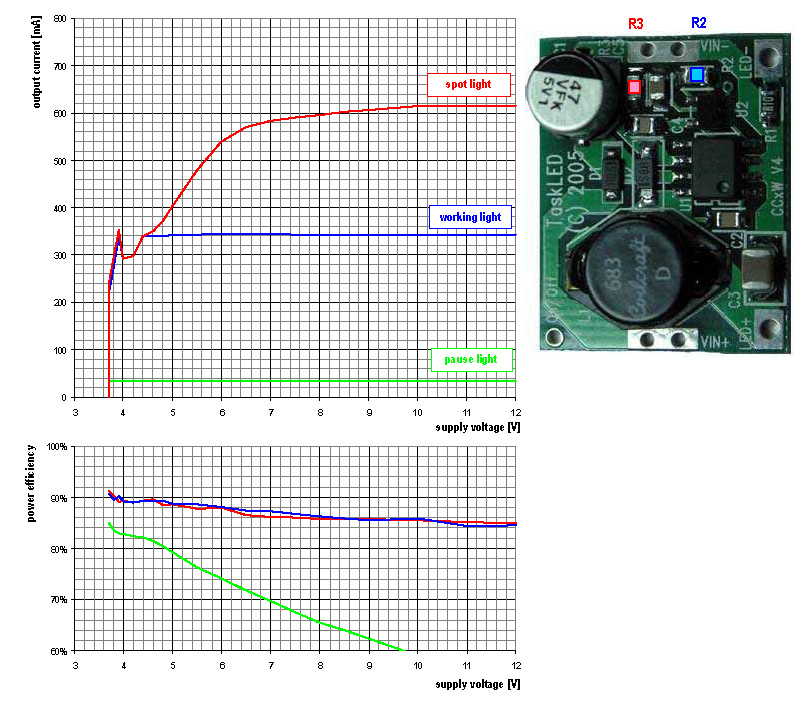
Figure 1 – Characteristics of Taskled CC1W
Original and dimmed current is regulated constant. Boosted current would calculate to 670 mA, but the internal current limiter supersedes and the output current depends upon supply voltage. This is no disadvantage because it makes no sense to demand a boosted current from nearly discharged alkaline batteries. This board accepts supply voltages up to 20V.
Kaidomain sku.2982
This medium priced board ($ 3,10, free shipping) also has a good manufacturing quality but its efficiency suffers at higher current levels. This board accepts supply voltages up to 18V. Fortunately this board is now available again.
Originally the board delivers 750 mA, always o.k. for our boost mode. To reduce output current you will have to unsolder pin 8 (FB) of the integrated circuit PT4105 and insert a resistor (I took 1,8 kohm). With an additional resistor of 56 kohm from FB to LED+ you will get about 350 mA output current, and with about 25 kohm (depends upon Vf of LED) you achieve 35 mA.
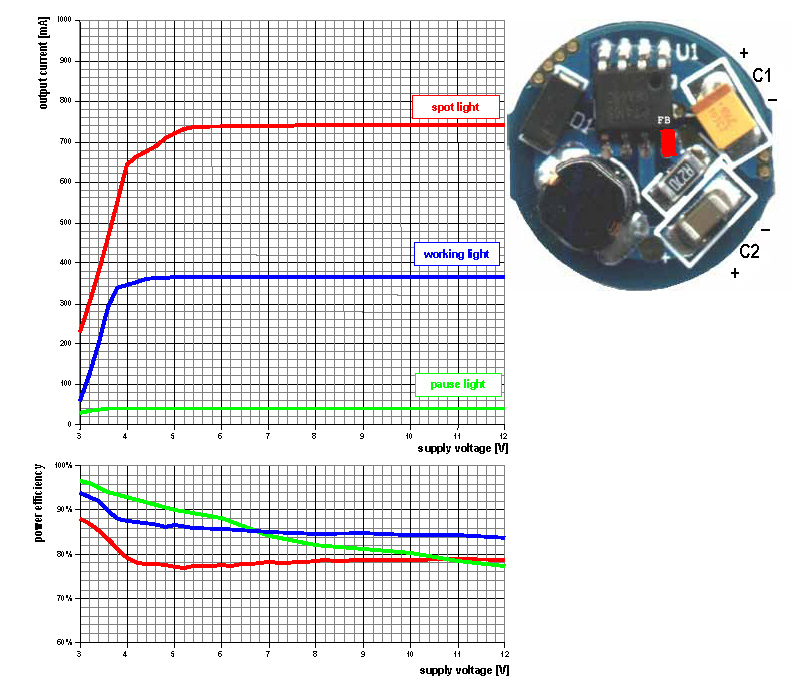
Figure 2 – Characteristics of Kaidomain sku.2982
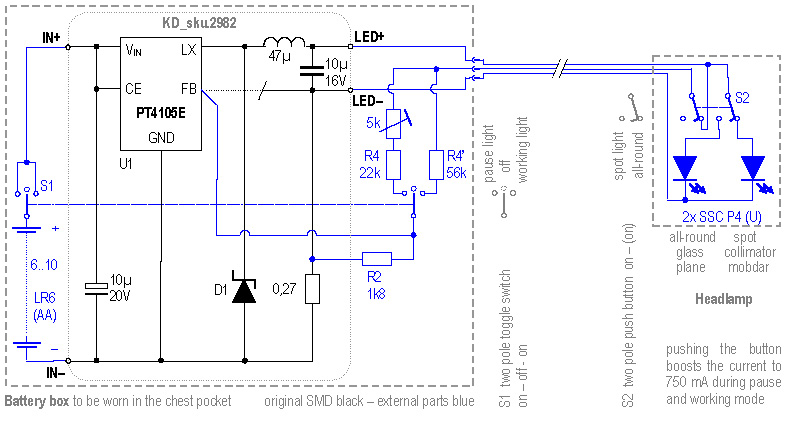
Figure 3 – Application of Kaidomain sku.2982 for cavers headlamp
DealExtreme sku.3256
This low priced board ($ 1,61, free shipping) has poor manufacturing quality only but its efficiency is good. This board is specified for 1 A output current, but the current is unregulated and depends upon supply voltage and Vf of LED.
Before you start modifying the output current of this board, you should solder ceramic SMD capacitors in parallel to these strange aluminium electrolytic capacitors, this will increase the efficiency by about 3% (I tried 2,2 or 4,7µF 16V).
To reduce output current you will have to unsolder pin 4 (ISENSE) of the integrated circuit C300 and insert a resistor. This resistor should range below 100 ohm, because it is in the rf path (I took 39 ohm SMD type and soldered it on empty place "R2" after having cut the lower connection of it to IN-).
With an additional resistor from ISENSE to ground (IN-) you can divide the sensed voltage and thus increase the output current. With an additional resistor from ISENSE to supply voltage (IN+) you can decrease the output current. But the effect of this manipulation depends upon supply voltage and therefore rotates the output current curve over input voltage clockwise. If you connect the resistor to LED- instead, this rotation will be even stronger. Choosing the optimum relation between resistors to IN- and to IN+ or LED- you can achieve a nearly flat response.
With resistors of 27 kohm from ISENSE to LED- and of 220 ohm to IN- you will get about 1 A output current almost constant over an input voltage from 4 to 9V.
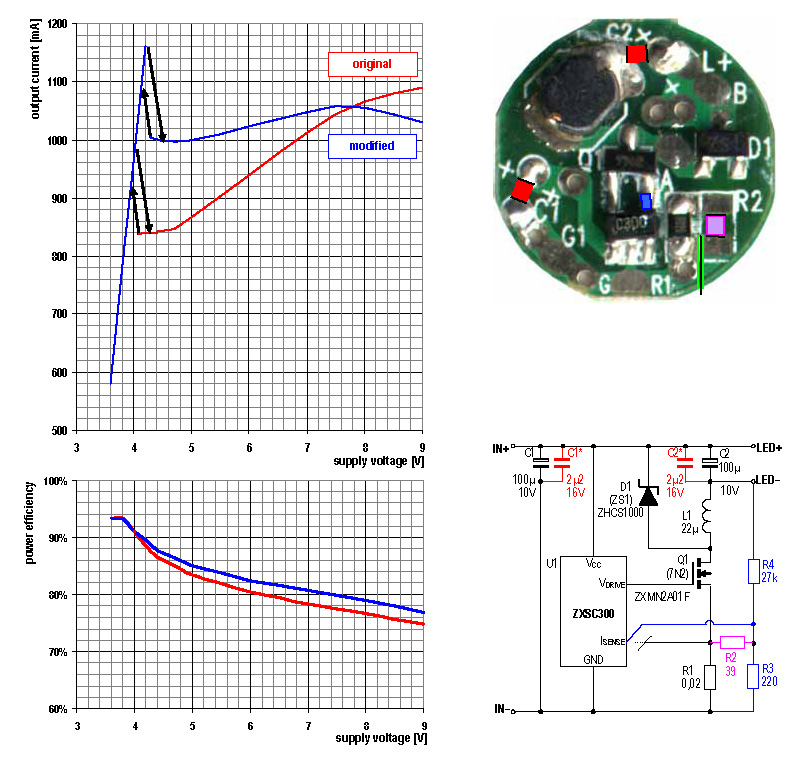
Figure 4 – Characteristics of DealExtreme sku.3256 for high current level
The current spikes in these curves occur when the device transfers from direct mode to switching mode and vice versa. The arrows show the different dynamic behavior for increasing and decreasing supply voltage. The arrows would be vertical with zero source impedance and horizontal with a pure current supply. During use with alkaline batteries you will not encounter these peaks, because the impedance of nearly discharged batteries is too high.
1 A is not of interest for our project since we require lower currents. It is impossible to decrease the output current much below 100 mA using the original current measurement resistor of 0,020 ohms. You need to unsolder it and replace it by a higher value (I used 0,150 ohm). With this you can achieve flattened curve at 350 mA and 35 mA as demonstrated in the application. In this application the boost level intentionally is not flattened.
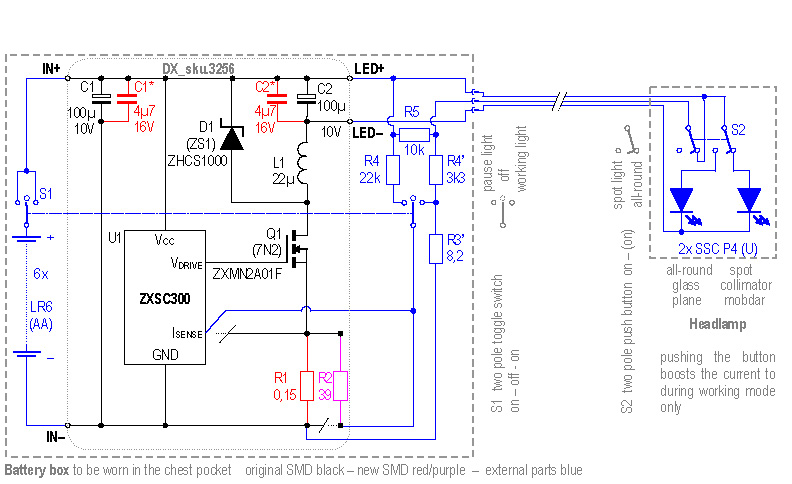
Figure 5 – Application of DealExtreme sku.3265 for cavers headlamp
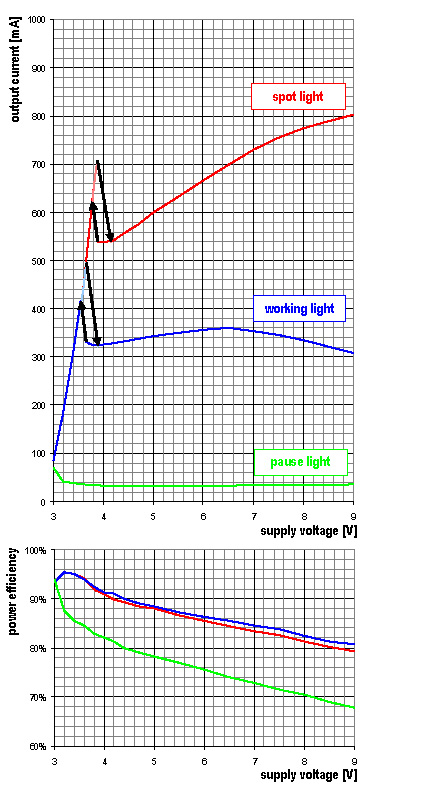
Figure 6 – Characteristics of DealExtreme sku.3256 used for cavers headlamp
The disadvantage of this board is the limited input voltage. Therefore the battery pack is limited to 6 alkaline cells in series or to 7 Ni-MH.
6.Optics and housing
Mechanical manufacturing seems to provide more problems than electronics!
Optics
Most actual white LED provide a dome with a week spatial concentrating. This is fine for working and pause light and needs no additional optics which would cost 15 to 25% of light anyhow. But at least you will need a plane of glass to protect the LED and the starboard. Even this will cost about 10% of emitted light and restrict the spatial pattern to about 150° (original is 180°). It would be preferable to use a transparent spherical cap, comparable to http://www.khatod.eu/pdf/pljt20_test_report.pdf but not opalescent.
>> Questions to everyone:
Where can I buy such transparent caps?
For spot light we need a reflector or lens optic with low losses, narrow beam and low stray light around the spot. Most of all miniature plastic optics don't comply with this. The best results so far were achieved with Gaggione LL3 http://www.lednlight.com/LL3.htm, in German forums sometimes called 'Mobdar' but as far as I can see, these are from different sources. Unfortunately this collimator needs small modification to allow optimum placement of SSC P4 LED.
>> Questions to everyone:
Is there any better optics for SSC P4 LED on the market?
Housing
The headlamp mounted at the helmet contains two parts, one for spot light and another one for working light. Spotlight will be similar to http://default.nueb.de/fahrrad/licht/mueller/ but with smaller heat sink. The other one may be a short aluminium tube (diameter 25 mm) covered by a plane of glass at front side and by a small heat sink in the back.
At the moment four arrangements are under discussion:
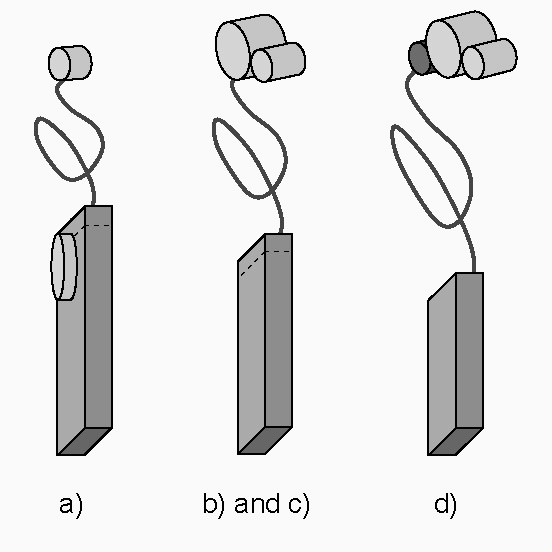
Figure 7 – Four alternative arrangements of battery box and headlamp
Arrangement a)
Electronics, both switches and spot light mounted in the battery box; headlamp contains all-round light only; minimum weight and size mounted at helmet.
Headlamp diameter 25mm, length 15 mm
Cable with two wires only
Battery box in the chest pocket 140 x 60 x 20/25 mm; spot light with diameter 40 mm protruding 5 mm out of the flat side; switches and cable outlet flush mounted at the smallest side
Problem: How to protect spot during crawling?
Arrangement b)
Electronics and both switches mounted in the battery box; headlamp contains all-round light and spot light; all switches still safe in the pocket; spot light follows movement of head.
Headlamp diameter 25mm, length 25 mm plus diameter 40mm, length 25.
Cable with three wires.
Battery box in the chest pocket 120 x 60 x 20 mm; both switches and cable outlet flush mounted at the smallest side; alternatively one rotary switch instead of two toggle switches.
Arrangement c)
Electronics and only main switch mounted in the battery box; headlamp contains all-round light, spot light and switch to choosing amongst all-round and spot light.
Headlamp diameter 25mm, length 25 mm plus diameter 40mm, length 25.
Cable with three wires.
Battery box in the chest pocket 120 x 60 x 20 mm; main switch (work-off-pause) and cable outlet flush mounted at the smallest side.
Arrangement d)
Only batteries in the battery box; headlamp contains all-round light, spot light, electronics and both switches.
Headlamp diameter 25mm, length 25 mm plus diameter 40mm, length 25 plus diameter 25mm, length 25 mm (containing electronics).
Cable with two wires only.
Battery box in the chest pocket 100 x 60 x 20 mm; if desired, battery could be changed together with battery box.
In any case the battery box is required to be solid enough to accept the barer rests on it at a stony subgrade. The headlamp is required to be solid enough to accept knocking one's head against the roof. Both parts are required to be waterproof.
At the moment nothing mechanical is realized; I'm happy not to be the one having to develop this!
1.Purpose of this treat
2.Development of a headlamp optimized for caving
3.Amount of light required
4.Color temperature and beam pattern
5.Batteries and electronics
6.Optics and housing
1.Purpose of this treat
Candlepowerforums is substantial work, sometimes too extensive to find exactly what you need. The purpose of this treat is to bring together all those information required to develop an optimized headlamp for utilization in caves.
I start this treat with a lot of additional information and hope, that I can learn from feedback and proposals the members of Candlepowerforums can give me.
I'm member of a cavers club in Austria. We plan to build our own headlamps for our club but not to sell them: we have NO commercial interest. But we think the 'high tech' products from www.lupine.de and www.scurion.ch are much too expensive for hobby cavers, so one aim is to develop cheep but never the less optimized alternatives.
2.Development of a headlamp optimized for caving
When I started my first expedition into a big alpine cave in 1965 I used a carbide hand lamp, as usual at that time. In those days it was impossible to achieve sufficient light output with battery flashlights for expeditions of several days. In the early 1970s cavers changed to carbide headlamps. Up to now most cavers still use carbide lamps, since these are extremely reliable, easy to maintain and provide sufficient light even for large rooms in big caves. Duration of expedition doesn't matter, its a question of amount of carbide you take along (about 400g per day).
Since some years, many manufacturers provide battery headlamps based on white LED. Unfortunately none of them really comply with what is required during a several days cave expedition. But indeed the technology is advanced enough to develop a headlamp satisfying these requirements.
3.Amount of light output required
The old lamps e.g. combine up to 250g of carbide with about 140g of water to produce an amount of 100g acetylene (~ 100 liters). Four sizes of burners are used commonly, consuming 7, 10, 14 or 21 l/h of acetylene. The flame delivers about 67, 92, 133 or 200 lm at a color temperature of about 2300K. The burner alone would throw a nearly isotropic pattern, only downwards a cone of about 60 degree is shaded by the burner itself. The burner is mounted in front of the helmet and uses a small reflector. During normal use, this reflector gets blackened quickly, so about 60% of the light can be used only. Most cavers in Europe use burners with 14 or 21 l/h providing a total luminous flux of about 80 to 120 lm. These lamps consume about 33 to 50 g/h of carbide. But the carbide lamp itself has an overall weight (carbide/water-container plus tube plus head lamp) of another 1000 g too.
It would be nice to get the same total luminous flux from the new technique too.
Actual white LEDs are promoted to deliver 100 lm/W. That's not true. The following table demonstrates the achievable luminous output of four actual types off SSC P4.

Table 1 – Achievable luminous output with actual white SSC P4 LEDs
The electrical power required to replace the good old carbide lamp depends. Carbide lamps deliver a rather uniform spatial pattern, thus you have to compare with bare LED covered by plain glass only. In the worst case using the S_42182_S_SS0_I to replace a burner with 21l/h you will need 3,2 W drawn from the battery and in the best case using the W_42182_U_SVN_I to replace a burner with 14 l/h you will need 1,3W.
So 'paulr' http://www.candlepowerforums.com/vb/showpost.php?p=2176679&postcount=2 was right with his estimations!
First thought: take SSC U bins, they are brightest! Really?
4.Color temperature and spatial pattern
We are not interested in the physiological sensation looking directly into the light source but rather in the amount of light being reflected from the objects we want to see. SSC U bin covers equivalent temperatures from 4500 to 7000K, quite different from our used carbide flame having 2300K. The reflection factor of typical materials found in caves depends on wavelength. Bluish materials are rare, e.g. loam is rather beige. Therefore it might be possible, that the "bright" U bins with 6700K subjectively will be less bright inside a cave than an objectively less bright S2 bin with 3000K.
Color temperature
First I tested those five LED types given in table 1 at home. Against a pure white wall indeed all U bins are the brightest subjectively. Against a wall colored with 'apricot white' the S bin with 4000K subjectively seems to be at least as bright as the best U bin, in this case 5300K. Against a pine wood ceiling, the S2 bin with 3000K appears brightest.
Studies are carried out in alpine caves at the moment to determine the subjectively brightest LED type amongst those of table one. The tests cover both, plain LED (uniform spatial pattern) and narrow beam (10 deg), because it is not determined in advance, that the findings will be the same. I will supplement the results when finished!
>> Questions to everyone:
Are there better LEDs out for 3000 to 4000K than SSC P4 bin S and S2?
Where can I buy W_42182_U_SUN_.. or ...SUM..., that's 4500 to 5000K and nevertheless U bin?
Spatial pattern
The carbide lamp didn't allow realizing a narrow beam. This is one significant improvement using LED technique, now you can look down into deep pits too. But during walking and climbing inside a cave, you rather would prefer uniform spatial pattern than any beam. Everyone who ever tried to make a night walk with a beam lamp knows what I mean: You either risk stumbling or you will get a stiff neck! Therefore the new electric headlamp should provide both, all-round light (covering hemisphere in front of you) and spotlight (as narrow as achievable), switched alternatively.
5.Batteries and electronics
In October 2007 I started the project and asked the members of candlepowerforums for applicable converter boards for my project. But this was on the wrong forum I think (flashlight electronics – batteries included). Now I can demonstrate three practical solutions, cheep, efficient and optimized for cavers headlamps. But the optimum solution depends upon the battery type to be used.
Batteries
Professional 'high tech' headlamps use Li-Ion rechargeable batteries. This is the best solution technically: Li-Ion provide the highest energy density (more than twice of alkaline and Ni-MH) and are able to deliver high drain currents even at low temperatures. But the problem arises from cavers negligence: They use the lamp until it gets dark and after the trip all the stuff ends up in the cellar, neither being cleaned nor recharged – this normally will be made up for 15 minutes before starting to the next expedition. Therefore I decided not to propose them to use Li-Ion rechargeable batteries.
The second-best solution would be Li-FeS2 primary batteries. But if you start remembering your stuff just some hours in front of leaving to the trip and have not enough batteries at home, you will fail, because there is no shop providing these strange batteries on the way to the cave.
Alkaline batteries would be the most practical solution in my mind. They are extremely cheep and available everywhere. But the characteristic of alkaline cells depends strongly upon the cell size! As you can derive from the studies of 'Silver Fox' http://www.candlepowerforums.com/vb/showthread.php?t=64660 the realistically achievable energy density of alkaline cells drained with low to medium currents is nearly independent of the cell size (50 to 90 Wh/kg depending on brand). This doesn't surprise because the chemistry is the same for small and large cells. But the realistically achievable power per weight is much higher with smaller cells (AA-size above 20 W/kg but D-size below 8 W/kg only). Thus it makes more sense to use 6 AA cells than 1 D cells having the same weight.
The achievable energy depends upon the power drained: the heavier the load, the smaller the drainable energy content. I made two tests in my household refrigerator: two battery packs (6 AA and 8 AA in series) were discharged with 1,5 W continuously down to 3,5V. This means, the first pack is loaded by 0,25 W and discharged to 0,6 V each cell and the second pack by 0,188 W and to 0,45 V. The weight of the second pack is 133% of first one, but delivers 142% of total energy. My conclusion is that these additional two cells could be carried much more comfortable in the backpack than in battery belt at the helmet or worn in the chest pocket!
At the end I decided to propose using batteries of AA size. Most cavers I know will use alkaline types which you can purchase at every supermarket. But the electronics will also accept Li-FeS2 primary and Ni-MH rechargeable batteries of AA size too.
As estimated above, at least 1,3 W will be required continuously to get an equivalent luminous flax as a carbide lamp. Inside alpine caves temperatures are about 0 to 6°C. Under such circumstances alkaline AA cells deliver about 1,5 to 2,2 Wh when drained with less than 250 mW continuously and if the converter board allows to unload the cells completely. Rough estimation: average cell consumption will be 0,7 to 1 cell per hour when using at least 6 cells in a battery pack. For a 9 hours trip with continuous light you will waste 6 'good' or 9 'cheep' AA alkaline batteries. The consumption expressed in weight is about 18 to 25 g/h. Remember: this will replace 33 to 50 g/h of carbide consumption, a reduction of 50%! And the device itself is much lighter than the carbide lamp too. Additionally we can hope LED efficiency still will increase in future ...
Electronics
We need thee levels of output current:
Working light, about 350 mA, used continuously all over the day
Pause light, below 35 mA, used during breaks
Spot light, amara (as much as realistically achievable) used only for short term
First I tested some of those multi mode buck converter boards from Kaidomain and DealExtreme. But I came back to the single mode types, because these are more flexible for my own modifications. At the end three boards are shortlisted: Taskled CC1W, Kaidomain sku.2982 and Dealextreme sku.3256. All three easily can be modified to match the requirements of cavers headlamps.
Taskled CC1W
By far this is the best board tested, but also the most expensive too ($15 + shipping). It has excellent manufacturing quality and George gives extensive support, answering your questions spontaneously! This board also provides the best efficiency. The output current can be varied by paralleling resistors to R2 or R3 labeled on the board.
I provide you with measured curves for three modes, each of them with shortened polarity protection diode:
Blue – original board (no resistors in parallel) => I = 350 mA, average efficiency 88%
Green – dimmed down with R2 || 560 ohm => 35 mA, average efficiency 72%
Red – boosted with R3 || 180 kohm => up to 620 mA, average efficiency 87%

Figure 1 – Characteristics of Taskled CC1W
Original and dimmed current is regulated constant. Boosted current would calculate to 670 mA, but the internal current limiter supersedes and the output current depends upon supply voltage. This is no disadvantage because it makes no sense to demand a boosted current from nearly discharged alkaline batteries. This board accepts supply voltages up to 20V.
Kaidomain sku.2982
This medium priced board ($ 3,10, free shipping) also has a good manufacturing quality but its efficiency suffers at higher current levels. This board accepts supply voltages up to 18V. Fortunately this board is now available again.
Originally the board delivers 750 mA, always o.k. for our boost mode. To reduce output current you will have to unsolder pin 8 (FB) of the integrated circuit PT4105 and insert a resistor (I took 1,8 kohm). With an additional resistor of 56 kohm from FB to LED+ you will get about 350 mA output current, and with about 25 kohm (depends upon Vf of LED) you achieve 35 mA.

Figure 2 – Characteristics of Kaidomain sku.2982

Figure 3 – Application of Kaidomain sku.2982 for cavers headlamp
DealExtreme sku.3256
This low priced board ($ 1,61, free shipping) has poor manufacturing quality only but its efficiency is good. This board is specified for 1 A output current, but the current is unregulated and depends upon supply voltage and Vf of LED.
Before you start modifying the output current of this board, you should solder ceramic SMD capacitors in parallel to these strange aluminium electrolytic capacitors, this will increase the efficiency by about 3% (I tried 2,2 or 4,7µF 16V).
To reduce output current you will have to unsolder pin 4 (ISENSE) of the integrated circuit C300 and insert a resistor. This resistor should range below 100 ohm, because it is in the rf path (I took 39 ohm SMD type and soldered it on empty place "R2" after having cut the lower connection of it to IN-).
With an additional resistor from ISENSE to ground (IN-) you can divide the sensed voltage and thus increase the output current. With an additional resistor from ISENSE to supply voltage (IN+) you can decrease the output current. But the effect of this manipulation depends upon supply voltage and therefore rotates the output current curve over input voltage clockwise. If you connect the resistor to LED- instead, this rotation will be even stronger. Choosing the optimum relation between resistors to IN- and to IN+ or LED- you can achieve a nearly flat response.
With resistors of 27 kohm from ISENSE to LED- and of 220 ohm to IN- you will get about 1 A output current almost constant over an input voltage from 4 to 9V.

Figure 4 – Characteristics of DealExtreme sku.3256 for high current level
The current spikes in these curves occur when the device transfers from direct mode to switching mode and vice versa. The arrows show the different dynamic behavior for increasing and decreasing supply voltage. The arrows would be vertical with zero source impedance and horizontal with a pure current supply. During use with alkaline batteries you will not encounter these peaks, because the impedance of nearly discharged batteries is too high.
1 A is not of interest for our project since we require lower currents. It is impossible to decrease the output current much below 100 mA using the original current measurement resistor of 0,020 ohms. You need to unsolder it and replace it by a higher value (I used 0,150 ohm). With this you can achieve flattened curve at 350 mA and 35 mA as demonstrated in the application. In this application the boost level intentionally is not flattened.

Figure 5 – Application of DealExtreme sku.3265 for cavers headlamp

Figure 6 – Characteristics of DealExtreme sku.3256 used for cavers headlamp
The disadvantage of this board is the limited input voltage. Therefore the battery pack is limited to 6 alkaline cells in series or to 7 Ni-MH.
6.Optics and housing
Mechanical manufacturing seems to provide more problems than electronics!
Optics
Most actual white LED provide a dome with a week spatial concentrating. This is fine for working and pause light and needs no additional optics which would cost 15 to 25% of light anyhow. But at least you will need a plane of glass to protect the LED and the starboard. Even this will cost about 10% of emitted light and restrict the spatial pattern to about 150° (original is 180°). It would be preferable to use a transparent spherical cap, comparable to http://www.khatod.eu/pdf/pljt20_test_report.pdf but not opalescent.
>> Questions to everyone:
Where can I buy such transparent caps?
For spot light we need a reflector or lens optic with low losses, narrow beam and low stray light around the spot. Most of all miniature plastic optics don't comply with this. The best results so far were achieved with Gaggione LL3 http://www.lednlight.com/LL3.htm, in German forums sometimes called 'Mobdar' but as far as I can see, these are from different sources. Unfortunately this collimator needs small modification to allow optimum placement of SSC P4 LED.
>> Questions to everyone:
Is there any better optics for SSC P4 LED on the market?
Housing
The headlamp mounted at the helmet contains two parts, one for spot light and another one for working light. Spotlight will be similar to http://default.nueb.de/fahrrad/licht/mueller/ but with smaller heat sink. The other one may be a short aluminium tube (diameter 25 mm) covered by a plane of glass at front side and by a small heat sink in the back.
At the moment four arrangements are under discussion:

Figure 7 – Four alternative arrangements of battery box and headlamp
Arrangement a)
Electronics, both switches and spot light mounted in the battery box; headlamp contains all-round light only; minimum weight and size mounted at helmet.
Headlamp diameter 25mm, length 15 mm
Cable with two wires only
Battery box in the chest pocket 140 x 60 x 20/25 mm; spot light with diameter 40 mm protruding 5 mm out of the flat side; switches and cable outlet flush mounted at the smallest side
Problem: How to protect spot during crawling?
Arrangement b)
Electronics and both switches mounted in the battery box; headlamp contains all-round light and spot light; all switches still safe in the pocket; spot light follows movement of head.
Headlamp diameter 25mm, length 25 mm plus diameter 40mm, length 25.
Cable with three wires.
Battery box in the chest pocket 120 x 60 x 20 mm; both switches and cable outlet flush mounted at the smallest side; alternatively one rotary switch instead of two toggle switches.
Arrangement c)
Electronics and only main switch mounted in the battery box; headlamp contains all-round light, spot light and switch to choosing amongst all-round and spot light.
Headlamp diameter 25mm, length 25 mm plus diameter 40mm, length 25.
Cable with three wires.
Battery box in the chest pocket 120 x 60 x 20 mm; main switch (work-off-pause) and cable outlet flush mounted at the smallest side.
Arrangement d)
Only batteries in the battery box; headlamp contains all-round light, spot light, electronics and both switches.
Headlamp diameter 25mm, length 25 mm plus diameter 40mm, length 25 plus diameter 25mm, length 25 mm (containing electronics).
Cable with two wires only.
Battery box in the chest pocket 100 x 60 x 20 mm; if desired, battery could be changed together with battery box.
In any case the battery box is required to be solid enough to accept the barer rests on it at a stony subgrade. The headlamp is required to be solid enough to accept knocking one's head against the roof. Both parts are required to be waterproof.
At the moment nothing mechanical is realized; I'm happy not to be the one having to develop this!
Last edited:


