Epsilon
Enlightened
All pictures are clickable!
Enjoy!
After a few mods, I wanted to make a very powerful, handheld light which is still very usable.
A few things that this mod needed to be:
- Very powerful
- Quality parts for reliability
- Almost factory-like fit
I already made a SST-90 mod for power in a Maglite and wanted massively more power, and not only for the wow-factor. It should be powerful when you want it and have a long runtime as well.
So I got to collecting the parts I needed:
- Gunmetal grey FiveMega Elephant II host (without reflector and battery holder --> special note on the last item)
- Maglite Switch from a stock Maglite
- 7* (actually I bought 15 ) Led-tech.de direct to copper bonded XM-L U2 on 16mm PCB's (which really do ~1000lumen @ 3A)
- Taskled HBFlex driver for pushing 3amps of current through the 7 LEDS
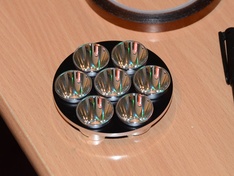
- 7* Der Wichtel 23mm Reflectors, about the maximum size to fit inside this host
- Reflector holder, black anodized
The beautiful FiveMega Elephant II Host:

I modified the Maglite Switch to momentary for use with the driver. I used 2mm gold connectors (female) which I fitted to the Switch. The driver will get the male connectors, for "easy" connecting.


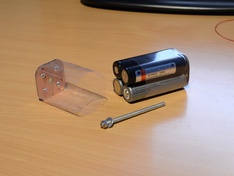
Remember that I didn't have a FM 4*18650 battery holder? Not that I had a choice because he didn't have any left, but I would really to have had one. I tried to make the battery holder myself but with no satisfying results.
A few of the left over pieces:

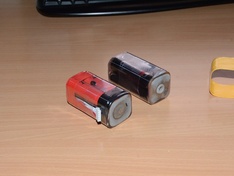
I was fed up with it and decided that it was best to solder the AW IMR cells together with balance leads.
Parts:
- Schrink-wrap
- Balance lead
- Terminals (cut pieces of an old computer case side)
- Insulator pads (cut pieces of plastic from a package)
- 4* 18650 1600mA AW IMR cells with the same charge

Soldered and hot-glued the cells together


Shrink-wrapped


Fits great in the host:

Now it was time to have the heatsink made so I took measurements and bought a big piece of aluminium (200mm * 80mm dia). A friend made the heatsink on a lathe following the measurements to 0.05mm. In return I repaired his Streamlight Stinger flashlight, which I had never seen before and actually is a very nice form factor.


Putting the LEDS on the heatsink


A holder with 16mm holes on exactly the right spots ensures the exact placement of the leds

The heatsink appears to be very flat and smooth, but it really isn't. So I lapped the heatsink to 600grid (the picture makes it look even worse, but it really isn't).


The same for the led PCB's:

After this stage I ground groves in the side of the heatsink with for the wires
Glued the LEDS to the heatsink with Arctic Silver Adhesive and firmly clamped down to ensure a good thermal path.


Soldered and covered the solder points with 3M Polyamide tape to electrically insulate them from the reflectors (which shouldn't touch, but better to be safe).

The Taskled HBFlex driver was next on the list


Soldered the lead with the 2mm gold connectors. The connectors can cary a lot more current than the wires can, so are never the bottleneck.


Not on picture: The back of the solder points are filed flat and covered with a piece of 3M Polyamide tape to make a flat mounting possible.


Testing: IT'S ALIVE!

The reflectors in the reflector holder (with some dust).
To reduce the amount of dust in the reflectors and behind the lens for performance and cosmetic reasons, I assembled the light in a low-dust environment: The shower. To accomplish this, I made sure the complete shower room was filled with small water droplets by jetting hot water through the showerhead. After 30 minutes, the steam/droplets were cleared, and took pretty much all the dust with them. The stuck dust on the reflectors and lens was cleared off with a jet of air from my camera airclean thingy (not with a spray can of "compressed air"). I do not have any pictures of the assembly itself.
And then, I am very proud to present the finished light :


I already have made beamshots and temperature measurements, which I will post in the next few days.
Maybe we can make this into a challenge. I left out a very key part of this build in the text, and I wonder who notices this first. This person will receive a virtual cookie. When this missing bit of build info is noticed, I will post the beamshots .
Enjoy
All pictures are clickable!
Edit: Temperatures and cut-off voltage settings:
Beamshots!
Inside very under exposed beamshot on white wall to compare spot size and brightness. The rebel reflectored XM-L @ 5A (the same copper led-tech board, I will post a build log of this light as well) has a very bright hotspot. I build this light for my dad but always get it when making beamshots because it is a very impressive light.

Outside beamshots is where the spill can be seen and used.
Control shot (1sec exposure)

35mm OP reflectored XM-L T6 light @ 2800mA on standard alu star (taken on a different day with the same camera settings, but put here to put the other two lights into perspective):

Maglite Rebel with XM-L U2 on copper Led-tech board @ 5A:

And the 7* XM-L U2 Light of this topic :

Hope you enjoyed the beamshots
Runtime calculations
Custom Battery holder
Since having loose 18650 cells does have its avantages (normal chargers etc), I took another attempt at making a batteryholder.
No wires, but copper plate epoxyplate for the current.


This time, I am not making the outlite out of perspex/Nylon but am using shrinkwrap to hold the batteries together.


And finished next to the fixed version:

It takes protected and unprotected cells.
Enjoy!
After a few mods, I wanted to make a very powerful, handheld light which is still very usable.
A few things that this mod needed to be:
- Very powerful
- Quality parts for reliability
- Almost factory-like fit
I already made a SST-90 mod for power in a Maglite and wanted massively more power, and not only for the wow-factor. It should be powerful when you want it and have a long runtime as well.
So I got to collecting the parts I needed:
- Gunmetal grey FiveMega Elephant II host (without reflector and battery holder --> special note on the last item)
- Maglite Switch from a stock Maglite
- 7* (actually I bought 15
) Led-tech.de direct to copper bonded XM-L U2 on 16mm PCB's (which really do ~1000lumen @ 3A)- Taskled HBFlex driver for pushing 3amps of current through the 7 LEDS
- 7* Der Wichtel 23mm Reflectors, about the maximum size to fit inside this host
- Reflector holder, black anodized
The beautiful FiveMega Elephant II Host:

I modified the Maglite Switch to momentary for use with the driver. I used 2mm gold connectors (female) which I fitted to the Switch. The driver will get the male connectors, for "easy" connecting.


Remember that I didn't have a FM 4*18650 battery holder? Not that I had a choice because he didn't have any left, but I would really to have had one. I tried to make the battery holder myself but with no satisfying results.
A few of the left over pieces:

I was fed up with it and decided that it was best to solder the AW IMR cells together with balance leads.
Parts:
- Schrink-wrap
- Balance lead
- Terminals (cut pieces of an old computer case side)
- Insulator pads (cut pieces of plastic from a package)
- 4* 18650 1600mA AW IMR cells with the same charge

Soldered and hot-glued the cells together


Shrink-wrapped


Fits great in the host:

Now it was time to have the heatsink made so I took measurements and bought a big piece of aluminium (200mm * 80mm dia). A friend made the heatsink on a lathe following the measurements to 0.05mm. In return I repaired his Streamlight Stinger flashlight, which I had never seen before and actually is a very nice form factor.


Putting the LEDS on the heatsink


A holder with 16mm holes on exactly the right spots ensures the exact placement of the leds

The heatsink appears to be very flat and smooth, but it really isn't. So I lapped the heatsink to 600grid (the picture makes it look even worse, but it really isn't
).

The same for the led PCB's:

After this stage I ground groves in the side of the heatsink with for the wires
Glued the LEDS to the heatsink with Arctic Silver Adhesive and firmly clamped down to ensure a good thermal path.


Soldered and covered the solder points with 3M Polyamide tape to electrically insulate them from the reflectors (which shouldn't touch, but better to be safe).

The Taskled HBFlex driver was next on the list


Soldered the lead with the 2mm gold connectors. The connectors can cary a lot more current than the wires can, so are never the bottleneck
.

Not on picture: The back of the solder points are filed flat and covered with a piece of 3M Polyamide tape to make a flat mounting possible.


Testing: IT'S ALIVE!

The reflectors in the reflector holder (with some dust).

To reduce the amount of dust in the reflectors and behind the lens for performance and cosmetic reasons, I assembled the light in a low-dust environment: The shower. To accomplish this, I made sure the complete shower room was filled with small water droplets by jetting hot water through the showerhead. After 30 minutes, the steam/droplets were cleared, and took pretty much all the dust with them. The stuck dust on the reflectors and lens was cleared off with a jet of air from my camera airclean thingy (not with a spray can of "compressed air"). I do not have any pictures of the assembly itself.
And then, I am very proud to present the finished light
:


I already have made beamshots and temperature measurements, which I will post in the next few days
.Maybe we can make this into a challenge. I left out a very key part of this build in the text, and I wonder who notices this first. This person will receive a virtual cookie
. When this missing bit of build info is noticed, I will post the beamshots .Enjoy
All pictures are clickable!
Edit: Temperatures and cut-off voltage settings:
Code:
Voltage cut-off settings:
16.8V 	4.20v (full)
13.6	3.40v (medium)
13.0	3.25v (Low)
12.0	3.00v (Cutoff)

Temparatures, measured with 3A drivecurrent
(On table, no airflow, measured on neck, where the heatsink touches the neck. Sensor with AA).

Secs	DegC	DegF
  0	20.9	69.6
 30	21.4	70.5
 60	22.9	73.2
 90	24.7	76.5
120	26.5	79.7
150	28.4	83.1
180	30.2	86.4
210	31.9	89.4
240	33.6	92.5
270	35.2	95.4
300	36.7	98.0
Beamshots!
Inside very under exposed beamshot on white wall to compare spot size and brightness. The rebel reflectored XM-L @ 5A (the same copper led-tech board, I will post a build log of this light as well) has a very bright hotspot. I build this light for my dad but always get it when making beamshots because it is a very impressive light
.
Outside beamshots is where the spill can be seen and used.
Control shot (1sec exposure)

35mm OP reflectored XM-L T6 light @ 2800mA on standard alu star (taken on a different day with the same camera settings, but put here to put the other two lights into perspective):

Maglite Rebel with XM-L U2 on copper Led-tech board @ 5A:

And the 7* XM-L U2 Light of this topic
: 
Hope you enjoyed the beamshots
Runtime calculations
Code:
Runtimes on 4*1600mA 18650IMR = 23.7Wh:
	- 3000mA ~ 77W ~ 7000lumen ~  18min (Max mode)
	- 1000mA ~ 24W ~ 2800lumen ~  55min (not an actual mode, just for runtime perspective)
	-  350mA ~  8W ~ 1000lumen ~ 180min  (not an actual mode, just for runtime perspective)
	-   50mA ~  1W ~  150lumen ~  24 hours     (Lowest mode)
Custom Battery holder
Since having loose 18650 cells does have its avantages (normal chargers etc), I took another attempt at making a batteryholder.
No wires, but copper plate epoxyplate for the current.


This time, I am not making the outlite out of perspex/Nylon but am using shrinkwrap to hold the batteries together.


And finished next to the fixed version:


It takes protected and unprotected cells
.
Last edited: