You are using an out of date browser. It may not display this or other websites correctly.
You should upgrade or use an alternative browser.
You should upgrade or use an alternative browser.
2D Mag P7 shopping list + Build thread
- Thread starter spankone
- Start date

:goodjob:
Nice build and great pics! P7's are pretty easy to do and you get a lot of bag for the buck
It's a mute point now that you have already done the build with a driver, but if you wanted to save $$, it would actually be cheaper to go the dd using 3 x C NiMh cells, even if you have to purchase a dedicated smart charger.
P7 driver = ~$35
4 x 18650 = ~$48
charger = ~$15
Total= ~$98
vs
no driver = $0
4 x C NimH = ~$20
PVC (for battery sleeve) = ~$3
smart charger = ~$20
Total= ~$47
These figures are just from memory so don't quote me on them. I did a 2D P7 running DD from 3 C LSD NiMh cells. On a fresh charge, it pushes >3A and I get probably 900 lumens.
Either way, it will work.
Hill
Der Wichtel
Enlightened
but he uses only 2 batteries. the other 2 batteries are spare batteries.
The Trustfire batteries are pretty good and cost less than 10$ for a pair.
http://www.messerforum.net/showthread.php?t=61183&page=4
so it's 98$-38$ = 60$ for the setup with driver.
The Trustfire batteries are pretty good and cost less than 10$ for a pair.
http://www.messerforum.net/showthread.php?t=61183&page=4
so it's 98$-38$ = 60$ for the setup with driver.
LOL
Did you ever try to sputter the reflector or get an OP reflector ?
Also did you follow member JamisonM's advice and pull the wires
thru some more
I have always wanted to build a tri-P7 Mag but never seem to be
able to get around to it ..... the funds for the build always get diverted
to another project
old4570
Flashlight Enthusiast
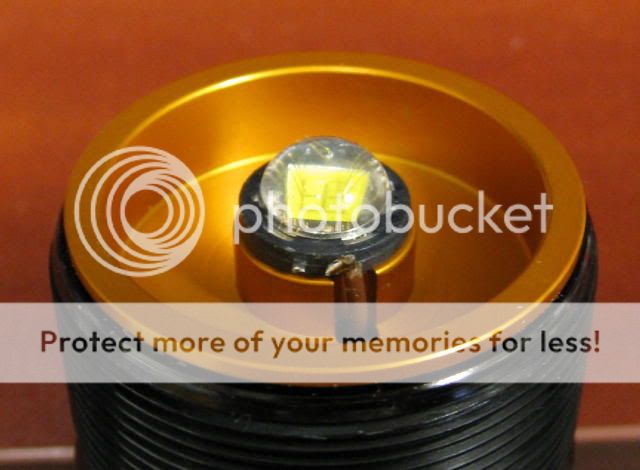
Your reflector needs to sit a little lower ..
In fact Im wondering why its sitting so high ? Are the wires to the LED in the way ?
In fact Im wondering why its sitting so high ? Are the wires to the LED in the way ?
yeh the wires are in the way which was a mistake on my part and for some reason wont go through any more I've opened up the reflector so it sits lower, I'm back in the office tomorrow so i'll try to OP it and fit the wires properly once and for all. I've realy enjoyed this project and can't wait to build another I'm thinking I'll build a p7 mag cut off with seperate power supply as my next project
Fulgeo
Enlightened
If you OP your stock plastic reflector with clear enamel paint you will lose some light output. Make one pass North to South about 6 inches away from the reflector and then do another pass East to West. Do not over do it, less is more. It does work thou. BriteLumens sells an inexpensive MOP aluminum reflector with 15 mm and 16 mm openings. The 15 mm version would clear your heatsink center post but maybe not your wires. So I would suggest the 16 mm version. With these metal reflectors you will lose less light output than the sputtered plastic reflector. Also I have found that a good aspherical lens with a FL of 250mm will clean up the beam as much as a sputtered plastic stock reflector. This lens works great with P7. Here is one that works great http://www.surplusshed.com/pages/item/pl1106.html I have all of the above components including the homemade sputtered MOP plastic reflector, so I have first hand experience with them. I was playing with them last night for a new build I am currently working on. Happy Mods!
Justin Case
Flashlight Enthusiast
- Joined
- Mar 19, 2008
- Messages
- 3,797
Your reflector needs to sit a little lower ..
In fact Im wondering why its sitting so high ? Are the wires to the LED in the way ?
No doubt the wires to the LED are in the way. Check out the photo, top view of the P7 mounted on the heat sink. There is a lot of excess wire. The wire insulator thickness also seems very large, making the overall wire diameter overly large. I've been able to fit 22 gauge, stranded, Teflon jacketed wire, and it just barely clears a 15mm diam reflector opening. You need to pull your wires tight and come straight up the feed holes to the LED terminals and flush against the heat sink. Then either bend 90 degree doglegs in the bared wire ends and solder them to the LED or just go straight up and solder the bared wires to the sides of the terminals. It helps to position the LED terminals so that the hookup wires can make as straight of a line as possible to their connection points. Or at least that's one way to do it.
Justin Case
Flashlight Enthusiast
- Joined
- Mar 19, 2008
- Messages
- 3,797
shdwkeeper's guide on building a direct drive P7 Mag mod has some good photos of soldering your hookup wires to the LED. See the 3 photos that follow the one where he smears the Ceramique thermal compound on the heat sink. Here is another example:
Last edited:
kramer5150
Flashaholic
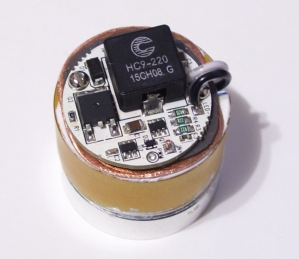
I am scoping out a similar mod for my 2D...
Where do you mount the DC-DC board? Does it just hang there? Isn't that a little risky?
Where do you mount the DC-DC board? Does it just hang there? Isn't that a little risky?
Justin Case
Flashlight Enthusiast
- Joined
- Mar 19, 2008
- Messages
- 3,797
What driver? Check out The Shoppe's Shark Sink for one option for mounting the Shark series drivers and other similar boards.
JamisonM
Enlightened
Here's what I do.I am scoping out a similar mod for my 2D...
Where do you mount the DC-DC board? Does it just hang there? Isn't that a little risky?
Justin Case
Flashlight Enthusiast
- Joined
- Mar 19, 2008
- Messages
- 3,797
If reasonably feasible, I think it is better to pot the driver on the Mag tube inside wall instead of the heat sink. Let the heat sink keep the LED cool, which is a critical task. Don't add to the heat sink's burden by adding another direct heat input to it. If you can use a Shark Sink type interface, you'll also save a lot of thermal potting material as well.
JamisonM
Enlightened
Just how much heat are we talking about that needs to be moved? If I have a P7 (or similar LED) and I'm putting 2.8A through it, that I know is producing around 10 watts of heat. Now, How much heat does the driver make and how does the heat from the LED affect it? In this case, the driver is a hipCC. There are 5 NiMH powering it all. This is still something I don't quite understand.If reasonably feasible, I think it is better to pot the driver on the Mag tube inside wall instead of the heat sink. Let the heat sink keep the LED cool, which is a critical task. Don't add to the heat sink's burden by adding another direct heat input to it. If you can use a Shark Sink type interface, you'll also save a lot of thermal potting material as well.
Justin Case
Flashlight Enthusiast
- Joined
- Mar 19, 2008
- Messages
- 3,797
Relatively speaking, the amount of heat added by a good driver is small compared to the heat generated by the P7 itself. For a average driver efficiency of say 80%, a P7 driven at full power (let's say 10W) will require about 12.5W of power sent to the driver (10W/80%). So potting the driver to the heat sink will add about 2.5W of additional heat that needs to be dissipated. The P7 is already generating roughly 8W of waste heat.
It's not a case of excess worry. If you can use a Shark Sink, then it is just as easy to pot the driver on the side of the Mag tube as it is to pot the driver to the heat sink. So why not do it right? Of course it is always cost-benefit. If you can't use a Shark Sink and it is a hassle to figure out a way to attach the driver thermally to the Mag tube, then potting the driver to the heat sink might be more desirable. Since I can't know all of the driver variations that might be used, I simply presented the desired approach in terms of thermal considerations. It's not a law of physics that you have to do it that way.
If I were using a Shark, Shark Buck, Blue Shark, or hipCC, I'd sink the driver to the Mag body using a Shark Sink. Unquestionably. The less the LED heats up, the better the performance. That is a law of physics.
Last edited: