Justin Case
Flashlight Enthusiast
- Joined
- Mar 19, 2008
- Messages
- 3,797
Previous reviews have already provided beamshots, so I don't plan on re-doing that work. For example,
http://www.candlepowerforums.com/vb/showthread.php?t=187573
http://www.candlepowerforums.com/vb/showthread.php?t=188464
My OpticsHQ/TLS kit is slightly different from those shown above. For my kit, both main button and side button are greenish GITD buttons.
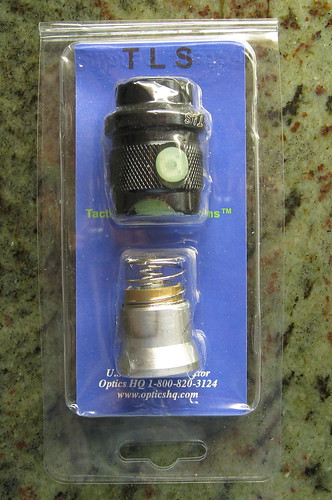
Here is a photo of the kit in the original packaging:
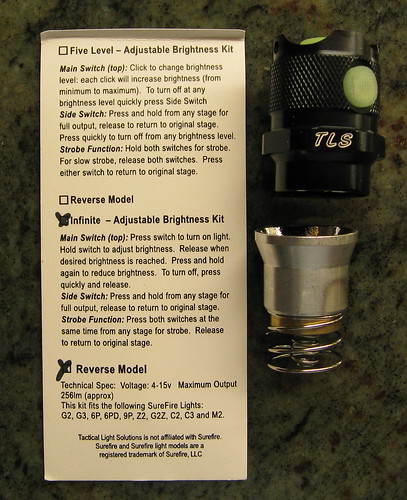
Out of the packaging:
Closeup of the tailcap:
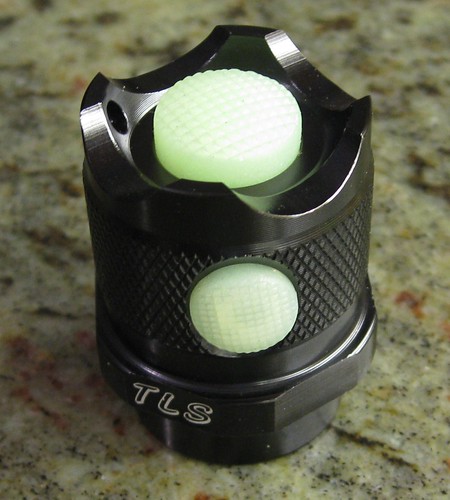
The points of the tailcap scallops are a bit too sharp for my tastes.
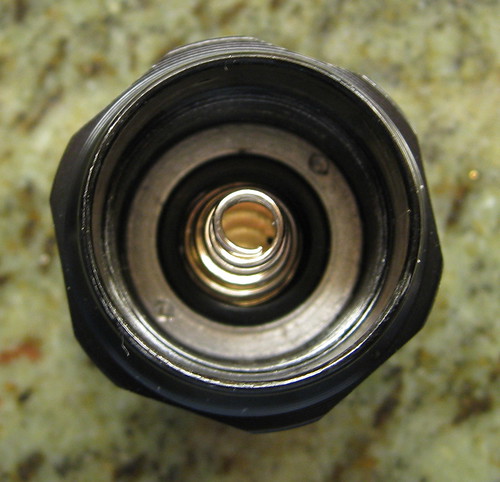
Here is the underside of the tailcap (this is where I inserted a metal spacer to allow the kit to work with my old SureFire 6P -- see discussion below):
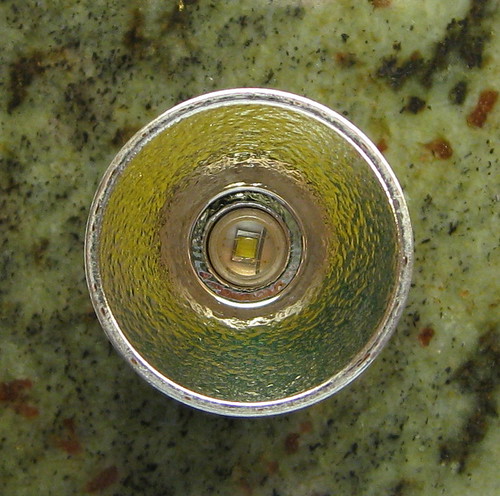
Closeup of the drop-in. Note that the LED is slightly off-center (gap on the left side between the dome and reflector opening):
Installation:
I first tried the kit in my old SureFire 6P that I bought around 1990. The kit didn't work. The tailcap screwed down all the way, as it is supposed to but I felt no resistance all the way down. Thus, it felt like the tailcap could have gone down further if there had been more room, and I suspected possible lack of electrical contact by the tailcap. And my guess was correct. When I put the old SureFire tailcap back on, the OpticsHQ LED drop-in lamp lit up.
I then tested the kit in a SureFire 6Z. Again, no function. But this time, it was clear that the problem was the drop-in. The tailcap worked with the SureFire P60 lamp (just on-off, no strobe or dimming since those functions require an LED emitter). If I removed the bezel and wiggled and-or rotated the OpticsHQ LED lamp around, I could get some intermittent, but unreliable, lighting up. So, for whatever reason, the LED drop-in wasn't making good electrical contact in my 6Z. I suspect that the reason is the 6P "well" at the top of the body is machined slightly differently than for the 6Z. In the 6P, the well has straight sides and ends with a fairly wide unanodized "shoulder" where the outer lamp spring makes electrical contact. For the 6Z, the well has a slight taper near the bottom and the unanodized shoulder is correspondingly narrower. I assume that the combination of a taper and narrower shoulder makes electrical contact by the OpticsHQ lamp's outer spring less reliable.
Finally, I tested the kit in a SureFire G2 and everything worked great.
When I talked with Mike at OpticsHQ, he immediately recognized the problem. The kit is designed for the new generation 6P family. Apparently, SureFire has changed its machining dimensions enough that the old 6P family (which includes my old 6P and 6Z) doesn't work well with the OpticsHQ kit. One suggested workaround is to insert a washer or other metallic conductor spacer into the OpticsHQ tailcap to allow function in old-style SureFire 6Ps.
I did this and the kit now also works with my SureFire 6P.
Observations and measurements:
Specs are listed as Voltage: 4-15v, Maximum Output: 256lm (approx).
The OpticsHQ beam is quite similar to the Deal Extreme 6090 drop-in. Very close match in brightness, size of the hotspot, and beam smoothness. I think that the DX6090 hot spot looks a bit brighter/whiter. The OpticsHQ beam looks a bit smoother (fewer "Cree rings"). The biggest difference is that the OpticsHQ LED drop-in has a slightly wider overall beam (slightly larger spill), but even this is minor. Measured lux at 1 meter for the OpticsHQ P60 drop-in, DX6090, and the OpticsHQ E2 replacement head are all about the same -- 5500-6500 lux.
The OpticsHQ drop-in drew 0.53A (measured at the tail end of the 6P body) when driven by two RCR123A AW cells. The drop-in drew 0.73A when driven by two Duracell CR123A cells.
Strobe rate seems comparable to the Gladius.
The multifunction tailcap doesn't function correctly with my DX6090 and DX11836 drop-ins. With both drop-ins, max brightness and strobe modes work fine. The first problem is that both drop-ins come on in dim mode as soon as you screw down the OpticsHQ tailcap all the way. You can't turn off the flashlight. The second problem is that if you press the side button, all that happens is that you can dim or brighten the light. A fast click-release of the side button doesn't turn off the light, which is what should happen.
The first review that I referenced above states that the OpticsHQ tailcap also functions with the Malkoff and BugOutGearUSA drop-ins. Just not my DX6090s apparently.
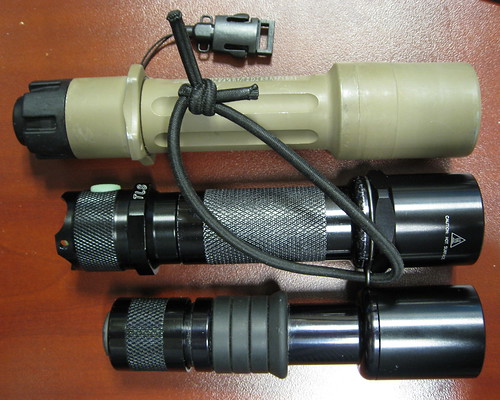
Overall size using the G2 host and bezel lanyard ring is 14 cm long vs. 15.7 cm for the Gladius. Using the 6P host and bezel lanyard ring, I measure an overall length of 13.8 cm. The Gladius max diameter is larger than the SureFire hosts because the Gladius has an integral star-shaped grip ring for the cigar hold. The OpticsHQ tailcap has a protected tailcap button, so that it can also "tail stand".
Here is a comparison of a Gladius, old-style SureFire6P with the OpticsHQ kit, and old-style 6Z:
Operation of the reverse tailcap:
The OpticsHQ main tailcap button gives momentary-on operation. Click and hold the button and you get max brightness. Release the button and the light reverts back to whatever state it was in before. I don't like the fact that the main button clicks and makes a slight noise though. I would prefer to dispense with the tactile feedback to keep the switch quiet. I also don't like the glow-in-the-dark rubber buttons and would prefer the option for non-GITD. You probably can paint the buttons with a black marker to cover the glow.
The side button for the reverse tailcap that I bought is a clicky, constant-on switch. You click it to turn on the light. The light comes on in the lowest brightness level. Holding down the side button ramps up the brightness. If you let go and click-hold again, the brightness ramps down. With the light on at some level you've selected, you can press the main tailcap button to get to the max brightness, momentary-on mode. Release the main tailcap button and the light goes back to whatever brightness level it was in before. If you fast click-release, the light turns off. If you click-release the side button again, the light turns back on in its default lowest setting.
However, I have some difficulty to click-release the side button with the right timing to obtain the lowest brightness setting. I typically get a setting 1-2 steps brighter and have to dim the light back down. At the lowest setting, the light is brighter than a Gladius on its lowest setting, but not excessively bright.
I've also found an oddity with the operation of the side button that OpticsHQ has not encountered before.
The glitch is with the initial click-release to activate the initial low mode. If you click and hold momentarily, the light comes on at a level slightly above the min brightness level, as mentioned above. If you fast click-release thinking that this will get you to the lowest brightness level, then the light does come on at the lowest level but then turns itself off after about 2-3 sec or so. It doesn't seem to happen every time, but it does happen frequently enough to be clearly repeatable.
I discussed this with Mike at OpticsHQ and he had not heard of that before. He suggested that I continue to try out the kit and if I decide that I can't live with the my difficulty with the side button timing, he'll try to make things right. Excellent customer service.
You can enter a fast, bright strobe mode in 3 ways:
1) You can press the main tailcap button and side button simultaneously to enter the strobe mode directly.
2) You can press the main tailcap button to get the momentary-on max brightness mode. Then, while still pressing the main button, also press the side button to enter strobe mode.
3) Press the side button to enter into dimming/brightening mode. Then, while still pressing the side button, also press the main button to enter strobe mode.
At any time, you can get back to momentary-on max brightness mode by simply releasing the side button. Or you can go directly back to the dimming/brightness mode by releasing the main button first and then the side button. The brightness level that you had previously set will still be there.
I think that this user interface might be better than the Gladius's UI. For the Gladius, you can't go directly from strobe mode to momentary-on max brightness mode or to dimming/brightening mode. You have to release the tailcap button, twist the selector ring, and then press the tailcap button again. You can't go from momentary-on max brightness mode to strobe either. Again, you have to release the tailcap button, turn the selector ring, and press the tailcap button again. You can go from dimming/brightening mode to strobe mode or momentary-on max brightness mode. But to do so, after you enter dimming/brigthening mode, you have to turn the selector to strobe mode or momentary-on mode. Then if you press the tailcap button again, you enter the new mode. But that's it. You are now either in strobe or momentary-on mode, and to go to a new mode, you have to twist the selector ring as described before.
A theoretical downside with the OpticsHQ UI is that it is a 2-finger operation and stress-induced sequence error can occur. Let's look at the possibilities:
1) Start in momentary-on mode and enter strobe mode: I don't see much problem here. Just press the side button to get to strobe mode. No sequential error issue here.
The buttons fall reasonably naturally under the thumb and index fingers, so button access also does not seem to be an issue. However, there could be a button access issue on initial grasping of the light, since you have to get the light oriented correctly so that the side button falls under the index finger distal pad. The symmetry of the light and tailcap does not provide any good way of forcing correct orientation or feeling for the correct orientation. I've installed a SureFire bezel lanyard ring to give me some asymmetry to clue me in on correct orientation. If I feel the lanyard ring pressing against the fat edge of my hand, then I know that the light is oriented correctly for the side button to fall under my index finger.
2) Go directly to strobe mode: Just press both buttons simultaneously. Again, no sequential error issue. Same issue as above with correct orientation of the light upon initial grasping.
3) Start in dimming/brightening mode and go to strobe mode. Same as #1 above. No button orientation problem here since your index finger is already on the side button.
4) From strobe mode, enter momentary-on mode. Confusion would result in the operator releasing the main button instead of the side button, entering dimming/brighteniing mode instead of momentary-on, max brightness mode. This could be a problem if you expected to get max brightness but got some dimmer level instead. I suppose it is also possible that confusion could result in releasing both buttons, thus getting darkness mode. My guess, though I have no data to support this, is that the thumb acts as the dominant operating finger and it would be more likely that the index finger is released.
5) From strobe mode, enter dimming/brightening mode. Confusion would result in the operator releasing the side button instead of the side button, entering dimming/brighteniing mode instead of momentary-on, max brightness mode. This could be a problem if you expected to get a dimmer mode but got mx brightness instead. Presumably, the need for a dimmer mode means that the situation is not a critical one, so a momentary flash might not be a serious problem especially since you were just in a high brightness strobe mode. However, if my assumption above regarding the thumb being the dominant finger is correct, then this sequential error may be the most frequently occurring one. And as in #4, another possibility is that the operator releases both buttons.
One other potential issue is interlimb interaction. Using your index finger to press the side button may produce a matching trigger finger movement. Thus, it is probably that much more important to make sure your trigger finger is in the register position if you are using this flashlight setup with a firearm.
http://www.candlepowerforums.com/vb/showthread.php?t=187573
http://www.candlepowerforums.com/vb/showthread.php?t=188464
My OpticsHQ/TLS kit is slightly different from those shown above. For my kit, both main button and side button are greenish GITD buttons.
Here is a photo of the kit in the original packaging:

Out of the packaging:

Closeup of the tailcap:

The points of the tailcap scallops are a bit too sharp for my tastes.
Here is the underside of the tailcap (this is where I inserted a metal spacer to allow the kit to work with my old SureFire 6P -- see discussion below):

Closeup of the drop-in. Note that the LED is slightly off-center (gap on the left side between the dome and reflector opening):

Installation:
I first tried the kit in my old SureFire 6P that I bought around 1990. The kit didn't work. The tailcap screwed down all the way, as it is supposed to but I felt no resistance all the way down. Thus, it felt like the tailcap could have gone down further if there had been more room, and I suspected possible lack of electrical contact by the tailcap. And my guess was correct. When I put the old SureFire tailcap back on, the OpticsHQ LED drop-in lamp lit up.
I then tested the kit in a SureFire 6Z. Again, no function. But this time, it was clear that the problem was the drop-in. The tailcap worked with the SureFire P60 lamp (just on-off, no strobe or dimming since those functions require an LED emitter). If I removed the bezel and wiggled and-or rotated the OpticsHQ LED lamp around, I could get some intermittent, but unreliable, lighting up. So, for whatever reason, the LED drop-in wasn't making good electrical contact in my 6Z. I suspect that the reason is the 6P "well" at the top of the body is machined slightly differently than for the 6Z. In the 6P, the well has straight sides and ends with a fairly wide unanodized "shoulder" where the outer lamp spring makes electrical contact. For the 6Z, the well has a slight taper near the bottom and the unanodized shoulder is correspondingly narrower. I assume that the combination of a taper and narrower shoulder makes electrical contact by the OpticsHQ lamp's outer spring less reliable.
Finally, I tested the kit in a SureFire G2 and everything worked great.
When I talked with Mike at OpticsHQ, he immediately recognized the problem. The kit is designed for the new generation 6P family. Apparently, SureFire has changed its machining dimensions enough that the old 6P family (which includes my old 6P and 6Z) doesn't work well with the OpticsHQ kit. One suggested workaround is to insert a washer or other metallic conductor spacer into the OpticsHQ tailcap to allow function in old-style SureFire 6Ps.
I did this and the kit now also works with my SureFire 6P.
Observations and measurements:
Specs are listed as Voltage: 4-15v, Maximum Output: 256lm (approx).
The OpticsHQ beam is quite similar to the Deal Extreme 6090 drop-in. Very close match in brightness, size of the hotspot, and beam smoothness. I think that the DX6090 hot spot looks a bit brighter/whiter. The OpticsHQ beam looks a bit smoother (fewer "Cree rings"). The biggest difference is that the OpticsHQ LED drop-in has a slightly wider overall beam (slightly larger spill), but even this is minor. Measured lux at 1 meter for the OpticsHQ P60 drop-in, DX6090, and the OpticsHQ E2 replacement head are all about the same -- 5500-6500 lux.
The OpticsHQ drop-in drew 0.53A (measured at the tail end of the 6P body) when driven by two RCR123A AW cells. The drop-in drew 0.73A when driven by two Duracell CR123A cells.
Strobe rate seems comparable to the Gladius.
The multifunction tailcap doesn't function correctly with my DX6090 and DX11836 drop-ins. With both drop-ins, max brightness and strobe modes work fine. The first problem is that both drop-ins come on in dim mode as soon as you screw down the OpticsHQ tailcap all the way. You can't turn off the flashlight. The second problem is that if you press the side button, all that happens is that you can dim or brighten the light. A fast click-release of the side button doesn't turn off the light, which is what should happen.
The first review that I referenced above states that the OpticsHQ tailcap also functions with the Malkoff and BugOutGearUSA drop-ins. Just not my DX6090s apparently.
Overall size using the G2 host and bezel lanyard ring is 14 cm long vs. 15.7 cm for the Gladius. Using the 6P host and bezel lanyard ring, I measure an overall length of 13.8 cm. The Gladius max diameter is larger than the SureFire hosts because the Gladius has an integral star-shaped grip ring for the cigar hold. The OpticsHQ tailcap has a protected tailcap button, so that it can also "tail stand".
Here is a comparison of a Gladius, old-style SureFire6P with the OpticsHQ kit, and old-style 6Z:

Operation of the reverse tailcap:
The OpticsHQ main tailcap button gives momentary-on operation. Click and hold the button and you get max brightness. Release the button and the light reverts back to whatever state it was in before. I don't like the fact that the main button clicks and makes a slight noise though. I would prefer to dispense with the tactile feedback to keep the switch quiet. I also don't like the glow-in-the-dark rubber buttons and would prefer the option for non-GITD. You probably can paint the buttons with a black marker to cover the glow.
The side button for the reverse tailcap that I bought is a clicky, constant-on switch. You click it to turn on the light. The light comes on in the lowest brightness level. Holding down the side button ramps up the brightness. If you let go and click-hold again, the brightness ramps down. With the light on at some level you've selected, you can press the main tailcap button to get to the max brightness, momentary-on mode. Release the main tailcap button and the light goes back to whatever brightness level it was in before. If you fast click-release, the light turns off. If you click-release the side button again, the light turns back on in its default lowest setting.
However, I have some difficulty to click-release the side button with the right timing to obtain the lowest brightness setting. I typically get a setting 1-2 steps brighter and have to dim the light back down. At the lowest setting, the light is brighter than a Gladius on its lowest setting, but not excessively bright.
I've also found an oddity with the operation of the side button that OpticsHQ has not encountered before.
The glitch is with the initial click-release to activate the initial low mode. If you click and hold momentarily, the light comes on at a level slightly above the min brightness level, as mentioned above. If you fast click-release thinking that this will get you to the lowest brightness level, then the light does come on at the lowest level but then turns itself off after about 2-3 sec or so. It doesn't seem to happen every time, but it does happen frequently enough to be clearly repeatable.
I discussed this with Mike at OpticsHQ and he had not heard of that before. He suggested that I continue to try out the kit and if I decide that I can't live with the my difficulty with the side button timing, he'll try to make things right. Excellent customer service.
You can enter a fast, bright strobe mode in 3 ways:
1) You can press the main tailcap button and side button simultaneously to enter the strobe mode directly.
2) You can press the main tailcap button to get the momentary-on max brightness mode. Then, while still pressing the main button, also press the side button to enter strobe mode.
3) Press the side button to enter into dimming/brightening mode. Then, while still pressing the side button, also press the main button to enter strobe mode.
At any time, you can get back to momentary-on max brightness mode by simply releasing the side button. Or you can go directly back to the dimming/brightness mode by releasing the main button first and then the side button. The brightness level that you had previously set will still be there.
I think that this user interface might be better than the Gladius's UI. For the Gladius, you can't go directly from strobe mode to momentary-on max brightness mode or to dimming/brightening mode. You have to release the tailcap button, twist the selector ring, and then press the tailcap button again. You can't go from momentary-on max brightness mode to strobe either. Again, you have to release the tailcap button, turn the selector ring, and press the tailcap button again. You can go from dimming/brightening mode to strobe mode or momentary-on max brightness mode. But to do so, after you enter dimming/brigthening mode, you have to turn the selector to strobe mode or momentary-on mode. Then if you press the tailcap button again, you enter the new mode. But that's it. You are now either in strobe or momentary-on mode, and to go to a new mode, you have to twist the selector ring as described before.
A theoretical downside with the OpticsHQ UI is that it is a 2-finger operation and stress-induced sequence error can occur. Let's look at the possibilities:
1) Start in momentary-on mode and enter strobe mode: I don't see much problem here. Just press the side button to get to strobe mode. No sequential error issue here.
The buttons fall reasonably naturally under the thumb and index fingers, so button access also does not seem to be an issue. However, there could be a button access issue on initial grasping of the light, since you have to get the light oriented correctly so that the side button falls under the index finger distal pad. The symmetry of the light and tailcap does not provide any good way of forcing correct orientation or feeling for the correct orientation. I've installed a SureFire bezel lanyard ring to give me some asymmetry to clue me in on correct orientation. If I feel the lanyard ring pressing against the fat edge of my hand, then I know that the light is oriented correctly for the side button to fall under my index finger.
2) Go directly to strobe mode: Just press both buttons simultaneously. Again, no sequential error issue. Same issue as above with correct orientation of the light upon initial grasping.
3) Start in dimming/brightening mode and go to strobe mode. Same as #1 above. No button orientation problem here since your index finger is already on the side button.
4) From strobe mode, enter momentary-on mode. Confusion would result in the operator releasing the main button instead of the side button, entering dimming/brighteniing mode instead of momentary-on, max brightness mode. This could be a problem if you expected to get max brightness but got some dimmer level instead. I suppose it is also possible that confusion could result in releasing both buttons, thus getting darkness mode. My guess, though I have no data to support this, is that the thumb acts as the dominant operating finger and it would be more likely that the index finger is released.
5) From strobe mode, enter dimming/brightening mode. Confusion would result in the operator releasing the side button instead of the side button, entering dimming/brighteniing mode instead of momentary-on, max brightness mode. This could be a problem if you expected to get a dimmer mode but got mx brightness instead. Presumably, the need for a dimmer mode means that the situation is not a critical one, so a momentary flash might not be a serious problem especially since you were just in a high brightness strobe mode. However, if my assumption above regarding the thumb being the dominant finger is correct, then this sequential error may be the most frequently occurring one. And as in #4, another possibility is that the operator releases both buttons.
One other potential issue is interlimb interaction. Using your index finger to press the side button may produce a matching trigger finger movement. Thus, it is probably that much more important to make sure your trigger finger is in the register position if you are using this flashlight setup with a firearm.
Last edited:

