
Z
z_Match
Guest
Hey guys, although I don't post on this particular flashlight site too often, I thought some of you may enjoy my latest project:
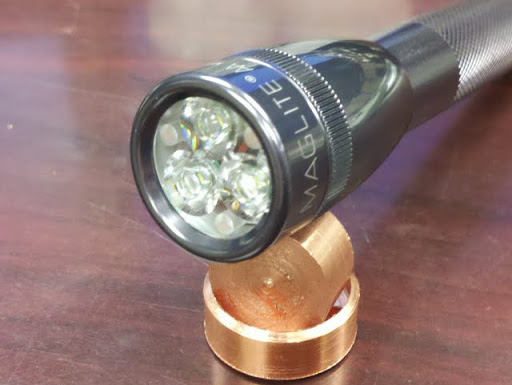
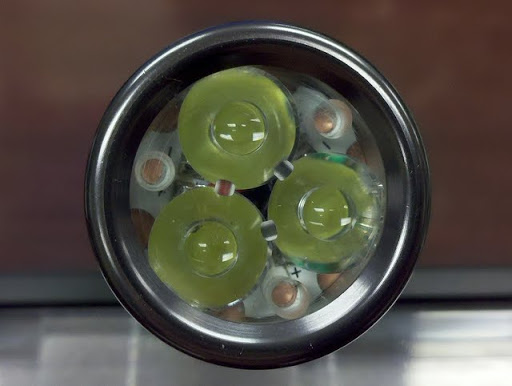
From outside appearances, except from the front, it looks like any other 2xAA mini maglite. Stock dimensions, stock tail, stock finish.... a real sleeper! Behind the front lens though lies a lot of lumens. How many?
Darn good question: I tried two setups, one at 1.4a to each led and 950ma to each led. Not having and intergrating sphere, I can only go off other published data. For example, at 1.4a the general consensus on the emitter lumens seems to be @ 1350LM. I wonder if that makes this the highest lumen mini-mag yet? Enough speculation, let's get into the build!
The first step, as usual, is complete disassembly. After writing down all the dimensions, a quick design sketch showed me that I had a bit over 20mm width by 16mm deep space to work with comfortably... i.e. not much.
Easy enough to do straight with a drill press. I used two blocks of v-notched wood covered with scrap leather as the clap and to prevent marring the head. I also drilled it slightly under 20mm (19.7mm) to allow hand lapping the copper pill/heatsink later. Once that was done, it was time to move onto the pill. In this case, the pill is (needs to be) a big hunk of pure copper. Since the diameter was @20mm, I was able to bore out the tail to exactly 17mm to allow the driver to fit completely. A lot of grinding, polishing, sanding, and coffee went into this and here she is:

After that, it's time to put everything all together. I lapped the star and the top of the pill to make a perfectly flush seating surface, then used artic silver with Fujik on the very rim to seal it down. The driver slides into the back, with the inductor bottoming out inside just as the base is flush with the rim...pefect! (Note, driver has now been thermally potted with fujik inside the pill):
 [/IMG]
The last step left was to prep the body tube to maintain stock twist for on/off (opposite now). I removed the silly stock plastic parts and used a stepper bit to slowly enlarge the opening. This was done to ensure the no contact is made to the positive center post by the body. The anodizing is removed from the top of the body to allow it to make and break contact with the negative ring on the pill. Simple yet elegant.
Now comes assembling the light. The pill slides in and bottoms out leaving the proper spacing for the optics.
And now, the finished product!
And that's it! Total project material cost turned out to be under $30, and that includes the light. Using two flame trustfire 14500's I get @ 1.5a at the tail which is roughly 1a to each led. I'm quite suprised on how well the heatsink design handles the heat. Make no mistake though, gripping the head firmly is definately a necessity for extended use. Operation is simple and robust with a slight variation to the stock twist-off / twist-on design. I'm pretty happy the way this project and design worked out. All the parts fit together like a swiss watch, and it's soon becoming one of my favorites.
From outside appearances, except from the front, it looks like any other 2xAA mini maglite. Stock dimensions, stock tail, stock finish.... a real sleeper! Behind the front lens though lies a lot of lumens. How many?
Darn good question: I tried two setups, one at 1.4a to each led and 950ma to each led. Not having and intergrating sphere, I can only go off other published data. For example, at 1.4a the general consensus on the emitter lumens seems to be @ 1350LM. I wonder if that makes this the highest lumen mini-mag yet? Enough speculation, let's get into the build!
The first step, as usual, is complete disassembly. After writing down all the dimensions, a quick design sketch showed me that I had a bit over 20mm width by 16mm deep space to work with comfortably... i.e. not much.
Easy enough to do straight with a drill press. I used two blocks of v-notched wood covered with scrap leather as the clap and to prevent marring the head. I also drilled it slightly under 20mm (19.7mm) to allow hand lapping the copper pill/heatsink later. Once that was done, it was time to move onto the pill. In this case, the pill is (needs to be) a big hunk of pure copper. Since the diameter was @20mm, I was able to bore out the tail to exactly 17mm to allow the driver to fit completely. A lot of grinding, polishing, sanding, and coffee went into this and here she is:
After that, it's time to put everything all together. I lapped the star and the top of the pill to make a perfectly flush seating surface, then used artic silver with Fujik on the very rim to seal it down. The driver slides into the back, with the inductor bottoming out inside just as the base is flush with the rim...pefect! (Note, driver has now been thermally potted with fujik inside the pill):
The last step left was to prep the body tube to maintain stock twist for on/off (opposite now). I removed the silly stock plastic parts and used a stepper bit to slowly enlarge the opening. This was done to ensure the no contact is made to the positive center post by the body. The anodizing is removed from the top of the body to allow it to make and break contact with the negative ring on the pill. Simple yet elegant.
Now comes assembling the light. The pill slides in and bottoms out leaving the proper spacing for the optics.
And now, the finished product!
And that's it! Total project material cost turned out to be under $30, and that includes the light. Using two flame trustfire 14500's I get @ 1.5a at the tail which is roughly 1a to each led. I'm quite suprised on how well the heatsink design handles the heat. Make no mistake though, gripping the head firmly is definately a necessity for extended use. Operation is simple and robust with a slight variation to the stock twist-off / twist-on design. I'm pretty happy the way this project and design worked out. All the parts fit together like a swiss watch, and it's soon becoming one of my favorites.

")