luxlover
Banned
Hello Surefire light users,
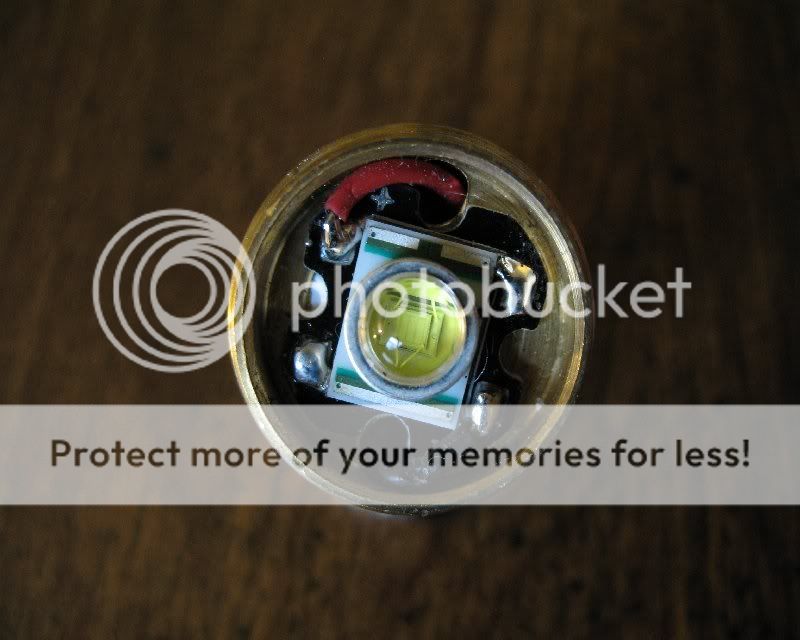
For the last month I have had the pleasure of evaluating two samples of light adapter kits that will change the way you think about your SureFire (SF) lights. Each kit consists of a light module and one of two types of tailcap. The light module has a medium orange peel reflector, a Cree Q5 WC emitter (samples came with Cree Q2 WC emitters) on a brass heatsink and 2 electrical contact springs. Each tailcap is made of aluminum with an HA II finish (samples are bare aluminum), and has 2 external activation buttons and an internal electronics package. The kits will mate with the following SF light models.....G2, G3, G2Z, Z2, 6P, 9P, C2, C3, L5, L6 and M2. In other words, any SF light using a P60 or P90 lamp module assembly can use the kit. My evaluation was done using my G2 and 6P lights.
The light module replaces the stock SF lamp module assembly in the above lights, and the tailcap replaces the stock SF tailcap. The light modules are identical in each kit. But the tailcaps differ. One uses a ramping brightness level progression (5lm to 220lm, continuous) and has a disorienting strobe. The sample kits have a 5lm-180lm rating, continuous. The other uses a 5 step brightness level progression (5lm-20lm-90lm-140lm-220lm). The sample kits have a 5lm-45lm-90lm-140lm-180lm rating. It has an emergency strobe as well as a disorienting strobe. Both tailcaps are identical on the outside and inside. The electronics are inside the tailcap and not in the light module. The regulation circuit in either tailcap can handle CR123, R123, 17650 or 17670 cells, as long as the voltage doesn't exceed 18v. This means that a 9P light with the use of a single cell extension tube, can use 4xR123 (16.8v), 2x17650 (8.2v), or 2x17670 (8.2v) cells.
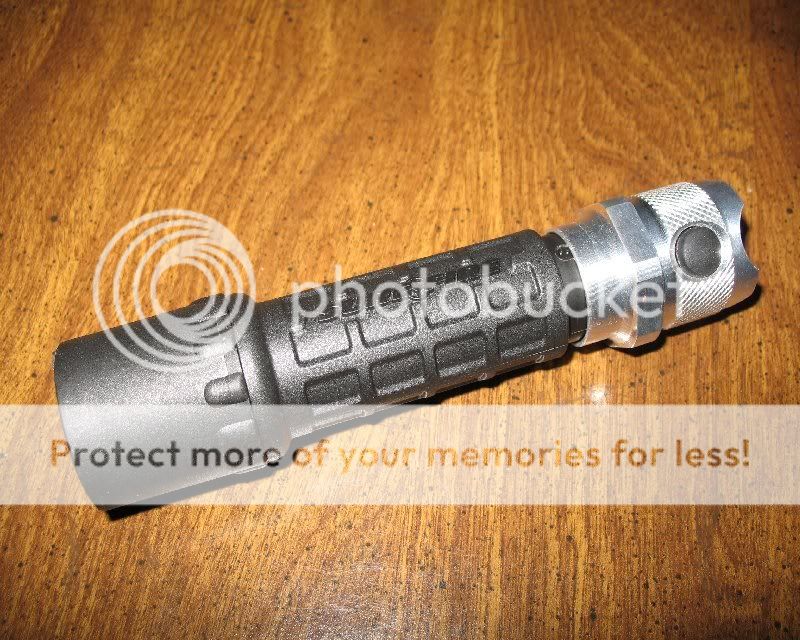
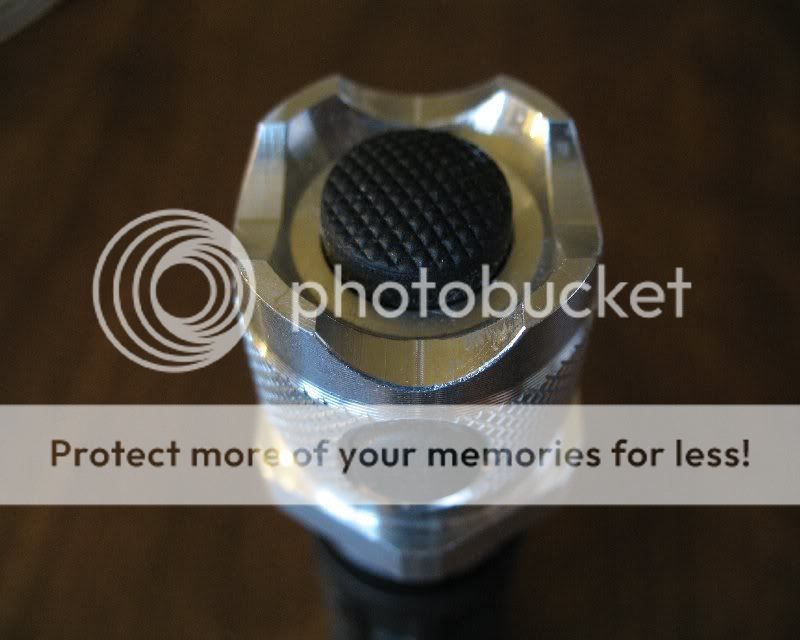
Notice the 4 cutouts at the end of each the tailcap. The edges are "slightly" sharp for use as a tactical weapon. But the edges are not sharp enough to cut a user not wearing gloves. This compromise was made to allow usability by anybody. The side button in the pictures does not have a textured button. The production version will have it. The 6 sided machining with flattened corners, is an anti-roll feature. The knurling is shallow in depth.
RAMPING TAILCAP
To operate the ramping mode.....
Press the end button to turn on the light. Quickly press again and hold to ramp from minimum brightness to maximum brightness. Release at any time, and press/hold to go in the opposite direction. At any time, press the side button (a momentary switch) to initiate a burst at the maximum level. Release the side button and return to the previous brightness level. Press the side button from off, to activate a maximum burst. Release to turn off. At any time during the ramping process, release the end button and press it again to turn off the light.
To operate the disorienting strobe.....
Press/hold the side button immediately followed by press/hold the end button to activate the disorienting strobe. Release to return to the previous brightness setting.
5 STEP TAILCAP
To operate the 5 step mode.....Press the end button to turn on the light at the minimum brightness level. Press once for each desired increase in level. The change in level with each press is clear. At the 6th press, the light will turn off. Press the side button to activate maximum burst between steps. Release to return to the previous stepped level. Press the side button at any time for maximum burst. Press the side button to turn off the light at any time.
To operate the disorienting strobe and emergency strobe.....
As in the ramping tailcap, press both buttons to activate the disorienting strobe. Release both buttons to activate the emergency strobe. Press either button to return to the previous brightness level.
These light module kits are the brainchild of Mike of OpticsHQ, and will be available only from http://www.opticshq.com They will retail for $80-$90. They are currently in production, and will be available on his website soon. For those who want the versatility of Mike's kits at a low cost, SF's G2 is the lowest priced light at $36 retail. This means that a "complete lighting solution" can be had for $116 to $126.
The overall length of a G2 with the kit is 5.6" (142.2mm). The original length is 5.14" (130.6mm). The overall length of a 6P with the kit is 5.8" (147.3mm). The original length is 5.20" (132.1mm). The maximum diameter of either tailcap is 1.27" (32.3mm). Both tailcaps tailstand.
For both kits, the estimated runtime using 2xCR123 cells at maximum output is 2 hours (120 mins.).
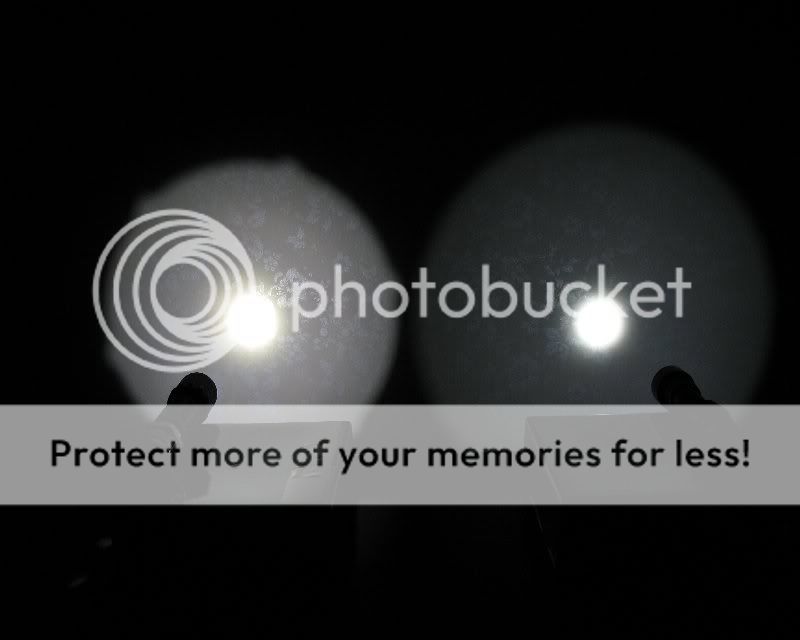
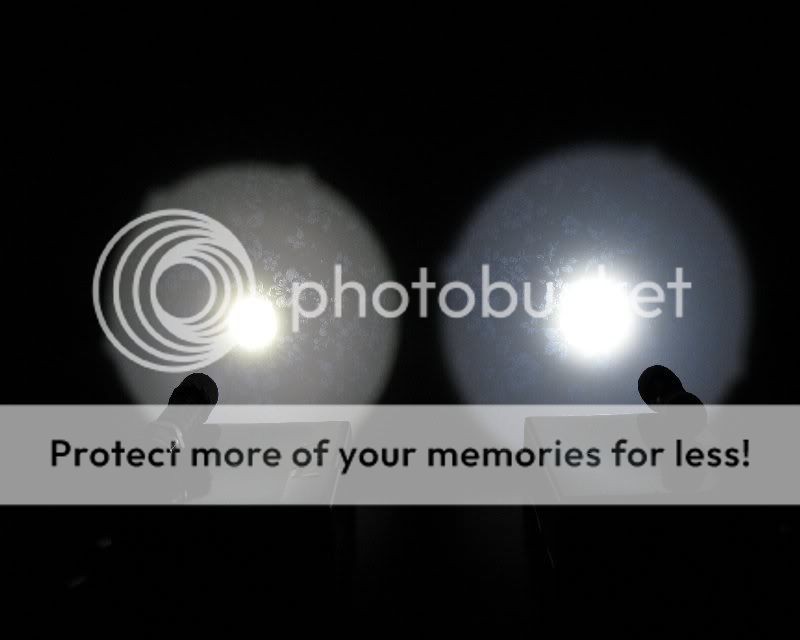
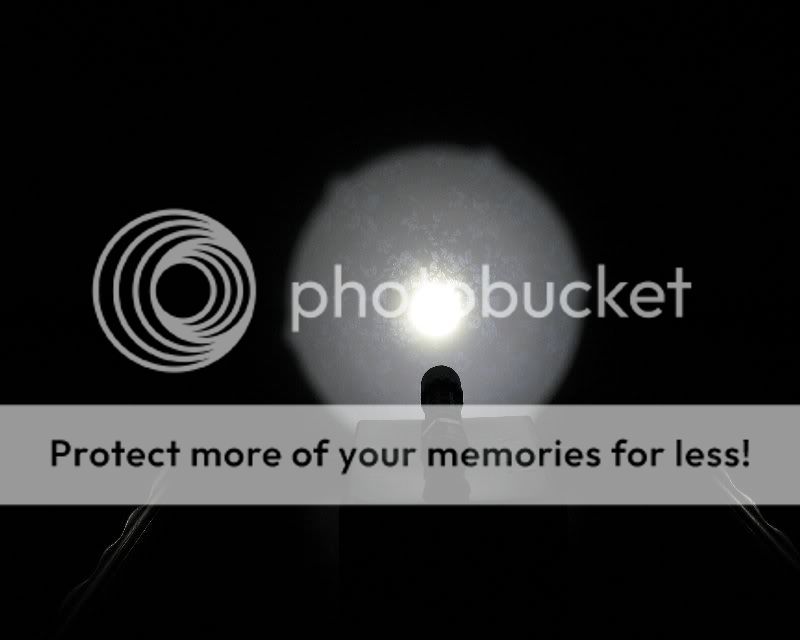
Per Mike's request, I took beamshots of my 6P and kit using 2xCR123 cells. You will see a beamshot of the 6P side by side with my PR-T bezel on a SF-L4 body. Also, you will see a beamshot of the 6P side by side with my HDS U60 light modded with a Seoul USXOH emitter.
Camera = Canon PowerShot A620 (7.1Mpixel).
F-stop = 2.8.
Shutter speed = 1/250 sec.
Distance between lights = 15" (381mm).
Distance of lights from wall = 10" (254mm).
Distance of camera from wall = 34" (863.6mm).
Light kit/6P on left.....PR-T bezel/L4 body on right
Light kit/6P on left.....HDS w/Seoul emitter on right
Light Kit on 6P
PR-T on an L4 body

HDS U60 w/Seoul emitter

Light kit/6P
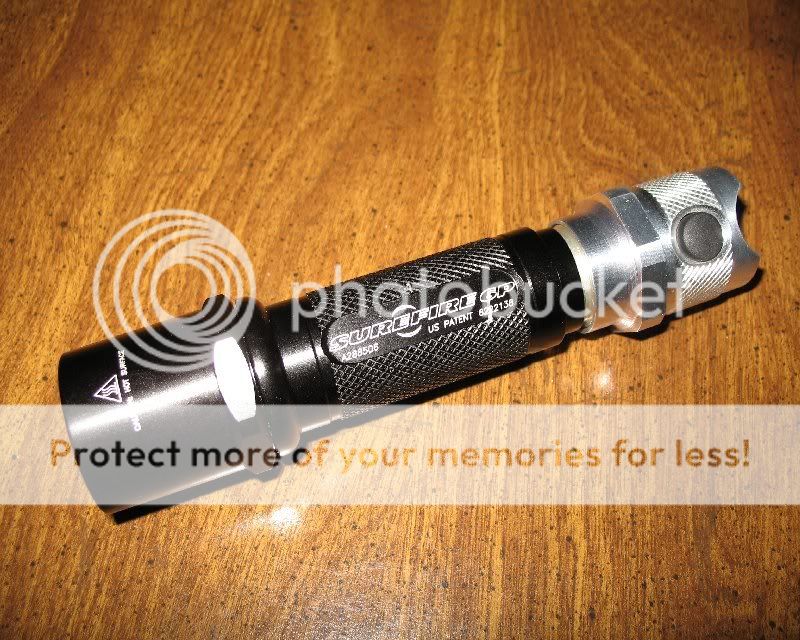
Light kit/G2
Light module - heatsink and emitter - front view
Light module complete - external

Tailcap - internal

Tailcap - external
Light module installed in G2

USER IMPRESSIONS
1. Of the two lights I used with the kits, I like the G2 better due to it's lighter weight.
2. The user interface for both versions couldn't be easier. In fact, the ramping tailcap works exactly like that of the Night-Ops Gladius. The ramping is the smoothest and most uniform of any light I have seen. Also, it take a little longer to go from min. to max. or vice versa, than on the Gladius. Note that the production versions of the kits will have a 5lm to 220lm range!
3. The end button has an aggressive rubber surface, and the tactile feel is excellent with or without the use of a glove.
4. The conical springs in the light module and tailcap have been bent inward, so as not to gouge either end of a battery case.
5. It is not possible for the light to come on accidentally from the side button, since it is at a level below that of the flattened hexagonal machining.
6. Both switches have good tactile feel and an audible click, and the endswitch has just the right amount of throw before activation.
7. Looking into the reflector, one can see the emitter within the reflector without any space around it. In fact, the bottom of the reflector is on a flat plane with the emitter, and even that surface is reflectorized.
8. The beam quality is the best I have seen in any light using a Cree emitter. The typical rings are less prominent than on any other Cree equipped light I have seen.
9. The disorienting strobe is slightly slower than that of a Gladius, and the emergency strobe is about one flash per second.
10. In the cigar grip, the hexagonal machining provides a comfortable stop for the index and middle fingers.
11. As seen in the beamshots, the hotspot is intense, making either version ideal for tasks requiring long throw.
12. The proximity of the side and end buttons to each other is good, allowing easy access to both buttons without any finger manipulation. In fact, the side button is in line with one of the 4 tailcap cutouts provided for tailstanding.
All in all, the engineering in these kits is excellent, with everything relating to human engineering having been well thought out.
For the last month I have had the pleasure of evaluating two samples of light adapter kits that will change the way you think about your SureFire (SF) lights. Each kit consists of a light module and one of two types of tailcap. The light module has a medium orange peel reflector, a Cree Q5 WC emitter (samples came with Cree Q2 WC emitters) on a brass heatsink and 2 electrical contact springs. Each tailcap is made of aluminum with an HA II finish (samples are bare aluminum), and has 2 external activation buttons and an internal electronics package. The kits will mate with the following SF light models.....G2, G3, G2Z, Z2, 6P, 9P, C2, C3, L5, L6 and M2. In other words, any SF light using a P60 or P90 lamp module assembly can use the kit. My evaluation was done using my G2 and 6P lights.
The light module replaces the stock SF lamp module assembly in the above lights, and the tailcap replaces the stock SF tailcap. The light modules are identical in each kit. But the tailcaps differ. One uses a ramping brightness level progression (5lm to 220lm, continuous) and has a disorienting strobe. The sample kits have a 5lm-180lm rating, continuous. The other uses a 5 step brightness level progression (5lm-20lm-90lm-140lm-220lm). The sample kits have a 5lm-45lm-90lm-140lm-180lm rating. It has an emergency strobe as well as a disorienting strobe. Both tailcaps are identical on the outside and inside. The electronics are inside the tailcap and not in the light module. The regulation circuit in either tailcap can handle CR123, R123, 17650 or 17670 cells, as long as the voltage doesn't exceed 18v. This means that a 9P light with the use of a single cell extension tube, can use 4xR123 (16.8v), 2x17650 (8.2v), or 2x17670 (8.2v) cells.
Notice the 4 cutouts at the end of each the tailcap. The edges are "slightly" sharp for use as a tactical weapon. But the edges are not sharp enough to cut a user not wearing gloves. This compromise was made to allow usability by anybody. The side button in the pictures does not have a textured button. The production version will have it. The 6 sided machining with flattened corners, is an anti-roll feature. The knurling is shallow in depth.
RAMPING TAILCAP
To operate the ramping mode.....
Press the end button to turn on the light. Quickly press again and hold to ramp from minimum brightness to maximum brightness. Release at any time, and press/hold to go in the opposite direction. At any time, press the side button (a momentary switch) to initiate a burst at the maximum level. Release the side button and return to the previous brightness level. Press the side button from off, to activate a maximum burst. Release to turn off. At any time during the ramping process, release the end button and press it again to turn off the light.
To operate the disorienting strobe.....
Press/hold the side button immediately followed by press/hold the end button to activate the disorienting strobe. Release to return to the previous brightness setting.
5 STEP TAILCAP
To operate the 5 step mode.....Press the end button to turn on the light at the minimum brightness level. Press once for each desired increase in level. The change in level with each press is clear. At the 6th press, the light will turn off. Press the side button to activate maximum burst between steps. Release to return to the previous stepped level. Press the side button at any time for maximum burst. Press the side button to turn off the light at any time.
To operate the disorienting strobe and emergency strobe.....
As in the ramping tailcap, press both buttons to activate the disorienting strobe. Release both buttons to activate the emergency strobe. Press either button to return to the previous brightness level.
These light module kits are the brainchild of Mike of OpticsHQ, and will be available only from http://www.opticshq.com They will retail for $80-$90. They are currently in production, and will be available on his website soon. For those who want the versatility of Mike's kits at a low cost, SF's G2 is the lowest priced light at $36 retail. This means that a "complete lighting solution" can be had for $116 to $126.
The overall length of a G2 with the kit is 5.6" (142.2mm). The original length is 5.14" (130.6mm). The overall length of a 6P with the kit is 5.8" (147.3mm). The original length is 5.20" (132.1mm). The maximum diameter of either tailcap is 1.27" (32.3mm). Both tailcaps tailstand.
For both kits, the estimated runtime using 2xCR123 cells at maximum output is 2 hours (120 mins.).
Per Mike's request, I took beamshots of my 6P and kit using 2xCR123 cells. You will see a beamshot of the 6P side by side with my PR-T bezel on a SF-L4 body. Also, you will see a beamshot of the 6P side by side with my HDS U60 light modded with a Seoul USXOH emitter.
Camera = Canon PowerShot A620 (7.1Mpixel).
F-stop = 2.8.
Shutter speed = 1/250 sec.
Distance between lights = 15" (381mm).
Distance of lights from wall = 10" (254mm).
Distance of camera from wall = 34" (863.6mm).
Light kit/6P on left.....PR-T bezel/L4 body on right

Light kit/6P on left.....HDS w/Seoul emitter on right

Light Kit on 6P

PR-T on an L4 body

HDS U60 w/Seoul emitter

Light kit/6P

Light kit/G2

Light module - heatsink and emitter - front view

Light module complete - external

Tailcap - internal

Tailcap - external

Light module installed in G2

USER IMPRESSIONS
1. Of the two lights I used with the kits, I like the G2 better due to it's lighter weight.
2. The user interface for both versions couldn't be easier. In fact, the ramping tailcap works exactly like that of the Night-Ops Gladius. The ramping is the smoothest and most uniform of any light I have seen. Also, it take a little longer to go from min. to max. or vice versa, than on the Gladius. Note that the production versions of the kits will have a 5lm to 220lm range!
3. The end button has an aggressive rubber surface, and the tactile feel is excellent with or without the use of a glove.
4. The conical springs in the light module and tailcap have been bent inward, so as not to gouge either end of a battery case.
5. It is not possible for the light to come on accidentally from the side button, since it is at a level below that of the flattened hexagonal machining.
6. Both switches have good tactile feel and an audible click, and the endswitch has just the right amount of throw before activation.
7. Looking into the reflector, one can see the emitter within the reflector without any space around it. In fact, the bottom of the reflector is on a flat plane with the emitter, and even that surface is reflectorized.
8. The beam quality is the best I have seen in any light using a Cree emitter. The typical rings are less prominent than on any other Cree equipped light I have seen.
9. The disorienting strobe is slightly slower than that of a Gladius, and the emergency strobe is about one flash per second.
10. In the cigar grip, the hexagonal machining provides a comfortable stop for the index and middle fingers.
11. As seen in the beamshots, the hotspot is intense, making either version ideal for tasks requiring long throw.
12. The proximity of the side and end buttons to each other is good, allowing easy access to both buttons without any finger manipulation. In fact, the side button is in line with one of the 4 tailcap cutouts provided for tailstanding.
All in all, the engineering in these kits is excellent, with everything relating to human engineering having been well thought out.


