
This is a project that I finished several months ago. I am just now getting around to creating this post. I just don't enjoy writing that much.
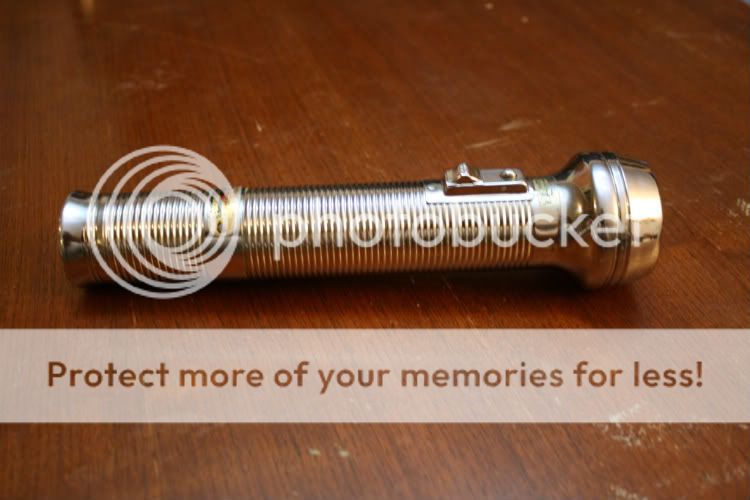
I bought a vintage Rayovac Sportsman off of ebay with the intent of upgrading it to led. I didn't want to alter or machine the light just the parts I was creating.
I had decided on a neutral k-bin MC-E emitter, but was undecided on the power source. I was thinking about a 3D to AA holder but that complicated the design by driver options. I know that most people here on CPF are anti alkaline and was shying away from d cells thinking that they just wouldn't work with a MC-E. I then learned about the C rating on batteries.
After I had ran some calculations, I found that at 2500 mA, I would be at about 0.2 C and have about 5-6 hours of runtime. This made ShiningBeam's 2500 mA buck driver perfect for the job, especially for mounting, as you will see in the photos.
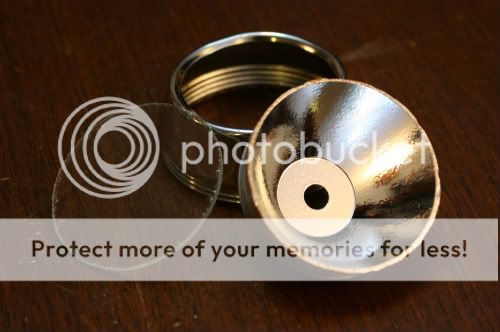
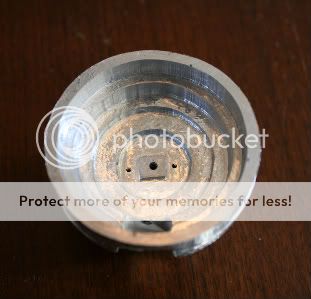
As can be seen above the head isn't very deep. This didn't leave me many options for reflectors. I wanted something that would spread across the face of the lens. I don't really care for the 20mm optic look in a 50mm lens. After some searching I found this. With a little trimming around the outside lip, it fits perfectly behind the lens.
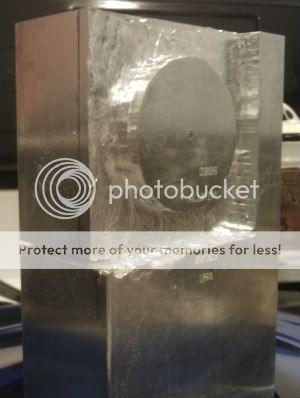
I still was left with the problem of the heatsink. I don't own a lathe and didn't want to spend a large amount on a custom sink. Ebay helped provide a solution….2.2 lbs of aluminum bullion for a whopping $10 shipped ($.99 bid, $9 shipping). It is approximately 1.5 in x 3 in x 5 in, giving enough for two sinks if needed.
I was thinking that I would start with a hacksaw to form it. This was very slow, not very effective, and I got impatient, so I pulled out the Dremel. I tried several different bits before I found one that worked well. Note: (As most already know, cutoff discs and grinding stones do not like aluminum.)
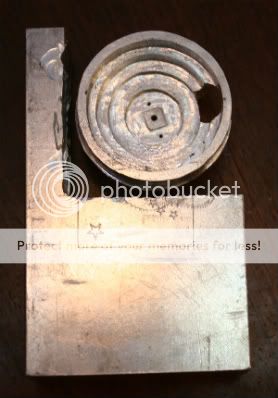
The router attachment was a must for this project. Part way through I started to use a drill press to cut out larger amounts of material. All the precision work was done with a Dremel.
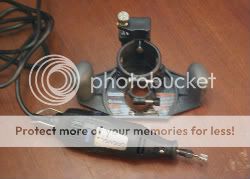
The progress was slow, taking me a couple of months to complete. I was slow for the fact that I was calculating cut diameters as I went, I had to let the aluminum and Dremel cool regularly, and I burned up one Dremel, and destroyed one cutting bit on a piece of broken drill bit. (The Dremel was long out of warranty coverage and it was not the motor brushes.)
I wasn't very good at taking a lot of in between pictures.
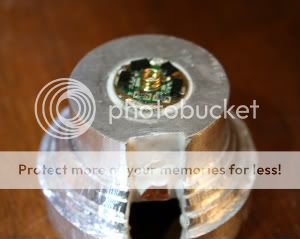
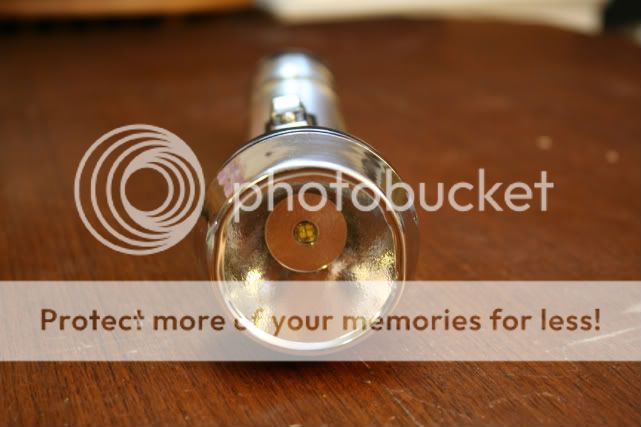
I epoxied a p60 drop-in pill into the bottom of the heatsink. I then ran a wire from the pill to the piece of copper seen below for the negative contact. I soldered a small piece of wire to the legs on each side of the emitter before connecting the contact wires.
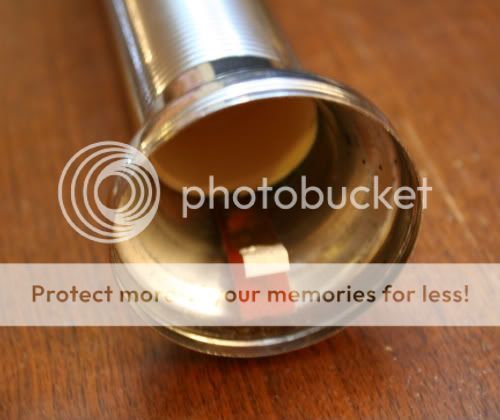
I replaced the old deteriorated cardboard with rolled cardstock. The one changed I did make was a little bit of epoxy on the end of the negative contact, so that it didn't ground with the reflector.
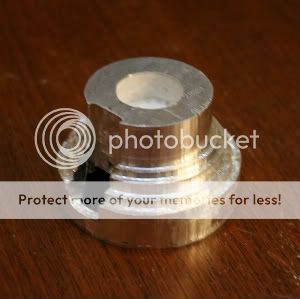
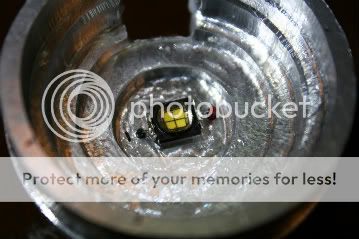
As seen everything came together nicely with an emitter that centers well and a light that gives a wall of flood.
Here are a few beam shots at ISO 400 1/50 Sec. All three are on high, MC-E on left, Quark Mini 123w, and RRT-0.


Control shot and the Rayovac on high.
After fighting with the photo sharing site and posting too soon :sick2:, it is done. I am pleased with the results and quite enjoyed creating this light. :twothumbs
I bought a vintage Rayovac Sportsman off of ebay with the intent of upgrading it to led. I didn't want to alter or machine the light just the parts I was creating.
I had decided on a neutral k-bin MC-E emitter, but was undecided on the power source. I was thinking about a 3D to AA holder but that complicated the design by driver options. I know that most people here on CPF are anti alkaline and was shying away from d cells thinking that they just wouldn't work with a MC-E. I then learned about the C rating on batteries.
After I had ran some calculations, I found that at 2500 mA, I would be at about 0.2 C and have about 5-6 hours of runtime. This made ShiningBeam's 2500 mA buck driver perfect for the job, especially for mounting, as you will see in the photos.
As can be seen above the head isn't very deep. This didn't leave me many options for reflectors. I wanted something that would spread across the face of the lens. I don't really care for the 20mm optic look in a 50mm lens. After some searching I found this. With a little trimming around the outside lip, it fits perfectly behind the lens.
I still was left with the problem of the heatsink. I don't own a lathe and didn't want to spend a large amount on a custom sink. Ebay helped provide a solution….2.2 lbs of aluminum bullion for a whopping $10 shipped ($.99 bid, $9 shipping). It is approximately 1.5 in x 3 in x 5 in, giving enough for two sinks if needed.
I was thinking that I would start with a hacksaw to form it. This was very slow, not very effective, and I got impatient, so I pulled out the Dremel. I tried several different bits before I found one that worked well. Note: (As most already know, cutoff discs and grinding stones do not like aluminum.)
The router attachment was a must for this project. Part way through I started to use a drill press to cut out larger amounts of material. All the precision work was done with a Dremel.
The progress was slow, taking me a couple of months to complete. I was slow for the fact that I was calculating cut diameters as I went, I had to let the aluminum and Dremel cool regularly, and I burned up one Dremel, and destroyed one cutting bit on a piece of broken drill bit. (The Dremel was long out of warranty coverage and it was not the motor brushes.)
I wasn't very good at taking a lot of in between pictures.
I epoxied a p60 drop-in pill into the bottom of the heatsink. I then ran a wire from the pill to the piece of copper seen below for the negative contact. I soldered a small piece of wire to the legs on each side of the emitter before connecting the contact wires.
I replaced the old deteriorated cardboard with rolled cardstock. The one changed I did make was a little bit of epoxy on the end of the negative contact, so that it didn't ground with the reflector.
As seen everything came together nicely with an emitter that centers well and a light that gives a wall of flood.
Here are a few beam shots at ISO 400 1/50 Sec. All three are on high, MC-E on left, Quark Mini 123w, and RRT-0.
Control shot and the Rayovac on high.
After fighting with the photo sharing site and posting too soon :sick2:, it is done. I am pleased with the results and quite enjoyed creating this light. :twothumbs
Last edited:
")