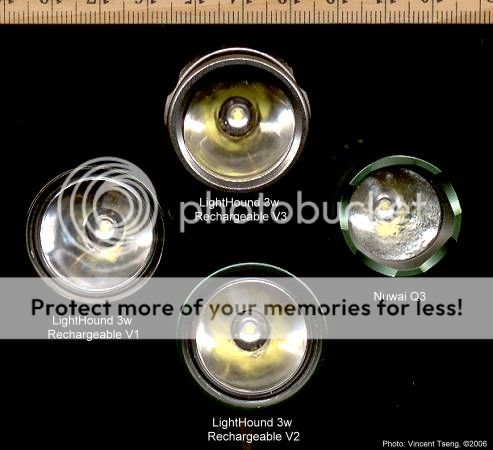
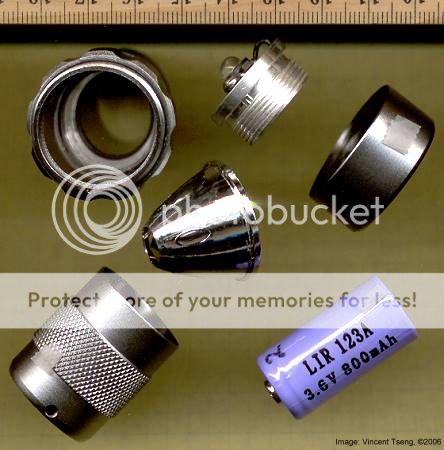
V3 Construction
I experienced some flickering of the V3 -
Initially I thought it might have simply been the tailcap not being screwed down tight enough since the vital electrical contact is made via the body tube end and the retaining screw ring for the switch. Loosening and tightening the tailcap seemed to do the trick and sometimes even a simple gentle smack of the light would stop the flicker.
Then I started to get very dim output - again simple loosening/tightening of the tailcap, or gentle shock to the light would make it go away.
But I started to be concerned about this and took to cleaning all the contact areas and noticed that the "+"ve contact pcb in the head seemed to be loose - when I went to clean it I thought tapping it seemed to make sounds like it was not fastened down tight.
Ah! I went, and had to bite the bullet to try and open the head.
Bagged the light without battery - but with the tailcap screwed on for overall water-tightness - using two ziplock type baggies and placed in gently boiling water for about 5 minutes - then attempted to unscrew the assembly using household rubber gloves to aid grip and insulate from the hotness.
Could not budge where I thought the head screwed on to the body - and I really tried.
But the front bezel did come undone quite easily.
I managed to unscrew the LED assembly/heatsink from the inside the head/body.
Disassembled
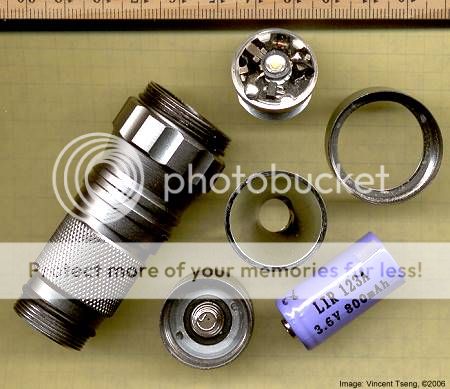
The 3watt LED
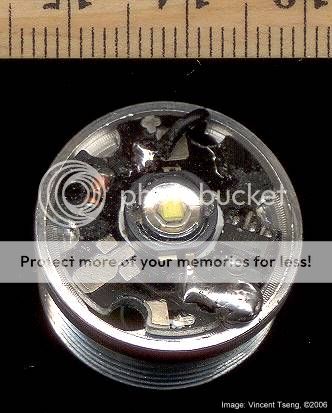
The "star" was hardly fastened down - it has one screw which is also soldered for electrical conductivity - I could easily partially lift the star and but using a flshlight I could see there was no bin # so = "clone"?
Then I tried to figure out why the (pcb) board at the other end of the LED star heatsink/assembly was loose and see if I could fasten it down.
Well, there was absolutely NO fastening - the pcb for the "+"ve contact just sat in a recess on the heatsink.
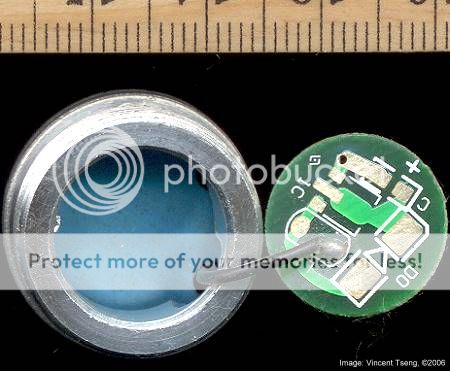
Now we can see the back of the star - where there is no bin # (therefore = clone)
Pushing everything back together I found the star didn't really want to sit snug - and tended to lift on the opposite end of the soldered screw. I placed small drops of glue at the two directly opposite prongs of the star to hold the star down - then attempted to screw the assembly back.
Here's where my nightmare began - it just seemed that the LED heatsink/assembly didn't want to screw in properly - and this was difficult compounded by having to work down into the head tube. Eventually I figured out that it was best to set the LED heatsink/assembly as best I could in the head tube, then very carefully rotate the body/head tube and the threads caught and it was pretty easy to screw in the LED heatsink/assembly. Phew!
Of course the flimsy glue I used no longer held, and the star tilted - so I used a pin to get a small amount of glue to the same opposite prongs of the star and pressed to adhere. This time things seemed to be OK.
Placed the reflector, being very careful not to contact the mirrored surface (the reflector's silver coating looked very fragile) and centered the LED the best I could and replaced the front bezel. BTW - the lens is Plastic and not glass as another website selling this light seems to indicate.
I'm not sure if I've improved anything - and am sort of regretful for opening the light since I am now pretty concerned about the internal construction durability of this light - especially the thermal contact for the star.
I'd be grateful for some advice on the appropriate thermal conducting glue that I can use to fasten the star down and conduct heat well.
Thanks.
I experienced some flickering of the V3 -
Initially I thought it might have simply been the tailcap not being screwed down tight enough since the vital electrical contact is made via the body tube end and the retaining screw ring for the switch. Loosening and tightening the tailcap seemed to do the trick and sometimes even a simple gentle smack of the light would stop the flicker.
Then I started to get very dim output - again simple loosening/tightening of the tailcap, or gentle shock to the light would make it go away.
But I started to be concerned about this and took to cleaning all the contact areas and noticed that the "+"ve contact pcb in the head seemed to be loose - when I went to clean it I thought tapping it seemed to make sounds like it was not fastened down tight.
Ah! I went, and had to bite the bullet to try and open the head.
Bagged the light without battery - but with the tailcap screwed on for overall water-tightness - using two ziplock type baggies and placed in gently boiling water for about 5 minutes - then attempted to unscrew the assembly using household rubber gloves to aid grip and insulate from the hotness.
Could not budge where I thought the head screwed on to the body - and I really tried.
But the front bezel did come undone quite easily.
I managed to unscrew the LED assembly/heatsink from the inside the head/body.
Disassembled
The 3watt LED
The "star" was hardly fastened down - it has one screw which is also soldered for electrical conductivity - I could easily partially lift the star and but using a flshlight I could see there was no bin # so = "clone"?
Then I tried to figure out why the (pcb) board at the other end of the LED star heatsink/assembly was loose and see if I could fasten it down.
Well, there was absolutely NO fastening - the pcb for the "+"ve contact just sat in a recess on the heatsink.
Now we can see the back of the star - where there is no bin # (therefore = clone)
Pushing everything back together I found the star didn't really want to sit snug - and tended to lift on the opposite end of the soldered screw. I placed small drops of glue at the two directly opposite prongs of the star to hold the star down - then attempted to screw the assembly back.
Here's where my nightmare began - it just seemed that the LED heatsink/assembly didn't want to screw in properly - and this was difficult compounded by having to work down into the head tube. Eventually I figured out that it was best to set the LED heatsink/assembly as best I could in the head tube, then very carefully rotate the body/head tube and the threads caught and it was pretty easy to screw in the LED heatsink/assembly. Phew!
Of course the flimsy glue I used no longer held, and the star tilted - so I used a pin to get a small amount of glue to the same opposite prongs of the star and pressed to adhere. This time things seemed to be OK.
Placed the reflector, being very careful not to contact the mirrored surface (the reflector's silver coating looked very fragile) and centered the LED the best I could and replaced the front bezel. BTW - the lens is Plastic and not glass as another website selling this light seems to indicate.
I'm not sure if I've improved anything - and am sort of regretful for opening the light since I am now pretty concerned about the internal construction durability of this light - especially the thermal contact for the star.
I'd be grateful for some advice on the appropriate thermal conducting glue that I can use to fasten the star down and conduct heat well.
Thanks.
")