Anodizing done the Flashoholic way

Codiak

Enlightened
Joined
Dec 7, 2009
Messages
515
Late in the summer I started playing with Anodizing. My thought was to save money and machine my own parts vs buying a bunch of Maglites.
A number of DIY sites provide various methods and details for the process and tools required.


To power the process some people suggested computer power supplies, Car batteries with incandesant light bulbs, others suggested battery chargers, and yet others just said to buy a power station.

So I:
Burned out 2 old power supplies.
Spent a day getting frustrated with the charger... turns out the newer models are too smart for me... they won't power up if they don't detect some current from a battery in the first place.
Tried a car battery but wasn't thrilled.


End result was... I bought a bunch of Mags.


Last night I was a bit bored, still waiting Cutter!, so I started researching the Anodizing process again...
when a Light went off... (bad pun)
To properly Anodize we need Constant Current.... well DUH same with LEDs

Having just gotten a new H6CC from Taskled I decided to wire something up

PC090709-1.jpg


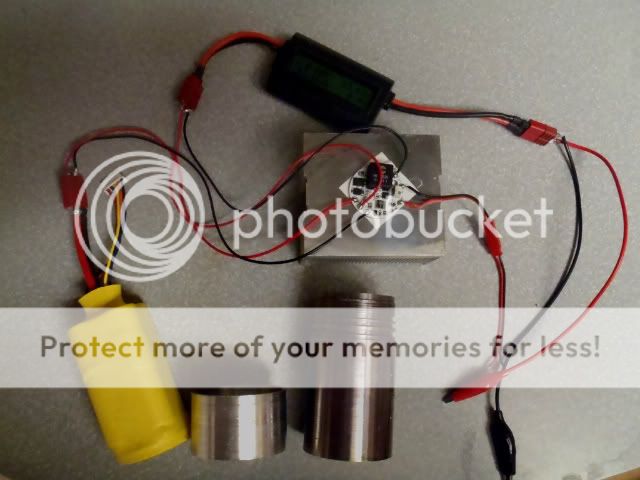
Using a 14.4 (4s x 18650) battery pack, the HC66 set to 6A, and a 15% Sulphuric Acid solution
I successfully anodized the tube shown on the right and dyed it gun metal gray.
The aluminum part on the left is not anodized for comparison.
It's harder, colored and shows 0 Ohms.....


I've just ordered some dyes for my next build!
 

Klem

Enlightened
Joined
Mar 26, 2010
Messages
581
Location
Perth Australia
Very interesting...

How long did it take?

What dye are you talking about; food dye or something specific for anodising?

Is the anodised part now an eletrically insulated?

Been looking into airbrushing with Moly Resin however anodising was my initial choice. Brilliant idea using the H6 driver...as Agatha Christie (writer of detective novels) once said..."Nothing is an inobvious as the obvious."
 

Codiak

Enlightened
Joined
Dec 7, 2009
Messages
515
Klem,
The aluminum part was in the tank less than 10 minutes. When I first wired it up the draw was 50 watts, when I went back to check on it the was down to .33 So I pulled the item, rinsed it and stuck a ohms meter on it. Yes, it is completely insulated.

The only dye I had around was an empty bottle of RIT, flushed what I could from the bottle and managed a gray dye job.
This was just to prove it would take the dye.

Honestly I was expecting a yellowish tint coming out of the acid and was surprised that it looked the same.


I've ordered the fluorescent yellow, sealer, masking and desmut from Caswell.

Per the moly resin, I've tried it and its good stuff but no where near some and jobs I've seen
 

Packhorse

Flashlight Enthusiast
Joined
Nov 29, 2007
Messages
1,912
Location
New Zealand
What a timely thread.

I am also looking at DIY anodizing. In fact I was about to google it again when I thought I would check in with CPF first.

Last week I brought a 5 amp 30 volt CC/CV benchtop power supply for anodizing stuff and also powering up projects. Just powered up my rebuilt ring of light with it in fact.

Anyway some questions.
15% acid sounds like a weak solution. Is that what they recommend?
6amp of current sounds like a lot. I though I read 2 amp per square foot?? EDIT 12 amp sq ft

Got any good links to DIY sites?
 
Last edited:

Codiak

Enlightened
Joined
Dec 7, 2009
Messages
515
Wrt this test a couple points:
1) acid was too dilute depending on method
2) current was way to high depending on method
3) duration in the tank was too short
4) tank was too cold, my bubbler iced up;)

In my defense, it was a proof of concept wrt using led drivers... That proven now I'll setup a proper test after my Business trip this week.

Ive found two well documented variations.
http://www.caswellplating.com/
http://www.focuser.com/anodize.html

They differ in terms of dilution and current yet get reportedly nice results.
Castell mixes 3 to 1 with battery acid. battery acid in the US is only 25% sulphuric. Current is 4.5A per square foot
Focused uses 2 parts water and 1 part sulphuric acid for a 33% mix and current of 12A per square foot

I can't say which will work better yet... But based on my test it looks like the process will be forgiving.
I will start testing with Castells first since I'll be using their chefs and dyes
 

Packhorse

Flashlight Enthusiast
Joined
Nov 29, 2007
Messages
1,912
Location
New Zealand
Thanks. It looks like the strength of the acid and current isnt all that important.

But I do have a question in regards to the aluminium wire that goes from the power supply to the item.
I guess this is getting anodized at the same time, so what you get is two pieces of aluminium slowly getting anodized and at some point current will stop flowing between them of the point of contact will not get anodized. How do you get around this?
 
Last edited:

Codiak

Enlightened
Joined
Dec 7, 2009
Messages
515
Two ways I've found so far...

Tap into the item being anodized..ie make sure you have a solid connection... This works since the power line is engaged out of the bath and stays powered

The other is to use titanium wire

In either case the connection has to be solid.... Titanium wire is reusable between soakings
 

Goldigger

Enlightened
Joined
Mar 17, 2009
Messages
327
Location
London UK
If you follow trouts link to the anodising thread you'll see how we have been doing it with great results...
Once you get the results its kinda addictive, you start to make excuses to mill a housing just so you can anodise it :D

Heres a few pics of the housings ive anodised at home in the kitchen!
P1010835.jpg


P1010827.jpg


P1010817.jpg


I use a kit that you can buy from gateros plating in the UK
http://www.gaterosplating.co.uk/Anodising-Kit.php
They also sell via ebay..
If your US based then try caswell http://www.caswellplating.com/kits/aluminum.htm

Or you can just buy the bits seperatly yourself if you can source them..
 

Goldigger

Enlightened
Joined
Mar 17, 2009
Messages
327
Location
London UK
Thanks. It looks like the strength of the acid and current isnt all that important.

But I do have a question in regards to the aluminium wire that goes from the power supply to the item.
I guess this is getting anodized at the same time, so what you get is two pieces of aluminium slowly getting anodized and at some point current will stop flowing between them of the point of contact will not get anodized. How do you get around this?

Where the ali wire is in contact with your part, these two contact points do not anodise.. that why its good pratice to jam the wire into a hole that wont be seen..
When the current stops flowing your part will not anodise any further... ie its finished :)
All alloys have a limit in film thickness..there is a limit on how much a part will anodise..
 

Goldigger

Enlightened
Joined
Mar 17, 2009
Messages
327
Location
London UK
If you want a cheap power supply try using a pc PSU, I used a 580w PSU for the little housing in the pics above..
Just use the 12v rail on one of the molex connectors, yellow and black wires..

I now have a 15v 15 amp variable power supply that works fine..got it from a RC company for £40
 
Last edited:

Codiak

Enlightened
Joined
Dec 7, 2009
Messages
515
I still like the fact that I can use my flashlight to deliver the power for anodizing ;-)

And as I noted early tested fried a 200 and 350w PSU I had laying around.

On the road for business right now... but dyes and chems should arrive about the same time of my return flight.
I'm looking forward to a good dye job.
 

Packhorse

Flashlight Enthusiast
Joined
Nov 29, 2007
Messages
1,912
Location
New Zealand
Just score 4 litres of 30% sulphuric acid from the local battery shop. Plan on mixing it with an equal amount of distilled water. Just need to get the clothes dye now and some aluminium wire.
 

Goldigger

Enlightened
Joined
Mar 17, 2009
Messages
327
Location
London UK
Just score 4 litres of 30% sulphuric acid from the local battery shop. Plan on mixing it with an equal amount of distilled water. Just need to get the clothes dye now and some aluminium wire.

Not saying your wrong..my kit instructions said to add the 2 litres of 30% to 3 litres of deionosed/distilled water.

How are you going to prep your pieces to anodise?
Good results depend on the preperation..

1. I use wire wool and remove all machining marks, then polish to a mirror shine.
2. Clean the part to remove all cutting fluids, and grease from your fingers etc. wear rubber gloves to avoid contaminating the part. I use regular washing up liquid and a stiff brush. Rinse in de-ionised/distilled water
3. Etch the part and rinse in de-ionised/distilled water http://www.gaterosplating.co.uk/Anodise-Stripper-and-Etch.php
4. Use a desmut to remove any surface impurities and rinse in de-ionised/distilled water http://www.gaterosplating.co.uk/Desmut.php
5. Anodise and Rinse in de-ionised/distilled water
6. Dye the part - all my dyes are heated between 40-60°C depending on which color im using. Any hotter and you risk sealing the part!
7. Seal the part in boiling water for 30mins - I use anoseal added to the boiling water. http://www.gaterosplating.co.uk/Anodising-Kit.php
 

Codiak

Enlightened
Joined
Dec 7, 2009
Messages
515
Still trying to get a richer yellow like the Kraft Mustard container or the legos...
IMG_2116-1.jpg
 

Packhorse

Flashlight Enthusiast
Joined
Nov 29, 2007
Messages
1,912
Location
New Zealand
Having some issues with my set up.

How do you know when to turn off the power supply?

I had my item in there at 2 amps for over an hour then 5 amps for another 30 minutes. ( <1square foot surface area)

I removed it and put it in dye but it wouldnt take.
I measured the impedance and it was still conducting well.


Do you have to use lead as the cathode or is aluminum OK?
Can you have it in the acid bath with current flowing for too long? Or will this just grow a thicker coating?
 
Last edited:

Packhorse

Flashlight Enthusiast
Joined
Nov 29, 2007
Messages
1,912
Location
New Zealand
Well I tried again.
2 hours at 5 amp 12 volt. solution was slightly warmer than ambient.
Cathode was an aluminium tube and wire ( about the same surface area as work piece. Half way through I tried wrapping aluminium foil around it to increase surface area. Not sure it had any effect. Plenty of bubbles before and after the foil.

Perhaps I need to up the Sulphuric acid to a higher lever than 10%?
 

aixdiver

Newly Enlightened
Joined
Jul 6, 2011
Messages
6
@Packhorse

Yes, it should be around 15% to 20%. It's easy if you mix acid for car batteries car battery with purified water. I use for the cathode lead and for the anode i use titanium wire. For the right time you can use the formula, that for every 100cm² with a current at 1,5A the time is about 60min. This is a rule of three and you can change any parameter.

Source: http://www.electronic-thingks.de/en/anodising-guide/work-steps.html
 

Codiak

Enlightened
Joined
Dec 7, 2009
Messages
515
I have no issue with Alum for cathode...

Following this guide http://www.caswellplating.com/kits/lcd_ano.pdf for your test piece make sure it's clean but don't worry about the finish.
Use the calculator trout mentioned with settings for 1 mil, and 4Amp Hrs (6 is fine too).
Make sure you have a solid connection to the part and do a run time of 90 minutes....
At that point the surface will not conduct electricy and the item will take dye.

Remember, if your using alumimum wire don't reuse it as it's anodized.... TI wire is amazing stuff for this
 
Top