XP-G modded Gladius

fletch31

Newly Enlightened
Joined
Jun 16, 2006
Messages
87
This is a very easy LED swap so I feel a bit embarrassed posting it here among the innovative greats but I thought I would share as I guess it is a mod.

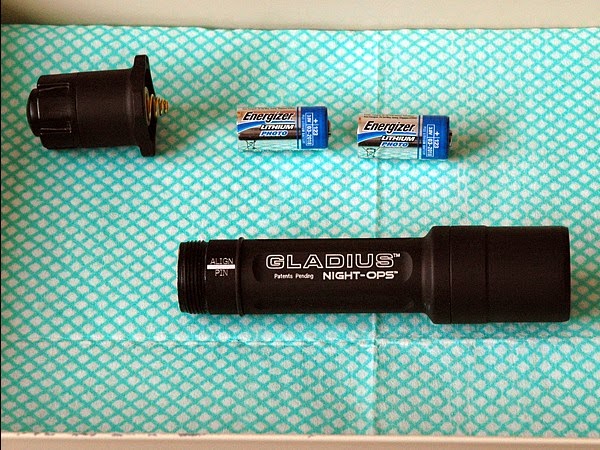
So I have modded two of these Gladius lights now with A0 bin XP-G R5 LEDs and I am just thrilled with the ease of the job and increased output. Previously I have modded these with U2 bin Seoul P4's and was happy with the output I got back then. Now I have a 50% even greater lumen output OTF with a very similar beam smooth beam pattern. The hot spot is just a bit bigger but its noticably brighter over the P4 and the spill is brighter as well. Best part is my low setting is still Loooow. The stock IMS27 reflector focuses this LED perfectly with no donuts and a nice even hot spot. I love these dang lights. Best UI made IMHO.

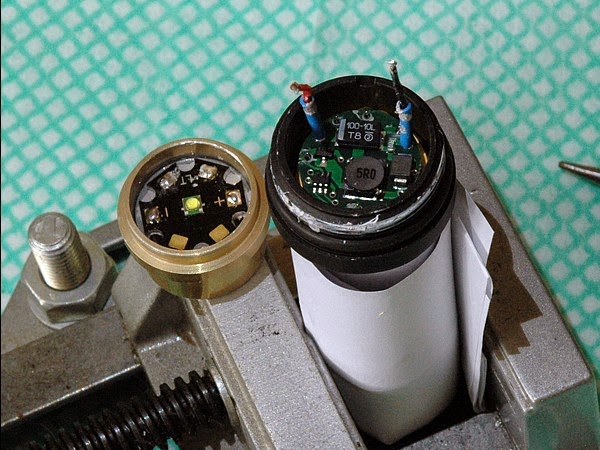
This time I used the XP-G's premounted on a 20mm stars (from Cutter) so this mod ended up being easier than my old P4 mods. When I did those, I had to make a copper shim under the P4 for focus and electrically isolate it using the old 80 lumen luxeon star mount because I could only source unmounted U2 bin LEDs then.

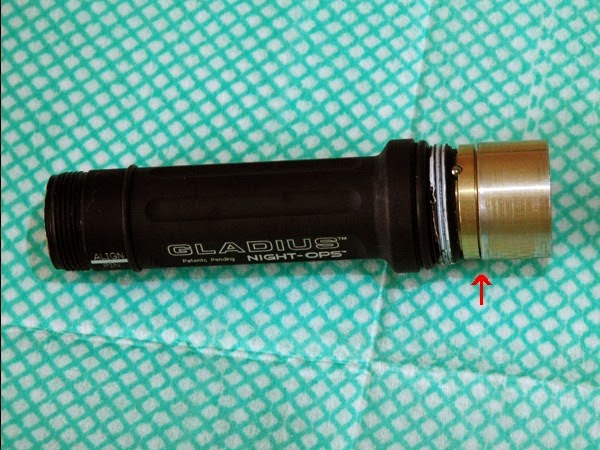
This mod is very easy. Just unsolder the two leads, pop the old star off with a small screw driver and lap the old thermal compound off.

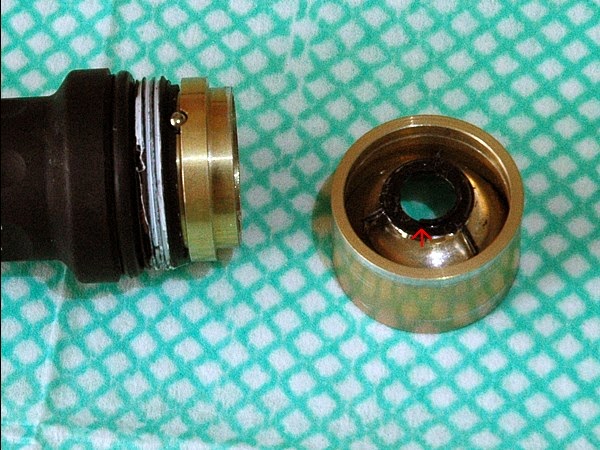
Trim off the two small half moon shaped plastic risers built into the bottom of the reflector to get the correct donut free focused beam.

Put down a thin layer of Arctic Silver 5 thermal compound and lay your new star down centered the best you can and resolder your leads.

This next part, you need to move kind of fast as it involves centering the LED. I mix some 5 min epoxy to put around one edge of the LED star to hold it in place. Its pretty easy to get in the ball park by moving the star equadistant from the edges of the heat sink platform. I take the reflector and circular shield that surrounds it out of the bezel and set it on top of the light and look down in to eyeball it for center, sliding the LED star around with some tweezers while the epoxy is still curing. Then reassemble the light and check the beam pattern on a wall. If there is any V shaped ring flair to the beam around the hotspot its not centered. Remove the head and repeat before the epoxy cures until you get the desired results. You should be able to get it with no problem in 5 minutes. I move the oring from below the reflecter shield to the top for centering purposes to get good downward pressure on the LED star as I tighten the head to center it. You will find that as you tighten the head, it will move out of center and back into center. Once you have the beam you are happy with, let the light sit upright while it cures. You will find you will have more than 5 mins because a bit of thermal compound likely will have mixed in with the epoxy at the leading edge of the star, giving you a bit more time before it hardens completely. Just keep track of that dang ball bearing that keeps the driver from tearing off the traces each time you dissassemble, and put it back in each time you reassemble the light for testing.

After the epoxy has cured, remove the head again and epoxy the other side of the star to make sure everything is good to go. Reassemble and enjoy your newly relevant Gladius. :naughty:
Fletch31
 
Last edited:

fletch31

Newly Enlightened
Joined
Jun 16, 2006
Messages
87
:eek: Just waiting on an unmodded Insight Typhoon II (same as the Gladius) I won on Ebay that has a Seoul P4 to arrive on Monday so I can post some comparison beam pics. I've already modded my Gladius and my LEO buddy's with the XP-Gs and don't have anything on hand just yet to show the improvement. I'll get something up early next week :)
 

ICUDoc

Enlightened
Joined
Aug 20, 2004
Messages
907
Location
Sydney, Australia
. I love these dang lights. Best UI made IMHO.... Just keep track of that dang ball bearing that keeps the driver from tearing off the traces each time you dissassemble....
Fletch31
Two lines I agree with very much!!!
AND an easy mod is not a BAD mod- this brings the Gladius output up to par with all the modern offerings out there- I like it!
 

fletch31

Newly Enlightened
Joined
Jun 16, 2006
Messages
87
How do u open the Gladius Head? I never managed to open it.

I have modded 6 of these lights now, most with the Seoul P4 a year ago, (a combo of typhoons and gladius lights) and I have always been able to twist them off by hand with some effort. I have just been lucky I guess. I'm not particularly strong I dont think. I have read of others having problems removing them though, more particularly with the earlier models. There have been about 2 threads or less of threadlock compound on all the ones I have done. Give some strap locks I try. There is a plastic ribbon in the body tube that may be susceptible to heat but a heatgun on the head works well per previous posts I have read.
 
Last edited:

greenLED

Flashaholic
Joined
Mar 26, 2004
Messages
13,263
Location
La Tiquicia
Nice mod, Fletch. Thanks for sharing.

Luminous, I had to use a blowtorch to heat the head on my Gladius. I only used that 'cuz I don't have a heat gun. I also had to use a pair of strap wrenches.
 

Moonshadow

Enlightened
Joined
Jan 31, 2009
Messages
985
Location
Scotland
Well, I've had a happy afternoon chasing that wretched ball-bearing all over the place, but the XP-G is in place and my Gladius back together.

It was indeed very easy to get the head open with the two strap wrenches - as mentioned by someone else there appears to be only one or two thread worth of locking compound.

The old star came out easily enough - at first I couldn't shift it but a good twist with a pair of pliers cracked the bond and it came out leaving the old epoxy behind [desolder the star and remove the star and brass holder from the head before you do this]. I cleaned the old epoxy off with a wire brush in my Dremel and put the the new star in with some silver-based CPU heatsink compound.

I had the idea to hold the ball bearing in place with some PTFE tape which sort of worked but I still ended up chasing the damn thing all over the floor several times.

The big difficulty I've had is that I cannot get the LED centred. As mentioned above, when you tighten the head back down the reflector stays centred until the last twist or so and suddenly squidges off to one side.

So at the moment my beam isn't perfect, but nevertheless - holy flamethrowers ! When completely sorted this is going to be one hell of an upgrade.

Going to have a go at making a spacer tomorrow to keep the star centred, but even though the beam's not perfect yet I still can't wait until it gets dark to try it out !
 

Boltgun

Newly Enlightened
Joined
Oct 11, 2004
Messages
168
Location
Nova Scotia, Can
Gents, what is the approximate output on these XPG modded Gladiai? Anyone have a step by step pictoral tutorial?

Boltgun
 

gswitter

Flashlight Enthusiast
Joined
Apr 26, 2006
Messages
2,586
Location
California
There was a great write-up with lots of pics for doing a SSC P4 swap, but the last time I checked, the pictures were no longer available. :mecry:
 

Moonshadow

Enlightened
Joined
Jan 31, 2009
Messages
985
Location
Scotland
OK, here's some photos from my project:

gladius_01.jpg


If you value your sanity, work over a tray or other receptacle to catch any bits (like that ballbearing) that fall out as you dismantle the head. Remove the tailcap and batteries before you start. Do not replace these until after you have re-assembled everything and retightened the head, or you will push the driver board and tube with the ribbon cables out of the head.

gladius_02.jpg


I used a strapwrench to grip the head, and a second one (not shown) to hold the body. A good firm twist will break the threadlock.

gladius_03.jpg


Head open. Note the ballbearing. There is originally an o-ring in the gap indicated by the arrow. Remove this and repostion it between the lens and front of the reflector when you re-assemble. This helps the reflector to sit further back.

gladius_04.jpg


Reflector off. I used a pair of sidecutters and a sharp knife to remove the semi-circles (arrowed) to help the reflector sit lower. Note remains of PTFE tape that I earlier used to retain the ballbearing (with only partial success - grr !)

gladius_05.jpg


Desolder the leads to the star and you can remove the brass pill. To remove the old star grip the lugs with a pair of pliers and twist to crack the epoxy. Only do this after removing the brass pill from the head to avoid exerting any forces on the wires or circuit board. I removed the old epoxy with a Dremel and wire brush attachment. Photo shows the new XP-G star in place.

I'm off to re-assemble again and try to recentre the LED better this time. Will let you know how it goes...
 
Last edited:

Moonshadow

Enlightened
Joined
Jan 31, 2009
Messages
985
Location
Scotland
No probs. It's back together and workng again, although the LED is still about 1mm off-centre. For some reason it looks perfectly OK until the last half-turn or so retightening the head, and then the reflector moves off-centre a little bit just at the last moment :hairpull:

When I have time I'm going to go all 4Sevens on it and make up a little centering ring to glue on around the LED itself.

The good news is that even with the LED slightly offcentre it's now a real flamethrower. Compared to before the hotspot is a bit larger and it is clearly much brighter and indeed whiter than the previous slightly purplish hue that the Luxeon had. There is some nonuniformity and asymmetry courtesy of the offcentre LED, and a bit of colour separation with a bluer corona and slightly warmer hotspot, but no more so than the GDP in my RA. I'm thinking that this may also clean up a bit with better alignment.

Had a chance to try it out a bit last night and I would say that the hotspot is similar in size to my Extreme, which is still pretty tight in spite of the distortion. It certainly lit up the top of a large tree over 100 metres away no problem.

It's now the brightest light in my collection by some way. It is noticeably brighter than the Extreme on high, and significantly brighter than my RA Clicky 170Cn, so I'm thinking that it's probably in the 250 to 300 lumen range, something like that.

Once I get the LED fully centred it should be a total lightsabre :twothumbs
 

fletch31

Newly Enlightened
Joined
Jun 16, 2006
Messages
87
Hey Moonshadow, good to see someone else doing this mod. Looking at your mod pics, it looks like you still have the plastic risers on the bottom of the reflector intact. I was able to get a better focus by carefully removing them flush with the bottom of the reflector. It doesn't open the hole at all, just allows the reflector to sit closer to the star. The die height of the mounted XP-G is lower than the LuxIII so it needs to sit deeper in the reflector. If I am not seeing your picture correctly and you already did this then disregard :)

With the tabs cut off, my reflector is off center until I get it tightened down and then it shifts into center. It is kind of a pain as I had to make several attempts at it. With the O-ring moved to the top, it does compress some and helps the reflector to move some but I needed the reflector to be even with the top of the ring around it and also sit down tightly on the star to get a good deep seat for focus. Your beam will improve dramatically with a centered led/reflector as a lot of your light is unevenly being emited as spill. Some type of centering ring would really be a good idea if you are able to do that. I'd like to see what you come up with. Good thing about getting the reflector centered finally as you tighten is as long as you dont remove the head, your light will stay centered forever.

Use compressed air to remove the dust from the inside of your head and off the reflector. Dont use a cloth or you will ruin your reflective coating. Be careful of fingerprints on there as well for the same reason. You will never get them off without scratching or dulling the finish. Great thing is you can buy replacement reflectors at the Sandwich Shoppe easily. Its the standard IMS27 reflector.
 
Last edited:

Moonshadow

Enlightened
Joined
Jan 31, 2009
Messages
985
Location
Scotland
Hi fletch - yes, the half-moons are still there in the photo, but I did trim them off after taking it. I had about six goes at tightening down, with a slightly different result each time, but never quite got it centred.

Nice to know that I can get a replacement reflector if needed although it's OK at the moment. I was a bit paranoid about getting dirt on it with taking it apart so many times. I used a blower bulb as you suggest to clean it off but there are a couple of small marks on it that I can't shift. Sounds like my instinct to leave those well alone rather than trying to clean 'em off was right !
 

FLT MEDIC

Newly Enlightened
Joined
Dec 22, 2008
Messages
180
Location
Philippines
Thanks for sharing your mod info.

With the heat that the R5 produces, I opted to use an aluminum XPG R5 OP reflector taken from a DX XPG R5 drop in and grinded down so the bezel would fully close without a gap.

The mod is worth it, the R2 hotspot was too small and the huge R5 hotspot is what I need most of the time.

With a large hotspot, the strobe is a lot more irritating.

The lowest setting with the R5 is dimmer than the R2, I don't know why.

The R2 throws better but the small hotspot is too small compared to the original Gladius large hotspot needed for house clearing so I'd skip the R2 mod. I got the Spear clone for long throw use anyway.
 

ResidentWeevil

Newly Enlightened
Joined
May 31, 2006
Messages
23
Hello,
Anyone interested in modifying my battered Gladius with an R5? I am sure we can organize suitable remuneration!:candle:

Regards
Udhi
 

oef24

Newly Enlightened
Joined
Oct 1, 2009
Messages
9
I too need my Gladius modded as well. Please let me know if you are capable and interested in the job. Thanks in advance.

O
 
Last edited:

Moonshadow

Enlightened
Joined
Jan 31, 2009
Messages
985
Location
Scotland
Anyone tried an XM-L in one of these yet ?

I've half a mind to open mine up again and plop one in, just to see how well it works with the stock reflector.
 
Top