Voltcraft Li-Ion Battery Holder - Newbie Modding Guide

LuxLuthor

Flashaholic
Joined
Nov 5, 2005
Messages
10,654
Location
MS
This other thread where we are discussing finding a safe way to charge multiple Li-Ion batteries is getting pretty long. This topic is to give a NEWBIE's pictoral guide to modding the Voltcraft cradle in the hopes that we can get more of them from a group buy.

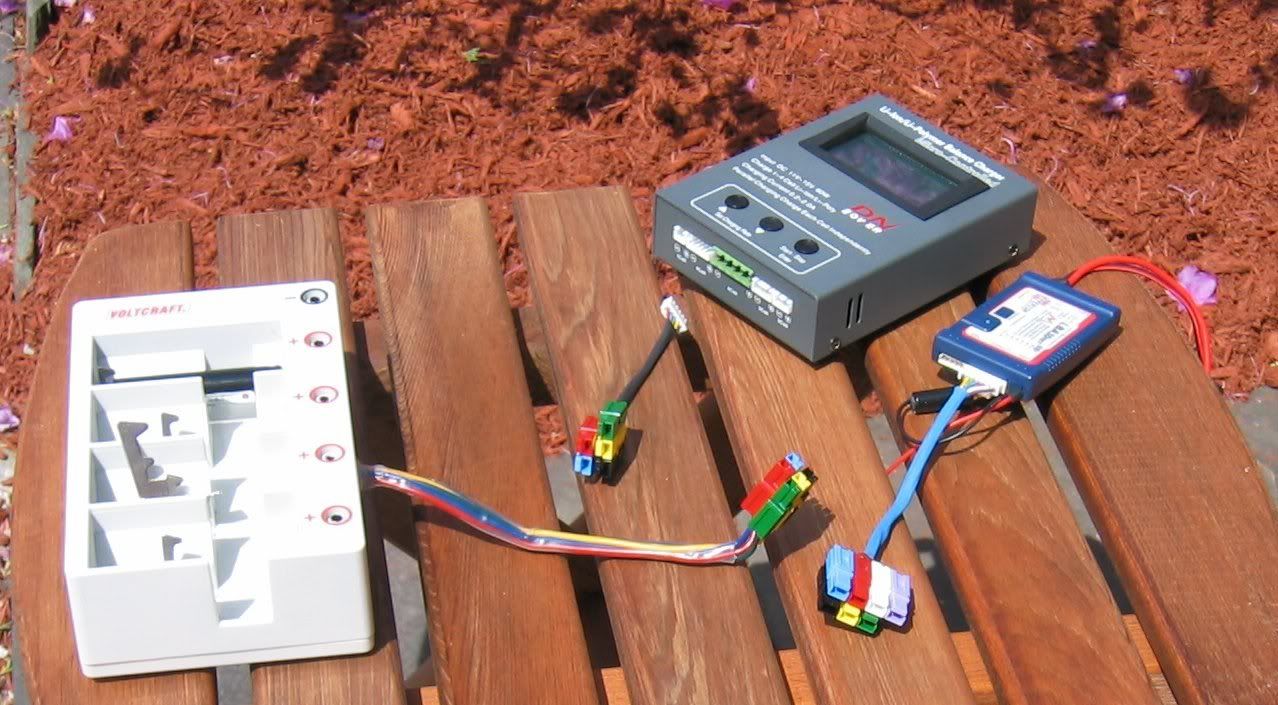
When combined with a safe 4-channel parallel charger like the DN/Tenergy which comes with an AC, 5A power supply in a package deal like this, it gives a great way to safely charge Li-Ion cells without the fire/explosion risk that is associated with universal $20 chargers that do not detect unbalanced high voltage cells that develop in a battery pack.

The only other safe alternative is the 1 or 2 cell Pila or Ultrafire chargers that "balance" cells by individually charging them all up to the same 4.2V...but these have very low 0.6A per cell charge rates....so it takes a long time.

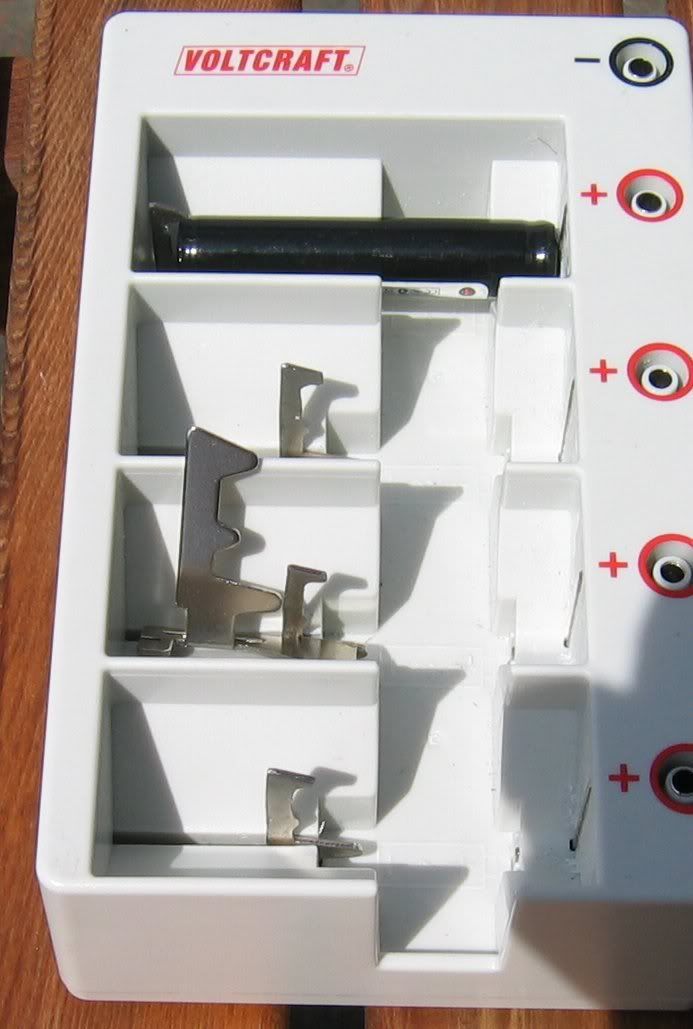
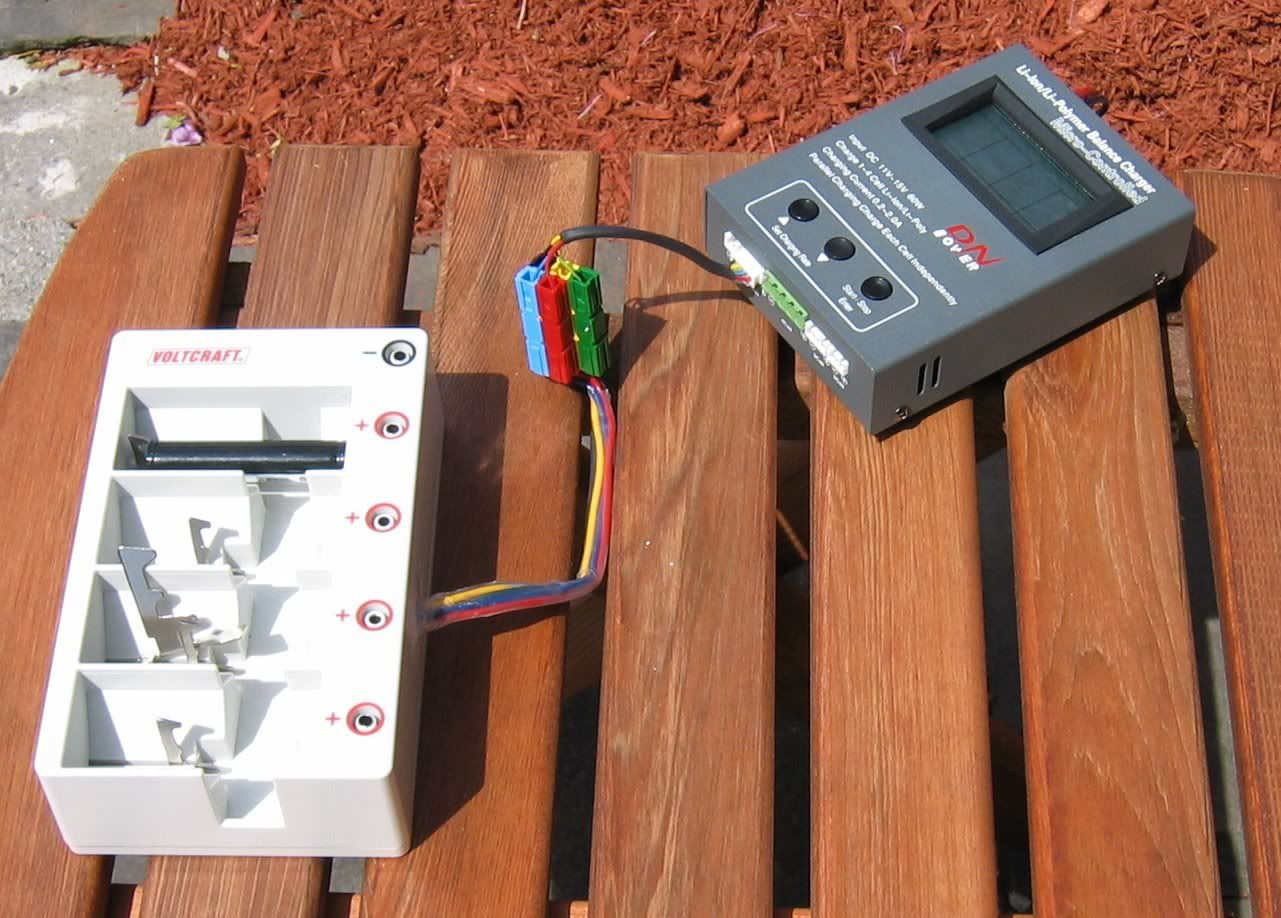
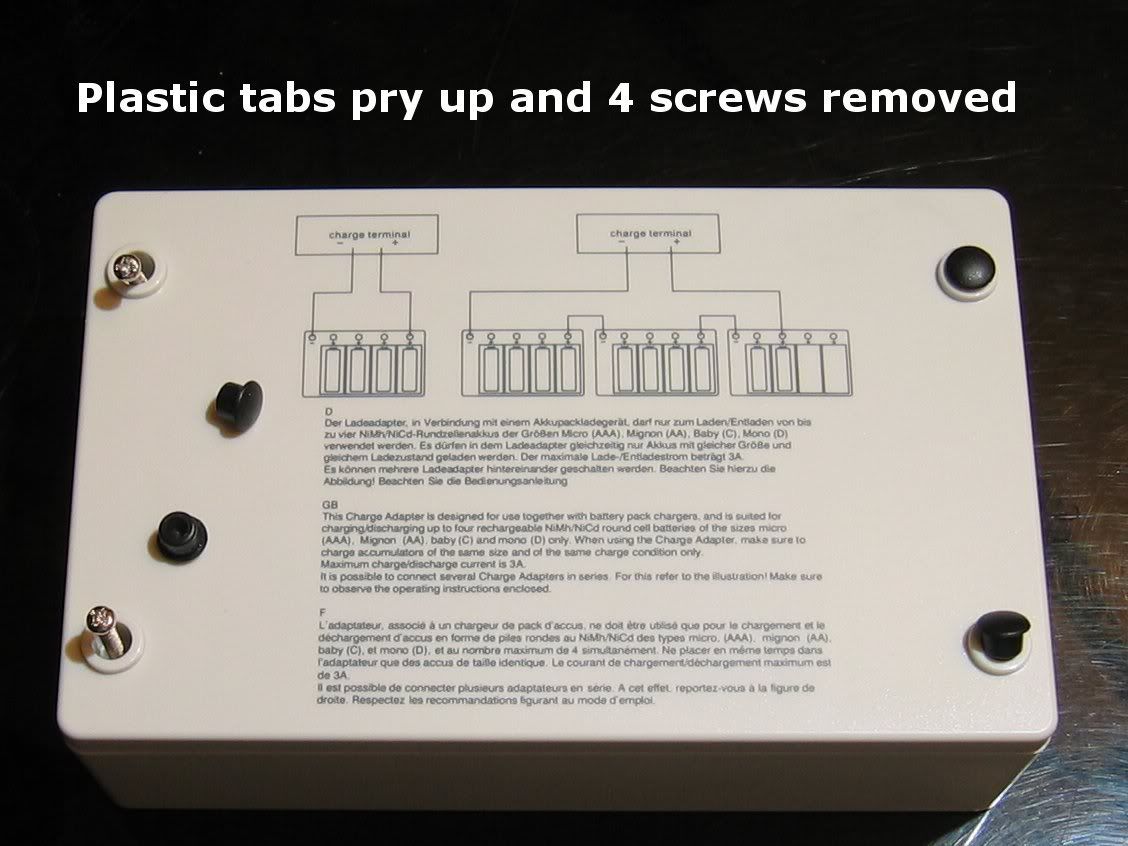
After an exhaustive search, we realized that noone has ever made a universal cradle to hold Li-Ion rechargeable cells, and while it would be relatively easy to manufacture (and at least one RC dealer is considering having them made), the only stop-gap measure is to use a simple DN/Tenergy 4 slot charger (or Cellpro 4S) with a German made Voltcraft universal 4 slot cradle for NiMH/NiCd cells.

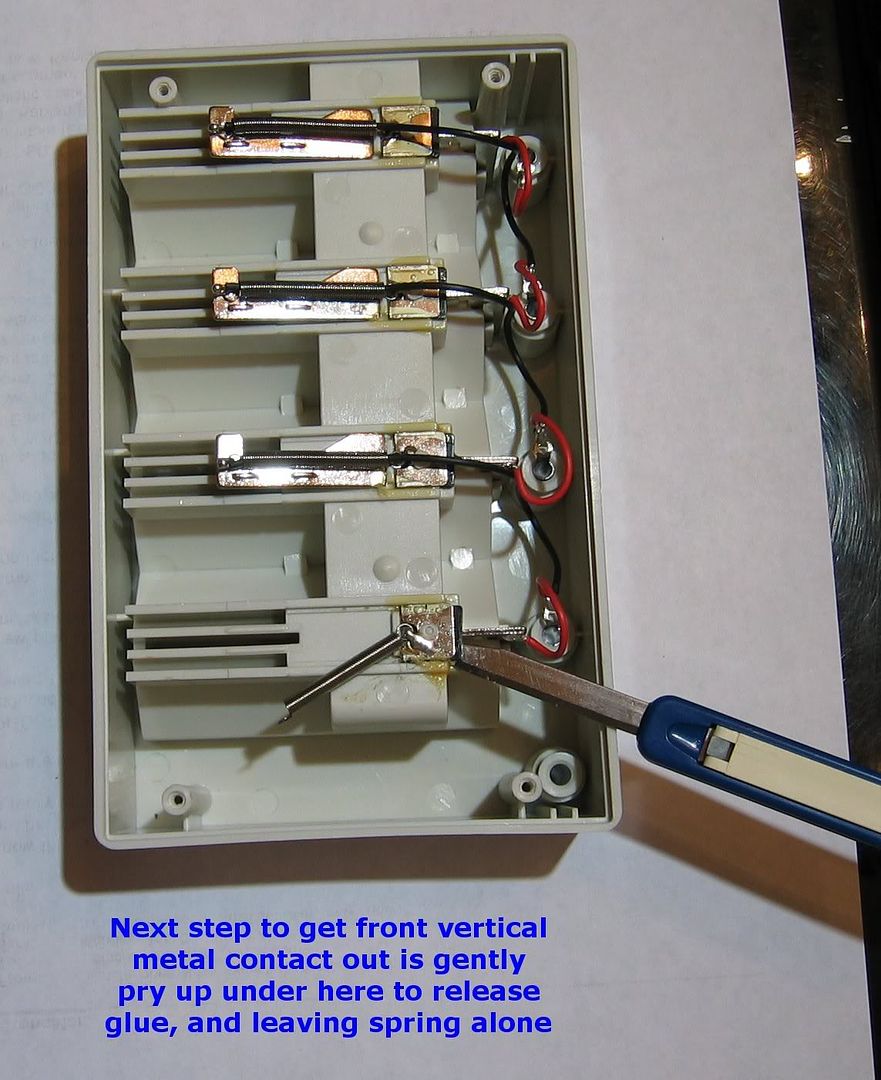
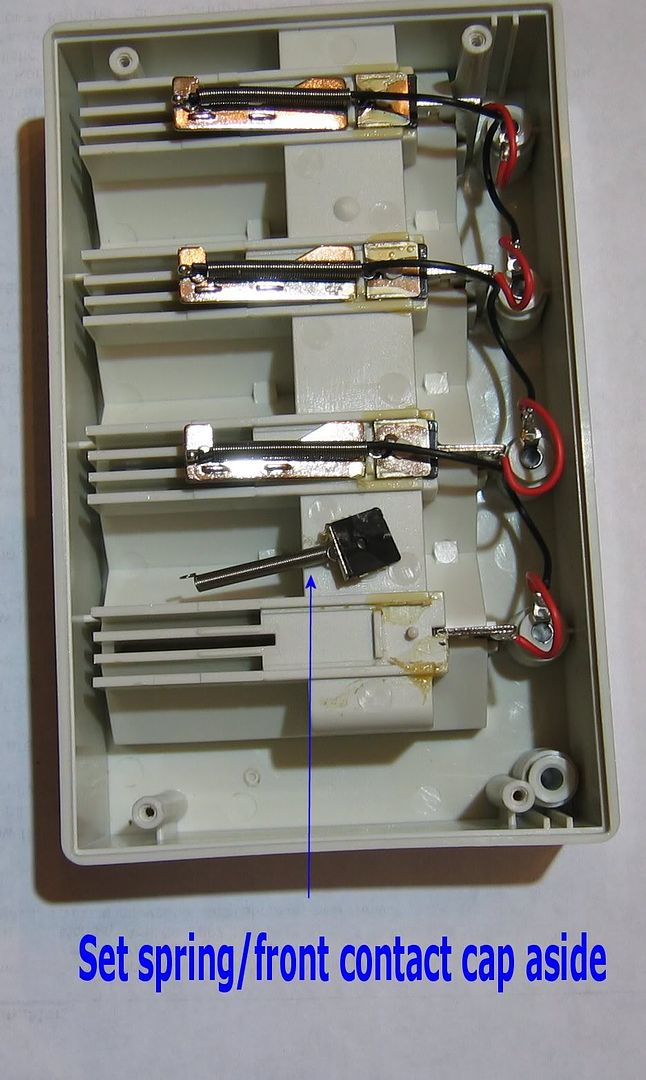
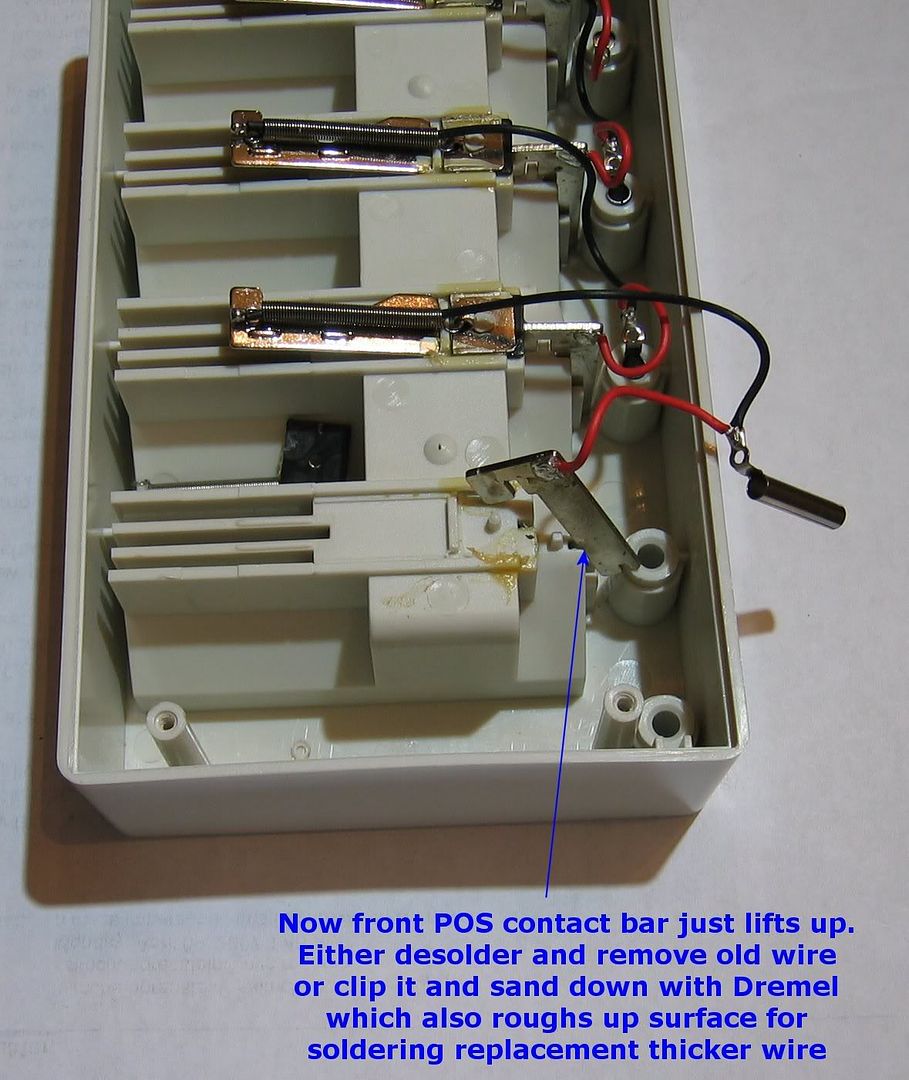
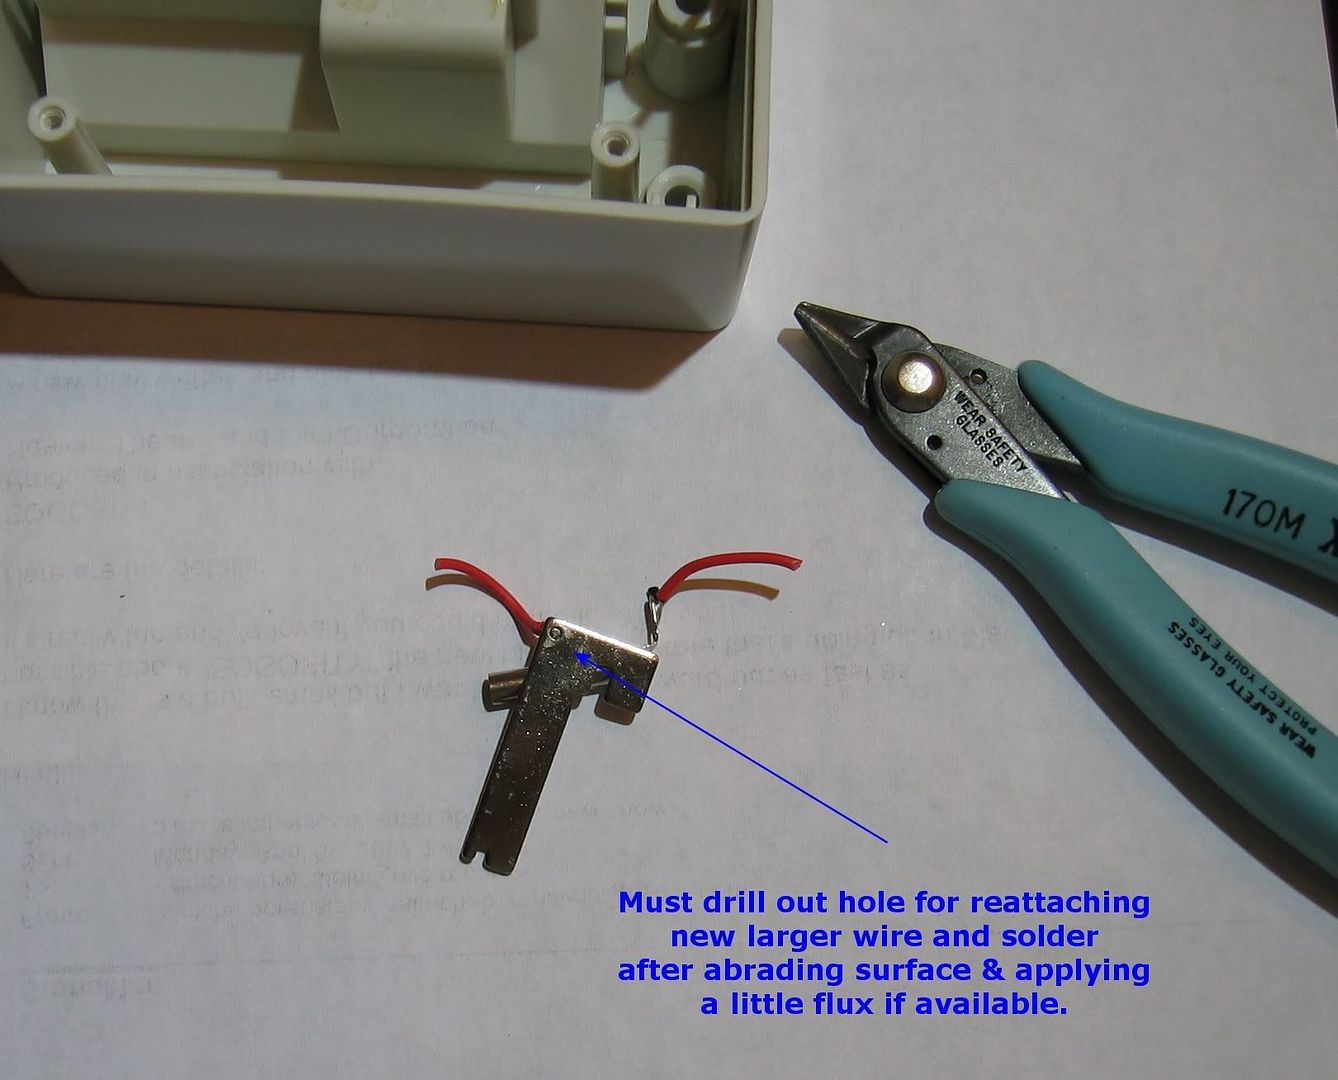
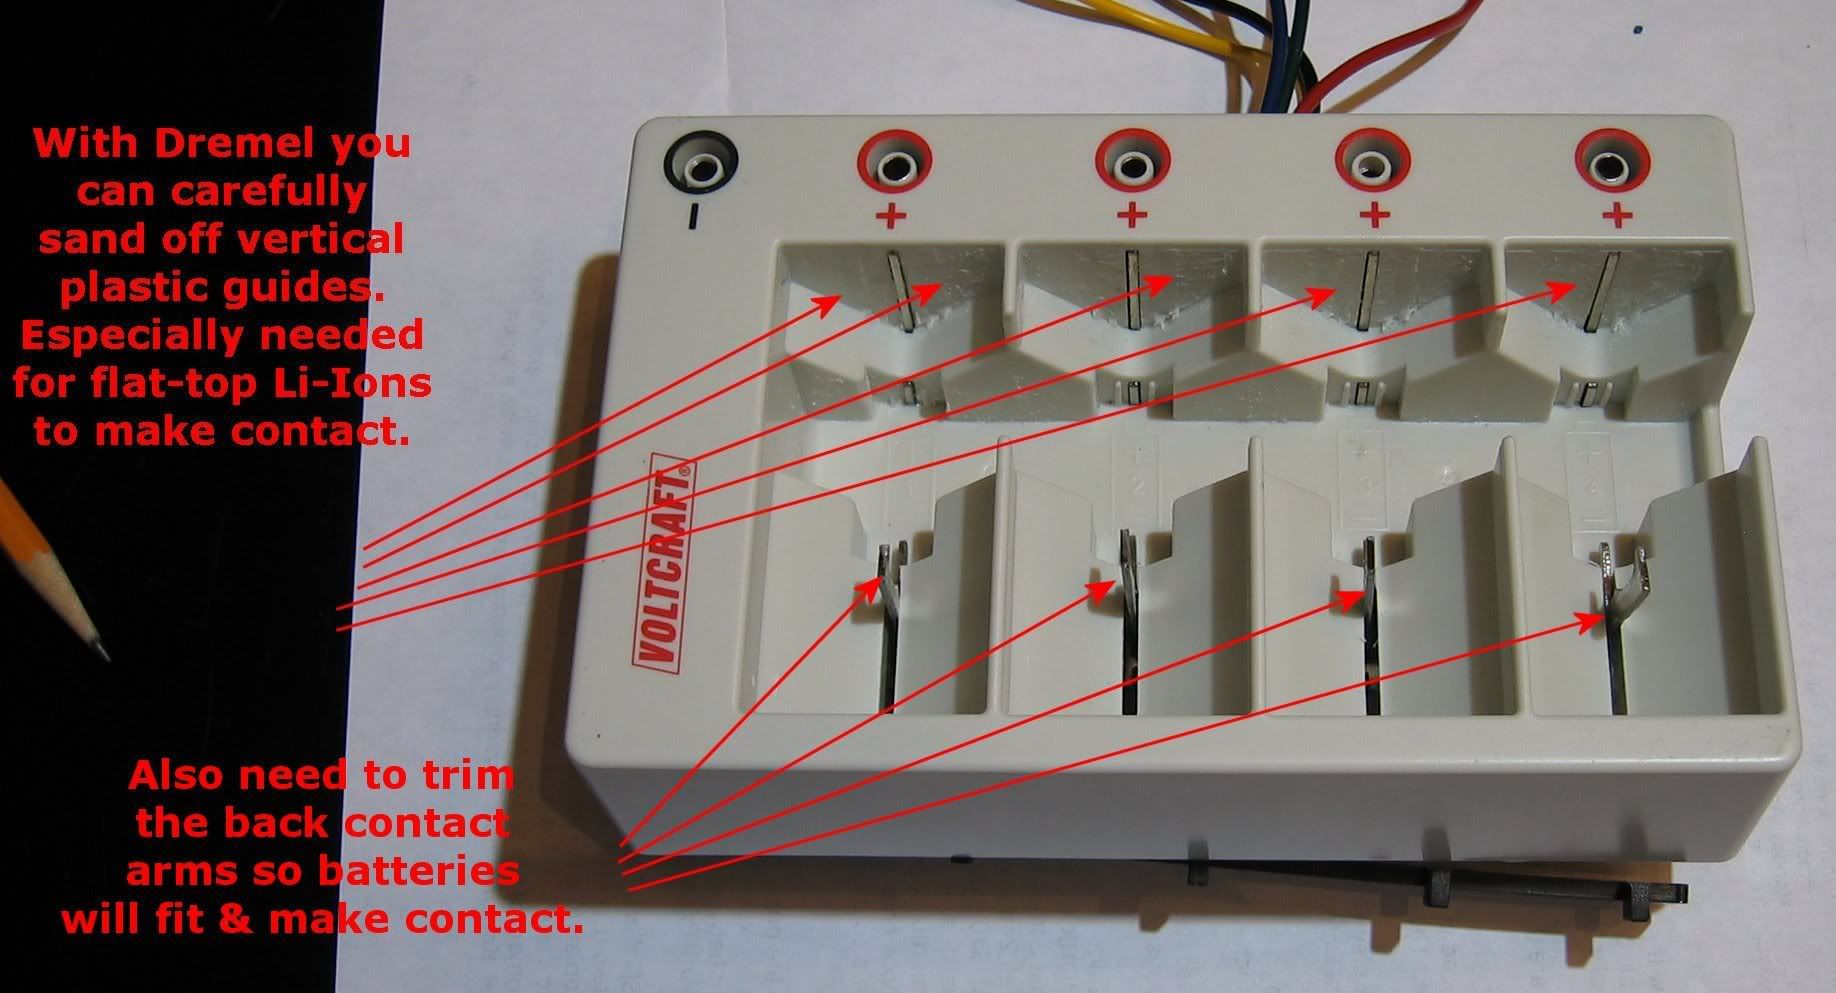
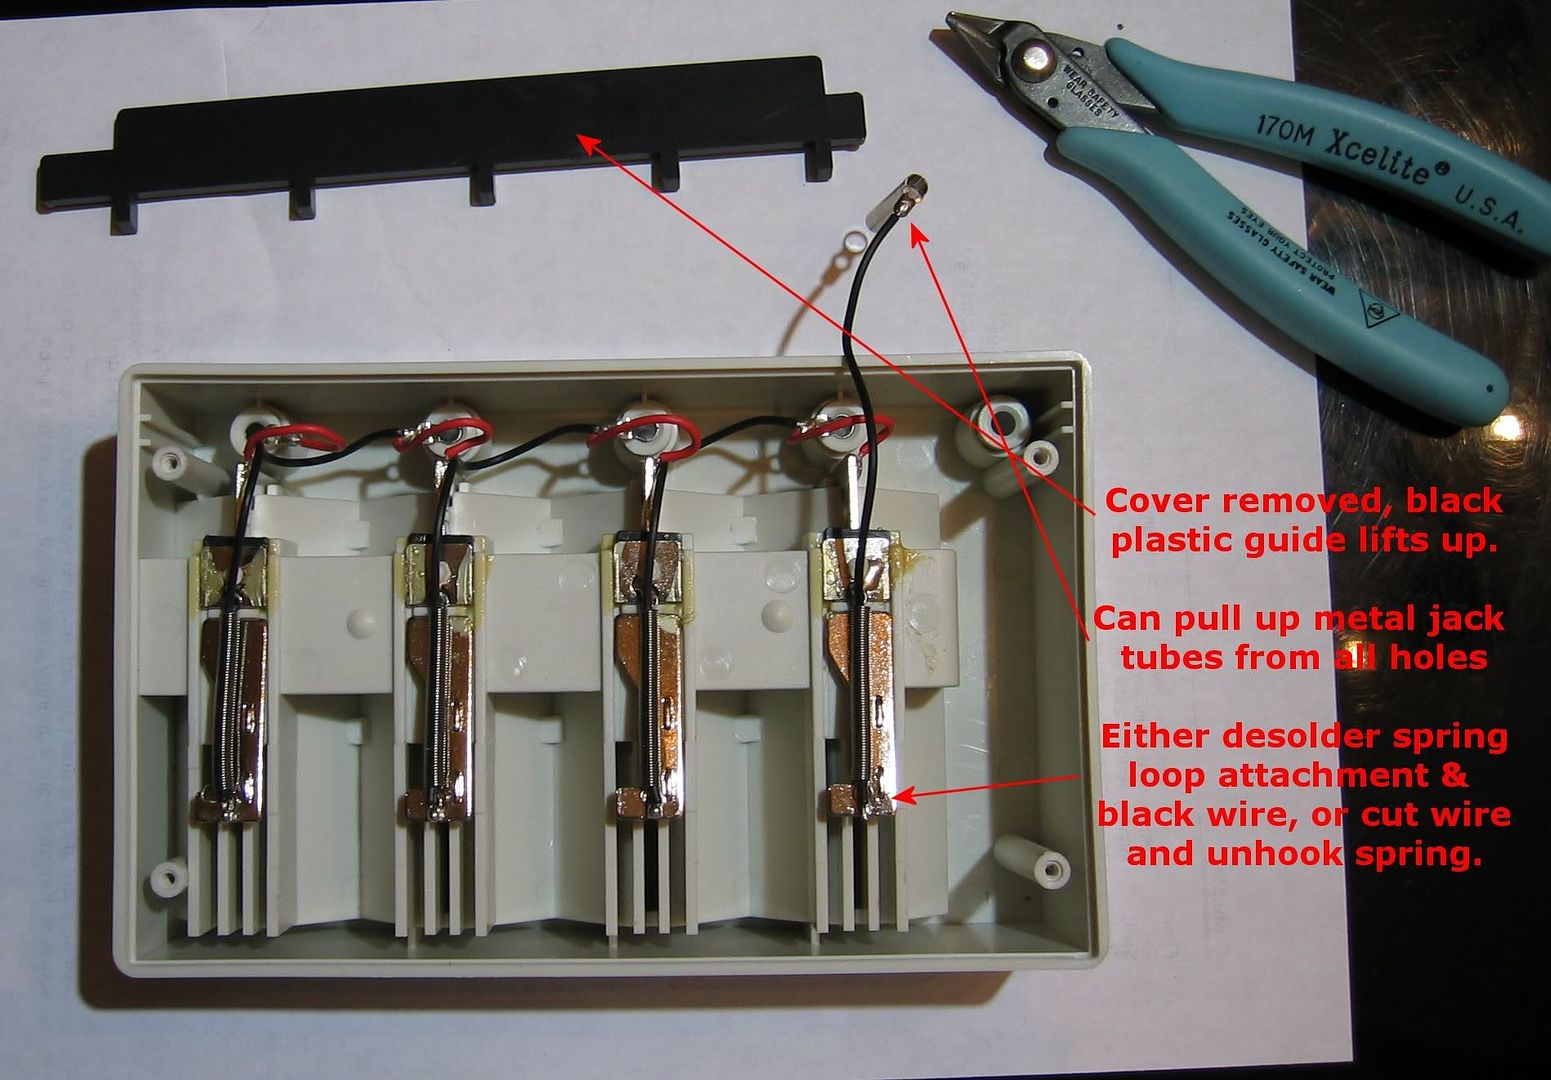
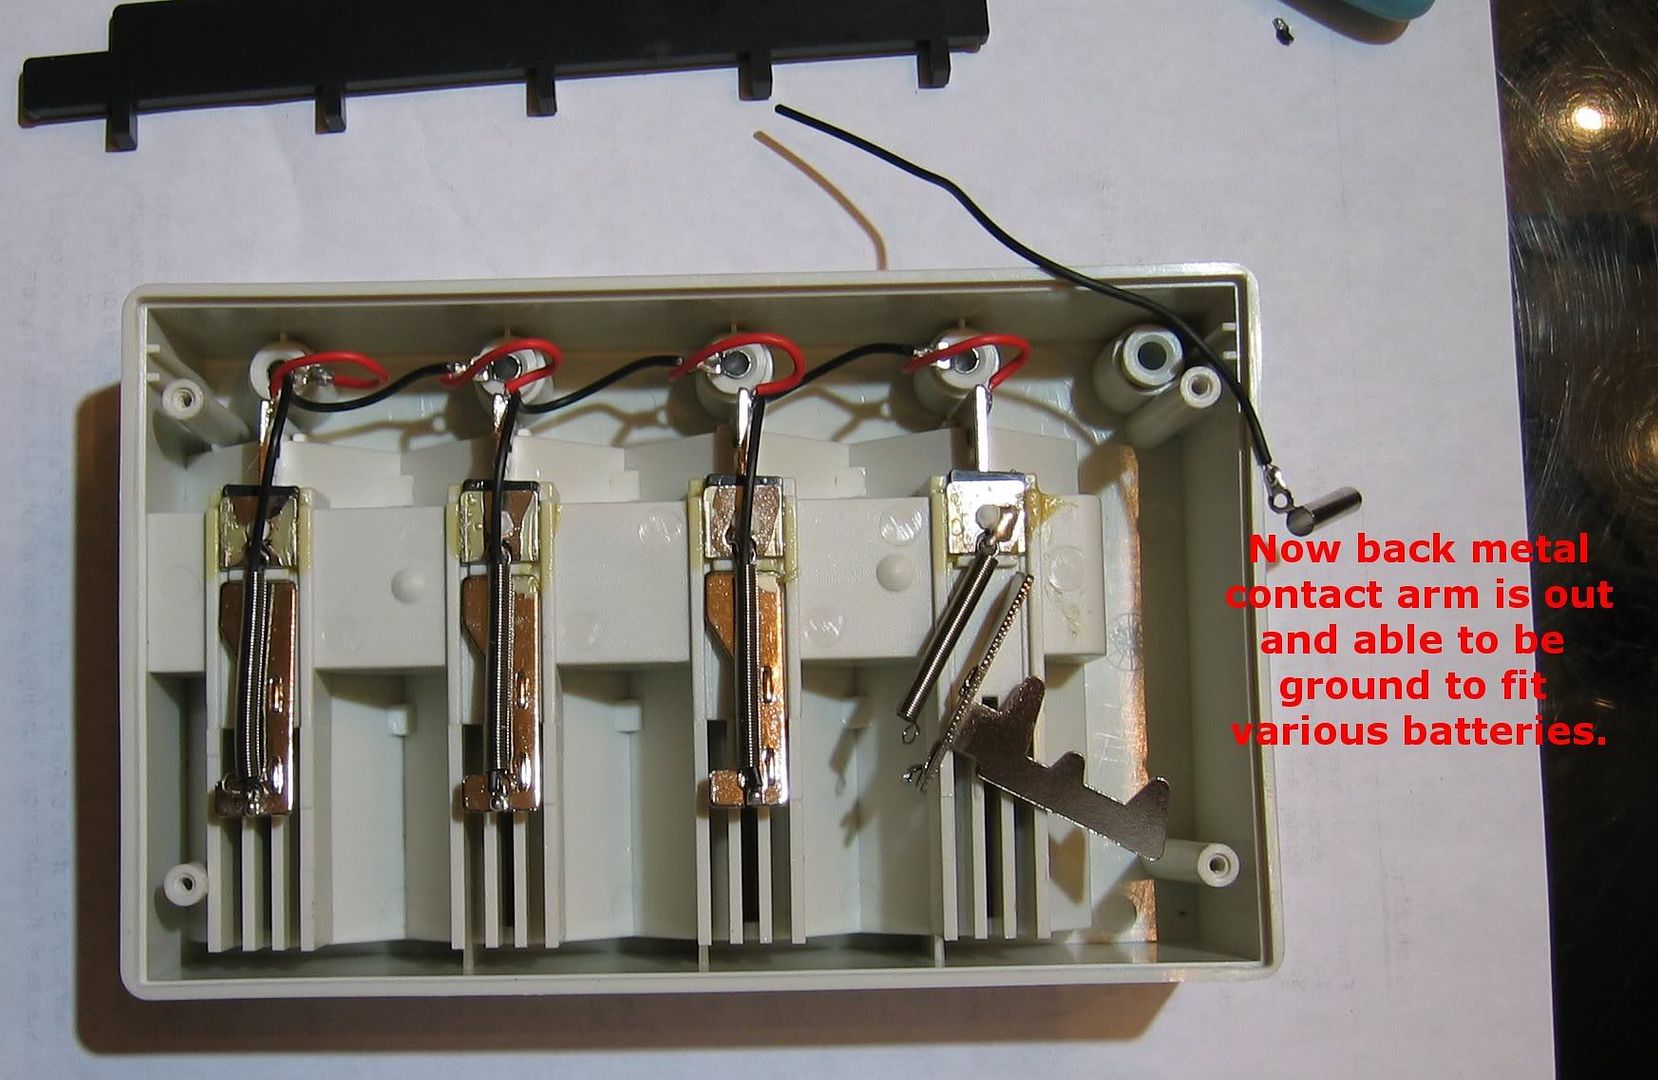
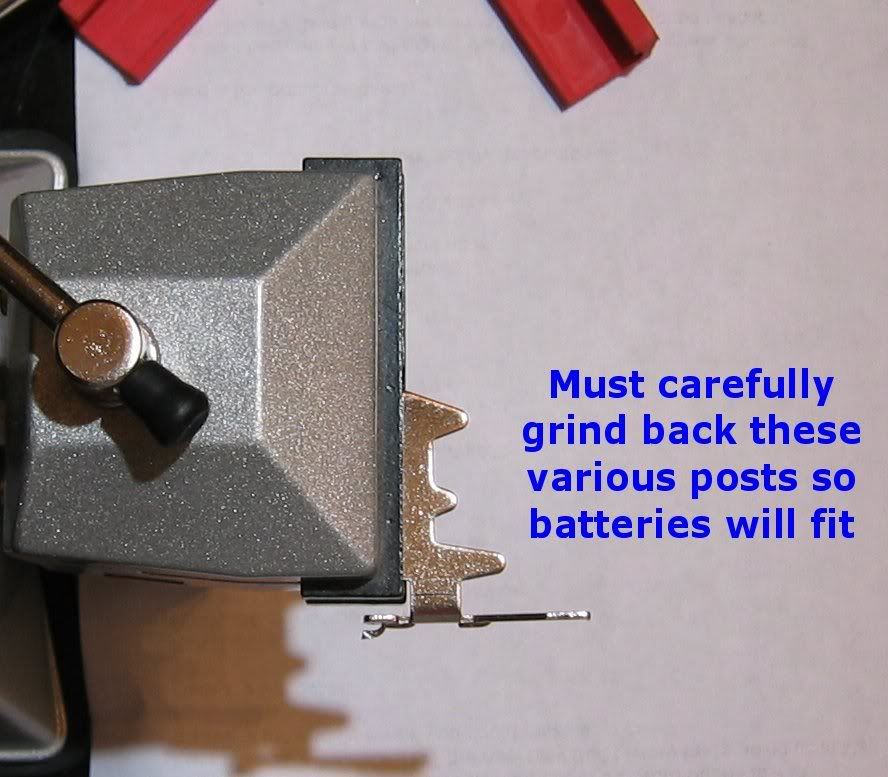
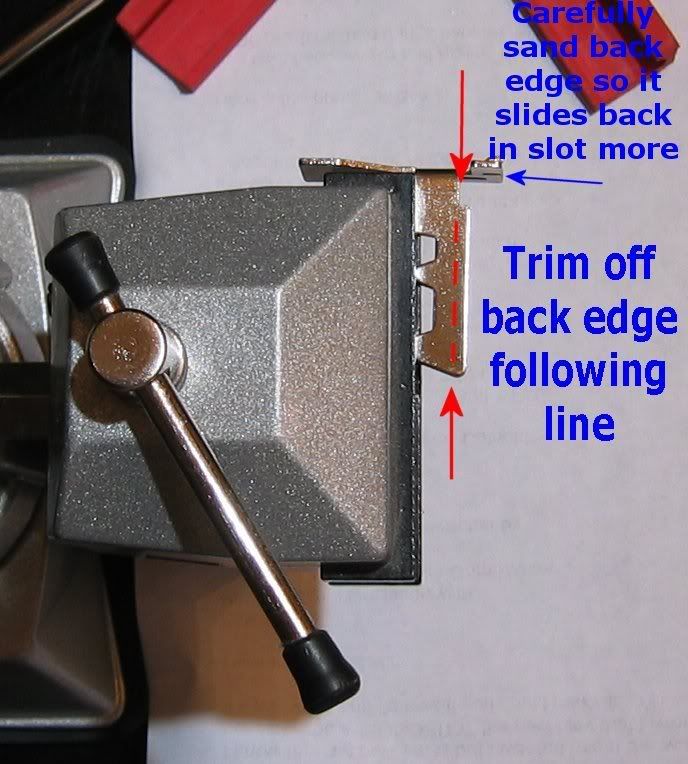
Because Li-Ions are different sizes, this Voltcraft cradle must be modded. It can be done VERY easily if only used with this DN/Tenergy maximum 2A per slot output charger, and labeled pictures in this post make it clear how to do that. After the last picture, just reattach the spring, solder back the black wire and reassemble.


-------------------------------------------------------------------

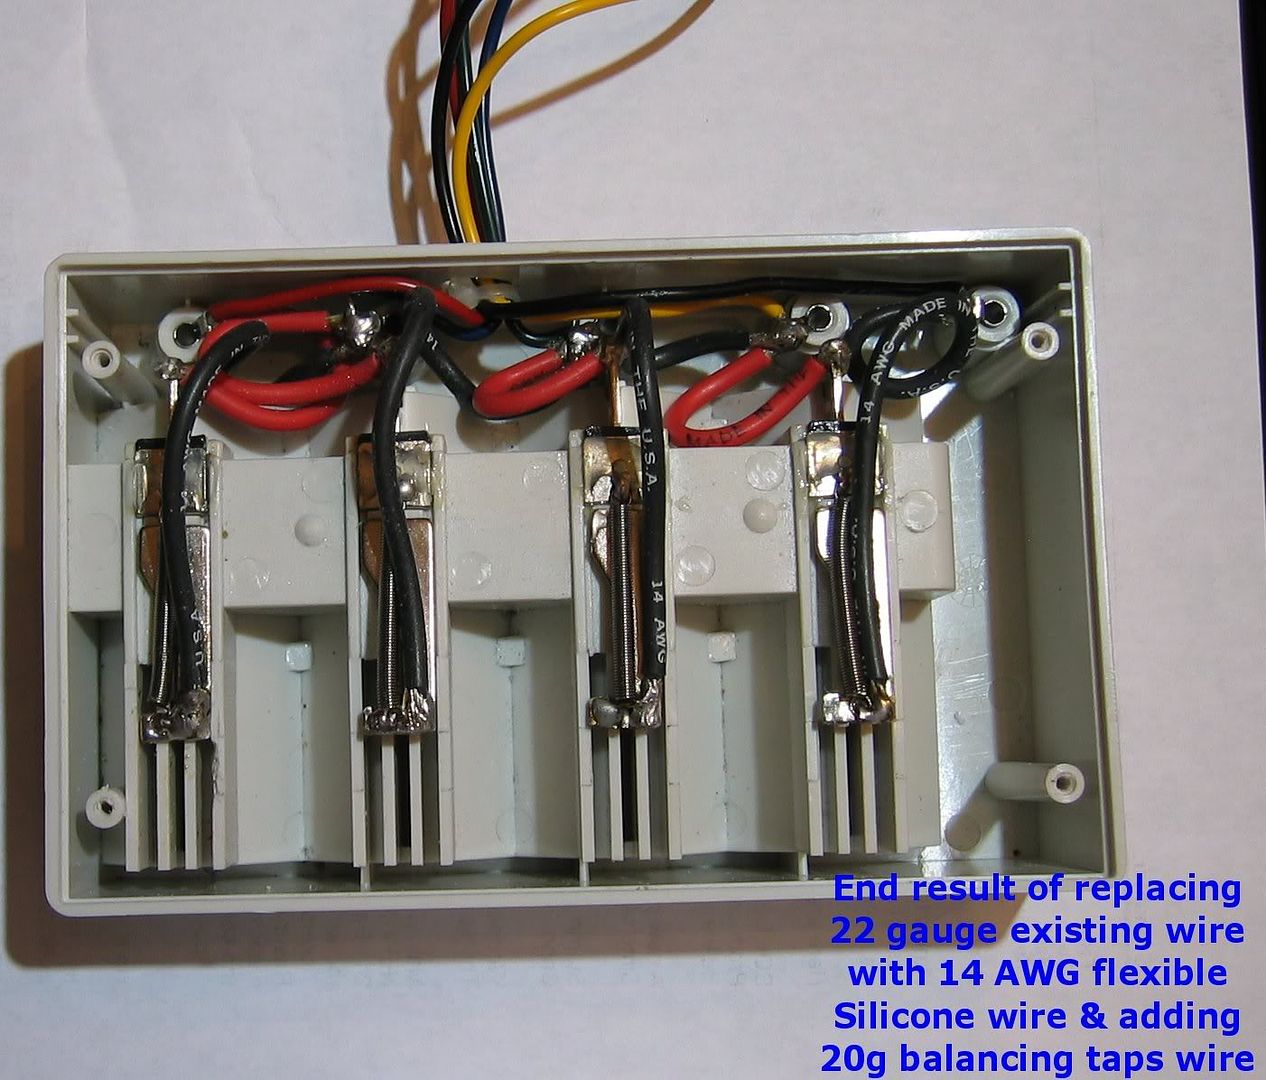
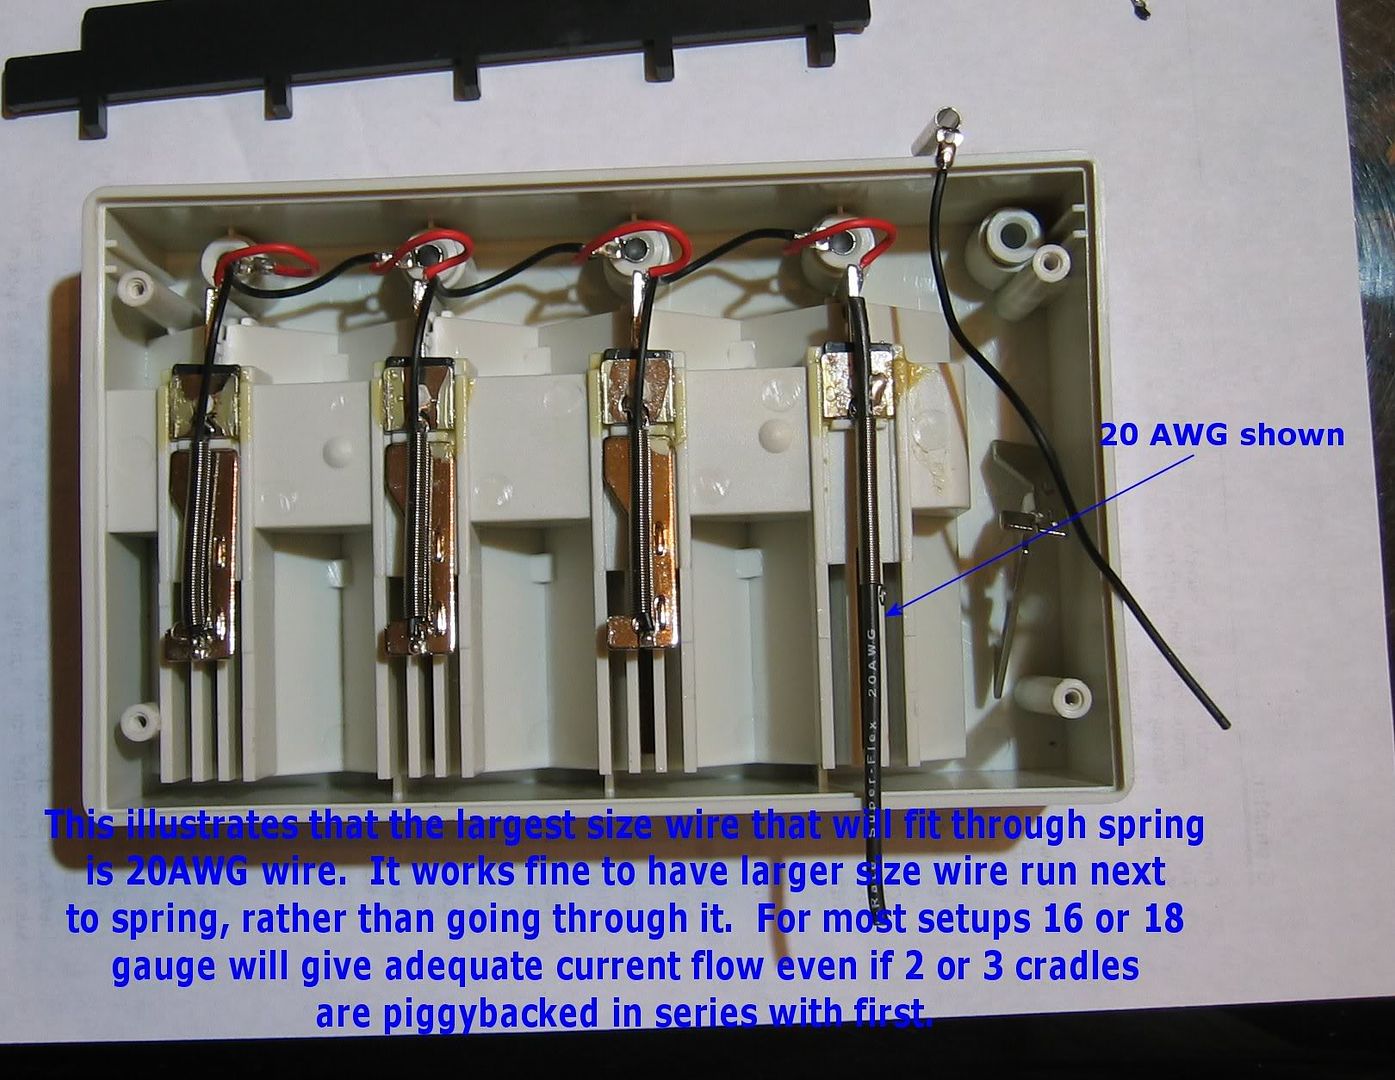
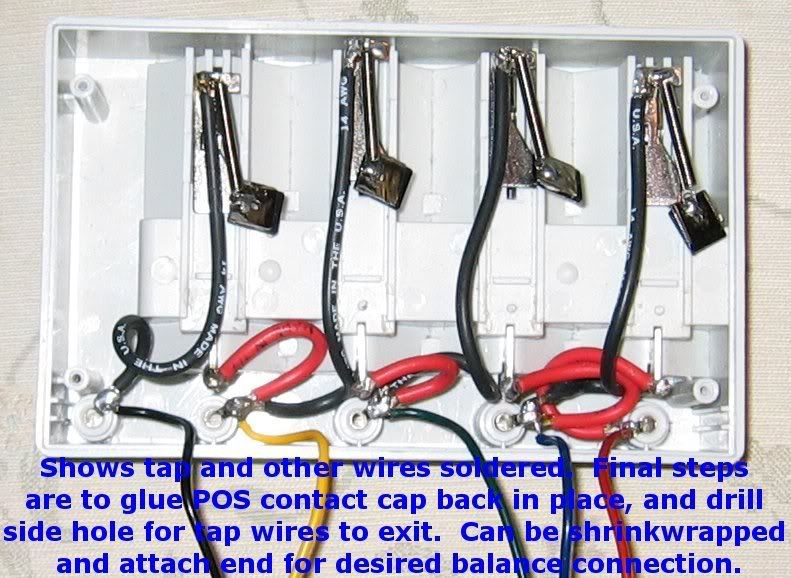
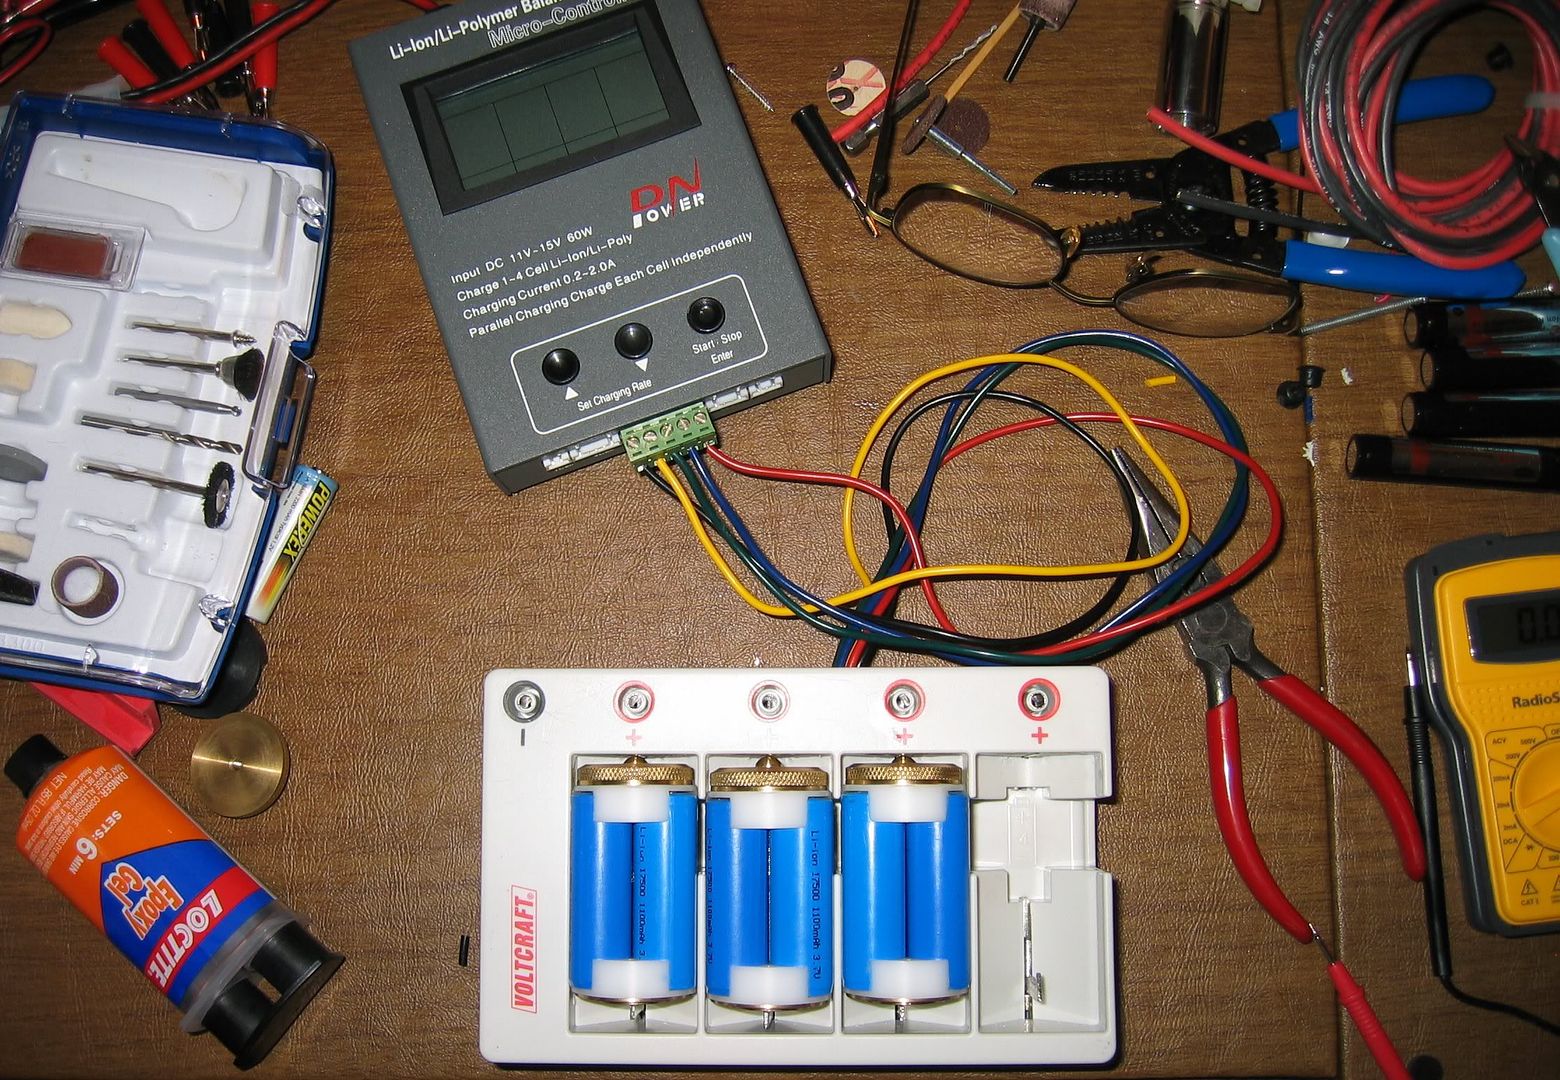
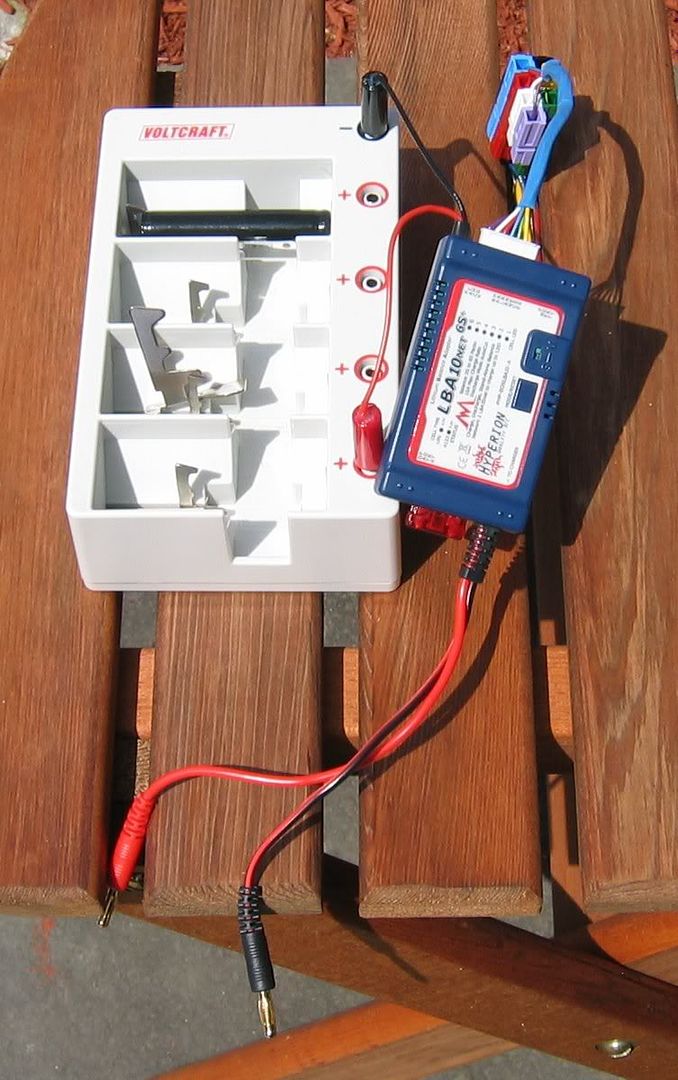
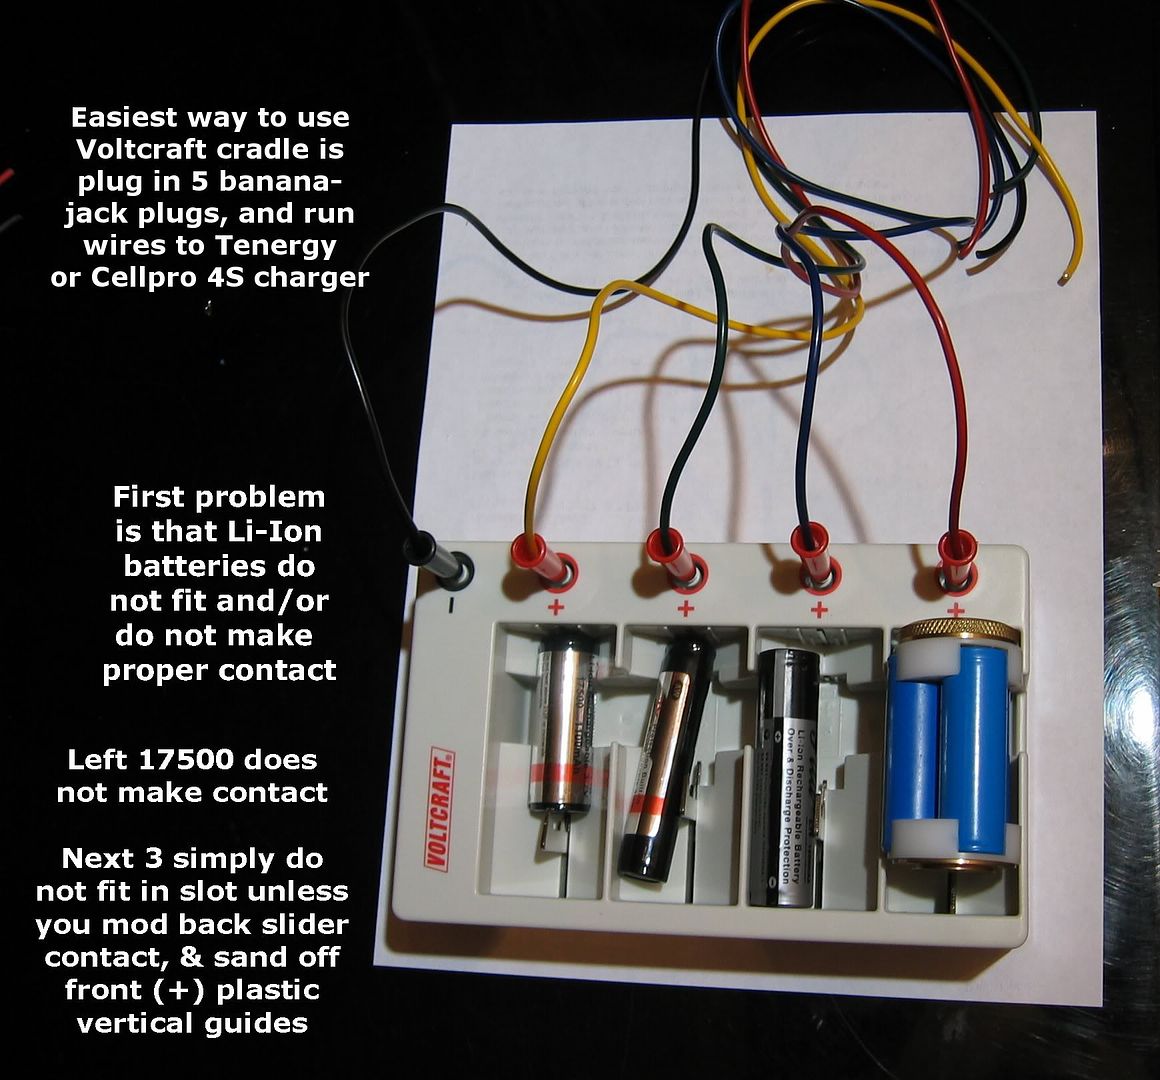
The next post assumes you wish to upgrade the 22gauge existing wiring for higher Amp charging, and to also use separate balancing taps for a more robust charging method. This chart shows the limitation of various wire gauges as it relates to charging Amps applied for a given voltage. With the output limit of 2A per cell (or 6A for all 4 cell slots combined) from the DN/Tenergy charger, the 22gauge wiring is still safe. In this lower current Tenergy scenario, you actually charge through the "balancing tap" connections to each cell, via 5 banana jacks as shown below.

lipopack.jpg


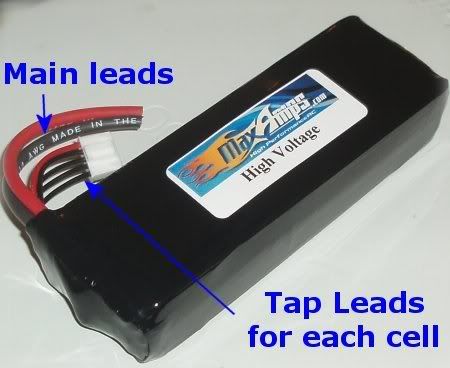
The advanced chargers normally deliver their higher power current to the single POS/NEG battery pack terminals ONLY, and do optional per cell balancing with the low current smaller "Tap Lead" wires.

With more advanced chargers such as the Schultze, Triton2, or Hyperion 1210i, etc. you can charge at higher rates, and daisy chain the 4 slot cradles to allow 4, 8, or 12 safe Li-Ion cell charging in series with taps to balance the voltages. These more advanced chargers require larger wire to safely transfer higher Amp current flow, and also need larger 12Volt power supplies than the Tenergy setup.
 

LuxLuthor

Flashaholic
Joined
Nov 5, 2005
Messages
10,654
Location
MS
In order to upgrade the wiring, these steps must be taken. I found 14AWG perhaps a bit thicker than necessary, but I would use at least 16AWG if you are going to do this step.


Last edited:

petrev

Flashlight Enthusiast
Joined
Jun 12, 2005
Messages
1,535
Location
SW England
Hi Lux

Brilliant pics of your major overhaul :goodjob:

I tried to fit 20AWG and it fits physically, but mine wasn't the Super-Flex kind, so movement was a bit restricted - must try and find some nice flexy-silicone wire over here.

I have done some more mods to my Voltcraft in order to fit LIR123A type cells - as we discussed, simply Dremeling a bigger lower receptacle would work but leave holes ! ! ! (might be preferable to/quicker than this solution ?) Anyway, I thought I'd give this other method a go anyway.

Take 1 AW brass half 123A size spacer (as supplied by AW for fitting 17500 cells in a DSD charger) and heat (a lot) using a heat-gun(electric paint stripper) - use pliers or a Leatherman type device to hold it in the heat.


Then keep pressing (and reheating) into cradle's lowest space - head and tail ends. I pressed straight down at the head end, but used an initial 45degree press for the tail end and then downwards to finish. This method helps to avoid forming holes at certain thin points but is not foolproof - I had to repair a couple of holes by melting surplus plastic back in.

This leaves a space about 123A size but needs lots of Dremel work to tidy up the melted plastic that forms on the margins and enlarge to full size for a cozy fit.


I cut a groove in the back wall of my cradle so that you don't have to take down the back of the slider-contact - but that's a personal choice as either method works the same.

I have soldered all the Dremeled faces of the slider to prevent possible rusting.

Had to add an extra bit of height to the bottom contact so that it reaches the +Pip of the LIR123s - used some wire and solder. X marks the spot . . .


Sorry there are no pics of the melting and Dremeling stages but I misplaced my CF-Card and I have had to borrow a friends for these shots . . .

Cheers Pete
 
Last edited:

LuxLuthor

Flashaholic
Joined
Nov 5, 2005
Messages
10,654
Location
MS
LOL! What all this tells me is how much we really need a professional manufacturing of a universal Li-Ion charging cradle!!!
 

LiteFan

Enlightened
Joined
Jul 2, 2006
Messages
232
LuxLuthor said:
LOL! What all this tells me is how much we really need a professional manufacturing of a universal Li-Ion charging cradle!!!

agreed
 

Nebula

Enlightened
Joined
Sep 9, 2006
Messages
993
Location
Northern Virginia
Lux and Pete - Very nice work indeed. I like the pictorial. Now if I can just manage to find a spare Voltcraft.

Again, thank you both for your contributions to this project.

Kirk
 

Daekar

Enlightened
Joined
Mar 23, 2007
Messages
837
Location
Virginia, USA
I think the question that every newbie has that I know is burning in MY mind is:
"Once I do all this (intimidating) modding, what size batteries will I be able to charge?"
I know that personally, I would want to know yes or no for the protected ones that AW sells on the boards:

- Protected "C" <----- this in particular!
- Protected 18650 ( 2200mAH )
- Protected 18500 ( 1500mAH )
- Protected 17670 ( 1600mAH )
- Protected 17500 ( 1100mAH )
- Protected 14670 ( 1100mAH )
- Protected 14500 ( 750 mAH )
- Protected R123A ( 750 mAH )
- Protected RCR2 ( 350mAH ) ------- $ 7.50 each

For You Newbies Reading this Thread, here's some more info shamelessly ripped from someone wiser than I:
Size Reference :

18650 = 168A / 600P
17670 = 168S / 600S
18500 = 150A / 300P
17500 = 150S / 300S
14500 = AA
16340 = CR123

*** The 5 digit number is deciphered like : 18650 = 18mm ( diameter ) X 65mm ( length ) where the last ' 0 ' stands for cylindrical cell

I think many people's decision on whether or not to participate in a group buy will hinge on how versatile the end produce will be. I know I'm in for at least 2 or 3 cradles (I'll be daisy-chaining!) if they'll do "C", 18650, 18500, 17650, 17500, and 14500 (with or without spacers required).

Well, oh gurus of battery wisdom... I'm waiting for you to justify buying... and decisions on whether or not to purchase a 500+ lumen milkspit mod are riding on your answers... heh heh :popcorn:

EDIT: Also... I have a feeling there are those who would rather just buy one. If there are a few enterprising souls on here who would like to increase the flashaholism rate throughout the world, this might be a good way to do it...
 
Last edited:

petrev

Flashlight Enthusiast
Joined
Jun 12, 2005
Messages
1,535
Location
SW England
Daekar said:
I think the question that every newbie has that I know is burning in MY mind is:
"Once I do all this (intimidating) modding, what size batteries will I be able to charge?"
I know that personally, I would want to know yes or no for the protected ones that AW sells on the boards:

Charging <= 3A - No Rewiring
Charging > 3A Re-Wire with bigger internal cable.

- Protected "C" 26540 (3300mAh). . . . . . No MOD Required
- Protected 18650 ( 2200mAH ) . . . . . . .Moving Spring Post MOD
- Protected 18500 ( 1500mAH ). . . . . . . .No MOD Required
- Protected 17670 ( 1600mAH ) . . . . . . .Moving Spring Post MOD
- Protected 17500 ( 1100mAH ). . . . . . . .No MOD Required
- Protected 14670 ( 1100mAH ) . . . . . . .Moving Spring Post MOD
- Protected 14500 ( 750 mAH ). . . . . . . .No MOD Required
- Protected R123A ( 750 mAH ) . . . . . . .Brass Spacer or Major Tray MOD
17350?
- Protected RCR2 ( 350mAH ) . . . . . . . . . BIG - Brass Spacer or Major Tray MOD
16270?

For small cells like RCR123A and RCR2 it should relatively easy to make a holder to charge 3-in-parallel in a bay for upto 12 at a time (a bit like the FM 3p17500 holders that Lux has)


For You Newbies Reading this Thread, here's some more info shamelessly ripped from someone wiser than I:
Size Reference :

18650 = 168A / 600P
17670 = 168S / 600S
18500 = 150A / 300P
17500 = 150S / 300S
14500 = AA
16340 = CR123

*** The 5 digit number is deciphered like : 18650 = 18mm ( diameter ) X 65mm ( length ) where the last ' 0 ' stands for cylindrical cell


I think many people's decision on whether or not to participate in a group buy will hinge on how versatile the end produce will be. I know I'm in for at least 2 or 3 cradles (I'll be daisy-chaining!) if they'll do "C", 18650, 18500, 17650, 17500, and 14500 (with or without spacers required).

Well, oh gurus of battery wisdom... I'm waiting for you to justify buying... and decisions on whether or not to purchase a 500+ lumen milkspit mod are riding on your answers... heh heh :popcorn:

EDIT: Also... I have a feeling there are those who would rather just buy one. If there are a few enterprising souls on here who would like to increase the flashaholism rate throughout the world, this might be a good way to do it...
 

LuxLuthor

Flashaholic
Joined
Nov 5, 2005
Messages
10,654
Location
MS
The simple answer to your question....it will allow all known Li-Ion cells to fit and be balance charged safely.

Certainly all the ones you mentioned, and that AW sells.

The actual plastic tray is 73mm long, and the back contact arm ("Moving Spring Post") is 3 mm in my narrowest part, but can be shortened a bit more.

The 2nd set of two digits in AW's battery types are the length in mm's, and the "67" models (i.e.
17670 ) fit mine just fine. I think you could go as long as 70-72mm long batteries if you recessed the contact arm by carving a bit of the plastic on back end so it slides back more.
 

petrev

Flashlight Enthusiast
Joined
Jun 12, 2005
Messages
1,535
Location
SW England
Ah - You mean


The Self Adjusting Reciprocating Back Spring Loaded Moving Negative Contact Arm Slider Post Assembly

Thing !

:popcorn:
 
Last edited:

65535

Flashlight Enthusiast
Joined
Dec 13, 2006
Messages
3,320
Location
*Out There* (Irvine, CA)
IMHO the tenergy is the best charger to mate with the voltcraft charger. Either that or a CC/CV powersupply which would require one to modify the battery carrier to be wired in parallel, which also IMHO is the best way.
 

petrev

Flashlight Enthusiast
Joined
Jun 12, 2005
Messages
1,535
Location
SW England
New Master Spring-Post


This version can be copied using a key cutting machine (? at any hardware store ?) as only the front face is re-shaped.

Pete
 

LuxLuthor

Flashaholic
Joined
Nov 5, 2005
Messages
10,654
Location
MS
I had to make mine even slimmer that you are showing to get the 67mm batteries to fit (like the 14670 cells) as shown in this close up.

Click Pix


Also, here are the images of the final connectors I put on the 5 wire harness coming out the side. I got these color coded Sermos connectors (look towards bottom of page here) to go with the wire colors I used so there is no question which battery slot I am using. These Sermos have side slot & groove on 4 sides so you can join them into a configuration like I did here.

The extra two connectors not used in these images are for adding a second cradle in series, and bringing over those other two tap wire connectors since my Hyperion 6S balancer lets me add two more...or I can buy a 2nd Hyperion and network them to charge 12S in series, but I don't think I'm really gonna need that potential, so am settling on 2 cradles and 6S.

These adaptors then let me build cable going to Hyperion balancer, or to the Tenergy/DN charger by swapping the cable I made.


Oh, Petrev, instead of trying to melt out the bottom to get those other cells to fit, I just put this foam in the slot to raise the batteries to use the other contacts. I would probably use some of the DSD blank spacer slugs if I had any 123R's to charge.

 
Last edited:

petrev

Flashlight Enthusiast
Joined
Jun 12, 2005
Messages
1,535
Location
SW England
Hi Lux

Loving the new wiring arrangement - Great solution for 6S-Balancer system.

Agreed - way too much work melting stuff just for LIR123s - so use a DSD type Brass Spacer as stated before. All my other cells fit without a foam piece though !

And my New Master Spring-Post

. . .

Fits AW-17670 protected cells (67.54mm) top cell
and AW-18650 protected cells (66.40mm) lower cell

Might just look wider than it is !! !!!

Only the edge marked in Red is altered so that it can be replicated using a key-cutting machine.


If these dimensions fail to fit any particular cell owned then file down as appropriate.

Cheers Pete
 
Last edited:

LuxLuthor

Flashaholic
Joined
Nov 5, 2005
Messages
10,654
Location
MS
I also realize now that I really don't need to replace the inside wiring with thicker than 18AWG because that Hyperion 6S balancer has 20AWG for output POS/NEG leads to the battery pack/cradle, and a stated charging limit of 10A, which I'm never going to be going beyond its capability.

Good to see that information on the Back Spring Terminal Post. They grind down very easily with the Dremel cutting disc, so that works too.

I'm beginning to think the best thing might be to see if Tronic can ship a bunch of these cradles. He charged me $85 delivered for 3 of them. I'm just not seeing most people wanting to go through the modding, or dealing with shipping from Europe.

I'm not getting any warm feelings from the US companies I tried to get interested in making a professional version for Li-Ion charging. They are all going South on the fire/explosion liability risk of charging Li-Ions.
 

petrev

Flashlight Enthusiast
Joined
Jun 12, 2005
Messages
1,535
Location
SW England
LuxLuthor said:
I also realize now that I really don't need to replace the inside wiring with thicker than 18AWG because that Hyperion 6S balancer has 20AWG for output POS/NEG leads to the battery pack/cradle, and a stated charging limit of 10A, which I'm never going to be going beyond its capability.

Good to see that information on the Back Spring Terminal Post. They grind down very easily with the Dremel cutting disc, so that works too.

I'm beginning to think the best thing might be to see if Tronic can ship a bunch of these cradles. He charged me $85 delivered for 3 of them. I'm just not seeing most people wanting to go through the modding, or dealing with shipping from Europe.

I'm not getting any warm feelings from the US companies I tried to get interested in making a professional version for Li-Ion charging. They are all going South on the fire/explosion liability risk of charging Li-Ions.

Hi Lux

Might even be able to get away with 2.4mm O/D silicon covered ? I had a quote for some rated at 12A

0.75mm2 ( 384/0.05mm ) Copper conductor, Silicone insulated 0.6mm nominal radial thickness
Overall diameter 2.4mm
Current Rating :- @ 30 Deg C up to 145 Deg C = 12 Amps

but the cost was £2.88 /m min order 100m ! ! ! too much for me.

My idea with the Back Spring-Post was Dremel 1 - KeyCopy 3 + +

$85 for 3 is cheaper than I can get them.

They aren't for LiIon cells at all - they are for 2/3A to Fat7/5A NiMh plus C and D . . .

Cheers Pete
 

LuxLuthor

Flashaholic
Joined
Nov 5, 2005
Messages
10,654
Location
MS
Yeah, I have some of the "Dean's Wet Noodle" 12AWG...beautiful stuff... but like I say....it is overkill since the output of the Hyperion balancer has 20AWG. Putting 16 or lower guage is not going to matter since they only allow 10A max output to the battery cradle.
 
Top