The World’s Most Powerful Single Searchlight Unit

LightSward

Flashlight Enthusiast
Joined
Feb 1, 2009
Messages
1,164
Location
Portland, Oregon
Here are a few images of my 1/4 ton crane in use lifting 180 pound 4kw ballast from workbench to floor. Before and After. Crane can be lifted with one hand and easily repositioned.
1621676_10201538398716982_759953222_n.jpg


15281324054_0cebf85bd5_k.jpg


Crane ready lift hoist 180 pound 4kw ballast off workbench to floor.

I need to add a few accessories such as a better crank system.

1798699_10201538398916987_1714796426_n.jpg


Crane has lifted the 180 pound 4kw ballast off workbench to floor.

The reflector mold concrete is curing after a few touch ups. Should be ready to produce first reflector section for the World's largest diameter single bulb searchlight, after mold cures and sets for a few more weeks and is treated and coated. At the same time I'm building the frames and connector system for joining the sections together into the single reflector.
 
Last edited:

LightSward

Flashlight Enthusiast
Joined
Feb 1, 2009
Messages
1,164
Location
Portland, Oregon
Most impressive! I have been watching the progress for a while and i can't wait to see it in action

I'm excited myself..! This thing is going to be awesome. There are interested individuals desiring to put this searchlight to use right away.


14003986305_764549003d_b.jpg


Building the "linkable reflector frame" members and other hardware to connect the quarter sections into the World's Largest searchlight, while I let the cement, (and recent touch ups), set for a few weeks, is the next step before I finish the sealing of the reflector mold and begin molding the fiberglass sections.

A side note on one aspect of the searchlight I'm working on is another advantage of using the Tesla Coil for the ignition system of the 4kw HMI hot re-strike-able bulb is just that, being able to hot re-strike the searchlight after just ten seconds or so. The Tesla coil kicks out up to 250,000 volts at a very high frequency in the millions of hertz which easily ionizes the arc chamber that does not have to be directly wired to the system and can be up to five feet away.

Fun, fun, fun...as this is all coming together.:cool:
 
Last edited:

Mr. Tone

Flashlight Enthusiast
Joined
Jul 2, 2009
Messages
2,350
Location
Illinois
There are many cool things going on here, keep it up. This is a fun thread and it is fun seeing you create new things as a means to another end, such as the crane. The Tesla coil is quite impressive and I am still trying to get a grasp on some of his work and theories. It is cool to see that arc lit up without you having the wires hooked up to anything!
 

LightSward

Flashlight Enthusiast
Joined
Feb 1, 2009
Messages
1,164
Location
Portland, Oregon
There are many cool things going on here, keep it up. This is a fun thread and it is fun seeing you create new things as a means to another end, such as the crane. The Tesla coil is quite impressive and I am still trying to get a grasp on some of his work and theories. It is cool to see that arc lit up without you having the wires hooked up to anything!
I apologize, but one of my photo hosts has unreliable and unstable links, (Facebook based), and this caused a large amount of my photos to vanish over he last few days. Apologize, but with all the photos I posted I'm not able to update all them do to a variety reasons, mostly time.

(Sneak Preview) Here is a quick look at the Searchlight when half finished, using only a 100watt HID bulb. Eventually I did Upgrade to a 1200 watt HMI with the help of the IgnITEor.
Thanks. It's a lot of fun and cool to see the results I can get now that seemed impossible years ago.:naughty:

The ignition of HMI bulbs with the a Tesla Coil routine is my temporary remedy for item that's turning out to be hard to locate the exact type and so far the ball park figures look expensive. So until I can afford a real ignitor, Tesla is it..!. Also the Tesla Coil seems to be somewhat friendly to the bulb and allows for the hot re-strike feature of the bulb to be a real possibility with this equipment.

Other benefits of Tesla for now, because of it's 250,000 volts of several megahertz resonating tuned frequency mixed with 300 hertz pulsating signal giving a proper ignition and an occasional manually induced 'cleaning and re-ignition' sequence, (as the electronic ones do), without extinguishing the bulb, just by adding the high voltage while the bulb stays lit for straggling salts that can sit idle)', as per manufacturer recommendations. The Operating Manual is quite long on these bulbs, with lots of little suggestions, but all this is to help prolong the life of the bulb, or at least have better performance for the normal operating lifetime range.

Beginning to experiment with using the Tesla Coil myself and then looked it up online to verify feasibility, and saw a kid demonstrating it on his modern pulse 'grow lights' wired to an old school magnetic ballast with no high voltage capabilities just by placing the Tesla Coil with in five feet or so. I watched a British man working with the 24,000 watt HMI bulb I someday want to lamp this searchlight with so it will be the Brightest without a doubt..,(24kw bulbs are currently used in lights that do not make for a narrow beam. Even my less focused searchlights produce a better beam than those Hollywood type lights.

When using the Tesla Coil, often fluorescent bulbs light up from as far as ten feet. Some day I'd like to build it to better dimensions and get much larger results, but for now it does the job of a little Tesla.

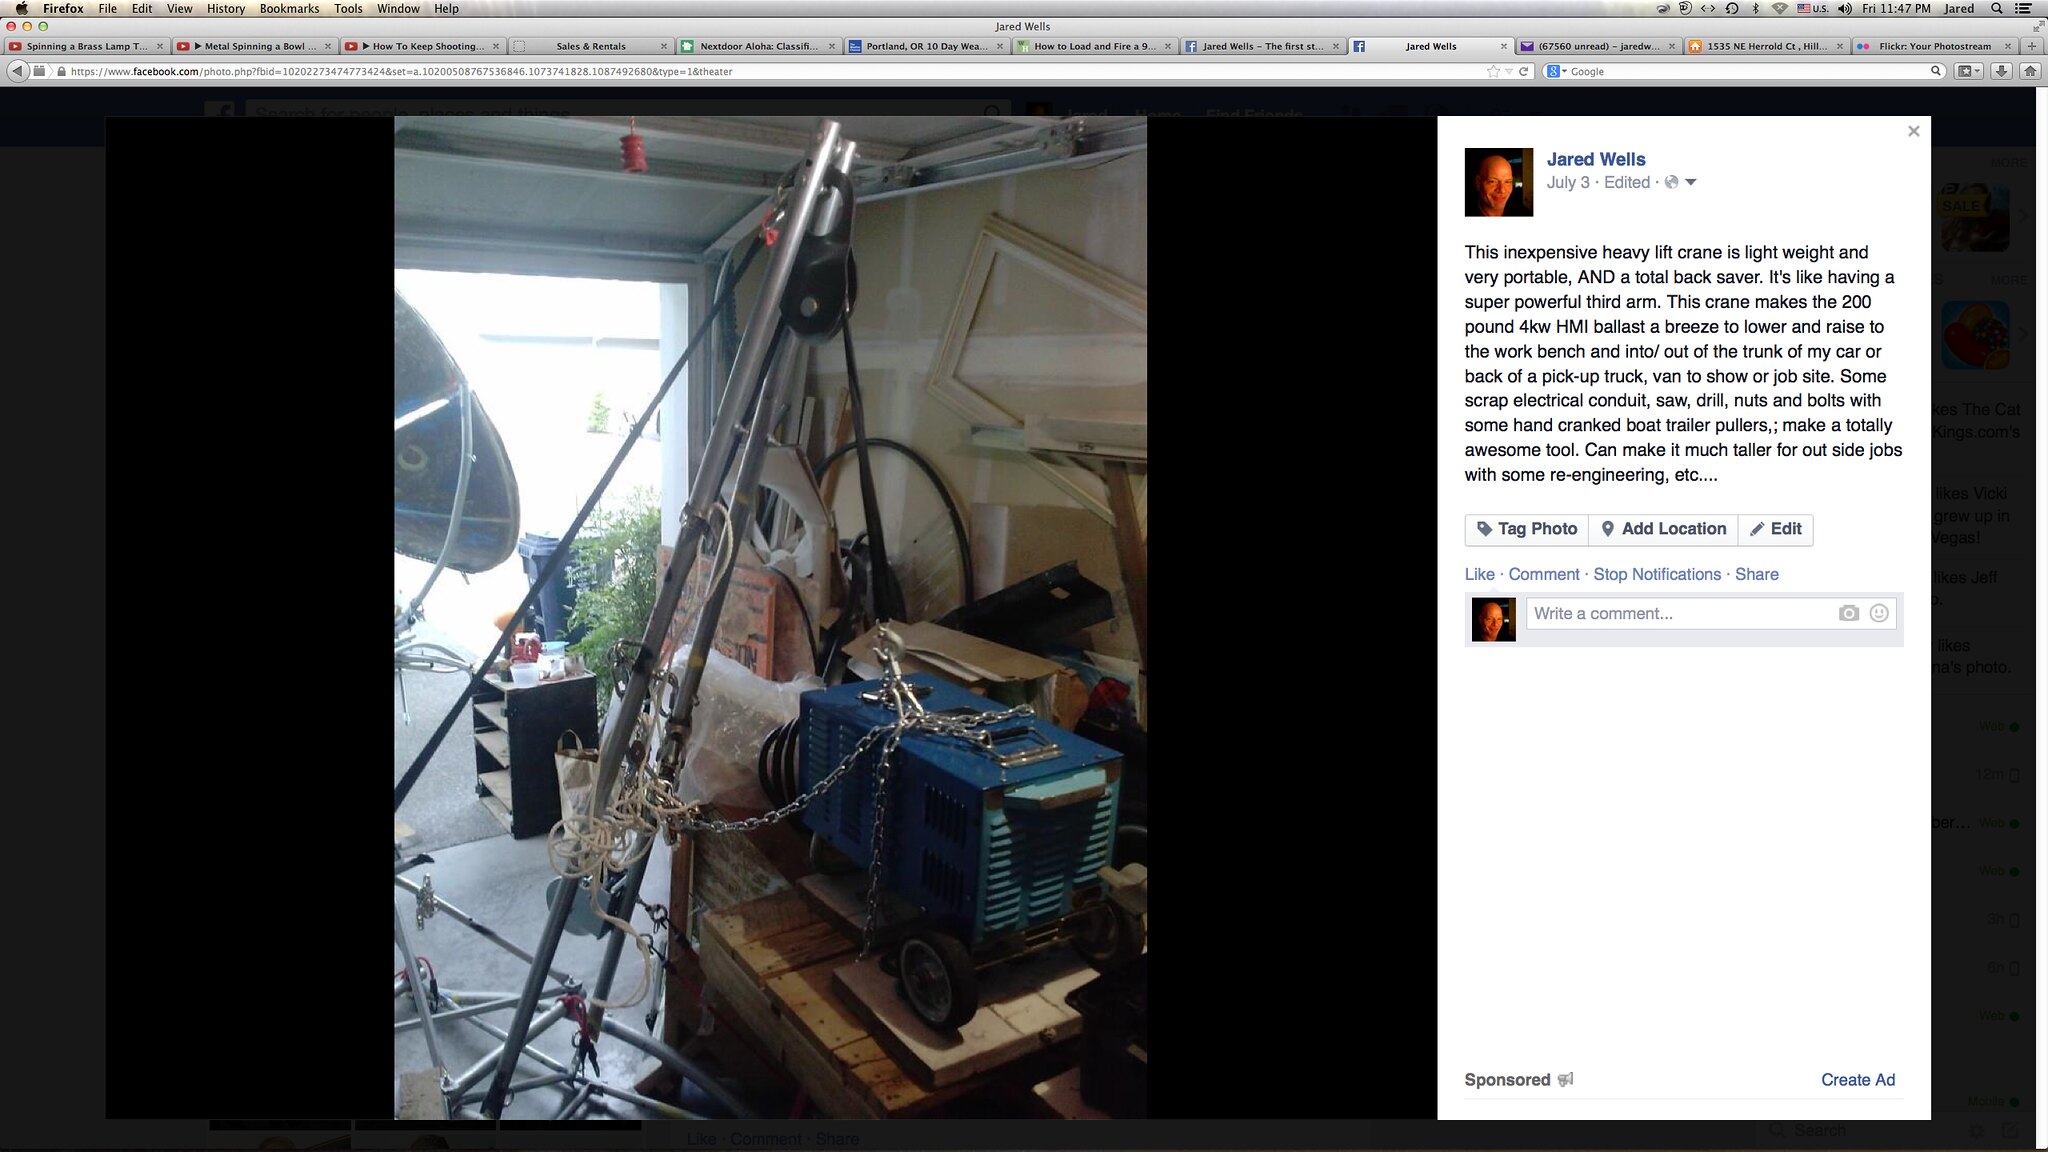
For many things I do, such as the crane, I take quick looks at ancient methods using hand tools to build large, impressive items. It may sound odd going as far back as some original theories, then trace the improvements made over time and eventually make my searchlight(s) or what ever else, from the best and most feasible options, often with my own improvements, making, I hope a remarkable and fun filled and even useful product, perhaps out the loading doors, someday...in theory.:cool:

I hope you and everyone else who reads this at the very least finds this an inspiring motivational piece that perhaps even gets someone to go out and do something maybe not even related, but good.:twothumbs
 
Last edited:

LightSward

Flashlight Enthusiast
Joined
Feb 1, 2009
Messages
1,164
Location
Portland, Oregon
Applying sealer coats to reflector mold, while also constructing the steel frame. Will build layers up and end with release layer of candle wax, buffed and shined to give fiberglass a smooth finish.

1977190_10201554087829200_431046831_n.jpg

Mold almost ready.


Hopefully have much of the wiring figured out. Feel confident changing ballast from 120 volt operation to 240 vac by switching wire from plug to the 240 spot from 120. Common becomes hot but stays on the tab marked '0'.

14004314574_87a4d61337_b.jpg


All other voltages are generated through the coils marked for each voltage needed as usual. I'm not sure about the grounding or secondary tab of the control contactor coil. I'll be building my own high wattage and low wattage, plus ignition and emergency stop leads on my own connector cables.

Frame is a little tougher than I thought as shaping the metal has caused unexpected failures at just one weak point during simple curve press. Making design changes as needed.
 
Last edited:

LightSward

Flashlight Enthusiast
Joined
Feb 1, 2009
Messages
1,164
Location
Portland, Oregon
Frame's beginning to take shape with steel angle tape and electrical conduit as the main inexpensive steel members.
1920240_10201559570126254_339396187_n.jpg


The metal pieces will be matched to each section and all four quarters will be identical and hopefully interchangeable.:cool:
Additional layers of sealer and paint will be added until a fairly smooth surface is achieved and then the release wax layer goes on.
 

LightSward

Flashlight Enthusiast
Joined
Feb 1, 2009
Messages
1,164
Location
Portland, Oregon
Moving closer to actually making the World's Biggest Searchlight at 72 inches diameter. I've finished the seals and now applying the release wax to the mold. This is another point I need to be very precise to get good optical purity. I have improved the wax application finish to be very precise, a great improvement over earlier models. The less than precise wax application in the past, has caused the reflectors to have that orange peel look and not create as collimated beam as will now be achieved.

1958157_10201587528265190_1428813426_n.jpg

Final seal coat applied, ready for '''wax on'''.

I apologize, but one of my photo hosts has unreliable and unstable links, (Facebook based), and this caused a large amount of my photos to vanish over he last few days. Apologize, but with all the photos I posted I'm not able to update all them do to a variety reasons, mostly time.

(Sneak Preview) Here is a quick look at the Searchlight when half finished, using only a 100watt HID bulb. Eventually I did Upgrade to a 1200 watt HMI with the help of the IgnITEor.
14519_10201587528785203_2007570626_n.jpg

Equipment at the ready with an old candle with higher melting point outer shell to be applied and not be as much of a problem in high Summer heat.

1922142_10201587528545197_1152783853_n.jpg


The slow process begins.


1013346_10201587528945207_1640138166_n.jpg


First wax layer almost done.


1800208_10201587529345217_1633022018_n.jpg


"Wax On", almost complete, After allowing to cool 24 hours, I'll apply the final precise coating with the 'screed'. This will create a much better optical finish than all my other reflectors. Great Improvement.:cool:

Fiber-glassing may start at this point. after the final ''wax screeding'' is done.
 
Last edited:

LightSward

Flashlight Enthusiast
Joined
Feb 1, 2009
Messages
1,164
Location
Portland, Oregon
Took a little longer to reach this stage. Wax a bit fussy. I will buff and calibrate wax and then hopefully be ready for Fiberglass.

1604819_10201652387886640_920552205_n.jpg

Close-up of almost screeded release wax. I will fill in the low spots, but wax is not filling low spots very easily.


Closer look. Been attempting to fill low spots, will buff and check calibration.
1378612_10201652388086645_972286444_n.jpg

Almost smooth, will use buffer to shine and smooth it out, then re-calibrate to make sure it's ready for Fiberglass. I will crank out a few of these started...soon.:twothumbs
 

LightSward

Flashlight Enthusiast
Joined
Feb 1, 2009
Messages
1,164
Location
Portland, Oregon
Update:
Because the whole searchlight beam comes down to this exact spot of manufacturing, I'm taking a little more quality time to try and get something looking like a six foot diameter laser beam.
1974979_10201662845828082_2006080171_n.jpg

I'm learning much about wax. Has to be heated just right and spread almost like an art such as doing a painting, (I do art on the side for extra cash).

Always tempting to redo a spot. My quality is significantly improved. Should be one heck of an awesome searchlight.
10003159_10201662845988086_2107576028_n.jpg

Gentle buffing and readying for the next micro finish.


Taking a quick break.
10001417_10201657798181894_348444100_n.jpg

I'm keeping my smile through this tedious part.

Wax is much 'trickier' than I remember.
10003502_10201672487149109_945509495_n.jpg

Still trying to get that last little bit of shine on the release wax. I'll be ready for producing the searchlight soon...lol. It really does all come down to this for how good of an actual light beam is produced. I'm aiming for a laser looking beam, slightly wider.:thumbsup: Remember there will be four of these bolted together to make the one reflector at 72 inches diameter.
 
Last edited:

LightSward

Flashlight Enthusiast
Joined
Feb 1, 2009
Messages
1,164
Location
Portland, Oregon
The fiberglass phase is a bit tricky when first applying to the release wax layer. It likes to coagulate into lumps and not spread evenly.

1922439_10201677136145331_319553845_n.jpg

The beginning of the Fiberglass poor begins at the very top where it's not going to matter because this part gets cut out. Working out a few details about how the center section will be handled. I'll probably adjust things as I produce these in number.:thumbsup:
 

LightSward

Flashlight Enthusiast
Joined
Feb 1, 2009
Messages
1,164
Location
Portland, Oregon
Well I made a nice big reflector today. Basically I finished the optical layer and then started with the reinforcing layer and added the glass fiber clothe, lovingly sandwiched between layers of gooey Plastic Glass, all put together known as fiberglass...that wonderful post WWII stuff that still rocks to this day!

1959872_10201682432917747_1893737334_n.jpg

Glass fiber clothe is positioned on top of optical layer.


Pre-cut and positioned Glass fiber clothe and ready to finish the basic reflector itself. I'll begin installing the frame elements tomorrow.
10150761_10201682433037750_760022681_n.jpg


Plastic Glass applied over glass fiber clothe. At this point the steel and PVC frame will be assembled and then encased with more fiberglass.

I'm beginning to ready the ballast and bulb for first full power up, after a series of little test to make sure all the safety and control circuits are operable. I'll be using my Tesla coil for the starter, (ignitor), until I locate an inexpensive one. I will contact IgNITEor for suggestions. :thumbsup:
 

LightSward

Flashlight Enthusiast
Joined
Feb 1, 2009
Messages
1,164
Location
Portland, Oregon
"World's Biggest Searchlight", also known as: "Lord of Lights" is moving right along with the first quarter reflector section is half finished. Few more days and I may install the reflective surface and do a test run for decent light beam.

I apologize, but one of my photo hosts has unreliable and unstable links, (Facebook based), and this caused a large amount of my photos to vanish over he last few days. Apologize, but with all the photos I posted I'm not able to update all them do to a variety reasons, mostly time.

(Sneak Preview) Here is a quick look at the Searchlight when half finished, using only a 100watt HID bulb. Eventually I did Upgrade to a 1200 watt HMI with the help of the IgnITEor.
Here's how it looked yesterday.
1238032_10201686984991546_477453014_n.jpg


These attachment points will be placed along the sides and additional framing members installed mid section to protect the vulnerable 'bottom' during 'stacked' transporting.

NOTE: I'm building the 72 inch diameter reflector out of four 'quarter sections' that quickly bolt together. This allows for much easier manufacturing and floor space issues, storage and easy transport in the trunk or back seat of a regular sized passenger sedan. The precision I'm hoping to get is a great improvement over past reflectors.
Wattage will range from 1,200 watt HMI, (100,000 lumen), --- 4,000 watt HMI, (380,000 lumen), represent in production now,
---to 24,000 watts HMI, (2,300,000 lumen) in the very near future..!:thumbsup:
 
Last edited:

LightSward

Flashlight Enthusiast
Joined
Feb 1, 2009
Messages
1,164
Location
Portland, Oregon
:thumbsup: Have attached and glassed in the basic framing elements of the first quarter reflector section. Here are a couple photos, a before and after set.


I measured and taped the elements exactly where I want them and hopefully everything will line up when all is assembled. I'll test each panel separately to make sure it meets my rigorous demands.:thumbsup:
1395174_10201692028797638_400264804_n.jpg

Basic frame members are taped with metal fasteners to the fiberglass shell, ready to be clothe and glassed in with resin and hardener.


10007403_10201692028957642_1669161847_n.jpg


Elements clothed and fiberglass-ed coated onto shell. More coatings will be added.
 

LightSward

Flashlight Enthusiast
Joined
Feb 1, 2009
Messages
1,164
Location
Portland, Oregon
With the World's Biggest Searchlight, (at 72 inches diameter being built right now), hopefully scheduling will allow me to perhaps bring it to the June CPF 'Seattle Area Get together'. I'll need 40 amp?? ..220 volt generator power outlet, but will bring the 1,200 watt HMI set up to install into the 72 inch searchlight if needed for lower power availability.

Here is a snapshot of the current stage of production.

1509903_10201696301544454_900897248_n.jpg

Well almost done with this part of the searchlight reflector 72 inch. Appears to have gone well I will put more fiberglass on. Next will pry reflector off the mold and hopefully it came out well.

Now I just have to make three more of these and bolt them together to form the one 72 inch reflector.

Cheers.
 

LightSward

Flashlight Enthusiast
Joined
Feb 1, 2009
Messages
1,164
Location
Portland, Oregon
I'm pleased with how well the reflector quarter section came out after all the effort to get this thing going. Each section should be faster now, as the wax release layer seems to have stayed fairly well intact. I'll do a re-calibration and prepare it for the next section and start on that next few days. I want to do a little more checking on the section just completed and look for any flaws that need to be dealt with before I make quarter section number 2.

Reflector just came right off the mold after I cut away the over-dripped Fiberglass.


1002661_10201704878158864_448114704_n.jpg

The first quarter reflector section came out a glittering success.


After some sanding to get rid of minor mold blemishes, an Acetone wash and apply some reflection tape and check how well it actually came out.
 

LightSward

Flashlight Enthusiast
Joined
Feb 1, 2009
Messages
1,164
Location
Portland, Oregon
The surface of the first quarter panel is: smooth, shiny and appears to have one fairly small, geometric focal point. The orange peel affect should be minimal. I'll know in the next few days when I apply reflective film and test it with a light source...fingers crossed, (Until I see someone I know and trust; demonstrate in front of my eyes, a suitable, inexpensive easy to use substitute for the reflective film, I think for now I'll 'stick to it").

Here is a photo taken when I noticed fiberglass can be distorted and have a memory just by sitting on something. I may strengthen it, but I want to keep it light weight and inexpensive for now. Commercial versions, I may build like a tank and heavy too.. Some may be produced as a single reflector for those not wanting the sections.

1974993_10201715506024554_574648225_n.jpg

I often work on my paintings and sculptures at the same time. I consider many mechanical things, like engines, transmissions and of course sculptures...art.
I apologize, but one of my photo hosts has unreliable and unstable links, (Facebook based), and this caused a large amount of my photos to vanish over he last few days. Apologize, but with all the photos I posted I'm not able to update all them do to a variety reasons, mostly time.

(Sneak Preview) Here is a quick look at the Searchlight when half finished, using only a 100watt HID bulb. Eventually I did Upgrade to a 1200 watt HMI with the help of the IgnITEor.

The Acrylic paint layer was applied only to smooth out the occasional air bubble hole, etc., and looks uneven, but is smooth as a car's hood.

1964959_10201715505864550_1990754642_n.jpg

---Fiberglass appears to have a temporary memory when its resting on something, so I had to push it out.
---I need to figure if need to strengthen it further. I'm trying to keep it light weight.
---Here it is with some other artwork I'm working on.

First quarter panel of The World's Biggest Searchlight is looking good.

Wax layer on mold is ready and second quarter goes into production tomorrow.
Cheers!:D
 
Last edited:

langham

Enlightened
Joined
Feb 9, 2012
Messages
441
Location
Tuscaloosa, AL
Try to use a small piece of aluminum that will fit against the outer ring at the top. I would use angle and it should work to strengthen it and still allow for flex like the fiber glass does naturally.
 

LightSward

Flashlight Enthusiast
Joined
Feb 1, 2009
Messages
1,164
Location
Portland, Oregon
Try to use a small piece of aluminum that will fit against the outer ring at the top. I would use angle and it should work to strengthen it and still allow for flex like the fiber glass does naturally.

UPDATE: I may not have to add additional ribs after all. The fiberglass continues to strengthen these last few days. Seems to have doubled in strength. When I press on reflector, very difficult to distort when pushing on it, campared to just two days ago.

---I'll add some ribs, perhaps as you suggest. :)
---I was initially surprised about the slow flex-back, but makes sense now. It occurred when I'd placed the reflector on some supports. Reflector shifted to where support pressed on right third near lower corner, while I worked on it, causing a reverse bulge. It didn't immediately flex back so I layed that portion on a pillow and placed a heavy weight on it for fifteen minutes to counteract the bulge. That seem to have done the trick.
---I'll probably add two more ribs at angles to intersect those last two vulnerable spots.:scowl:

Here is a crude artist rendering of ribs that cross paths where the pressure bulges occurred.


10170828_10201722032107702_1868845926_n.jpg

A crude conceptualization of some additional ribs added to prevent optical distortions due to unexpected object contact and pressure zones.
 
Last edited:

LightSward

Flashlight Enthusiast
Joined
Feb 1, 2009
Messages
1,164
Location
Portland, Oregon
Been busy, readying the mold for the second reflector quarter section. I'm analyzing the first section to see what improvements can be made in the molding process or any other improvements.

First Reflector quarter about to be covered in reflective coating.
10171723_10201725786721565_1000049346_n.jpg

The slightest blemishes are showing through, so I may re-surface after first set of test on the next quarter panel.
I apologize, but one of my photo hosts has unreliable and unstable links, (Facebook based), and this caused a large amount of my photos to vanish over he last few days. Apologize, but with all the photos I posted I'm not able to update all them do to a variety reasons, mostly time.
(Sneak Preview) Here is a quick look at the Searchlight when half finished, using only a 100watt HID bulb. Eventually I did Upgrade to a 1200 watt HMI with the help of the IgnITEor.

Overall Good News!

Reflector has good optical focal point precision.:twothumbs:twothumbs Not only that, but it appears fiberglass continues to 'cure', as it definitely doesn't distort anywhere3 as easily as just a few days ago. i have to experiment with the surface. Makes a small point of light hundreds of feet away using LED. Slight halo, from the minor imperfections, but will make a very narrow, bright, collimated beam.

1982168_10201726646223052_1700487940_n.jpg


---The reflection off the reflector looking good. Makes a nice small point of light hundreds of feet away. The surface needs a little work, more for cosmetics, but will make performance a little better.
---Each quarter section will have refinements and some experiments to achieve better performance. Eventually I may redo this particular reflector surface.
 
Last edited:

Latest posts

Top