Inside the Jetbeam Element (Nudity, make the kids leave the room)

EngrPaul

Flashlight Enthusiast
Joined
Sep 28, 2006
Messages
3,678
Location
PA
Unscrew bezel with battery still installed, the light engine unloads through the top. I separated the switch and spring for cleaning. You may find the last picture interesting.

I think the light is a bit underpowered for using a warm emitter. I'm going to put a R2 in there... but I will add thermal grease on top of the boosting washer. :p

IMG_2713.jpg


IMG_2702.jpg


IMG_3039.jpg


IMG_3040.jpg


IMG_3041.jpg


IMG_3042.jpg


IMG_3043.jpg
 
Last edited:
Shaaammmmeeeee on JB! thanks for the show EngrPaul. Now we know and knowing is... I almost pulled the trigger on one of these last week. But I have a feeling it'll be a little too slippery for me.
 
Shaaammmmeeeee on JB! thanks for the show EngrPaul. Now we know and knowing is... I almost pulled the trigger on one of these last week. But I have a feeling it'll be a little too slippery for me.

It may be effective enough. The emitter isn't driven all that hard. ;)

Now that I have it back together, I can say it's a much more useful light with the R2.
 
Ha! Sorry to disappoint you.... :nana:

No comparison beamshots. Just 5 bins colder and 3 bins brighter. :candle:

I think I know why Jetbeam says don't use 14500's. :sssh:

If you want to do so, I would at least recommend doing a pre-82 penny upgrade. :wink:
 
uhh did you clean it that well or is there something missing here ? is this some sort of new cleargel diamondCote super stealth areogel gassious thermal transfer elements , yet known to us mere mortals, kept in secret in the jetbeam labs , and in goverment offices awaiting pending patent :cool:
 
Here are your beamshots showing 3EP's compared, modded to stock.

R2 on the left, Q5 on the right. (Sorry, no neutral Element to compare).

Normal exposure:

IMG_3050.jpg


IMG_3051.jpg


I'm pulling apart the Q5 to put a red emitter in... I'll see if that one has the same lack of thermal paste. :popcorn:
 
place your bets ladies and gentlemen.
3-1 odds on the blueish one doing a pole dance later on tonight :sssh:
 
I figured while I'm at it, I might as well show you her bottom.

IMG_3052.jpg


IMG_3054.jpg


IMG_3055.jpg
 
Here's disassembly of a SECOND Jetbeam.

See also a picture of a RED LED I'm going to put in.

No thermal compound under the emitter. Misaligned steel washer with barely and adhesive under it.

IMG_3058.jpg


IMG_3059.jpg


IMG_3060.jpg
 
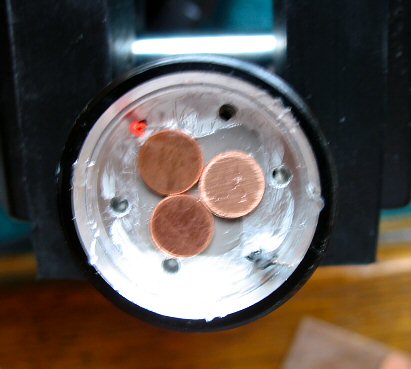
Well, I went back and "upgraded" both lights to have 3 copper discs under the emitter star. They are epoxy bonded to the aluminum pill. Before laying the star on there, I added some arctic silver thermal grease.

IMG_3061.jpg


After reassembly, I found that the red jetbeam didn't have much of a difference between high and low. I guess it's because of the lower emitter Vf.

IMG_3068.jpg


So I pulled the NiMh and put in a 1.7V Lithium primary. It was much more competitive against the R2.


Here the both are on low (automatic camera exposure) Remember, the R2 is running on NiMH, the Red on a AA Lithium PRIMARY.
IMG_3062.jpg


And here they both are on high (automatic camera exposure)
IMG_3063.jpg


For the heck of it, I also put a 14500 in for a few seconds. HOLY CRAP I never saw so much red in my life.

So here are a couple unnatural Elements, R2 and Red. Used to be 5A-Q3 and Q5.

IMG_3064.jpg


If you enjoyed the thread, please say so! :party:
 
Last edited:
Thanks for the investigation Paul ... very disappointing to see the lack of thermal paste and steel washer in there. That may indeed explain why it isn't driven very hard on Hi. Please feel free to post a link to this thread in my Element review thread - it's certainly very relevant info.

Interesting mod you are doing. I haven't tried a 14500 in these lights (since JB said it wasn't supported by the circuit). I presume you haven't tried more than a few secs?

As an aside, this image certainly gave me pause:

Well, I went back and "upgraded" both lights to have 3 copper discs under the emitter star. They are epoxy bonded to the aluminum pill.
IMG_3061.jpg

Hmmm, reminds me of a certain someone's comments in from my VB-16 mod thread from many moons ago:
For a minute there, I thought you were going to install 3 emitters. :grin2:
CPFVB16-4.jpg

So, how about it Paul? Are you going to make the dream a reality and put my soldering skills to shame? ;) Let's see a tri-Cree mod in there! :laughing:
 
Oh, yeah... forgot about that! I just put as many in there as would fit. :naughty:

Did you smash yours flat in a vice first, or did you leave them cupped :poke:

Hey, since I haven't been modding Lux to SSC, I have these little copper things laying around unused. :devil:
 
Did you smash yours flat in a vice first, or did you leave them cupped :poke:
Hey, since I haven't been modding Lux to SSC, I have these little copper things laying around unused. :devil:
As I recall, when I first tried those copper discs in stock form I didn't get a good thermal contact (SSC went blue after a few minutes runtime on max). After that, I typically ran them all through my small table-top vice first (with plastic inserts around the vice grips to keep everything smooth and flat when pressing). That modded VB-16 still sits on my nightstand. :)

And yeah, I've got a bunch of unused copper shims sitting in my workbench too (not to mention a few SSCs, Cree Q2s, etc,). Ah well, progress marches on. ;) Haven't done a lot of modding in the last year or so, except for a few gifts for family and friends (typically at my daughter's request - she likes it when I "pimp" her flashlights :laughing:).

Back on topic though, it is a concern to see a lack of thermal paste under there. I will mention it to JB next time I hear from them.
 
Last edited:
Top