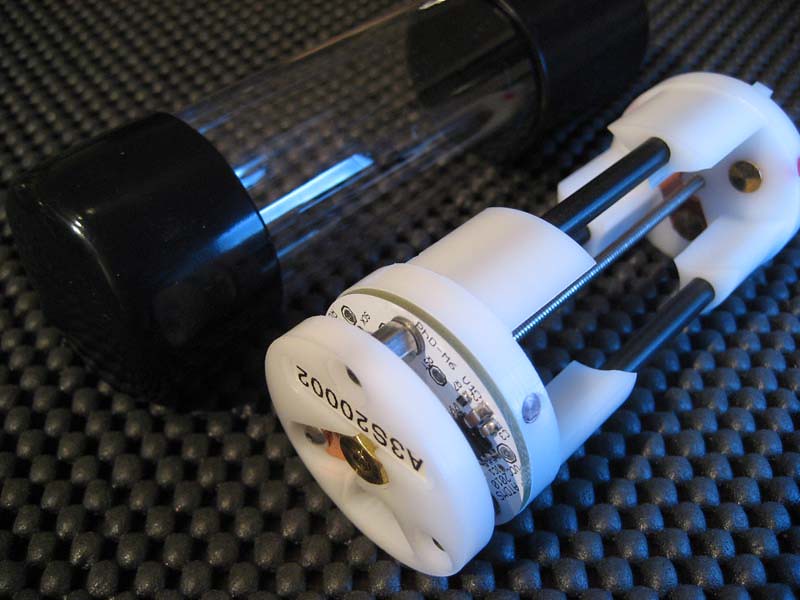
Feedback/impressions on the PhD-M6 custom battery pack

wquiles

Flashaholic
Joined
Jan 10, 2005
Messages
8,507
Location
Texas, USA, Earth
I am starting this thread so that we can discuss feedback/impressions/suggestions/recommendations/etc. on the production PhD-M6 packs, now that I started a new sales thread and have asked a moderator to close the feeler thread.

So going forward we will keep this discussion thread and the sales thread going.

Will
 
Last edited by a moderator:
Re: Feeler: PhD-M6 (programmable hotwire driver for the SF-M6)

I wanted to give an initial impressions report since I got the PhD-M6 from Will today.

First, let me thank Eric for his last post about the heat issue with cells, and his sensible recommendation when using higher power bulbs to limit runs to around 5 mins, or when it feels like significant heat is building up externally. The battery resellers/manufacturers who list performance specifications use the most favorable (yet unrealistic) testing conditions. For example, their measurements of cell capacity and voltage under load tests are done with the cells as hot as possible (like NiMH 'hot off the charger') knowing it will give the best results.

Secondly, now that I have one of these PhD-M6's in my hands, it is obvious how well designed they are. I had a couple of logistical/part orientation issues that can easily be fixed, and discussed them several hours ago with Will.

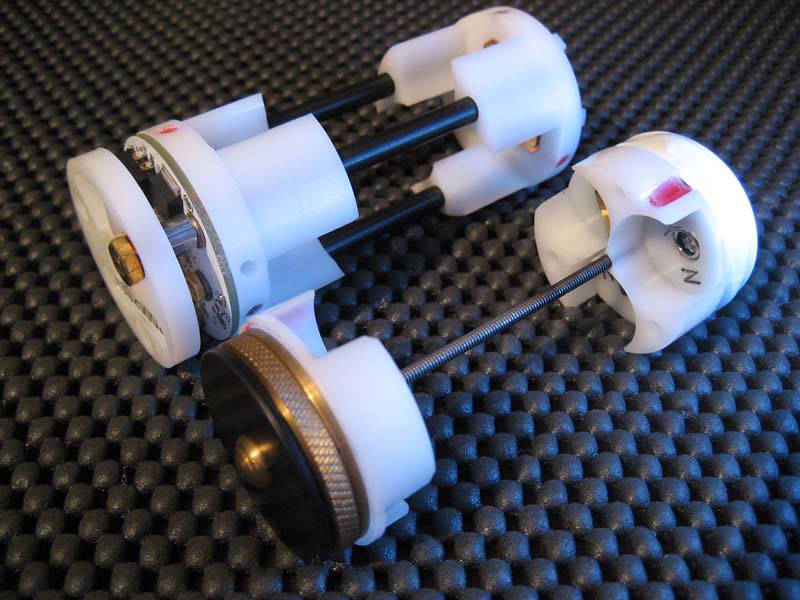
I have never used any of Eric's battery holders, and being accustomed to Fivemega's holders, the first thing I did was unscrew the top to load the batteries. That resulted in the unglued black support rods falling out of the Delrin end pieces, two of which rolled under my computer case. I missed the point that these were designed to not be completely unscrewed, rather the batteries only need to be pushed in from the side.

However, this gave me a chance to admire the contact points, and see how secure the center threaded rod was with regards to not being able to tighten down into the tail/driver board end which has been a problem with other brands. There is also zero rotational "twisting" as you tighten the cap--very nice. Once satisfied this was a secure and safe thread anchoring system, it took quite a while to line up the 3 batteries and black support rods to get the top back on. Then I was not sure which side of the top anchoring wheel/nut faced up. I thought I better give a quick call to Will about this and the bulb voltage question, and of course, I guessed wrong--the knob/nut faces down towards the pack for better electrical contact. :eek:

First lesson: Don't remove the top, just insert the cells from the side, and tighten top to hold them secure. If you do remove it, just put it back together without the cells, and insert them later. Securing "ratchet top" (another nice enhancement) goes with protruding nut/knob side down. I felt stupid. :eek:

Next suggestion I gave Will was to add the list of lamps to the printout, either next to the custom written level voltages, or with the photos. Most people are going to use the same default set of 4 voltage levels & moon-mode setting, so I think it could all be printed out and be a part of the instructions. Obviously for a custom voltage setup, another form with manually filled in blank numbers like the one sent to me could be separately used. I like the idea of keeping the circuit end of the pack towards the tailcap, and away from the bulb heat, but indeed, it works if inserted either end first.

Final confusion I had was selecting the proper voltage level with the default MN21 I had been using in my M6, so I came back to this thread, and after some searching, found that Eric recommended using the Level 2 (6.8V) setting for this bulb. I thought about that for a couple minutes, and spent about a half hour failing to find the threads where the various MN bulbs had their optimal voltages under load with standard SF holder & primary cells listed.

Despite all the work I have done with bi-pin bulb testing, I never learned about the voltage/performance under load of the SF MN bulbs, only having the M4 & M6, so I was puzzled why Eric's recommended voltage was so low, when I knew that putting 3s2p of SF A123 cells each with fresh voltage of 3.25V added up to 9.75V and drove the bulb just fine.

Of course, Will informed me that SF designed the combination of the MN20 & MN21 bulbs (and their primary cells) to withstand a normally higher initial inrush current without needing a soft start. The primary cells voltage/current sags almost immediately under the bulb's load to work just fine. Will was completely gracious, but again I felt stupid and had to laugh at myself being such a MN noob. :eek:

Once I was reassured that Eric's 6.8V (Level 2) was correct, flipping those switches with your fingernail to match the photos was child's play, and an elegant improvement over trying to jam a pen into the earlier 'recessed' switches.

From that point on, it was all a heavenly experience. Through two sets of 17670 AW protected cells, it always worked with that continuously regulated, beautiful white color! :D The 1/10th to 2/10's of a second soft start is not even noticeable. Push button flashing works just fine. If you do it as fast as you can, the pulses are dim, but at a rate of 1 per second, they were bright white flashes.

I ran it several times for 7 & 8 minutes, and this bulb/battery combination got warm at the head and neck, but not at all hot, unless I neglected adequate cooling time in between. I didn't get precise on the overall run time of the cells, but I think Eric has that nailed down in other posts. I would estimate it to be 22-25 mins, with another 5 mins of moon-mode which was obvious and still useful illumination. Once I let it continue draining until shutdown, it did not turn back on (as is the design). Removing the three warm-hot cells after about 5 mins showed their voltages of 3.1, 3.3, & 3.4V, so they were well drained but not abused. These AW cells are 18-24 months old. Back into the Pila chargers they went.

I immediately began thinking of how many boxes of cells I had gone through since I bought this light, and how that--and the quickly fading output--were the biggest reasons I didn't use it more often. I figured I went through at least 90 cells at $1.75 to $2 each including shipping! Now I had something that has a soft start, gives regulated light, lets me easily replace the cells when they wear out, and allows easy custom settings for different bulb applications I want, and as far as I can tell is nearly idiot proof. It is what the average consumer would dream of having for this incan M6 model. I smiled, and am thrilled to have ordered two.

This is a no-brainer, folks. Big hat's off to Will, Eric, AlanB, JimmyM, Willie Hunt (who I'm sure will be proud when he sees this), and other contributors. As far as I am concerned, it is ready for release with some simple instructional enhancements & putting all the information on the shipped instructional pages.
 
Last edited:
Re: Feeler: PhD-M6 (programmable hotwire driver for the SF-M6)

OK folks, some great news regarding my destructive testing with protected LiIon cells - nothing was destructed :party:

So basically:
=> The regulator worked "only" when all 3 cells were inserted with the correct polarity, and it seems you can't harm the driver/regulator by installing protected cells backwards :twothumbs

So it looks like I can "relax" a little bit the warnings about reverse battery polarity protection, but certainly only when using protected LiIon cells(!).

I have not yet measured/try unprotected cells (which are not approved for this pack anyway!), but if I can find them and I can find a way to test them safely, I will report on that later.

So in summary: To ensure utmost safety to you, your lights, and the PhD-M6 pack, only use PROTECTED CELLS with the PhD-M6 pack - please be safe ;)

Will

Beautiful!

BTW, I have some unprotected cells I got from AW years ago when that's all there was. I don't know if its worth bothering to test with them though.
 
Re: Feeler: PhD-M6 (programmable hotwire driver for the SF-M6)

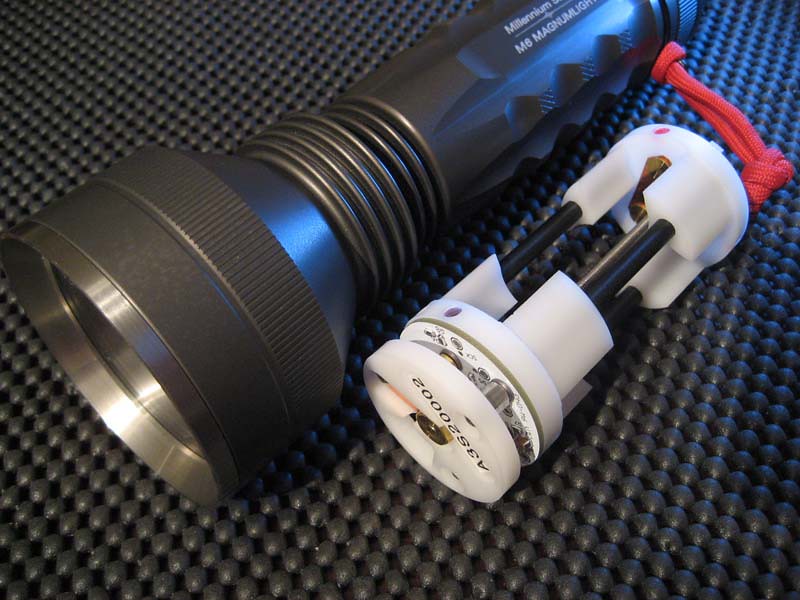
Like LuxLuthor, the PhD-M6 pack arrived well packaged today. The improvements to the intructions were great, Will. I think the pictures will be helpful for most folks. Here's the pack with the test M6:

4861860255_825d2be92d_b.jpg


As Lux mentioned, if you have not handled one of Eric's 3x17670 holders before, the fit and feel of the PhD-M6 will certainly impress. Compared to the FM pack that I modified to regulate at 7.5V, the PhD-M6 is completely superior in both design and function. My pack feels very fragile, the PhD-M6 commands a lot more confidence. All other regulated M6 packs only had one voltage, the PhD-M6 offers four!

4861860079_9e5808c764_b.jpg


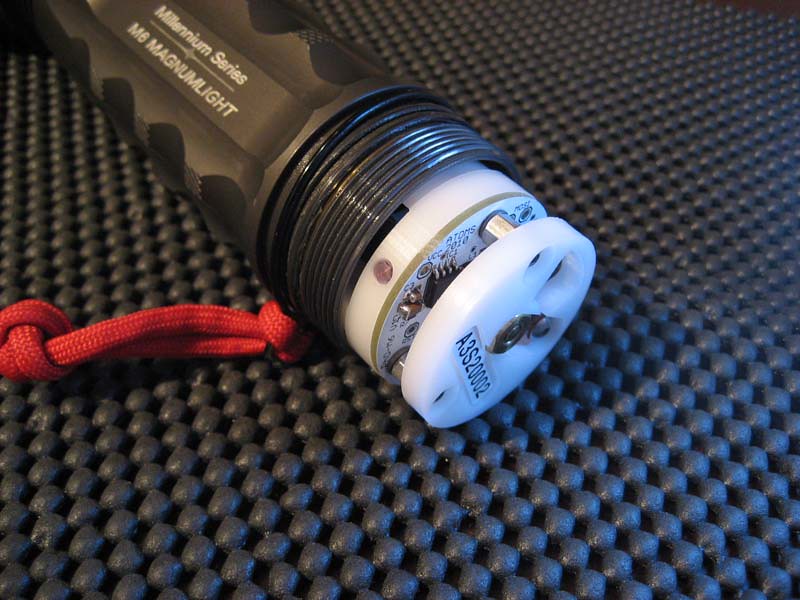
Will and Eric have listened to suggestions and have made some nice improvements since the beta packs. Both of my M6's are older, and I think may have smaller inner diameters than newer M6's. The beta pack was a bit snug and limited momentary operation. This newer pack slides in nice and smooth and I was able to tap out SOS with no issues.
The larger switches are an improvement. My fingers are still a little too fat to switch them without a toothpick or some tool, but it was much easier all the same.
The moon mode is fantastic. This is what I wanted from the beginning and Will, you delivered! Other regulators flash as a low battery warning, but this pack allows you usable light to find your second PhD-M6 pack before the light goes out. Great job!


4862479456_ee6fd6f874_b.jpg


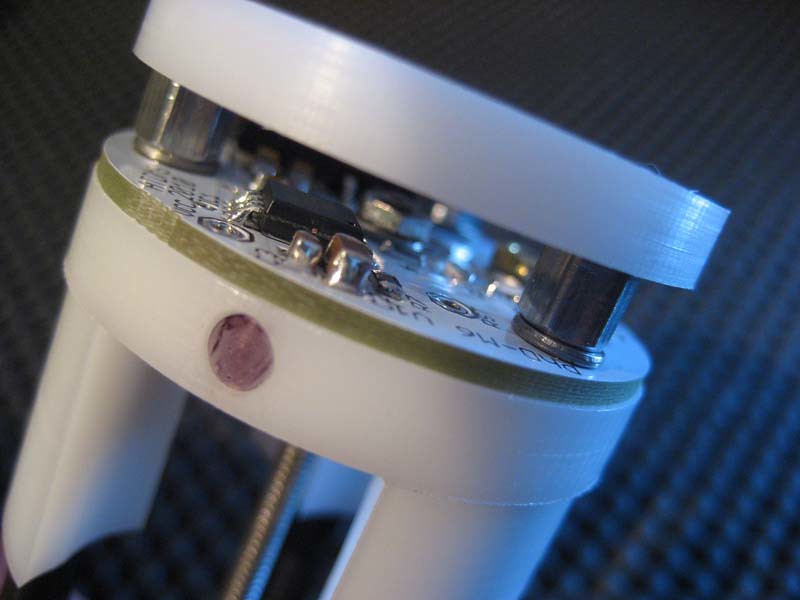
I still would like to do a lot more testing with this pack over the next few days into the weekend, but it certainly has two thumbs up so far. One modification I think I will suggest already (for Will, or the end user) would be to carefully fill the pcb gab with two part epoxy, potting compound, or hot glue to add a little insurance to the surface components, nuts, and washers (without covering the switches obviously!). I will do this for my two packs for durability and to add some water resistance if it is not part of the end design.

4862479368_6afe5498ce_b.jpg


My other quick suggestion for Will and Eric (if you guys have the time or energy) is to devise a simple protective carrying case. The one below is an example, but it could be made of pvc or anything.

4862479256_e23d1a344e_b.jpg


I'll add more over the next few days as I do a bit more testing. I will not be doing any destructive testing, just performance testing. There were a couple of improvements from the beta version that I would like to put through the paces. Thanks again, Will, for the opportunity to evaluate this fine piece of work. :thumbsup:
 
Last edited:
Re: Feeler: PhD-M6 (programmable hotwire driver for the SF-M6)

Leukos, I like your idea of having an insulating travel case if you get two.

My first reaction personally, I don't think I would want the epoxy/hot glue treatment, as I want the ability to get it serviced by Will, including reflashing the main chip with new set of bulb values--especially if a new battery capacity/voltage or custom bulb becomes available. The 3 spacer rods give a very secure support protection for the chip.

I'm also continuing to test it over the weekend, including using several bipin bulbs with an FM bulb holder, but I seriously doubt I willl have any substantive suggestions.

It's interesting to see that the pack with batteries inserted shows the total 3s battery voltage at the two terminals if you want to verify more objectively the pack's status.
 
Re: Feeler: PhD-M6 (programmable hotwire driver for the SF-M6)

+1 on the travel case idea.

Thanks to everybody involved in bringing this idea to life. I can't wait to pick one up!
 
Re: Feeler: PhD-M6 (programmable hotwire driver for the SF-M6)

New thread off to a great start with first-rate feedback. 5-star stuff, straight off the mark.
 
Re: Feeler: PhD-M6 (programmable hotwire driver for the SF-M6)

New thread off to a great start with first-rate feedback. 5-star stuff, straight off the mark.

Thanks David for your help and assistance getting the new threads going :bow:
 
Re: Feeler: PhD-M6 (programmable hotwire driver for the SF-M6)

I have never used any of Eric's battery holders, and being accustomed to Fivemega's holders, the first thing I did was unscrew the top to load the batteries. That resulted in the unglued black support rods falling out of the Delrin end pieces, two of which rolled under my computer case. I missed the point that these were designed to not be completely unscrewed, rather the batteries only need to be pushed in from the side.

Once satisfied this was a secure and safe thread anchoring system, it took quite a while to line up the 3 batteries and black support rods to get the top back on. Then I was not sure which side of the top anchoring wheel/nut faced up. I thought I better give a quick call to Will about this and the bulb voltage question, and of course, I guessed wrong--the knob/nut faces down towards the pack for better electrical contact.

Definitely something that I forgot to cover - sorry about that :whoopin:

I will update the handout/guide with a short description and at least one photo or two showing how to insert the cells into the pack, and to note the orientation:
DSCF3009.JPG

DSCF3011.JPG


Although Eric's design does not require at all for that nut to be removed, if it ever comes off by going too far out, this photo does show how it goes back in:
DSCF3020.JPG


I am working on up-loading a very short video showing how to load and unload the cells - I will have it available soon :D


Next suggestion I gave Will was to add the list of lamps to the printout, either next to the custom written level voltages, or with the photos. Most people are going to use the same default set of 4 voltage levels & moon-mode setting, so I think it could all be printed out and be a part of the instructions. Obviously for a custom voltage setup, another form with manually filled in blank numbers like the one sent to me could be separately used. I like the idea of keeping the circuit end of the pack towards the tailcap, and away from the bulb heat, but indeed, it works if inserted either end first.
I will update the guide to reflect this as well ;)


From that point on, it was all a heavenly experience. Through two sets of 17670 AW protected cells, it always worked with that continuously regulated, beautiful white color! :D The 1/10th to 2/10's of a second soft start is not even noticeable. Push button flashing works just fine. If you do it as fast as you can, the pulses are dim, but at a rate of 1 per second, they were bright white flashes.

I ran it several times for 7 & 8 minutes, and this bulb/battery combination got warm at the head and neck, but not at all hot, unless I neglected adequate cooling time in between. I didn't get precise on the overall run time of the cells, but I think Eric has that nailed down in other posts. I would estimate it to be 22-25 mins, with another 5 mins of moon-mode which was obvious and still useful illumination. Once I let it continue draining until shutdown, it did not turn back on (as is the design). Removing the three warm-hot cells after about 5 mins showed their voltages of 3.1, 3.3, & 3.4V, so they were well drained but not abused. These AW cells are 18-24 months old. Back into the Pila chargers they went.

This is a no-brainer, folks. Big hat's off to Will, Eric, AlanB, JimmyM, Willie Hunt (who I'm sure will be proud when he sees this), and other contributors. As far as I am concerned, it is ready for release with some simple instructional enhancements & putting all the information on the shipped instructional pages.
Thanks much :eek:
 
Re: Feeler: PhD-M6 (programmable hotwire driver for the SF-M6)

Like LuxLuthor, the PhD-M6 pack arrived well packaged today. The improvements to the intructions were great, Will. I think the pictures will be helpful for most folks.

Will and Eric have listened to suggestions and have made some nice improvements since the beta packs. Both of my M6's are older, and I think may have smaller inner diameters than newer M6's. The beta pack was a bit snug and limited momentary operation. This newer pack slides in nice and smooth and I was able to tap out SOS with no issues.
The larger switches are an improvement. My fingers are still a little too fat to switch them without a toothpick or some tool, but it was much easier all the same.
The moon mode is fantastic. This is what I wanted from the beginning and Will, you delivered! Other regulators flash as a low battery warning, but this pack allows you usable light to find your second PhD-M6 pack before the light goes out. Great job!
Thanks again for your help/testing during the Alpha phase, and for verifying that we addressed the concerns that you shared with us back them :thumbsup:


One modification I think I will suggest already (for Will, or the end user) would be to carefully fill the pcb gab with two part epoxy, potting compound, or hot glue to add a little insurance to the surface components, nuts, and washers (without covering the switches obviously!). I will do this for my two packs for durability and to add some water resistance if it is not part of the end design.
Since the pack is inside a water resistant housing (the M6), the pack is very secure and immune to the elements. Eric's holder is a very neat and strong solution - everything is bolted together nice and tight, and in over 3 months of testing, not a single pack has failed nor come loose, even after the heavy duty and constant usage we have given those packs.

Eric has done a fair amount of abuse dropping his M6 (with the PhD-M6 pack inside of course), repeatedly without the pack failing. Of course the pack is not indestructible, and obvious abuse is not something I should be expected to cover, but we did try out best during the development phase to "push" the envelope and the packs have remain solid so far.

The dimensions of the Delrin carrier and the board/switch were selected to make sure there was no exposed part of the circuit near the edge of the PWB, so there is no electrical contact possible, if the pack were to be laid down against something else, specially a conductive surface. However, nothing prevents "prying" into the circuit's "open cage", which could in fact damage/break one or more of the surface mount components.

The part about the epoxy filled was something that I talked to Eric about 2 months ago. Like you I also feel it is a great way to "seal" the circuit for those times when the pack is not inside the M6, and for a more "hostile" environment where the pack would/could be routinely be exposed to harm, or in a "extreme duty" light where you want to minimize/eliminate as many forms of failure as possible.

I have been calling this special version the LE version, for Law Enforcement version - it would be potted with special two-part electronics grade Epoxy (which I already have used in this project some time ago). It would certainly be the more robust version of the pack, having only the very top of the dip switch exposed, which is water resistant (I selected this specific switch due to this extra safety factor since I need all parts to survive cleaning with water in my ultrasonic cleaner). Note that I am not claiming nor supporting getting the PhD-M6 pack wet. The board itself and the board's components can be cleaned with water and air dry, but if the board is powered, I would expect the board to fail, like with most/all other electronic circuits.

However, like I have mentioned before (sorry guys if I am sounding like a broken record!), there is always a compromise. If the end user or myself, were the seal the board, there is ZERO chance to reprogram it, test it, repair, replace, etc.. - if it ever fails, it becomes an expensive paper weight :eek:. Since I would have to charge more for this extra potting step, and it voids any chance of repair/test/replace, it makes for an interesting catch-22. Until I can think this through in more detail, I will not be offering this option. Certainly not until I can deliver the regular PhD-M6 production packs.

My other quick suggestion for Will and Eric (if you guys have the time or energy) is to devise a simple protective carrying case. The one below is an example, but it could be made of pvc or anything.
Good idea. It certainly has not been part of the scope for the project, but I will consult with Eric on what we can do. Perhaps we can sell it as a low cost accessory to the pack.


I'll add more over the next few days as I do a bit more testing. I will not be doing any destructive testing, just performance testing. There were a couple of improvements from the beta version that I would like to put through the paces. Thanks again, Will, for the opportunity to evaluate this fine piece of work. :thumbsup:
Thanks much :eek:
 
Last edited:
Re: Feeler: PhD-M6 (programmable hotwire driver for the SF-M6)

Why not use some heatshrink tubing on the end with the circuit board.
It would shield the sides and yet still allow access to the switch and or future programming?

One modification I think I will suggest already (for Will, or the end user) would be to carefully fill the pcb gab with two part epoxy, potting compound, or hot glue to add a little insurance to the surface components, nuts, and washers (without covering the switches obviously!). I will do this for my two packs for durability and to add some water resistance if it is not part of the end design.
 
Last edited:
Re: Feeler: PhD-M6 (programmable hotwire driver for the SF-M6)

Why not use some heatshrink tubing on the end with the circuit board.
It would shield the sides and yet still allow access to the switch and or future programming?

The pack slides in/out easily, but the pack was not designed with the extra room to allow for the HS tubbing (it might or it might not fit back into the body of the M6). The HS tubbing could (as it shrinks) put pressure on the switch or other components near the edge of the board - none of which are designed to survive lateral forces, so the HS tubbing could (worst case) break a part, lift a pad, etc..

I am not trying to scare you or anyone, but please be mindful before attempting to modify the pack as it might end up costing more to repair/replace that if you left it alone.
 

LOL! Just thinking how much time I made you waste doing those videos. I was thinking you should make a Ronco/Billy Mays infomercial with voiceover "Tired of taking apart your battery packs, and dropping all the parts, not knowing where they went, or how they go back together...now we have the Ronco Pack-O-Matic" with the video showing a bumbling idiot taking off the cap, having the black rods fall out and roll under the computer case, crawling down on the floor looking for them with a flashlight, then spending 5 minutes trying to orient polarity, line up the 3 cells and 3 rods to get the top back on, re-attaching the nut the wrong way....then put a big red X over the last scene, and proceed to the proper use of your original elegant design. :twothumbs
 
LOL! Just thinking how much time I made you waste doing those videos. I was thinking you should make a Ronco/Billy Mays infomercial with voiceover "Tired of taking apart your battery packs, and dropping all the parts, not knowing where they went, or how they go back together...now we have the Ronco Pack-O-Matic" with the video showing a bumbling idiot taking off the cap, having the black rods fall out and roll under the computer case, crawling down on the floor looking for them with a flashlight, then spending 5 minutes trying to orient polarity, line up the 3 cells and 3 rods to get the top back on, re-attaching the nut the wrong way....then put a big red X over the last scene, and proceed to the proper use of your original elegant design. :twothumbs

No worries Lux, the videos do help show things more clearly. Besides, as David indicated above, if this flashlight "stuff" does not work out, I might have a chance in Hollywood :crackup:
 
Hi everyone,

Sounds like things are going well so far with just a few interesting hiccups :)nana:)

I'm realizing now that LuxLuthor may not be the only one to do a "double take" on the 6.8V recomendation. I'm hoping nobody tries to go with their "gut" and try the 10.8V setting thinking that it will be just a mild over-drive compared to the 9+V of the MB20 pack. :poof:

The normal average operating voltage of the MN21 is actually closer to 6.6V, however, it can be as high as ~7.0V with really fresh and warm CR123s, so we decided on 6.8V as a nice balance that pushes the HOLA lamps to a good balance of brilliance and bulb life. The MN16 works nicely here as well.

Eric
 
Will, when you get the instruction document updated the way you want it, can you please post it as link to download in the sales thread? I want to replace my earlier one (or email me a copy)--no hurry. Thank you sir!

Eric, thanks so much for all the testing and research you did with the various optimal bulb settings. I know the work that involves, and having it available as a concise, correlated to PhD-M6 voltage setting list is an enormous gift. People can just relax and enjoy their choice because of it. :kiss:
 
Been thinking about the levels some more. Can you list the bulbs that you envision for Level 3, and their "optimum" (or acceptable) voltages vs the actual Level 3 voltage of 7.5V? Basically, if there is some spread of the optimum/acceptable voltages for say an MN15, MN16, MN20, and other bulbs about 7.5V, then I might want to specify re-programming of the Level 3 voltage that might more closely match some bulb of interest whose optimum/acceptable voltage might be closer to 7.1V-7.3V. If such a case exists, then this might also better accommodate a WA1111/64250 than the current Level 3 voltage of 7.5V, providing a level that can drive the bulb a little harder than Level 2 but not so hard as to risk erratic filament life.

Thanks.
 
Last edited:

Latest posts

Top