DaFABRICATA
Flashlight Enthusiast
I finally quit being lazy and started my Bike light for my Cannondale.
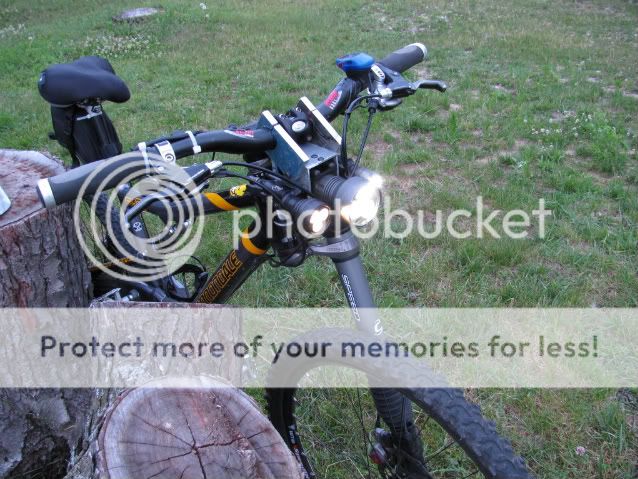
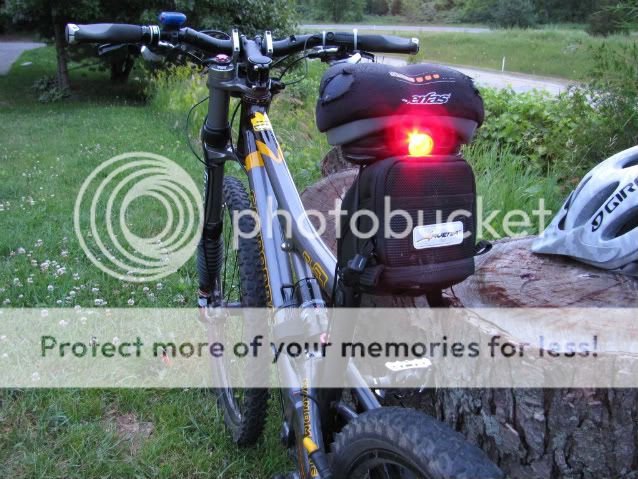
It consists of 3 Surefire Weaponlights up front and an L2 Head running direct drive from a single RCR123 in one my 1X123 cell "Ribber for your Pleasure" bodies as a brake light. A short length of rod was tig welded to a washer and mounted to the caliper to activate a pressure switch mounted on a custom bracket. A red filter is used to signal when I am stopping. The light is wedged under my seat and has never come loose..so far.
UPDATED with new pics.
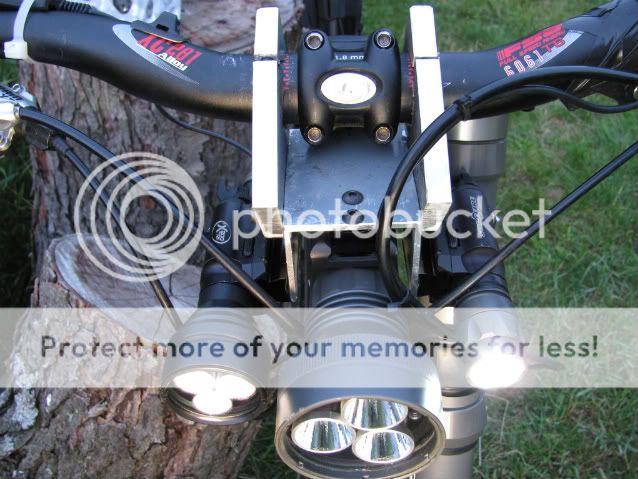
The 3 weaponlights up front are 2, X200's that accept E-series heads and an M103 in the center. I went to ****s sporting goods and bought a few sections of picatinny rail. Fortunately they were thick and worked perfect for this project. One of the X200's has a plug-in tailcap (XT07) with the combo constant ON and pressure switch (SR07)mounted within a thumbs reach on my handle bars.
The mount took a hell of a lot longer than I thought it would and I'm still not finished!:shakehead A section of box aluminum was used as the main center mount for everything. One side of the box was cut off and a section of picatinny rail was mounted up top to allow the M103 to sit inside. Two more sections of picatinny rail were used on either outter side of the box to mount the two X200's. The front screws holes for the rail are slotted to allow up and down aiming of the X200's. There are two holes cut out of the side of the mount to allow a finger to turn the M103 ON/OFF.
UPDATE: I made a new slider switch so it is easier for me to actuate the M103. I machined it using my drill press and a file and finished it off with 4oo grit sandpaper. I will be making a small lever to make it even easier to use.
PICS ADDED:
The biggest pain in the *** was making the handle bar mounts. A hole saw was used for one and the other was done by hand with various files and what not...SUCKED!!:scowl: I still need to finalize a few things before it is completely done but its close enough to share some pics. I might end up making a carbon fiber valance to hide all the clutter on the handle bars and make it look nice....we'll see.
I also finally bought a helmet. A Nitecore EX10 GD is secured with a rubber band and fits pefect in one of the airflow slots. I can also flip the sun visor over the top of the EX10 and it gives an amazing cut-off for oncoming traffic. Only problem is, that light is reflected into my face. Maybe a black velvet liner will cut down the glare.
Anyway, on to the pics..It looks a bit ghetto now. I'll update pics as I finalize and paint it.


Handlebar mount and light mounts


Brake light lit up

L2 head running DD of a single RCR123, custom tailcap to allow the use of remote pressure switch

The brake light pressure switch and arm that activates it.

New Helmet with Nitecore EX10

The Material used to make the mount:

The parts assembled:

M103 disassembled to make new slider switch:

The section of rod from old lawn furnature I dismantled years ago...glad I kept it around!

I machined this on my drill press with a file!

Much easier to press now.:thumbsup:

Both X200's and the M103 attached to the mount:

It consists of 3 Surefire Weaponlights up front and an L2 Head running direct drive from a single RCR123 in one my 1X123 cell "Ribber for your Pleasure" bodies as a brake light. A short length of rod was tig welded to a washer and mounted to the caliper to activate a pressure switch mounted on a custom bracket. A red filter is used to signal when I am stopping. The light is wedged under my seat and has never come loose..so far.
UPDATED with new pics.
The 3 weaponlights up front are 2, X200's that accept E-series heads and an M103 in the center. I went to ****s sporting goods and bought a few sections of picatinny rail. Fortunately they were thick and worked perfect for this project. One of the X200's has a plug-in tailcap (XT07) with the combo constant ON and pressure switch (SR07)mounted within a thumbs reach on my handle bars.
The mount took a hell of a lot longer than I thought it would and I'm still not finished!:shakehead A section of box aluminum was used as the main center mount for everything. One side of the box was cut off and a section of picatinny rail was mounted up top to allow the M103 to sit inside. Two more sections of picatinny rail were used on either outter side of the box to mount the two X200's. The front screws holes for the rail are slotted to allow up and down aiming of the X200's. There are two holes cut out of the side of the mount to allow a finger to turn the M103 ON/OFF.
UPDATE: I made a new slider switch so it is easier for me to actuate the M103. I machined it using my drill press and a file and finished it off with 4oo grit sandpaper.
 I will be making a small lever to make it even easier to use.
PICS ADDED:
The biggest pain in the *** was making the handle bar mounts. A hole saw was used for one and the other was done by hand with various files and what not...SUCKED!!:scowl: I still need to finalize a few things before it is completely done but its close enough to share some pics. I might end up making a carbon fiber valance to hide all the clutter on the handle bars and make it look nice....we'll see.
I also finally bought a helmet. A Nitecore EX10 GD is secured with a rubber band and fits pefect in one of the airflow slots. I can also flip the sun visor over the top of the EX10 and it gives an amazing cut-off for oncoming traffic. Only problem is, that light is reflected into my face. Maybe a black velvet liner will cut down the glare.
Anyway, on to the pics..It looks a bit ghetto now. I'll update pics as I finalize and paint it.


Handlebar mount and light mounts


Brake light lit up

L2 head running DD of a single RCR123, custom tailcap to allow the use of remote pressure switch

The brake light pressure switch and arm that activates it.

New Helmet with Nitecore EX10

The Material used to make the mount:

The parts assembled:

M103 disassembled to make new slider switch:

The section of rod from old lawn furnature I dismantled years ago...glad I kept it around!

I machined this on my drill press with a file!

Much easier to press now.:thumbsup:

Both X200's and the M103 attached to the mount:

Last edited:


